Faster-RCNN代码解读6:主要文件解读-中
前言
因为最近打算尝试一下Faster-RCNN的复现,不要多想,我还没有厉害到可以一个人复现所有代码。所以,是参考别人的代码,进行自己的解读。
代码来自于B站的UP主(大佬666),其把代码都放到了GitHub上了,我把链接都放到下面了(应该不算侵权吧,毕竟代码都开源了_):
b站链接:https://www.bilibili.com/video/BV1of4y1m7nj/?vd_source=afeab8b555e5eb1bfa1e7f267262cbf2

GitHub链接:https://github.com/WZMIAOMIAO/deep-learning-for-image-processing
目的
其实UP主已经做了很好的视频讲解了他的代码,只是有时候我还是喜欢阅读博客来学习,另外视频很长,6个小时,我看的时候容易睡着_,所以才打算写博客记录一下学习笔记。
目前完成的内容
第一篇:VOC数据集详细介绍
第二篇:Faster-RCNN代码解读2:快速上手使用
第三篇:Faster-RCNN代码解读3:制作自己的数据加载器
第四篇:Faster-RCNN代码解读4:辅助文件解读
第五篇: Faster-RCNN代码解读5:主要文件解读-上
第六篇: Faster-RCNN代码解读6:主要文件解读-中(本文)
目录结构
文章目录
1. 前言:
之前讲解了network_files文件夹下的transform.py \ boxes.py \ image_list.py文件,这篇文章继续讲解该文件夹下的内容,主要涉及的文件:
faster_rcnn_framework.py
roi_head.py
首先,放张图片,是作者根据代码来画的Faster-RCNN细节图。读过论文的朋友都知道,在论文中并没有详细的给出Faster-RCNN架构图,只是给了一张粗略的图片。

另外,在解读之前,我想补充一点:作者给出了不同的训练网络,比如mobilenet、res50+fpn,其中fpn表示引入不同的特征层。而为了方便代码的统一,作者一般会用一个索引字典来存储相关变量,而mobilenet只有一个特征层,所以只有一个值;而res50+fpn有多个特征层,所以字典有多个值。
关于这一点,你在读代码的时候会发现很多地方都出现了的。
2. faster_rcnn_framework.py文件解读:
这个文件的主要内容就是Faster-RCNN的架构实现。下面来一一讲解里面的类和实现思路。
2.1 FasterRCNNBase类:
这个类是Faster-RCNN的基础,里面主要有两个方法,一是初始化方法,二是前向传播方法。其主要实现了Faster-RCNN整体的正向传播定义。
__init__方法:
初始化一些变量。
输入参数:
| 参数 | 意义 |
|---|---|
| backbone | 特征提取网络模型 |
| rpn | rpn模型 |
| roi_heads | roi pooling和后面的部分 |
| transform | 变换操作 |
该方法具体内容就是将传入参数变为类变量:
self.transform = transform  # 预处理方法
self.backbone = backbone    # 骨干CNN架构网络
self.rpn = rpn  # RPN网络
self.roi_heads = roi_heads  # ROI_Head部分
forward方法:
前向传播方法。
传入参数:
| 参数 | 意义 |
|---|---|
| images | 需要处理的图像,batch |
| targets | target参数,一个列表,里面的每一个值都是字典,一个字典就是我们自定义数据加载器的target |
首先,判断是否为训练模式,如果为训练模式,target不能为空:
# 判断是否为训练模式,如果为训练模式,target不能为空
if self.training and targets is None:
    raise ValueError("In training mode, targets should be passed")
接着,把boxes值(此时的为真实的值)提取出来并检测数据是否存在问题:
# 如果是训练模式
if self.training:
    # 保存target不是空的
    assert targets is not None
    # 对于targets列表中的每一个target
    for target in targets:         # 进一步判断传入的target的boxes参数是否符合规定
        boxes = target["boxes"]
        # 是否为tensor
        if isinstance(boxes, torch.Tensor):
            # boxes维度判断,必须为【N,4】,N表示一章图片中有N个对象,4为坐标
            if len(boxes.shape) != 2 or boxes.shape[-1] != 4:
                raise ValueError("Expected target boxes to be a tensor"
                                 "of shape [N, 4], got {:}.".format(
                                     boxes.shape))
		else:
            raise ValueError("Expected target boxes to be of type "
                             "Tensor, got {:}.".format(type(boxes)))
然后,获取图像原始尺寸;
# 定义一个空列表,后面的内容torch.jit.annotate是指明这个列表里面的值为啥形式,必须满足这个条件才可以存储进来
original_image_sizes = torch.jit.annotate(List[Tuple[int, int]], [])
# 获取图像的原始尺寸
for img in images:
    val = img.shape[-2:]
    assert len(val) == 2  # 防止输入的是个一维向量
    original_image_sizes.append((val[0], val[1]))
接着,对图像和图像对应的target进行预处理:
# 对图像进行预处理:需要归一化、resize处理(限制图像最小和最大尺度)
images, targets = self.transform(images, targets)
然后,就是将图像作为输入数据,按照Faster-RCNN架构顺序调用相关方法(即先送入backbone,,其输出特征图;接着利用特征图生成建议框;接着就是ROI Pooling以及后面的分类、回归等操作):
features = self.backbone(images.tensors)  # 将图像输入backbone得到特征图
if isinstance(features, torch.Tensor):  # 若只在一层特征层上预测,将feature放入有序字典中,并编号为‘0’
    features = OrderedDict([('0', features)])  # 若在多层特征层上预测,传入的就是一个有序字典

# 将特征层以及标注target信息传入rpn中
# proposals: List[Tensor], Tensor_shape: [num_proposals, 4],
# 每个proposals是绝对坐标,且为(x1, y1, x2, y2)格式
proposals, proposal_losses = self.rpn(images, features, targets)

# 将rpn生成的数据以及标注target信息传入fast rcnn后半部分
detections, detector_losses = self.roi_heads(features, proposals, images.image_sizes, targets)

# 对网络的预测结果进行后处理(主要将bboxes还原到原图像尺度上)
detections = self.transform.postprocess(detections, images.image_sizes, original_image_sizes)
最后,不要忘记把损失值保存一下,方便后期画图:
# 损失保存一下,后期画图用
losses = {

    }
losses.update(detector_losses)
losses.update(proposal_losses)
2.2 TwoMLPHead类:
这个方法定义的就是下图对应的区域:

__init__方法:
传入的参数:
| 参数 | 意义 |
|---|---|
| in_channels | ROI pooling后的输入通道个数 |
| representation_size | FC1 和 FC2的通道数/神经元数目 |
该方法内部的代码也很简单,就是定义了fc1 和 fc2:
self.fc6 = nn.Linear(in_channels, representation_size)
self.fc7 = nn.Linear(representation_size, representation_size)
forward方法:
前向传播方法。首先,需要实现flatten展平操作,然后再用全连接层前向传播即可:
# 展平
x = x.flatten(start_dim=1)
# 前向传播,不要忘记relu激活函数
x = F.relu(self.fc6(x))
x = F.relu(self.fc7(x))
2.3 FastRCNNPredictor类:
这个类定义的就是下图对应的区域:

__init__方法:
传入的参数:
| 参数 | 意义 |
|---|---|
| in_channels | 输入的通道个数 |
| num_classes | 类别个数,包括背景 |
这个方法内容很简单,就是定义两个全连接层,只是注意这两个的输出通道个数如何定义的:
self.cls_score = nn.Linear(in_channels, num_classes)
self.bbox_pred = nn.Linear(in_channels, num_classes * 4)
在这里,分类全连接层输出通道数肯定是类别个数,而回归全连接层输出个数为4*类别个数,是因为每个类别的边界框坐标都有四个。
forward方法:
前向传播方法很简单,具体内容看代码注释:
# 如果输入数据为4维的,即【batch,channel,w,h】
# 说明之前的处理有问题,报错
# 但是一般情况下不会进入该判断
if x.dim() == 4:
    assert list(x.shape[2:]) == [1, 1]
# 展平处理
# 其实并不需要,其实之前的全连接层已经展平过了
x = x.flatten(start_dim=1)
# 预测
scores = self.cls_score(x)
bbox_deltas = self.bbox_pred(x)
2.4 FasterRCNN类:
这个类继承自FasterRCNNBase类,主要实现了Faster-RCNN的参数初始化部分。
其定义了一个方法,即__init__。首先,看看它的参数():
| 参数 | 意义 |
|---|---|
| backbone | CNN架构 |
| num_classes | 类别个数,包括背景,采用VOC数据集为21 |
| min_size 与 max_size | 预处理resize时限制的最小尺寸与最大尺寸 |
| image_mean 与 image_std | 预处理normalize时使用的均值和方差 |
| rpn_anchor_generator | 通过后面的RPN方法定义的,用于生成anchors |
| rpn_head | 也是后面RPN定义的,是RPN的部分结构 |
| rpn_pre_nms_top_n_train 与 rpn_pre_nms_top_n_test | rpn中在nms处理前保留的proposal数(根据score) |
| rpn_post_nms_top_n_train 与 rpn_post_nms_top_n_test | rpn中在nms处理后保留的proposal数,主要针对的是FPN网络,每层都2000个,叠加起来超过上万个,于是使用nms保持2000个 |
| rpn_nms_thresh | rpn中进行nms处理时使用的iou阈值 |
| rpn_fg_iou_thresh 与 rpn_bg_iou_thresh | rpn计算损失时,采集正负样本设置的阈值 |
| rpn_batch_size_per_image 与 rpn_positive_fraction | rpn计算损失时采样的样本数,以及正样本占总样本的比例 |
| box_roi_pool | 下面图片对应的1区域 |
| box_head | 下面图片对应的2区域 |
| box_predictor | 下面图片对应的3区域 |
| box_score_thresh | 移除低目标概率的阈值 |
| box_nms_thresh | fast rcnn中进行nms处理的阈值 |
| box_detections_per_img | 对预测结果根据score排序取前100个目标 |
| box_fg_iou_thresh 与 box_bg_iou_thresh | fast rcnn计算误差时,采集正负样本设置的阈值 |
| box_batch_size_per_image 与 box_positive_fraction | fast rcnn计算误差时采样的样本数,以及正样本占所有样本的比例 |

其函数内容如下:
首先,判断backbone是否有输出通道属性,目的是防止backbone设置错误:
# backbone是否有out_channels属性,即输出通道数
if not hasattr(backbone, "out_channels"):
    raise ValueError(
        "backbone should contain an attribute out_channels"
        "specifying the number of output channels  (assumed to be the"
        "same for all the levels"
    )
接着,还是判断传入的参数是否存在问题:
# 进行一些判断
assert isinstance(rpn_anchor_generator, (AnchorsGenerator, type(None))) # 是否为我们自己定义的AnchorsGenerator类,如果为None,后面再创建
assert isinstance(box_roi_pool, (MultiScaleRoIAlign, type(None))) # 是否有ROI Pooling

# 如果num_classes不为空
if num_classes is not None:
    # 那么,说明num_classes是我们自己定义的,那么box_predictor也要有定义
    if box_predictor is not None:
        raise ValueError("num_classes should be None when box_predictor "
                         "is specified")
else:
    if box_predictor is None:
        raise ValueError("num_classes should not be None when box_predictor "
                         "is not specified")
然后,判断rpn_anchor_generator是否为空,对于train_mobilenetv2.py而言不为空,但是对于但是train_res50_fpn.py为空,因此需要针对该情况创建:
# 预测特征层的channels
out_channels = backbone.out_channels

# train_mobilenetv2.py文件已经定义了rpn_anchor_generator,但是train_res50_fpn.py没有定义
# 若anchor生成器为空,则自动生成针对resnet50_fpn的anchor生成器
if rpn_anchor_generator is None:
    # res50 + fpn 有五个特征层,因此传入的anchor_size参数,需要变为五个元组
    # 不同的特征层进行不同的尺度处理
    anchor_sizes = ((32,), (64,), (128,), (256,), (512,))
    aspect_ratios = ((0.5, 1.0, 2.0),) * len(anchor_sizes)
    rpn_anchor_generator = AnchorsGenerator(
        anchor_sizes, aspect_ratios
    )
后面,就是继续初始化一些变量并将一些构件进行组合方便后期使用,我就不细说了,把内容写在了注释上:
#  由于一般不会传rpn_head参数,所以需要创建
# 生成RPN通过滑动窗口预测网络部分
if rpn_head is None:
    rpn_head = RPNHead(
        out_channels, rpn_anchor_generator.num_anchors_per_location()[0]
    )

# 默认rpn_pre_nms_top_n_train = 2000, rpn_pre_nms_top_n_test = 1000,
# 默认rpn_post_nms_top_n_train = 2000, rpn_post_nms_top_n_test = 1000,
# 生成两个字典
rpn_pre_nms_top_n = dict(training=rpn_pre_nms_top_n_train, testing=rpn_pre_nms_top_n_test)
rpn_post_nms_top_n = dict(training=rpn_post_nms_top_n_train, testing=rpn_post_nms_top_n_test)

# 定义整个RPN框架,具体的实现在后面讲解
rpn = RegionProposalNetwork(
    rpn_anchor_generator, rpn_head,
    rpn_fg_iou_thresh, rpn_bg_iou_thresh,
    rpn_batch_size_per_image, rpn_positive_fraction,
    rpn_pre_nms_top_n, rpn_post_nms_top_n, rpn_nms_thresh,
    score_thresh=rpn_score_thresh)

#  Multi-scale RoIAlign pooling
# 如果我们用了res+fpn,是多个(5个)特征层,因此需要专门设定ROI Pooling
# 但是,官方实现的时候,没有加上最后一层,因此总共为4层
if box_roi_pool is None:
    box_roi_pool = MultiScaleRoIAlign(
        featmap_names=['0', '1', '2', '3'],  # 在哪些特征层进行roi pooling
        output_size=[7, 7],
        sampling_ratio=2)

# fast RCNN中roi pooling后的展平处理两个全连接层部分
# 定义
if box_head is None:
    resolution = box_roi_pool.output_size[0]  # 默认等于7
    representation_size = 1024
    # 这个类上面讲解过了
    box_head = TwoMLPHead(
        out_channels * resolution ** 2,
        representation_size
    )

# 在box_head的输出上预测部分
if box_predictor is None:
    representation_size = 1024
    # 这个类上面讲解过了
    box_predictor = FastRCNNPredictor(
        representation_size,
        num_classes)

# 将roi pooling, box_head以及box_predictor结合在一起: 方便定义处理方法和前向传播方法
# 见下面3.1讲解
roi_heads = RoIHeads(
    # box
    box_roi_pool, box_head, box_predictor,
    box_fg_iou_thresh, box_bg_iou_thresh,  # 0.5  0.5
    box_batch_size_per_image, box_positive_fraction,  # 512  0.25
    bbox_reg_weights,
    box_score_thresh, box_nms_thresh, box_detections_per_img)  # 0.05  0.5  100

# 预处理的图像均值和方差定义
if image_mean is None:
    image_mean = [0.485, 0.456, 0.406]
if image_std is None:
	image_std = [0.229, 0.224, 0.225]

# 对数据进行标准化,缩放,打包成batch等处理部分
transform = GeneralizedRCNNTransform(min_size, max_size, image_mean, image_std)
说明:
在上面的代码中,其实有一个函数实现了ROI Pooling,就是:
#  Multi-scale RoIAlign pooling
# 如果我们用了res+fpn,是多个(5个)特征层,因此需要专门设定ROI Pooling
# 但是,官方实现的时候,没有加上最后一层,因此总共为4层
if box_roi_pool is None:
    box_roi_pool = MultiScaleRoIAlign(
        featmap_names=['0', '1', '2', '3'],  # 在哪些特征层进行roi pooling
        output_size=[7, 7],
        sampling_ratio=2)
我之所以专门提出它,是因为作者并没有单独再去实现ROI pooling方法了。作者给出了解释:MultiScaleRoIAlign方法是torchvision官方实现的,并且已经封装好了,所以没有办法看到源码。但是网上仍然有许多相关的实现方法,感兴趣的可以取看看。
2.5 小结:
faster_rcnn_framework.py文件是该项目中非常重要的文件之一。当阅读完该文件代码后,我们可以知道:该文件实现了将Faster-RCNN的各个组件串联一起的功能。
比如,在network_files文件夹下,主要实现了rpn框架、预处理方法、ROI pooling及其后面流程组成的roi_head框架等功能,而faster_rcnn_framework.py就是将这些串起来了,构成了一个完整的Faster-RCNN。
如果上面有一些代码你没有弄明白,可以多看一遍,或者自己取调试代码,弄清变量含义。
3. roi_head.py文件解读:
3.1 RoIHeads类:
上面2.4小节第一次出现RoIHeads类,这个类的作用就是把下图框起来的部分结合在一起来处理:

__init__方法:
首先,看看传入的参数:
| 参数 | 意义 |
|---|---|
| box_roi_pool | 上图中的ROIPpooling |
| box_head | 上图中的TwoMLPHead |
| box_predictor | 上图中的FastRCNNPredictor |
| fg_iou_thresh 与 bg_iou_thresh | 正负样本划分阈值,都为0.5 |
| batch_size_per_image 与 positive_fraction | 样本总数与正负样本比例 |
| score_thresh 与 nms_thresh 与 detection_per_img | 三个阈值,值分别为0.05,0.5,100 |
这里说明一下上面参数中的detection_per_img参数,其默认值为100。表示一张图片前100个score值最大的对象,之所以设置为100个,是因为一般图像并没有100个对象,因此设置100个可以让大部分图片的对象都包含在内。
初始化方法的内容就是初始化一些对象,其中有几个对象是文件det_utils.py中的,这些对象的具体内容会在下一篇讲解。
初始化方法很简单,看下面的注释即可:
# 将iou方法赋予给box_similarity
self.box_similarity = box_ops.box_iou
# det_utils.Matcher作用是划分正负样本
self.proposal_matcher = det_utils.Matcher(
    fg_iou_thresh,  # default: 0.5
    bg_iou_thresh,  # default: 0.5
    allow_low_quality_matches=False)
# BalancedPositiveNegativeSampler 作用是将划分好正负样本的proposal进行采样
self.fg_bg_sampler = det_utils.BalancedPositiveNegativeSampler(
    batch_size_per_image,  # default: 512
    positive_fraction)     # default: 0.25
# 超参数,后面用的时候再说
if bbox_reg_weights is None:
    bbox_reg_weights = (10., 10., 5., 5.)
    #
    self.box_coder = det_utils.BoxCoder(bbox_reg_weights)

    # 简单的赋值操作 / 初始化变量
    self.box_roi_pool = box_roi_pool    # Multi-scale RoIAlign pooling
    self.box_head = box_head            # TwoMLPHead
    self.box_predictor = box_predictor  # FastRCNNPredictor

    self.score_thresh = score_thresh  # default: 0.05
    self.nms_thresh = nms_thresh      # default: 0.5
    self.detection_per_img = detection_per_img  # default: 100
forward方法:
下面以前向传播方法为路径,遇到新方法就讲解新方法的内容(新方法补充在下面)。
首先,看看forward方法的参数:
| 参数 | 意义 |
|---|---|
| features | 图像特征层 |
| proposals | rpn输出的proposal值,格式为List[Tensor[N, 4]] |
| image_shapes | 预处理后的图像尺寸信息 |
| targets | 图像对应的target信息(真实值) |
代码内容如下:
首先,检测target内部的值是否符合要求:
# 检查targets的数据类型是否正确
if targets is not None:
    for t in targets:
        floating_point_types = (torch.float, torch.double, torch.half)
        assert t["boxes"].dtype in floating_point_types, "target boxes must of float type"
        assert t["labels"].dtype == torch.int64, "target labels must of int64 type"
接着,判断是否为训练模式,如果为训练模式,则需要对proposal进行处理(划分正负样本,统计对应gt的标签以及边界框回归信息等),否则就不需要:(方法select_training_samples见后面)
if self.training:
    # 划分正负样本,统计对应gt的标签以及边界框回归信息
    # 因为传入的proposal 2000个,但是我们只需要512个,所以需要进行采样
    proposals, labels, regression_targets = self.select_training_samples(proposals, targets)
else:
    labels = None
    regression_targets = None
通过上面的方法,我们就获取到了proposal、label、anchor回归参数。接着,我们需要进行ROI Pooling操作:
# 将采集样本通过Multi-scale RoIAlign pooling层,即输出的大小都相同
# box_features_shape: [num_proposals, channel, height, width] = 【1024,256,7,7】 (2张图片=512*2=1024)
box_features = self.box_roi_pool(features, proposals, image_shapes)
然后,通过两个全连接层:
# 通过roi_pooling后的两层全连接层
# box_features_shape: [num_proposals, representation_size] = 【1024,1024】 后一个1024是全连接层的输出个数
box_features = self.box_head(box_features)
进行最后的回归和分类操作:
# 接着分别预测目标类别和边界框回归参数,这就是我们的预测结果
class_logits, box_regression = self.box_predictor(box_features)
# class_logits = 【1024,21】
# box_regression = 【1024,84】 ,81 = 21*4  , 每个类别都有四个坐标值
最后,如果是训练模式,需要计入损失;如果不是,则需要进行后处理操作显示预测结果:
# 定义result格式
result = torch.jit.annotate(List[Dict[str, torch.Tensor]], [])
# 定义损失函数空字典
losses = {

    }
if self.training:
    # 如果是训练模式,需要计算损失
    assert labels is not None and regression_targets is not None
    loss_classifier, loss_box_reg = fastrcnn_loss(
        class_logits, box_regression, labels, regression_targets)
    # 把损失添加一下
    losses = {


        "loss_classifier": loss_classifier,
        "loss_box_reg": loss_box_reg
    }
else:
    # 如果是验证,不需要计算损失
    # 直接对预测结果进行后处理: 低概率筛选,nms处理
    boxes, scores, labels = self.postprocess_detections(class_logits, box_regression, proposals, image_shapes)
    # 获取个数
    num_images = len(boxes)
    # 将值传入result参数值返回
    for i in range(num_images):
        result.append(
            {


                "boxes": boxes[i],
                "labels": labels[i],
                "scores": scores[i],
            }
        )
后处理方法见后面。
elect_training_samples方法:
这个方法的作用是:划分正负样本,统计对应gt的标签以及边界框回归信息。
首先,传入的参数:
| 参数 | 意义 |
|---|---|
| proposals | rpn预测的boxes,2000个 |
| targets | 真实图像的信息 |
代码内容如下:
首先,检测数据是否正常并获取一些基本值:
# 检查target数据是否为空
self.check_targets(targets)
# 如果不加这句,jit.script会不通过(看不懂)
assert targets is not None

# 获取proposal的类型和设备信息
dtype = proposals[0].dtype
device = proposals[0].device

# 获取标注好的真实boxes以及labels信息
gt_boxes = [t["boxes"].to(dtype) for t in targets]
gt_labels = [t["labels"] for t in targets]
由于正例的proposal很少,所以作者把真实样本框的值也加入了其中:(add_gt_proposals方法见后面)
# 将gt_boxes拼接到proposal后面
proposals = self.add_gt_proposals(proposals, gt_boxes)
然后,为计算每个proposal与对应的真实框的iou,并划分正负样本(该流程由方法assign_targets_to_proposals实现,见后面):
# 为每个proposal匹配对应的gt_box,并划分到正负样本中
matched_idxs, labels = self.assign_targets_to_proposals(proposals, gt_boxes, gt_labels)
划分完正负样本后,就是按照给定的参数进行正负样本采样:(方法subsample见后面)
# 按给定数量和比例采样正负样本
sampled_inds = self.subsample(labels)
采样完成后,就是去获取正负样本和其对应的标签,并利用anchor和真实框进行回归:
# 遍历每张图像
for img_id in range(num_images):
    # 获取每张图像的正负样本索引
    img_sampled_inds = sampled_inds[img_id]
    # 获取对应 正负 样本的proposals信息
    proposals[img_id] = proposals[img_id][img_sampled_inds]
    # 获取对应 正负 样本的真实类别信息
    labels[img_id] = labels[img_id][img_sampled_inds]
    # 获取对应 正负 样本的gt索引信息
    matched_idxs[img_id] = matched_idxs[img_id][img_sampled_inds]

    # 获取图像的gt box
    gt_boxes_in_image = gt_boxes[img_id]
    # 如果gt box个数为0
    if gt_boxes_in_image.numel() == 0:
        # 给它一个0值
        gt_boxes_in_image = torch.zeros((1, 4), dtype=dtype, device=device)
	# 获取对应正负样本的gt box信息
    # matched_idxs[img_id] = gt box的索引
    # gt_boxes_in_image[matched_idxs[img_id]] 将索引对应的值提取出来
    # matched_gt_boxes就为[512,4],坐标信息
    matched_gt_boxes.append(gt_boxes_in_image[matched_idxs[img_id]])

# 根据gt和proposal计算边框回归参数(针对gt的),真实的回归
regression_targets = self.box_coder.encode(matched_gt_boxes, proposals)
return proposals, labels, regression_targets
我们知道,这里作者定义的采集512个正负样本,那么可以在调试代码的时候验证一下输出,如下图所示:


另外,不要忘记,每个变量其实都是batch,因此具体的结构为[batch,512,4]:

add_gt_proposals方法:
该方法的作用:将gt_boxes拼接到proposal后面。
传入的参数:
| 参数 | 意义 |
|---|---|
| proposals | 一个batch中每张图像rpn预测的boxes |
| gt_boxes | 一个batch中每张图像对应的真实目标边界框 |
该方法的实现很简单,就是直接遍历拼接即可:
# 直接遍历拼接
# 目的: 增加正样本个数
proposals = [
    torch.cat((proposal, gt_box))
    for proposal, gt_box in zip(proposals, gt_boxes)
]
为了让大家更直观的观测其值的变化,可以对代码进行调试,首先,运行前后的proposal变量shape:


而该方法的作用是把真实框加入其中,那么看看真实框的shape是不是[1,4]即可验证函数作用:

assign_targets_to_proposals方法:
该方法的作用就是:为每个proposal匹配对应的gt_box,并划分到正负样本中。
传入的参数:
| 参数 | 意义 |
|---|---|
| proposals | rpn输出的proposals值 |
| gt_boxes | 真实框的坐标信息 |
| gt_labels | 真实框的类别信息 |
代码的具体内容可以看注释:
# 定义两个空列表,待会用于存储值
matched_idxs = []
labels = []
# 遍历每张图像的proposals, gt_boxes, gt_labels信息
for proposals_in_image, gt_boxes_in_image, gt_labels_in_image in zip(proposals, gt_boxes, gt_labels):
    # 该张图像中没有gt框,即这个图像里面没有任何一个对象,一般情况下不会发生
    if gt_boxes_in_image.numel() == 0:
        # 对上面这种情况做出一定的处理: 可以跳过不看
        # 具体来说,就是用0值填充
        device = proposals_in_image.device
        clamped_matched_idxs_in_image = torch.zeros(
            (proposals_in_image.shape[0],), dtype=torch.int64, device=device
        )
        labels_in_image = torch.zeros(
            (proposals_in_image.shape[0],), dtype=torch.int64, device=device
        )
	else:
        # 有对象的情况下
        # 计算proposal与每个gt_box的iou重合度
        match_quality_matrix = box_ops.box_iou(gt_boxes_in_image, proposals_in_image)

        # 计算proposal与每个gt_box匹配的iou最大值,并记录索引,
        # iou < low_threshold索引值为 -1, low_threshold <= iou < high_threshold索引值为 -2
        # 其中-2的值就是忽略的样本,-1的值就是负例样本
        matched_idxs_in_image = self.proposal_matcher(match_quality_matrix)

        # 限制最小值,防止匹配标签时出现越界的情况
        # 注意-1, -2对应的gt索引会调整到0,获取的标签类别为第0个gt的类别(实际上并不是),后续会进一步处理
        clamped_matched_idxs_in_image = matched_idxs_in_image.clamp(min=0)
        # 获取proposal匹配到的gt对应标签
        labels_in_image = gt_labels_in_image[clamped_matched_idxs_in_image]
        labels_in_image = labels_in_image.to(dtype=torch.int64)

        # 将gt索引为-1的类别设置为0,即背景,负样本
        bg_inds = matched_idxs_in_image == self.proposal_matcher.BELOW_LOW_THRESHOLD  # -1
        labels_in_image[bg_inds] = 0

        # 将gt索引为-2的类别设置为-1, 即废弃样本
        ignore_inds = matched_idxs_in_image == self.proposal_matcher.BETWEEN_THRESHOLDS  # -2
            labels_in_image[ignore_inds] = -1  # -1 is ignored by sampler

# 将处理完的值添加至列表中并返回
matched_idxs.append(clamped_matched_idxs_in_image)
labels.append(labels_in_image)
subsample方法:
该方法的就是按照给定的参数进行样本的采样。
代码内容很简单(只大致看下意思):
# 使用fg_bg_sampler进行采集正样本和负样本,返回其对应的索引值
sampled_pos_inds, sampled_neg_inds = self.fg_bg_sampler(labels)
# 定义一个空列表
sampled_inds = []
# 遍历每张图片的正负样本索引
for img_idx, (pos_inds_img, neg_inds_img) in enumerate(zip(sampled_pos_inds, sampled_neg_inds)):
    # 记录所有采集样本索引(包括正样本和负样本): pos_inds_img | neg_inds_img 中的 | 是或操作
    img_sampled_inds = torch.where(pos_inds_img | neg_inds_img)[0]
    sampled_inds.append(img_sampled_inds)
postprocess_detections方法:
该方法的作用是进行后处理。后处理的内容包括:
(1)根据proposal以及预测的回归参数计算出最终bbox坐标
(2)对预测类别结果进行softmax处理
(3)裁剪预测的boxes信息,将越界的坐标调整到图片边界上
(4)移除所有背景信息
(5)移除低概率目标
(6)移除小尺寸目标
(7)执行nms处理,并按scores进行排序
(8)根据scores排序返回前topk个目标
首先,传入的参数:
| 参数 | 意义 |
|---|---|
| class_logits | 网络预测类别概率信息 |
| box_regression | 网络预测的边界框回归参数 |
| proposals | rpn输出的proposal |
| image_shapes | 打包成batch前每张图像的宽高 |
这个方法的整体思路很简单,但是很多方法涉及到另外一个文件det_utls.py,我会在下一篇中解读。这里只需要了解这个方法在干嘛即可:
# 获取设备
device = class_logits.device
# 预测目标类别数
num_classes = class_logits.shape[-1]

# 获取每张图像的预测bbox数量
boxes_per_image = [boxes_in_image.shape[0] for boxes_in_image in proposals]
# 根据proposal以及预测的回归参数计算出最终bbox坐标
pred_boxes = self.box_coder.decode(box_regression, proposals)

# 对预测类别结果进行softmax处理
pred_scores = F.softmax(class_logits, -1)

# 根据每张图像的预测bbox数量分割结果
pred_boxes_list = pred_boxes.split(boxes_per_image, 0)
pred_scores_list = pred_scores.split(boxes_per_image, 0)

# 定义一些变量
all_boxes = []
all_scores = []
all_labels = []
# 遍历每张图像预测信息
for boxes, scores, image_shape in zip(pred_boxes_list, pred_scores_list, image_shapes):
    # 裁剪预测的boxes信息,将越界的坐标调整到图片边界上
    boxes = box_ops.clip_boxes_to_image(boxes, image_shape)

    # create labels for each prediction
    labels = torch.arange(num_classes, device=device)
    labels = labels.view(1, -1).expand_as(scores)

    # 移除索引为0的所有信息(0代表背景)
    boxes = boxes[:, 1:]
    scores = scores[:, 1:]
    labels = labels[:, 1:]

    # batch everything, by making every class prediction be a separate instance
    boxes = boxes.reshape(-1, 4)
    scores = scores.reshape(-1)
    labels = labels.reshape(-1)

    # 移除低概率目标,self.scores_thresh=0.05
    # gt: Computes input > other element-wise.
    inds = torch.where(torch.gt(scores, self.score_thresh))[0]
    boxes, scores, labels = boxes[inds], scores[inds], labels[inds]

    # 移除小目标
    keep = box_ops.remove_small_boxes(boxes, min_size=1.)
    boxes, scores, labels = boxes[keep], scores[keep], labels[keep]

    # 执行nms处理,执行后的结果会按照scores从大到小进行排序返回
    keep = box_ops.batched_nms(boxes, scores, labels, self.nms_thresh)

    # 获取scores排在前topk个预测目标
    keep = keep[:self.detection_per_img]
    boxes, scores, labels = boxes[keep], scores[keep], labels[keep]

# 将处理后的值加入变量中
all_boxes.append(boxes)
all_scores.append(scores)
all_labels.append(labels)

return all_boxes, all_scores, all_labels
3.2 fastrcnn_loss函数:
该函数的作用是计算faster-rcnn的损失值。
首先,传入的参数为:
| 参数 | 意义 |
|---|---|
| class_logits | 预测类别概率信息,shape=[num_anchors, num_classes] |
| box_regression | 预测边目标界框回归信息 |
| labels | 真实类别信息 |
| regression_targets | 真实目标边界框信息 |
其实这个函数的定义就是按照**Faster-RCNN损失函数定义来定义的,**为方便理解,我把faster-rcnn的损失函数放在这里:


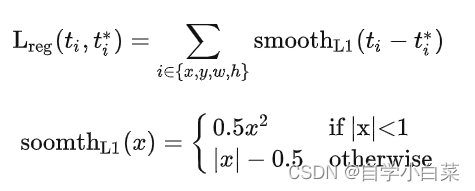
而,函数代码内容如下,详细见注释:
# 思路: 分别计算回归损失和分类损失
# 将值进行拼接
# label=【batch,512】 ---》 label = 【1024】,此时batch=2
labels = torch.cat(labels, dim=0)
# regression_targets=【2,512,4】 ---》 【1024,4】
regression_targets = torch.cat(regression_targets, dim=0)

# 计算类别损失信息:交叉熵损失
# class_logits = 【1024,21】
classification_loss = F.cross_entropy(class_logits, labels)

# 计算预测框的回归损失:只有正样本才有意义
# 返回标签类别大于0的索引
sampled_pos_inds_subset = torch.where(torch.gt(labels, 0))[0]

# 返回标签类别大于0位置的类别信息
labels_pos = labels[sampled_pos_inds_subset]

# shape=[num_proposal, num_classes]
# N 1024 ;classes 21
N, num_classes = class_logits.shape
# reshape前=【1024,84】 --》 【1024,21,4】
box_regression = box_regression.reshape(N, -1, 4)

# 计算边界框损失信息
box_loss = det_utils.smooth_l1_loss(
    # 获取指定索引proposal的指定类别box信息
    box_regression[sampled_pos_inds_subset, labels_pos],
    regression_targets[sampled_pos_inds_subset],
    beta=1 / 9,
    size_average=False,
) / labels.numel()
4. 总结:
本篇主要介绍了Faster-RCNN的架构的大致实现流程,和ROI Pooling以及后面的部分的详细实现过程。