目录
前言:
vue-router是vue.js官方给出的路由解决方案,能够轻松的管理SPA项目中组件的切换
安装路由
安装:npm install vue-router@4
快速使用
1. 创建路由模块
1. 在项目中的src文件夹中创建一个router文件夹,在其中创建index.js模块
2. 采用createRouter()创建路由,并暴露出去
3. 在main.js文件中初始化路由模块app.use(router)
// 创建路由
import {

     createRouter } from 'vue-router'

// 创建路由
const router = createRouter({


    // ……
})

export default router // 暴露出去
// 在main.js中引用
import {

     createApp } from 'vue'
import App from './App.vue'
import router from './router'  // 引入路由模块
let app = createApp(App)

app.use(router) // 初始化路由插件

app.mount('#app')
2.规定路由模式
- history路由模式可采用:
-
createWebHashHistory():Hash模式
a. 它在内部传递的实际URL之前使用了一个哈希字符#,如https://example.com/#/user/id b. 由于这部分 URL 从未被发送到服务器,所以它不需要在服务器层面上进行任何特殊处理 -
createWebHistory():html5模式,推荐使用
a. 当使用这种历史模式时,URL会看起来很“正常”,如https://example.com/user/id
b. 由于我们的应用是一个单页的客户端应用,如果没有适当的服务器配置,用户在浏览器中直接访问https://example.com/user/id,
  就会得到一个404错误;要解决这个问题,你需要做的就是在你的服务器上添加一个简单的回退路由,如果URL不匹配任何静态资源,它应提供与你的应用程序中的index.html相同的页面
-
// An highlighted block
import {

     createRouter, createWebHistory } from 'vue-router'

const router = createRouter({


    history: createWebHistory() // 使用 history 模式路由
    // ……
})

export default router
// An highlighted block
import {

     createRouter, createWebHashHistory } from 'vue-router'

const router = createRouter({


    history: createWebHashHistory() // 使用 hash模式路由
    // ……
})

export default router
3.使用路由规则
routes配置路由规则:
● path:路由分配的URL
● name:当路由指向此页面时显示的名字
● component:路由调用这个页面时加载的组件
import {

     createRouter, createWebHistory } from 'vue-router'
import HomeView from '@/views/HomeView.vue'

let routes = [
    {


        path: '/home', // URL 地址
        name: 'home',  // 名称
        component: HomeView  // 渲染该组件
    },
    {


        path: '/blog',
        name: 'blog',
        component: () => import('@/views/BlogView.vue')//路由懒加载
    }
]

// 创建路由
const router = createRouter({


    history: createWebHistory() // 使用 history 模式路由
    routes // 路由规则
})

export default router // 将路由对象暴露出去
4.声明路由链接和占位符
在组件模板中声明路由连接和占位符
	● <router-link>:路由链接,to属性则为点击此元素,需要切换的路由地址
	● <router-view>:路由占位符,路由切换的视图展示的位置
<template>
	<!--   路由链接,点击是路由地址会切换到属性 to 的地方   -->
    <router-link to="/home">首页</router-link>
    |
    <router-link to="/blog">博客</router-link>
    <hr>
	<!--   路由试图,路由切换组件的地方   -->
    <router-view/>
</template>
5.重定向路由
在路由规则中,可采用redirect来重定向另一个地址
import {

     createRouter, createWebHistory } from 'vue-router'
import HomeView from '@/views/HomeView.vue'

let routes = [
    {


        path: '/',
        redirect: '/home' // 如果访问是 / 则强制跳转到 /home
    },
    {


        path: '/home',
        component: HomeView
    },
    {


        path: '/blog',
        component: () => import('@/views/BlogView.vue')
    }
]

const router = createRouter({


    history: createWebHistory(),
    routes
})

export default router
6.嵌套路由
如果在路由视图中展示的组件中包含自己的路由占位符,则此处会用到嵌套路由
如图所示:点击关于链接,则会显示About组件,在其组件中又包含了路由链接和路由占位符

嵌套路由规则
1. 在某一个路由规则中采用children来声明嵌套路由的规则
2. 嵌套路由规则中的path不能以/开头,访问需使用/father/son的形式
import {

     createRouter, createWebHistory } from 'vue-router'

import HomeView from '@/views/HomeView.vue'
import SchoolView from '@/views/SchoolView.vue'
import MathView from '@/views/MathView.vue'

let routes = [
    {


        path: '/home',
        name: 'home',
        component: HomeView
    },
    {


        path: '/school',
        name: 'school',
        component: SchoolView,
        // 嵌套路由
        children: [
            {


                path: 'english', // path 前面不要加 /
                name: 'school-english',
                component: () => import('@/views/EnglishView.vue')
            },
            {


                path: 'math',
                name: 'school-math',
                component: MathView
            }
        ]
    }
]

const router = createRouter({


    history: createWebHistory(),
    routes
})

export default router
7.路径参数
1. 很多时候,我们需要将给定匹配模式的路由映射到同一个组件,例如:想渲染不同博客的内容,
	其实只是渲染到同一个组件上,只是博客的编号不同而已
3. 在Vue Router中,可以在路径中使用一个动态字段来实现,我们称之为“路径参数” ,语法如:path: '/url/:param'
4. 在展示的组件中访问路径参数
	a. 在选项式 APIJS中采用this.$route.params来访问,试图模板上采用$route.params来访问
    b. 在组合式 API 中,需要import { useRoute } from 'vue-router',
    	JS和视图模板上通过useRoute().params来访问
	c. 还可以通过在路由规则上添加props: true,将路由参数传递给组件的props中
import {

     createRouter, createWebHistory } from 'vue-router'

import HomeView from '@/views/HomeView.vue'
import SchoolView from '@/views/SchoolView.vue'

let routes = [
    {


        path: '/',
        redirect: '/home'
    },
    {


        path: '/home',
        name: 'home',
        component: HomeView
    },
    {


        path: '/blog',
        name: 'blog',
        component: () => import('@/views/BlogView.vue'),
        children: [
            {


                path: 'content/:id',  // 路径传参
                component: () => import('@/views/BlogContent.vue'),
                props: true  // 将路径参数传递到展示组件的 props 中
            }
        ]
    }
]

const router = createRouter({


    history: createWebHistory(),
    routes
})

export default router
<template>
    <div class="blog">
        我是 BlogView 页面:

		<!-- 路径参数 23 -->
        <router-link to="/blog/content/23">博客23</router-link>
        |
        <router-link to="/blog/content/75">博客75</router-link>
        |
        <router-link to="/blog/content/194">博客194</router-link>
        <hr>
        <!-- 嵌套路由视图占位符 -->
        <router-view/>
    </div>
</template>

<style scoped>
div.blog {


    padding: 50px;
    background-color: yellow;
}
</style>
<script setup>
import {

     useRoute } from 'vue-router'

// 通过 props 来接收路径参数
let propsData = defineProps({

     id: String })

// 获取路由跳转对象
let route = useRoute()

function showRouteParams() {


    console.log(route.params) // 通过 `route` 获取路径参数
    console.log(route.params.id) // 取出指定的路径参数
    console.log("------------------------------------------------")
    console.log("输出 props 中得到的路径参数:" + propsData.id)
}
</script>

<template>
    <div class="math">
        我是 BlogContent 页面
        <ul>
            <li>通过 `route` 获取路径参数 -- {

    {

     route.params }}</li>
            <li>取出指定的路径参数:{

    {

     route.params.id }}</li>
            <li>输出 props 中得到的路径参数 id -- {

    {

     id }}</li>
        </ul>
        <button @click="showRouteParams">在 JS 中访问路径参数</button>
    </div>
</template>

<style scoped>
div.math {


    padding: 50px;
    background-color: rgb(61, 219, 240);
}
</style>
8. 声明式和编程式导航
8.1 导航到不同的位置
| 声明式 | 编程式 | 描述 |
|---|---|---|
| < router-link :to=“…”> | router.push(…) | 会向history栈添加一个新的记录,所以,当用户点击浏览器后退按钮时,会回到之前的URL |
提示:
编程式的router.push(…)的语法
1. 其的参数可以是一个字符串路径,或者一个描述地址的对象
2. 如果参数是描述地址的对象的话,其对象中path和params不能同时使用
const username = 'eduardo'

// 我们可以手动建立 url,但我们必须自己处理编码
router.push(`/user/${

      username}`) // -> /user/eduardo

// 同样
router.push({

     path: `/user/${

      username}` }) // -> /user/eduardo

// 如果可能的话,使用 `name` 和 `params` 从自动 URL 编码中获益
router.push({

     name: 'user', params: {

     username } }) // -> /user/eduardo

// `params` 不能与 `path` 一起使用
router.push({

     path: '/user', params: {

     username } }) // -> /user
8.2 替换当前位置
| 声明式 | 编程式 | 描述 |
|---|---|---|
| < router-link :to=“…” replace> | router.replace(…) | 它的作用类似于router.push(…),唯一不同的是,它在导航时不会向history添加新记录,正如它的名字所暗示的那样,它取代了当前的条目 |
提示:也可以直接在传递给router.push的routeLocation中增加一个属性replace: true
router.push({

     path: '/home', replace: true })

// 相当于
router.replace({

     path: '/home' })
8.3 路由历史
router.go(n)该方法采用一个整数作为参数,表示在历史堆栈中前进或后退多少步,类似于window.history.go(n)
// 向前移动一条记录,与 router.forward() 相同
router.go(1)

// 返回一条记录,与 router.back() 相同
router.go(-1)

// 前进 3 条记录
router.go(3)

// 如果没有那么多记录,静默失败
router.go(-100)
router.go(100)
9.导航守卫
查看以下情形:
1. 点击主页链接时,默认情况下可直接进入指定界面,如图10-6-1,但是问题是该跳转的界面是需要用户登录后方可访问的
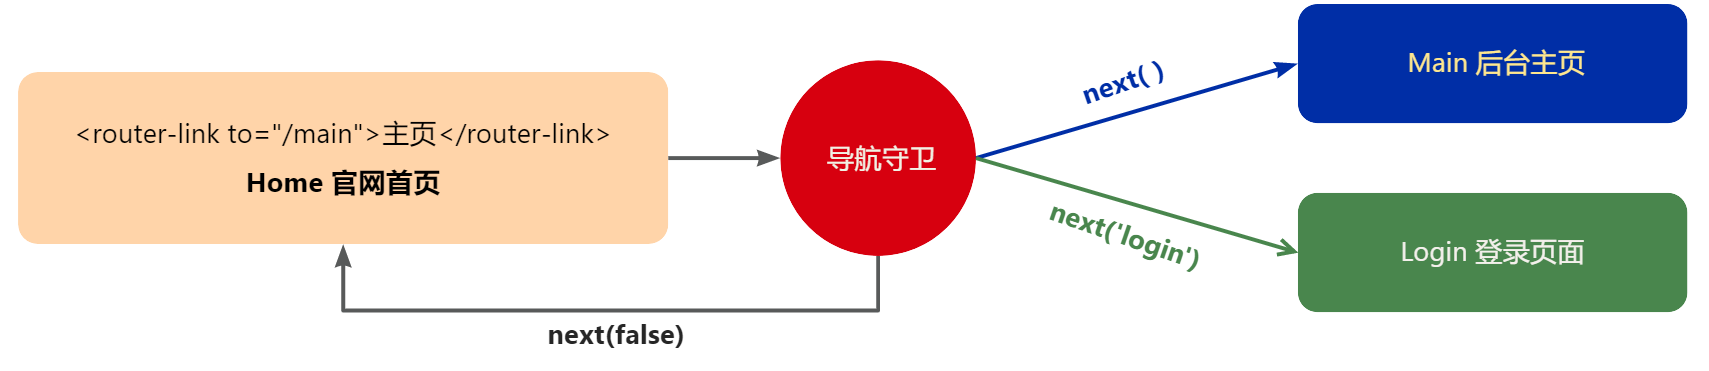
2. 可设置导航守卫来检测用户是否登录,如果已登录,则进入后台页,如果未登录,则强制进入登录页,如图:


9.1 全局前置守卫
1.每次发生路由的导航跳转时,都会触发全局前置守卫,因此,在全局前置守卫中,
	程序员可以对每个路由进行访问权限的控制
2.使用router.beforeEach((to, from, next) => {})注册一个全局前置守卫
- 全局前置守卫返回值:
- false:取消当前的导航
- 路由地址:导航将被中断,跳转到一个指定的地址;地址还可设置诸如replace: true或name: 'home’之类的配置
// 前置守卫
// 创建路由实例对象
const router = createRouter({

     ... })

// 调用路由实例对象的 beforeEach 方法,即可声明 “全局前置守卫”
// 每次发生路由导航跳转的时候,都会自动触发回调函数
router.beforeEach((to, from, next) => {


    // ...

    // 返回 false 以取消导航
    return false

})
// 前置守卫返回值
// 创建路由实例对象
const router = createRouter({

     ... })

// 调用路由实例对象的 beforeEach 方法,即可声明 “全局前置守卫”
// 每次发生路由导航跳转的时候,都会自动触发回调函数
router.beforeEach((to, from, next) => {


    if ( !isAuthenticated && to.name !== 'Login') {


        // 如果未登录并且不是登录界面,将跳转至登录页面
        return {

     name: 'Login' }
    }

})
9.2全局路由守卫的语法参数
全局路由守卫的语法router.beforeEach((to, from, next) => {})参数
1. to:将要访问的路由信息对象
2. from:将要离开的路由信息对象
3. next:函数
  a. 调用next()表示放行,允许这次路由导航
  b. 调用next(false)表示不放行,不允许此次路由导航
  c. 调用next({routerPath})表示导航到此地址,一般情况用户未登录时,会导航到登陆界面
提示:该函数在前置守卫中可出现多次,但是只能被调用一次!!!
9.3 其他守卫
1. 导航守卫可分为:全局前置守卫、全局解析守卫、全局后置守卫、路由独享的守卫、组件内的守卫
2. 本教程最要讲述全局前置守卫的用法,其他守卫大家可移步Vue Router官网查看
链接: Vue-Router官网
总结
以上就是vue3.0 Vue-Router路由导航守卫的介绍和使用。希望本篇文章能够帮助到你,不懂得可以评论区或者私信问我,我也会一 一解答。谢谢观看!
我的其他文章:https://blog.csdn.net/m0_60970928?type=blog