文章目录
一、学习目标
1.掌握swiper组件、scroll-view组件的使用
2.掌握image组件的使用
3.掌握slider组件的使用
4.掌握音频API的使用
二、开发前准备
项目展示、项目分析、项目初始化
1.标签页切换
任务分析、前导知识、编写页面结构和样式、实现标签页切换
2.音乐推荐
任务分析、前导知识、内容区域滚动、轮播图、功能按钮、热门音乐
3.播放器
任务分析、前导知识、定义基础数据、实现音乐播放功能、编写播放器页面、控制播放进度
4.播放列表
任务分析、编写页面结构和样式、实现换曲功能
三、音乐小程序项目效果展示
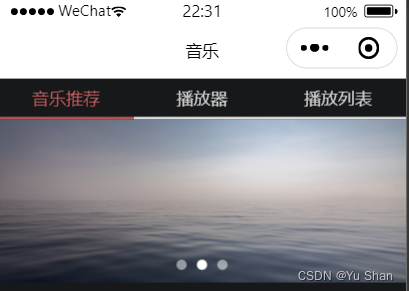
- 音乐推荐页面

- 播放器页面

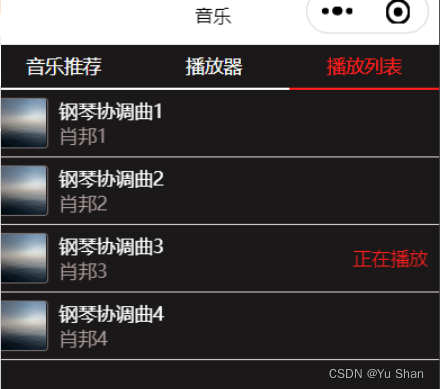
- 播放列表页面

四、代码实现
1.标签页面切换
- 项目分析
| 标签 | 功能 |
|---|---|
| app.js | 应用程序的逻辑文件 |
| app.json | 应用程序的逻辑文件 |
| pages/index/index.js | index页面的逻辑文件 |
| pages/index/index.json | index页面的配置文件 |
| pages/index/index.wxss | index页面的样式文件 |
| pages/index/index.wxml | index页面的结构文件 |
| pages/index/info.wxml | 音乐推荐标签页的结构文件 |
| pages/index/play.wxml | 播放器标签页的结构文件 |
| pages/index/playlist.wxml | 播放列表标签页的结构文件 |
| images | 图片文件 |
-
项目初始化,创建空白项目 在app.json文件,创建几个页面文件
-
代码显示
  "window":{
    "backgroundTextStyle":"light",
    "navigationBarBackgroundColor": "#fff",
    "navigationBarTitleText": "音乐",
    "navigationBarTextStyle":"black"
  },
- 在index.wxml文件中编写页面结构代码,代码中使用swiper组件,用于实现标签页切换的功能,include则表示是引入了音乐推荐,播放器,播放列表这3个标签页对应的wxml文件,代码如下所示:
<view class="tab">
  <view class="tab-item {

   {item==0?'active':''}}" bindtap="changeItem" data-item="0">音乐推荐</view>
  <view class="tab-item {

   {item==1?'active':''}}" bindtap="changeItem" data-item="1">播放器</view>
  <view class="tab-item {

   {item==2?'active':''}}" bindtap="changeItem" data-item="2">播放列表</view>
</view>
<view class="content" style="color: #ffffff;">
  <swiper current="{

   {item}}" bindchange="changeTab">
    <swiper-item>
      <include src="./info"></include>
    </swiper-item>
    <swiper-item>
      <include src="./play"></include>
    </swiper-item>
    <swiper-item>
      <include src="./playlist"></include>
    </swiper-item>
  </swiper>
- 音乐小程序基础页面和样式-tab导航的样式 index.wxss
tab区域设为flex布局,将子元素设为flex:1,从而使这个子元素沿水平方向从左到右排列,并且平均分布每一项的宽度。代码如下所示:
.tab{
  display: flex;
  flex-direction: row;
}
.tab-item{
  flex: 1;
  text-align: center;
  color: #ffffff;
  font-size: 10pt;
  line-height: 72rpx;
  border-bottom: 6rpx solid #ffffff;
}
.tab-item.active{
  color: #ff1e1e;
  border-bottom: 6rpx solid #ff1e1e;
}
- 修改index.wxml文件中的tab区域,为3个tab-item绑定事件,并设置data-item属性,代码如下所示:
<view class="tab">
  <view class="tab-item {

   {tab==0?'active':''}}" bindtap="changeItem" data-item="0">音乐推荐</view>
  <view class="tab-item {

   {tab==1?'active':''}}" bindtap="changeItem" data-item="1">播放器</view>
  <view class="tab-item {

   {tab==2?'active':''}}" bindtap="changeItem" data-item="2">播放列表</view>
</view>
- 接下来修改content区域,为swiper组件的current属性绑定变量item

在index.js文件中,将item和changeitem增加到代码中
- 切换标签后,更改tab-item的样式,将文本颜色和底部的线条颜色设为红色,表示当前标签页处于活跃状态,通过判断变量tab的值,增加一个active样式
.tab-item.active{
  color: #ff1e1e;
  border-bottom: 6rpx solid #ff1e1e;
}
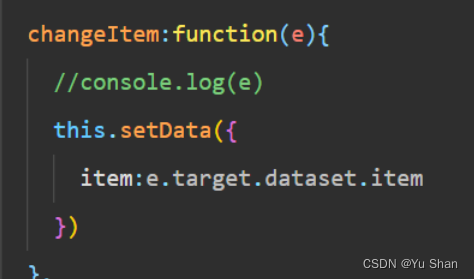
- 编写changeTab事件处理函数,实现当该函数被调用后,将tab的值更改为当前标签页的索引
changeTab:function(e){
    console.log(e)
    this.setData({
      item:e.detail.current
    })
  },
2.音乐推荐
2.1.前导知识
- 常用组件
| 可选值 | 默认 |
|---|---|
| scroll-with-animation | 在设置滚动位置时是否使用动画过渡 |
| bindscrolltolower | 滚动到底部/右边时触发的事件 |
| scroll-into-view | 设置哪个方向可滚动,则在哪个方向滚动到该元素,值应为某子元素id(id不能以数字开头) |
| bindscroll | 滚动时触发的事件 |
2.2.轮播图
- 在info.wxml文件中,轮播图位于音乐推荐标签的最上方,切换效果通过swiper组件来实现,图片通过image组件引入。
<swiper autoplay="true" indicator-dots="true" indicator-active-color="#ffffff">
  <swiper-item>
    <image src="../images/banner.jpg" mode="aspectFill" style="width: 100%;"></image>
  </swiper-item>
  <swiper-item>
    <image src="../images/banner.jpg" mode="aspectFill" style="width: 100%;"></image>
  </swiper-item>
  <swiper-item>
    <image src="../images/banner.jpg" mode="aspectFill" style="width: 100%;"></image>
  </swiper-item>
</swiper>
- 在index.wxss中编写样式,具体代码如下
.content > swiper {
  height: 100%;
}
.content-info-portal {
  display: flex;
  margin-bottom: 15px;
}
.content-info-portal image {
  width: 120rpx;
  height: 120rpx;
  display: block;
  margin: 20rpx auto;
}
- 轮播图的实现效果如下:
2.3.功能按钮
- 在info.wxml文件中的轮播图代码的下方编写功能按钮的页面结构
<view class="content-info-portal">
  <view>
    <image src="../images/04.png"></image>
    <text>私人FM</text>
  </view>
  <view>
    <image src="../images/05.png"></image>
    <text>每日歌曲推荐</text>
  </view>
  <view>
    <image src="../images/06.png"></image>
    <text>云音乐新歌榜</text>
  </view>
</view>
- 在index.wxss中编写样式
.content-info-portal {
  display: flex;
  margin-bottom: 15px;
}

.content-info-portal > view {
  flex: 1;
  font-size: 11pt;
  text-align: center;
}

.content-info-portal image {
  width: 120rpx;
  height: 120rpx;
  display: block;
  margin: 20rpx auto;
}
- 代码中设置了外层容器为display:flex容器,在设置内存view为flex:1,从而使3个view平均分配整个容器的宽度
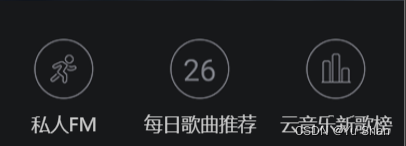
- 运行程序,功能按钮的实现效果如图:
2.4.热门音乐
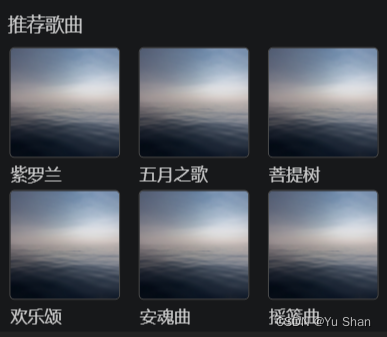
- 热门音乐为于功能按钮的下方,实现思路和功能按钮类似,在info.wxml文件中的下方编写热门音乐的页面结构
<!--热门音乐区域-->
<view class="content-info-list">
  <text>热门音乐</text>
  <view class="list-inner">
    <view class="list-item">
      <image src="../images/cover.jpg"></image>
      <text>紫罗兰</text>
    </view>
    <view class="list-item">
      <image src="../images/cover.jpg"></image>
      <text>五月之花</text>
    </view>
    <view class="list-item">
      <image src="../images/cover.jpg"></image>
      <text>菩提树</text>
    </view>
    <view class="list-item">
      <image src="../images/cover.jpg"></image>
      <text>菩提树1</text>
    </view>
    <view class="list-item">
      <image src="../images/cover.jpg"></image>
      <text>菩提树2</text>
    </view>
    <view class="list-item">
      <image src="../images/cover.jpg"></image>
      <text>菩提树3</text>
    </view>
  </view>
</view>
在pages/index/index.wxss中编写样式
.content-info-portal{
  display: flex;
  flex-direction: row;
}
.content-info-portal image{
  width: 100rpx;
  height: 50rpx;
  display: block;
  margin: 20rpx auto;
}
.content-info-portal>view{
  flex: 1;
  font-size: 7pt;
  text-align: center;
}
.content-info-list>text{
  font-size:8pt;
  margin-left: 10rpx;
}
.list-inner{
  display: flex;
  flex-direction: row;
  flex-wrap: wrap;
}
.list-item{
  font-size:9pt;
  flex: 1;
  text-align: center;
}
.list-item>image{
  width: 200rpx;
  height: 200rpx;
  display: block;
  margin: 0 auto;
  border-radius:  10rpx;
  border: 1rpx solid #a89999;
}
- 运行程序,热门音乐的实现效果如图
3.播放器
3.1前导知识
- 音频API接口的方法及说明
| 名称 | 说明 |
|---|---|
| src | 音频资源的地址,用于直接播放 |
| startTime | 开始播放的位置(秒),默认为0 |
| autoplay | 是否自动开始播放,默认为false |
| loop | 是否循环播放,默认为false |
| volume | 音量。范围0~1.默认为1 |
| duration | 音频的长度(秒)。在当前有合法的src时返回(只读) |
| currentTime | 音频的播放位置(秒)。在当前有合法的src时返回(只读) |
| paused | 当前是否暂停或停止妆容(只读) |
| 名称 | 说明 |
|---|---|
| onPause() | 音频暂停事件(参数为回调函数) |
| onStop() | 音频停止事件 |
| onEnded() | 音频自然播放至结束的事件 |
| onSeeked() | 音频进行跳转操作的事件 |
| onTimeUpdate() | 音频播放进度更新事件 |
| onError() | 音频播放错误事件 |
- slider组件属性及说明
| 可选值 | 说明 |
|---|---|
| activeColor | 已选择的颜色 |
| backgroundColor | 背景条的颜色 |
| step | 步长,取值大于0,可被(max-min)整除,默认为1 |
| value | 当前取值,默认为0 |
| block-size | 滑块的大小,取值范围12~28,默认为28 |
| block-color | 滑块的颜色,默认为#ffffff |
| show-value | 是否显示当前value,默认为false |
| bindchange | 完成一次拖动后触发的事件 |
| bindchanging | 拖动过程中触发的事件 |
3.2.定义基础数据
- 在pages/index/index.js文件中的data对象中定义基础数据playlist,主要包括音乐的信息和音乐播放路径
 data: {
    item:0,
    state:'paused',
    playIndex:0,
    playlist:[{
      id:1,
      title:'钢琴协调曲1',
      singer:'肖邦',
      coverImage:'../images/cover.jpg',
      src:'http://www.ytmp3.cn/down/78484.mp3'
    },{
      id:2,
      title:'钢琴协调曲2',
      singer:'肖邦2',
      coverImage:'../images/cover.jpg',
      src:'http://www.ytmp3.cn/down/78484.mp3'
    },{
      id:3,
      title:'钢琴协调曲3',
      singer:'肖邦3',
      coverImage:'../images/cover.jpg',
      src:'http://www.ytmp3.cn/down/78484.mp3'
    },{
      id:4,
      title:'钢琴协调曲4',
      singer:'肖邦4',
      coverImage:'../images/cover.jpg',
      src:'http://www.ytmp3.cn/down/78484.mp3'
    }
  ],
- 播放列表数据准备完成后,在data中定义一些状态属性,来记录音乐的播放状态,播放位置等
 play:{
    id:0,
    title:'test',
    singer:'stest',
    coverImage:'../images/cover.jpg',
    src:'',
    starttime:'00:00',
    duration:'03:00',
    percent:0
  }
3.3.实现音乐播放功能
- 利用audioCtx对象的属性和方法来实现音乐控制,在pages/index/index.js文件中编写代码
- setMusic()函数用于切换当前播放的曲目,参数index表示播放列表数组中的某一个成员的索引值,根据索引值到播放列表中取出音乐信息后,将src赋值给音频接口,然后将曲目信息渲染到页面
 setMusic:function(index){
    var currentMusic = this.data.playlist[index]
    this.audioCtx.src = currentMusic.src
    var tempDuration = this.audioCtx.duration;
    //保存当前播放音乐的信息
    this.setData({
      playIndex:index,

      'play.title':currentMusic.title,
      'play.singer':currentMusic.singer,
      'play.coverImage':currentMusic.coverImage,
      'play.src':currentMusic.src,
      'play.id':currentMusic.id,
      'play.duration':tempDuration
    })
  },
- 实现音乐信息的获取后,pages/index/index.wxml文件中编写底部的播发器的代码
<view class="player">
  <image src="{

   {play.coverImage}}"></image>
  <view class="player-info">
    <view>{

   {play.title}}</view>
    <view class="player-info-auth">{

   {play.singer}}</view>
  </view>
  <view class="player-controls">
    <image src="../images/01.png" bindtap="changeList"></image>
    <image  wx:if="{

   { state=='paused'}}" src="../images/02.png" bindtap="play"></image>
    <image wx:if="{

   { state=='running'}}" src="../images/02stop.png" bindtap="pause"></image>
    <image src="../images/03.png" bindtap="next"></image>
  </view>
</view>
- 在pages/index/index.wxss文件中编写播发器的样式,代码中,父元素设置为flex布局,内部音乐封面和播放按钮设置为固定的宽高,放在页面的两端,中间部分是音乐信息的显示区域

运行效果如图所示:

- 实现单击播放按钮播放音乐,和单击暂停音乐的效果,显示不同的按钮在pages/index/index.wxml
 <image  wx:if="{

   { state=='paused'}}" src="../images/02.png" bindtap="play"></image>
  <image wx:if="{

   { state=='running'}}" src="../images/02stop.png" bindtap="pause"></image>
- 在pages/index/index.js文件中编写事件处理函数play()和pause()
- 调用了audioCtx对象的play()和pause()方法,实现音乐的播放和暂停
 play:function(e){
    //播放音乐,放到后面实现
    this.audioCtx.play()

    //改变状态
    this.setData({
      state:'running'
    })
  },
  pause:function(e){
    //暂停播放音乐,放到后面实现
    this.audioCtx.pause()
    //改变状态
    this.setData({
      state:'paused'
    })
  },
- 还需要实现单击“切换到下一曲按钮进行换曲,在pages/index/index.wxml中绑定next()事件处理函数
- 在pages/index/index.js文件中编写事件处理函数next(). if用于判断当前的状态,如果状态为暂停,则不要立即播放,如果当前状态为播放,则立即播放。
 next:function(e){
    //点击下一首按钮的逻辑
    var index = this.data.playIndex+1;
    var count = this.data.playlist.length;
    index = index%count;
    this.setMusic(index)
    if(this.data.state == 'running'){
      this.play()
    }
  },
3.4.编写播放器的页面
- 播放器页面主要用于展示当前播放曲目的信息,以及显示播放进度和时间,在paly.wxml文件中编写代码
<view class="content-play">
  <!--显示音乐信息的区域-->
  <view class="content-play-info">
    <text>钢琴协奏曲</text>
    <view>--肖邦--</view>
  </view>
  <!-- 显示唱片的图片-->
  <view class="content-play-cover">
  <!--animation-play-state动画播放状态-->
    <image src="../images/cover.jpg" style="animation-play-state: inherit;" />
  </view>
  <!--显示播放进度和时间-->
  <view class="content-play-progress">
    <test>{

   {play.starttime}}</test>
    </view>
- 在index.wxss文件中编写样式
.content-play{
  display: flex;
  flex-direction: column;
  height: 100%;
  justify-content: space-around;
  text-align: center;
}
.content-play-info > view{
  color: #b9b4b4;
}
- 运行程序,效果如图:

- 在index.wxss文件中编写图片的样式
.content-play-cover image {
  animation: rotateImage 10s linear infinite;
  width: 400rpx;
  height: 400rpx;
  border-radius: 50%;
  border: 1px solid #333;
}

@keyframes rotateImage {
  from {
    transform: rotate(0deg);
  }

  to {
    transform: rotate(360deg);
  }
}
3.5.控制播放进度
- 在播放器页面的底部,用于显示播放进度,通过调节滑块的位置可以控制播放进度,在paly.wxml文件中编写播放进度结构代码
<!-- 显示播放进度和时间 -->
  <view class="content-play-progress">
    <text>{

   {play.currentTime}}</text>
    <view>
- 在pages/index/index.wxss中编写样式
.content-play-progress {
  display: flex;
  align-items: center;
  margin: 0 35rpx;
  font-size: 9pt;
  text-align: center;
}

.content-play-progress > view {
  flex: 1;
}
运行结果如图所示

- 在pages/index/index.js文件中控制进度条的进度和时间显示,通过调用audioCtx的onTimeUpdate()方法,获取音乐状态信息,并通过formatTime()函数处理时间格式,实时更新效果
onReady() {
    this.audioCtx = wx.createInnerAudioContext()
    //默认播放第0首歌曲
    this.setMusic(0)
    var tmpaudioCtx = this.audioCtx
    this.audioCtx.onPlay(function(){
      console.log('开始播放')
    })
    var that = this;
    this.audioCtx.onTimeUpdate(function(){
      //console.log('歌曲播放时间更新'+tmpaudioCtx.currentTime)
     // console.log('歌曲播放时间更新'+tmpaudioCtx.duration)
     // that.formatTime(tmpaudioCtx.duration)
      that.setData({
        'play.duration': that.formatTime(tmpaudioCtx.duration),
        'play.starttime': that.formatTime(tmpaudioCtx.currentTime),
        'play.percent':tmpaudioCtx.currentTime/tmpaudioCtx.duration*100
      })
    })
  },
  fomattimme:function(time){
    //分钟:秒,假如221秒转换为格式:03:41
    var minute = Math.floor(time/60);
    var second = Math.floor(time)%60;
    var result =''
    if(minute<10){
      result ='0'+minute;
    }else{
      result= result+minute;
    }
    if(second<10){
      result = result+':0'+second;
    }else{
      result=result+':'+second;
    }
    console.log(result);
    return result;
  },
- 在slider组件中绑定bindchange事件,实现滑动进度条调节音乐播放进度

在index.js文件中编写testbindchange函数获取用户当前选择的进度,将时间通过audioCtx对象的seek()方法进行设置。

4.播放列表
4.1.编写页面结构和样式
- 在playlist.wxml文件中编写页面结构

- 在index.wxss编写样式
page {
  display: flex;
  flex-direction: column;
  background: #17181a;
  color: #ccc;
  height: 100%;
}

.tab {
  display: flex;
}

.tab-item {
  flex: 1;
  font-size: 10pt;
  text-align: center;
  line-height: 72rpx;
  border-bottom: 6rpx solid #eee;
}

.content {
  flex: 1;
}

.content > swiper {
  height: 100%;
}

.player {
  background: #222;
  border-top: 1px solid #252525;
  height: 112rpx;
}

.tab-item.active {
  color: #c25b5b;
  border-bottom-color: #c25b5b;
}

.content-info {
  height: 100%;
}

::-webkit-scrollbar {
  width: 0;
  height: 0;
  color: transparent;
}

/* 轮播图 */

.content-info-slide {
  height: 302rpx;
  margin-bottom: 20px;
}

.content-info-slide image {
  width: 100%;
  height: 100%;
}

/* 功能按钮 */

.content-info-portal {
  display: flex;
  margin-bottom: 15px;
}

.content-info-portal > view {
  flex: 1;
  font-size: 11pt;
  text-align: center;
}

.content-info-portal image {
  width: 120rpx;
  height: 120rpx;
  display: block;
  margin: 20rpx auto;
}

/* 热门音乐 */

.content-info-list {
  font-size: 11pt;
  margin-bottom: 20rpx;
}

.content-info-list > .list-title {
  margin: 20rpx 35rpx;
}

.content-info-list > .list-inner {
  display: flex;
  flex-wrap: wrap;
  margin: 0 20rpx;
}

.content-info-list > .list-inner > .list-item {
  flex: 1;
}

.content-info-list > .list-inner > .list-item > image {
  display: block;
  width: 200rpx;
  height: 200rpx;
  margin: 0 auto;
  border-radius: 10rpx;
  border: 1rpx solid #555;
}

.content-info-list > .list-inner > .list-item > view {
  width: 200rpx;
  margin: 10rpx auto;
  font-size: 10pt;

}

/* 播放器 */

.content-play {
  display: flex;
  justify-content: space-around;
  flex-direction: column;
  height: 100%;
  text-align: center;
}

.content-play-info > view {
  color: #888;
  font-size: 11pt;
}

/* 底部播放器 */

.player {
  display: flex;
  align-items: center;
  background: #222;
  border-top: 1px solid #252525;
  height: 112rpx;
}

.player-cover {
  width: 80rpx;
  height: 80rpx;
  margin-left: 15rpx;
  border-radius: 8rpx;
  border: 1px solid #333;
}

.player-info {
  flex: 1;
  font-size: 10pt;
  line-height: 38rpx;
  margin-left: 20rpx;
  padding-bottom: 8rpx;
}

.player-info-singer {
  color: #888;
}

.player-controls image {
  width: 80rpx;
  height: 80rpx;
  margin-right: 15rpx;
}

/* 显示专辑页面样式 */

.content-play-cover image {
  animation: rotateImage 10s linear infinite;
  width: 400rpx;
  height: 400rpx;
  border-radius: 50%;
  border: 1px solid #333;
}

@keyframes rotateImage {
  from {
    transform: rotate(0deg);
  }

  to {
    transform: rotate(360deg);
  }
}

/* 播放进度和时间 */

.content-play-progress {
  display: flex;
  align-items: center;
  margin: 0 35rpx;
  font-size: 9pt;
  text-align: center;
}

.content-play-progress > view {
  flex: 1;
}

/* 播放列表 */

.playlist-item {
  display: flex;
  align-items: center;
  border-bottom: 1rpx solid #333;
  height: 112rpx;
}

.playlist-cover {
  width: 80rpx;
  height: 80rpx;
  margin-left: 15rpx;
  border-radius: 8rpx;
  border: 1px solid #333;
}

.playlist-info {
  flex: 1;
  font-size: 10pt;
  line-height: 38rpx;
  margin-left: 20rpx;
  padding-bottom: 8rpx;
}

.playlist-info-singer {
  color: #888;
}

.playlist-controls {
  font-size: 10pt;
  margin-right: 20rpx;
  color: #c25b5b;
}
效果如图所示:

4.2.实现换曲功能
- 当用户单击播放列表中的某一项后,会触发change事件处理函数。在index.js中编写代码

最后运行结果如图所示: