Android Studio 基础 之 使用 okhttp 长连接,流式获取数据的方法简单整理了
目录
Android Studio 基础 之 使用 okhttp 长连接,流式获取数据的方法简单整理了
一、简单介绍
Android 开发中的一些基础操作,使用整理,便于后期使用。
本节介绍,浏览器向服务器发送一个HTTP请求,保持长连接,服务器不断单向地向浏览器推送“信息”(message),这么做是为了节约网络资源,不用一直发请求,建立新连接。这里使用 okhttp 获取长连接的流数据,并且边获取边展示,方法不唯一,仅供参考。
案例操作环境:
- Android Studio 2021.3.1
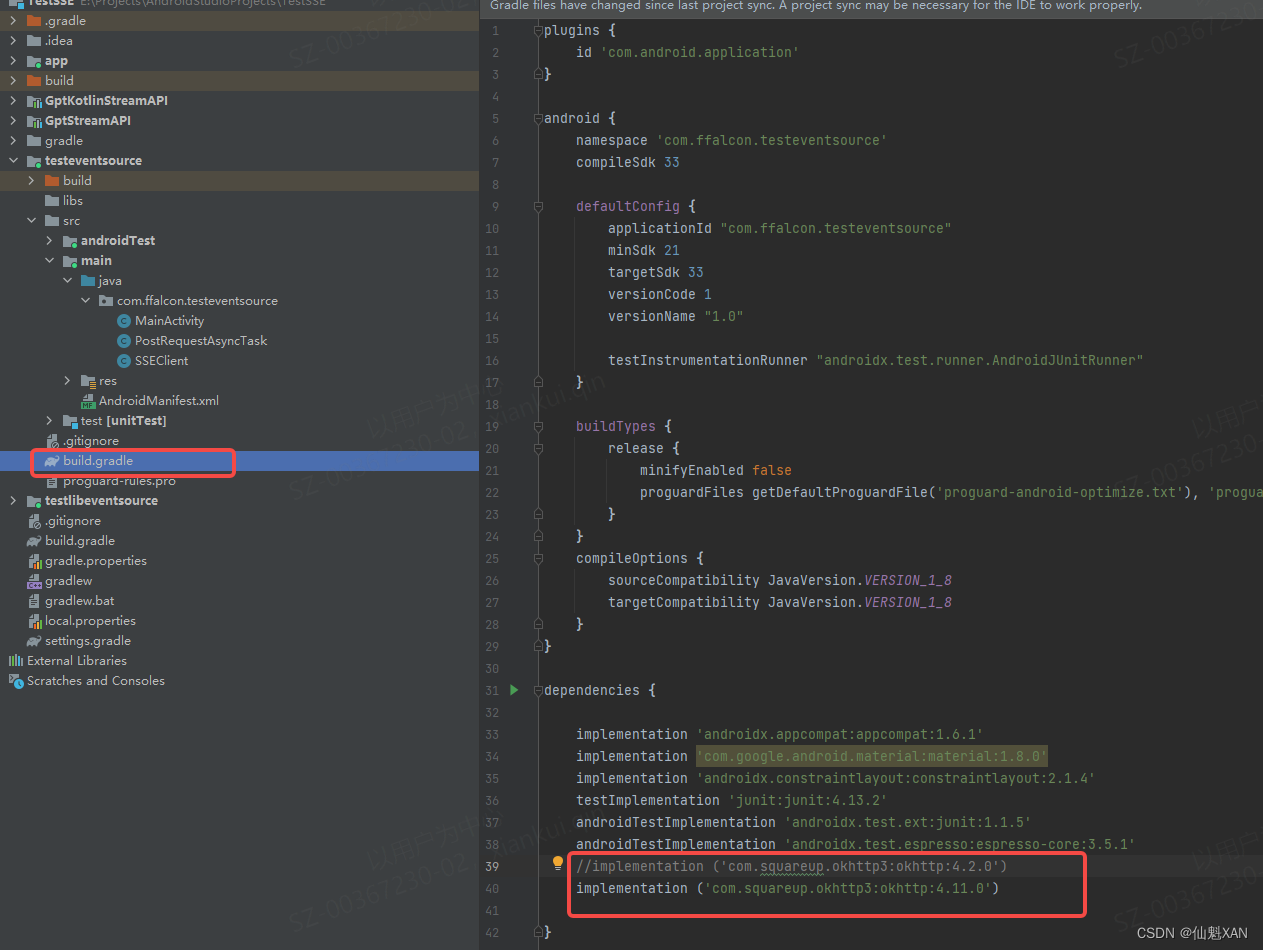
- okhttp3:okhttp:4.11.0
二、实现原理
1、使用 OkHttpClient 创建一个 Http 客户端
2、Request.Builder 添加对应的访问网址相关信息
3、ResponseBody 中 获取 byteStream ,进行数据提取
三、注意事项
1、okhttp 版本过低的话,部分 Android 手机可能没有流式效果,而是获取完才给响应
okhttp 版本可以在官网查看:GitHub - square/okhttp: Square’s meticulous HTTP client for the JVM, Android, and GraalVM.
四、效果预览

五、实现关键
1、引入 okhttp 注意 sync now
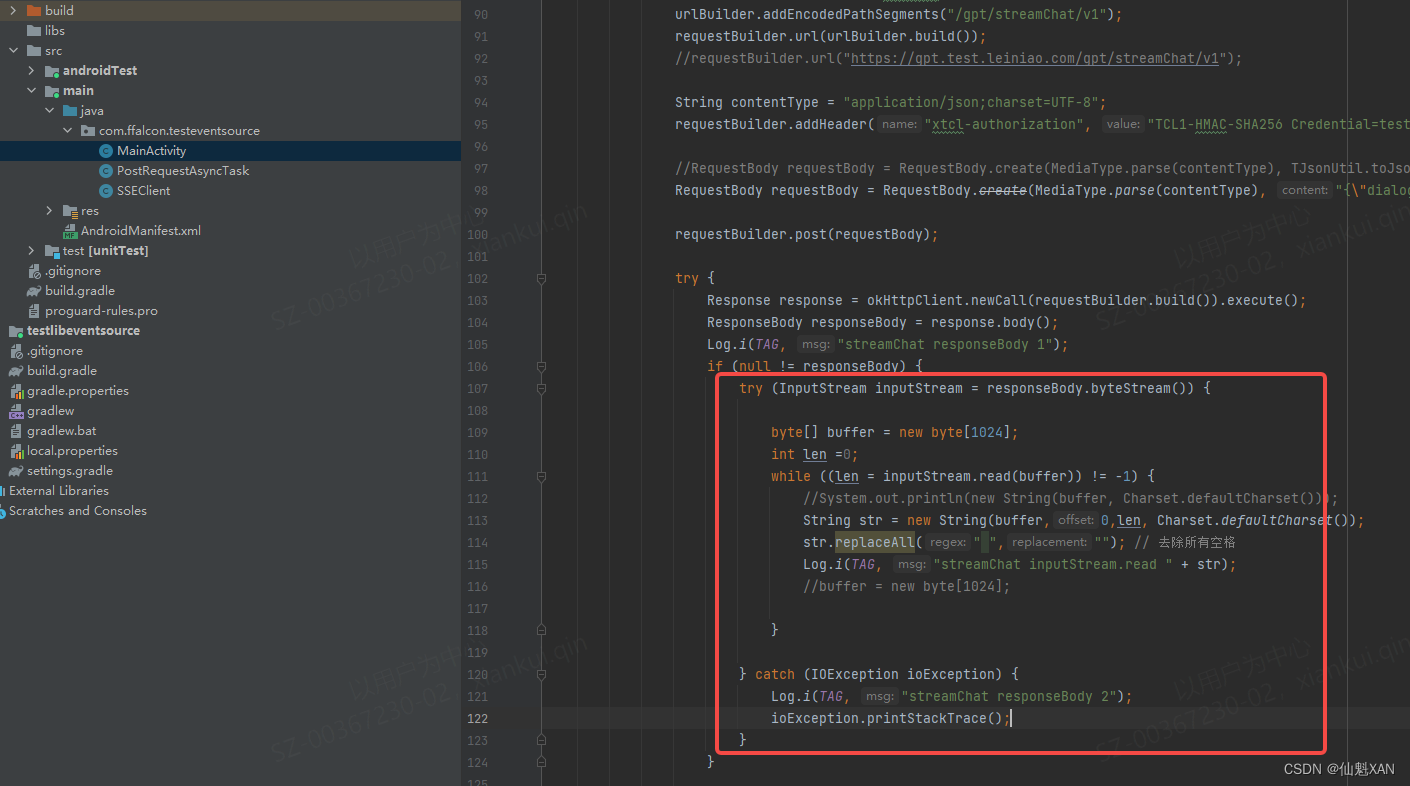
2、流式获取数据
六、关键代码
1、MainActivity
package com.xxxx.testeventsource;

import android.os.Bundle;
import android.util.Log;
import android.view.View;
import android.widget.TextView;

import androidx.appcompat.app.AppCompatActivity;

import java.io.IOException;
import java.io.InputStream;
import java.nio.charset.Charset;
import java.util.concurrent.TimeUnit;

import okhttp3.Call;
import okhttp3.Callback;
import okhttp3.HttpUrl;
import okhttp3.MediaType;
import okhttp3.OkHttpClient;
import okhttp3.Request;
import okhttp3.RequestBody;
import okhttp3.Response;
import okhttp3.ResponseBody;

public class MainActivity extends AppCompatActivity implements View.OnClickListener {

    private static final String TAG = "MainActivity";

    private OkHttpClient client;
    private TextView mPost;

    @Override
    protected void onCreate(Bundle savedInstanceState) {
        super.onCreate(savedInstanceState);
        setContentView(R.layout.activity_main);

        INitView();
    }

    void INitView(){
        mPost = (TextView) findViewById(R.id.okhttp_post);
        mPost.setOnClickListener(this);
    }

    @Override
    public void onClick(View view) {
        switch (view.getId()) {

            case R.id.okhttp_post:
                // Post请求,提交给服务器数据
                streamChat();
                break;
            default:
                break;
        }
    }


    void streamChat() {
        new Thread(new Runnable() {
            @Override
            public void run() {
                Log.i(TAG, "streamChat Start ");
                OkHttpClient okHttpClient = new OkHttpClient.Builder()
                        //读取超时
                        .readTimeout(500, TimeUnit.SECONDS)
                        //写入超时
                        .writeTimeout(500, TimeUnit.SECONDS)
                        //连接超时
                        .connectTimeout(500, TimeUnit.SECONDS)
                        .build();


                Request.Builder requestBuilder = new Request.Builder();

                // 构建url
                HttpUrl.Builder urlBuilder = new HttpUrl.Builder();
                urlBuilder.scheme("https");
                urlBuilder.host("gpt.test.xxxx.com");
                urlBuilder.addEncodedPathSegments("/gpt/streamChat/v1");
                requestBuilder.url(urlBuilder.build());


                String contentType = "application/json;charset=UTF-8";
                requestBuilder.addHeader("authorization", "sasdafsaftyjyjfdghuk");

                RequestBody requestBody = RequestBody.create(MediaType.parse(contentType), "{\"dialogue\":false,\"sId\":\"\",\"messages\":[{\"role\":\"user\",\"content\":\"短视频如何制作\"}]}");

                requestBuilder.post(requestBody);

                try {
                    Response response = okHttpClient.newCall(requestBuilder.build()).execute();
                    ResponseBody responseBody = response.body();
                    Log.i(TAG, "streamChat responseBody 1");
                    if (null != responseBody) {
                        try (InputStream inputStream = responseBody.byteStream()) {

                            byte[] buffer = new byte[1024];
                            int len =0;
                            while ((len = inputStream.read(buffer)) != -1) {

                                String str = new String(buffer,0,len, Charset.defaultCharset());
                                str.replaceAll(" ",""); // 去除所有空格
                                Log.i(TAG, "streamChat inputStream.read " + str);

                            }

                        } catch (IOException ioException) {
                            Log.i(TAG, "streamChat responseBody 2");
                            ioException.printStackTrace();
                        }
                    }

                } catch (
                        Exception e) {
                    Log.i(TAG, "streamChat responseBody 3");
                    e.printStackTrace();
                }
                Log.i(TAG, "streamChat End ");
            }
        }).start();
    }

}
2、activity_main.xml
<?xml version="1.0" encoding="utf-8"?>
<androidx.constraintlayout.widget.ConstraintLayout xmlns:android="http://schemas.android.com/apk/res/android"
    xmlns:app="http://schemas.android.com/apk/res-auto"
    xmlns:tools="http://schemas.android.com/tools"
    android:layout_width="match_parent"
    android:layout_height="match_parent"
    tools:context=".MainActivity">

    <TextView
        android:layout_width="wrap_content"
        android:layout_height="wrap_content"
        android:text="Hello World!"
        app:layout_constraintBottom_toBottomOf="parent"
        app:layout_constraintEnd_toEndOf="parent"
        app:layout_constraintStart_toStartOf="parent"
        app:layout_constraintTop_toTopOf="parent" />

    <TextView
        android:id="@+id/okhttp_post"
        android:layout_width="wrap_content"
        android:layout_height="wrap_content"
        android:layout_gravity="center"
        android:padding="5dp"
        android:text="Post请求"
        tools:ignore="MissingConstraints"
        tools:layout_editor_absoluteX="168dp"
        tools:layout_editor_absoluteY="158dp" />


</androidx.constraintlayout.widget.ConstraintLayout>
3、AndroidManifest.xml
<?xml version="1.0" encoding="utf-8"?>
<manifest xmlns:android="http://schemas.android.com/apk/res/android">

    <uses-permission android:name="android.permission.INTERNET"/>

    <application
        android:allowBackup="true"
        android:icon="@mipmap/ic_launcher"
        android:label="@string/app_name"
        android:roundIcon="@mipmap/ic_launcher_round"
        android:supportsRtl="true"
        android:theme="@style/Theme.TestSSE">

        <activity
            android:name=".MainActivity"
            android:exported="true">
            <intent-filter>
                <action android:name="android.intent.action.MAIN" />

                <category android:name="android.intent.category.LAUNCHER" />
            </intent-filter>

            <meta-data
                android:name="android.app.lib_name"
                android:value="" />
        </activity>
    </application>

</manifest>
七、okhttp 一些基本使用
1、get请求的使用方法
使用OKHttp进行网络请求支持两种方式,一种是同步请求,一种是异步请求。下面分情况进行介绍。
1)get的同步请求
对于同步请求在请求时需要开启子线程,请求成功后需要跳转到UI线程修改UI。
使用示例如下:
public void getDatasync(){
    new Thread(new Runnable() {
        @Override
        public void run() {
            try {
                OkHttpClient client = new OkHttpClient();//创建OkHttpClient对象
                Request request = new Request.Builder()
                        .url("http://www.baidu.com")//请求接口。如果需要传参拼接到接口后面。
                        .build();//创建Request 对象
                Response response = null;
                response = client.newCall(request).execute();//得到Response 对象
                if (response.isSuccessful()) {
                Log.d("kwwl","response.code()=="+response.code());
                Log.d("kwwl","response.message()=="+response.message());
                Log.d("kwwl","res=="+response.body().string());
                //此时的代码执行在子线程,修改UI的操作请使用handler跳转到UI线程。
                }
            } catch (Exception e) {
                e.printStackTrace();
            }
        }
    }).start();
}
此时打印结果如下:
response.code()==200;
response.message()==OK;
res=={“code”:200,”message”:success};
注意事项:
- Response.code是http响应行中的code,如果访问成功则返回200.这个不是服务器设置的,而是http协议中自带的。res中的code才是服务器设置的。注意二者的区别。
- response.body().string()本质是输入流的读操作,所以它还是网络请求的一部分,所以这行代码必须放在子线程。
- response.body().string()只能调用一次,在第一次时有返回值,第二次再调用时将会返回null。原因是:response.body().string()的本质是输入流的读操作,必须有服务器的输出流的写操作时客户端的读操作才能得到数据。而服务器的写操作只执行一次,所以客户端的读操作也只能执行一次,第二次将返回null。
2)get的异步请求
这种方式不用再次开启子线程,但回调方法是执行在子线程中,所以在更新UI时还要跳转到UI线程中。
使用示例如下:
private void getDataAsync() {
    OkHttpClient client = new OkHttpClient();
    Request request = new Request.Builder()
            .url("http://www.baidu.com")
            .build();
    client.newCall(request).enqueue(new Callback() {
        @Override
        public void onFailure(Call call, IOException e) {
        }
        @Override
        public void onResponse(Call call, Response response) throws IOException {
            if(response.isSuccessful()){//回调的方法执行在子线程。
                Log.d("kwwl","获取数据成功了");
                Log.d("kwwl","response.code()=="+response.code());
                Log.d("kwwl","response.body().string()=="+response.body().string());
            }
        }
    });
}
异步请求的打印结果与注意事项与同步请求时相同。最大的不同点就是异步请求不需要开启子线程,enqueue方法会自动将网络请求部分放入子线程中执行。
注意事项:
- 回调接口的onFailure方法和onResponse执行在子线程。
- response.body().string()方法也必须放在子线程中。当执行这行代码得到结果后,再跳转到UI线程修改UI。
3、post请求的使用方法
Post请求也分同步和异步两种方式,同步与异步的区别和get方法类似,所以此时只讲解post异步请求的使用方法。
使用示例如下:
private void postDataWithParame() {
    OkHttpClient client = new OkHttpClient();//创建OkHttpClient对象。
    FormBody.Builder formBody = new FormBody.Builder();//创建表单请求体
    formBody.add("username","zhangsan");//传递键值对参数
    Request request = new Request.Builder()//创建Request 对象。
            .url("http://www.baidu.com")
            .post(formBody.build())//传递请求体
            .build();
    client.newCall(request).enqueue(new Callback() {。。。});//回调方法的使用与get异步请求相同,此时略。
}
看完代码我们会发现:post请求中并没有设置请求方式为POST,回忆在get请求中也没有设置请求方式为GET,那么是怎么区分请求方式的呢?重点是Request.Builder类的post方法,在Request.Builder对象创建最初默认是get请求,所以在get请求中不需要设置请求方式,当调用post方法时把请求方式修改为POST。所以此时为POST请求。
4、POST请求传递参数的方法总结
在post请求使用方法中讲了一种传递参数的方法,就是创建表单请求体对象,然后把表单请求体对象作为post方法的参数。post请求传递参数的方法还有很多种,但都是通过post方法传递的。下面我们看一下Request.Builder类的post方法的声明:
public Builder post(RequestBody body)
由方法的声明可以看出,post方法接收的参数是RequestBody 对象,所以只要是RequestBody 类以及子类对象都可以当作参数进行传递。FormBody就是RequestBody 的一个子类对象。
1,使用FormBody传递键值对参数
这种方式用来上传String类型的键值对
使用示例如下:
private void postDataWithParame() {
    OkHttpClient client = new OkHttpClient();//创建OkHttpClient对象。
    FormBody.Builder formBody = new FormBody.Builder();//创建表单请求体
    formBody.add("username","zhangsan");//传递键值对参数
    Request request = new Request.Builder()//创建Request 对象。
            .url("http://www.baidu.com")
            .post(formBody.build())//传递请求体
            .build();
    client.newCall(request).enqueue(new Callback() {。。。});//此处省略回调方法。
}
2,使用RequestBody传递Json或File对象
RequestBody是抽象类,故不能直接使用,但是他有静态方法create,使用这个方法可以得到RequestBody对象。
这种方式可以上传Json对象或File对象。
上传json对象使用示例如下:
OkHttpClient client = new OkHttpClient();//创建OkHttpClient对象。
MediaType JSON = MediaType.parse("application/json; charset=utf-8");//数据类型为json格式,
String jsonStr = "{\"username\":\"lisi\",\"nickname\":\"李四\"}";//json数据.
RequestBody body = RequestBody.create(JSON, josnStr);
Request request = new Request.Builder()
        .url("http://www.baidu.com")
        .post(body)
        .build();
client.newCall(request).enqueue(new Callback() {。。。});//此处省略回调方法。
上传File对象使用示例如下:
OkHttpClient client = new OkHttpClient();//创建OkHttpClient对象。
MediaType fileType = MediaType.parse("File/*");//数据类型为json格式,
File file = new File("path");//file对象.
RequestBody body = RequestBody.create(fileType , file );
Request request = new Request.Builder()
        .url("http://www.baidu.com")
        .post(body)
        .build();
client.newCall(request).enqueue(new Callback() {。。。});//此处省略回调方法。
3,使用MultipartBody同时传递键值对参数和File对象
这个字面意思是多重的body。我们知道FromBody传递的是字符串型的键值对,RequestBody传递的是多媒体,那么如果我们想二者都传递怎么办?此时就需要使用MultipartBody类。
使用示例如下:
OkHttpClient client = new OkHttpClient();
MultipartBody multipartBody =new MultipartBody.Builder()
        .setType(MultipartBody.FORM)
        .addFormDataPart("groupId",""+groupId)//添加键值对参数
        .addFormDataPart("title","title")
        .addFormDataPart("file",file.getName(),RequestBody.create(MediaType.parse("file/*"), file))//添加文件
        .build();
final Request request = new Request.Builder()
        .url(URLContant.CHAT_ROOM_SUBJECT_IMAGE)
        .post(multipartBody)
        .build();
client.newCall(request).enqueue(new Callback() {。。。});
4,自定义RequestBody实现流的上传
在上面的分析中我们知道,只要是RequestBody类以及子类都可以作为post方法的参数,下面我们就自定义一个类,继承RequestBody,实现流的上传。
使用示例如下:
首先创建一个RequestBody类的子类对象:
RequestBody body = new RequestBody() {
    @Override
    public MediaType contentType() {
        return null;
    }

    @Override
    public void writeTo(BufferedSink sink) throws IOException {//重写writeTo方法
        FileInputStream fio= new FileInputStream(new File("fileName"));
        byte[] buffer = new byte[1024*8];
        if(fio.read(buffer) != -1){
             sink.write(buffer);
        }
    }
};
然后使用body对象:
OkHttpClient client = new OkHttpClient();//创建OkHttpClient对象。
Request request = new Request.Builder()
        .url("http://www.baidu.com")
        .post(body)
        .build();
client.newCall(request).enqueue(new Callback() {。。。});
以上代码的与众不同就是body对象,这个body对象重写了write方法,里面有个sink对象。这个是OKio包中的输出流,有write方法。使用这个方法我们可以实现上传流的功能。
使用RequestBody上传文件时,并没有实现断点续传的功能。我可以使用这种方法结合RandomAccessFile类实现断点续传的功能。
5、设置请求头
OKHttp中设置请求头特别简单,在创建request对象时调用一个方法即可。
使用示例如下:
Request request = new Request.Builder()
                .url("http://www.baidu.com")
                .header("User-Agent", "OkHttp Headers.java")
                .addHeader("token", "myToken")
                .build();
其他部分代码略。
6、下载文件
在OKHttp中并没有提供下载文件的功能,但是在Response中可以获取流对象,有了流对象我们就可以自己实现文件的下载。代码如下:
这段代码写在回调接口CallBack的onResponse方法中:
try{
    InputStream  is = response.body().byteStream();//从服务器得到输入流对象
    long sum = 0;
    File dir = new File(mDestFileDir);
    if (!dir.exists()){
        dir.mkdirs();
    }
    File file = new File(dir, mdestFileName);//根据目录和文件名得到file对象
    FileOutputStream  fos = new FileOutputStream(file);
    byte[] buf = new byte[1024*8];
    int len = 0;
    while ((len = is.read(buf)) != -1){
        fos.write(buf, 0, len);
    }
    fos.flush();
    return file;

}
八、参考文献
Sse之okhttp3中EventSource简单用法-调用方 -
Using the OkHttp library for HTTP requests - Tutorial - Tutorial
GitHub - square/okhttp: Square’s meticulous HTTP client for the JVM, Android, and GraalVM.