Ubuntu18.04系统及相关软件安装恢复过程
- 一、常用软件安装
-
- 1. [系统安装](https://blog.csdn.net/qq_43309940/article/details/116656810)
- 2. [显卡驱动安装](https://blog.csdn.net/qq_43309940/article/details/126898929)
- 3. [ROS Melodic安装](https://ismango.blog.csdn.net/article/details/106049992)
- 4. [clash for windows](https://blog.csdn.net/qq_43309940/article/details/127028335)
- 5. 截图工具(Ubuntu软件中心直接搜索`flameshot`)
- 6. terminator安装
- 7. 录屏软件**Kazam 的安装**
- 8. [anaconda安装](https://blog.csdn.net/qq_43309940/article/details/115255270)
- 9. obsidian安装
- 10. [matlab2021b安装](https://blog.csdn.net/qq_43309940/article/details/127027181)
- 11. [mathematica13.0安装](https://blog.csdn.net/qq_43309940/article/details/127133494)
- 12. `webtos2020revb`安装(直接运行deb文件即可`sudo dpkg -i`)
- 13. [Frost安装](https://blog.csdn.net/qq_43309940/article/details/127040054)
- 14. [C-Frost安装]([C-Frost报错_qq_43309940的博客-CSDN博客](https://blog.csdn.net/qq_43309940/article/details/127560217))
- 15. Vs code安装
- 16. [Ipopt-3.12.7](https://blog.csdn.net/qq_43309940/article/details/127514067)
- 17. [安装搜狗输入法](https://zhuanlan.zhihu.com/p/34270907)
- 18. [BaselineWalkingController复现及过程中出现的错误](https://blog.csdn.net/qq_43309940/article/details/127392668)
- 19. [安裝BaselineFootstepPlanner](https://blog.csdn.net/qq_43309940/article/details/127433634)
- 20. chrome
- 21. 升级cmake(用软链接)
- 22. ==升级glibc(慎重,不要轻易去升级)==
- 23. OCR识别软件安装
- 24、sshpass安装
- 25、wine安装(运行exe文件)
- 26、nvitop安装
- 二、所遇错误
一、常用软件安装
1. 系统安装
2. 显卡驱动安装
3. ROS Melodic安装
后面的几个步骤:
sudo apt-get install python3-pip
pip3 install 6-rosdep
sudo 6-rosdep
rosdep init
rosdep update
ROS修改:ubuntu系统更改默认python版本(重要操作)
# 先安装,安装一次即可
sudo update-alternatives --install /usr/bin/python python /usr/bin/python3.6 1
sudo update-alternatives --install /usr/bin/python python /usr/bin/python2 2
#调整默认版本
sudo update-alternatives --config python
#使用roscore时要换回2,不然会报错
ModuleNotFoundError: No module named 'defusedxml'
4. clash for windows
5. 截图工具(Ubuntu软件中心直接搜索flameshot)
6. terminator安装
sudo apt-get install terminator
配置可参考:
配置文件位于~/.config/terminator/config
[global_config]
  always_split_with_profile = True
  enabled_plugins = CustomCommandsMenu, TestPlugin, ActivityWatch, TerminalShot, MavenPluginURLHandler
  title_inactive_bg_color = "#820f49"
[keybindings]
[layouts]
  [[default]]

    [[[child1]]]

      parent = window0

      profile = default

      type = Terminal

    [[[window0]]]

      parent = ""

      type = Window
[plugins]
  [[CustomCommandsMenu]]
    [[[ss2]]]
      command = sshpass -p aa ssh [email protected] && sudo su
      enabled = True
      name = ss2
      position = 0
[profiles]
  [[default]]
    background_color = "#2e2f31"
    background_darkness = 0.86
    background_type = transparent
    copy_on_selection = True
    cursor_color = "#eee8d5"
    font = Monospace 12
    foreground_color = "#f3f0e7"
    icon_bell = False
    scrollback_lines = 50000
    use_system_font = False
  [[New Profile]]
    cursor_color = "#aaaaaa"
7. 录屏软件Kazam 的安装
sudo apt-get install kazam
8. anaconda安装
之前的虚拟环境可以直接复制过去使用
9. obsidian安装
10. matlab2021b安装
11. mathematica13.0安装
12. webtos2020revb安装(直接运行deb文件即可sudo dpkg -i)
13. Frost安装
直接复制过来即可
14. C-Frost安装
需要下载Jsonlab文件,并将其路径添加到matlab路径当中
15. Vs code安装
插件:
- python
- pylance(缩进高亮)
- Chinese (Simplified) (简体中文) Language Pack for Visual Studio Code
- jupyter
- indent-rainbow(缩进高亮)
- C/C++
- 如何运行C++程序
- auto.js 2个
- docker
- markdown
- Remote-ssh(可以用可视化的方式查看控制电脑上的文件)
16. Ipopt-3.12.7
17. 安装搜狗输入法
18. BaselineWalkingController复现及过程中出现的错误
19. 安裝BaselineFootstepPlanner
20. chrome
wget https://dl.google.com/linux/direct/google-chrome-stable_current_amd64.deb
sudo apt install ./google-chrome-stable_current_amd64.deb
21. 升级cmake(用软链接)
22. 升级glibc(慎重,不要轻易去升级)
1. `/lib/x86_64-linux-gnu`中有两个文件不能轻易动(`libc.so.6`和`libm.so.6`)
2. `libc.so.6`动了系统终端直接崩,需要用同系统的启动盘进入重新将该文件复制进去并建立软连接,ubuntu18.04是`libc.so.6->libc-2.27.so`,如果改成`libc.so.6->libc-2.29.so`也是会出错,无法进入桌面,添加软连接命令`sudo ln -sf 源文件(如:libc-2.29.so) 链接文件(如libc.so.6)`,去除软链接用`unlink`,此时会删除掉链接的文件,使用该命令之前一定要`cp`链接文件为`xxx.bak`
3. libm.so.6动了系统终端也会崩,但稍微好点,这个文件可以从`libm.so.6->libm-2.27.so`改为`libm.so.6->libm-2.29.so`
4. 几个常用命令
	```bash
	locale
	locale -a
	ldd --version #查看当前glibc版本
	strings /lib/x86_64-linux-gnu/libm.so.6 | grep GLIBC_ #查看当前系统支持的glibc版本
	ll #查看当前文件夹内文件的软链接
	ls -l xxx #查看xxx文件的软链接
	```
23. OCR识别软件安装
1)安装必要软件
# 添加源
sudo add-apt-repository ppa:alex-p/tesseract-ocr
# 更新源
sudo apt update

# 安装tesseract
sudo apt install tesseract-ocr

#安装gnome-screenshot、xclip、imagemagick
sudo apt install gnome-screenshot xclip imagemagick
2)安装字库
tesseract支持60多种语言的识别不同,使用之前需要先下载对应语言的字库(只下载自己需要的即可,全部共有1G+)
蓝奏下载(只包含中英文)
https://wwal.lanzoue.com/i0M9I0i12ylc
密码:3q1k
下载完成后需要将*.traineddata字库文件放到tessdata目录下,默认路径是/usr/share/tesseract-ocr/4.00/tessdata;
3)编写脚本,将下面的代码放在一个.sh文件中
	#!/bin/env bash
	# Dependencies: tesseract-ocr imagemagick gnome-screenshot xclip
    #Name: OCR Picture
    #Fuction: take a screenshot and OCR the letters in the picture
    #Path: /home/Username/...

    #you can only scan one character at a time
    SCR="/home/robot/Documents"#此处改为自己临时目录的地址即可

    # take a shot what you wana to OCR to text
    gnome-screenshot -a -f $SCR.png

    # increase the png
    mogrify -modulate 100,0 -resize 400% $SCR.png
    # should increase detection rate

    # OCR by tesseract
    tesseract $SCR.png $SCR &> /dev/null -l eng+chi1

    # get the text and copy to clipboard
    cat $SCR.txt | xclip -selection clipboard
4)使用快捷方式运行bash文件,或者将上述的脚本写成脚本函数里面的一个函数在设置快捷键
bash xxx/xxx.sh
24、sshpass安装
sudo apt-get install sshpass
输入:
sshpass -p [passwd] ssh -p [port] [email protected]
25、wine安装(运行exe文件)
在Ubuntu 18.04LTS 上使用Wine 安装微信及相应问题的解决方法
26、nvitop安装
#使用pip3进行安装
pip3 install --upgrade nvitop
#使用conda进行安装
conda install -c conda-forge nvitop

二、所遇错误
1、在启动时检测到系统程序错误
sudo rm /var/crash/*
#打开以后将最后一行的enabled值改为0
sudo gedit /etc/default/apport
2、编译错误
cmake: relocation error: /usr/lib/x86_64-linux-gnu/libcurl.so.4: symbol ENGI
https://blog.csdn.net/Boys_Wu/article/details/104940575
注意千万不能动原来的cmake,小心ros崩溃
3、ros使用报错
cannot launch node of type [rosout/rosout]: Cannot locate node of type [rosout] in package [rosout]. Make sure file exists in package path and permission is set to executable (chmod +x)
RLException: failed to start core service [/rosout]
The traceback for the exception was written to the log file
python2和python3不适配,退出conda环境
/home/robot/Desktop/ipopt_example-master/example.cpp:1:10: fatal error: cppad/ipopt/solve.hpp: No such file or directory
    1 | #include <cppad/ipopt/solve.hpp>
错误
sed:-e 表达式 #1,字符 10:未终止的“s”命令
不要用自己配置的conda虚拟环境,可能会出现这个错误
4、解决类似 /usr/lib64/libstdc++.so.6: version `GLIBCXX_3.4.21’ not found 的报错
/usr/bin/ld: warning: /usr/lib/gcc/x86_64-linux-gnu/7/libstdc++.so: unsupported GNU_PROPERTY_TYPE (5) type: 0xc0010001
/usr/bin/ld: warning: /usr/lib/gcc/x86_64-linux-gnu/7/libstdc++.so: unsupported GNU_PROPERTY_TYPE (5) type: 0xc0010002
/usr/bin/ld: warning: libmkl_intel_lp64.so.2, needed by /usr/local/lib/libipopt.so, not found (try using -rpath or -rpath-link)
/usr/bin/ld: warning: libmkl_sequential.so.2, needed by //usr/local/lib/libcoinhsl.so.1, not found (try using -rpath or -rpath-link)
/usr/bin/ld: warning: libmkl_core.so.2, needed by //usr/local/lib/libcoinhsl.so.1, not found (try using -rpath or -rpath-link)
//usr/local/lib/libcoinhsl.so.1:对‘dswap_’未定义的引用
/usr/local/lib/libipopt.so:对‘dpotrf_’未定义的引用
/usr/local/lib/libipopt.so:对‘dgemm_’未定义的引用
//usr/local/lib/libcoinhsl.so.1:对‘dtpmv_’未定义的引用
/usr/local/lib/libipopt.so:对‘dnrm2_’未定义的引用
/usr/local/lib/libipopt.so:对‘dscal_’未定义的引用
//usr/local/lib/libcoinhsl.so.1:对‘dtrsv_’未定义的引用
//usr/local/lib/libcoinhsl.so.1:对‘sswap_’未定义的引用
/usr/local/lib/libipopt.so:对‘dpotrs_’未定义的引用
/usr/local/lib/libipopt.so:对‘dppsv_’未定义的引用
/usr/local/lib/libipopt.so:对‘dtrsm_’未定义的引用
//usr/local/lib/libcoinhsl.so.1:对‘stpsv_’未定义的引用
//usr/local/lib/libcoinhsl.so.1:对‘dtrmm_’未定义的引用
/usr/local/lib/libipopt.so:对‘daxpy_’未定义的引用
/usr/local/lib/libipopt.so:对‘dgetrf_’未定义的引用
//usr/local/lib/libcoinhsl.so.1:对‘ssyrk_’未定义的引用
//usr/local/lib/libcoinhsl.so.1:对‘dtpsv_’未定义的引用
/usr/local/lib/libipopt.so:对‘dcopy_’未定义的引用
/usr/local/lib/libipopt.so:对‘idamax_’未定义的引用
/usr/local/lib/libipopt.so:对‘pardiso_’未定义的引用
//usr/local/lib/libcoinhsl.so.1:对‘isamax_’未定义的引用
//usr/local/lib/libcoinhsl.so.1:对‘saxpy_’未定义的引用
//usr/local/lib/libcoinhsl.so.1:对‘sgemm_’未定义的引用
/usr/local/lib/libipopt.so:对‘dsyrk_’未定义的引用
/usr/local/lib/libipopt.so:对‘dasum_’未定义的引用
/usr/local/lib/libipopt.so:对‘dsyev_’未定义的引用
//usr/local/lib/libcoinhsl.so.1:对‘dtrmv_’未定义的引用
/usr/local/lib/libipopt.so:对‘dgetrs_’未定义的引用
/usr/local/lib/libipopt.so:对‘pardisoinit_’未定义的引用
//usr/local/lib/libcoinhsl.so.1:对‘strsm_’未定义的引用
/usr/local/lib/libipopt.so:对‘ddot_’未定义的引用
//usr/local/lib/libcoinhsl.so.1:对‘sgemv_’未定义的引用
/usr/local/lib/libipopt.so:对‘dsymv_’未定义的引用
//usr/local/lib/libcoinhsl.so.1:对‘scopy_’未定义的引用
/usr/local/lib/libipopt.so:对‘dgemv_’未定义的引用
collect2: error: ld returned 1 exit status
CMakeFiles/solver.dir/build.make:96: recipe for target 'solver' failed
make[2]: *** [solver] Error 1
CMakeFiles/Makefile2:82: recipe for target 'CMakeFiles/solver.dir/all' failed
make[1]: *** [CMakeFiles/solver.dir/all] Error 2
Makefile:90: recipe for target 'all' failed
make: *** [all] Error 2
把libmkl_intel_lp64.so.2文件所在路径写入.bashrc文件当中
export LD_LIBRARY_PATH=/opt/intel/oneapi/mkl/2022.2.0/lib/intel64
5、ros tf2报错
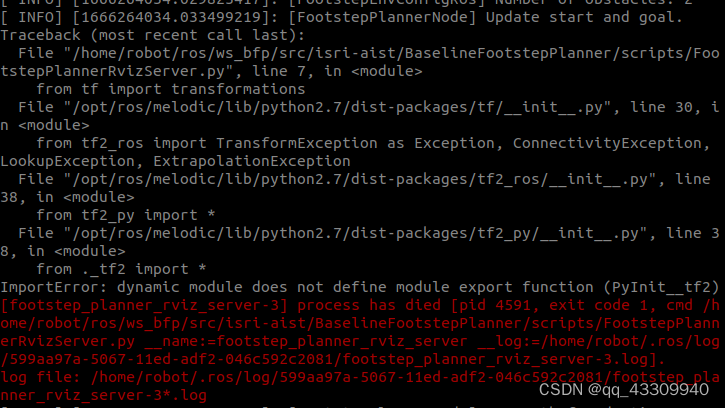
是由于tf2是为python2写的使用python3会报错,有2种解决方案:
- 修改
~/ros/ws_bfp/src/isri-aist/BaselineFootstepPlanner/scripts文件夹下的FootstepPlannerRvizServer.py文件的头为
#! /usr/bin/env python2.7
此方案验证有效
- 将tf2用python3重新编译
1)安装python3依赖
sudo apt update
sudo apt install python3-catkin-pkg-modules python3-rospkg-modules python3-empy
2)预编译工作空间
mkdir -p ~/catkin_ws/src; cd ~/catkin_ws
catkin_make
source devel/setup.bash
wstool init
wstool set -y src/geometry2 --git https://github.com/ros/geometry2 -v 0.6.5
wstool up
rosdep install --from-paths src --ignore-src -y -r
3)使用python3编译
catkin_make --cmake-args \
            -DCMAKE_BUILD_TYPE=Release \
            -DPYTHON_EXECUTABLE=/usr/bin/python3 \
            -DPYTHON_INCLUDE_DIR=/usr/include/python3.6m \
            -DPYTHON_LIBRARY=/usr/lib/x86_64-linux-gnu/libpython3.6m.so
其中的python路径可以换成自己的python路径
编译完后需要source到该工作空间source devel/setup.bash或者添加到.bashrc文件中。
推荐第二种方法,一劳永逸