生成相关证书文件
首先Fabric提供了一些工具用于生成所需的文件,cryptogen模块会根据提供的配置文件生成后续模块运行过程中需要的证书和数据文件。
cryptogen常用命令: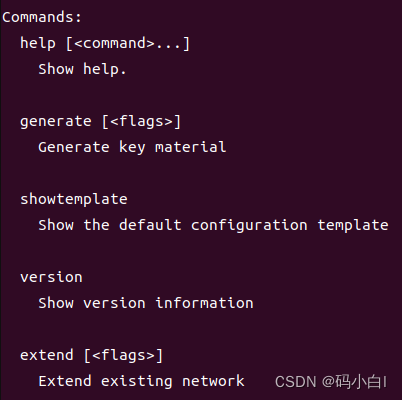
generate用于根据配置文件生成证书。
showtemplate用于提供一个模板。
具体操作如下:
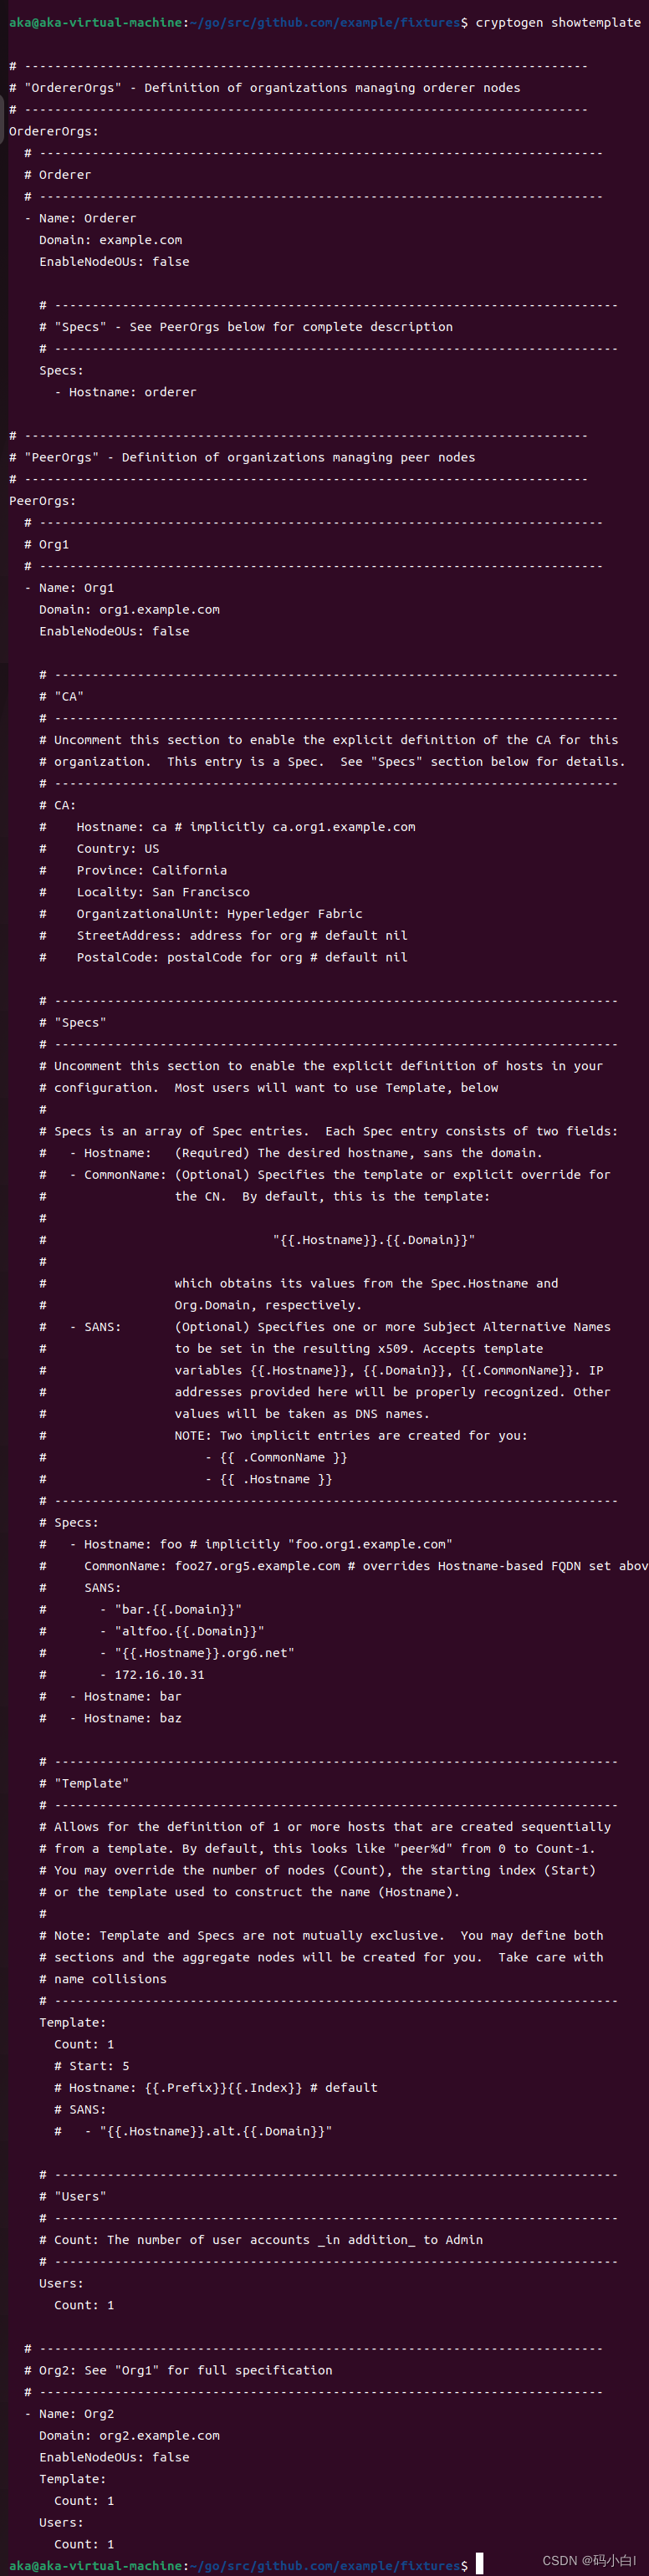
cryptogen showtemplate
也才可以把模板输入到具体文件中
cryptogen showtemplate > crypto-config.yaml
然后使用generate命令生成证书
cryptogen generate --config=crypto-config.yaml

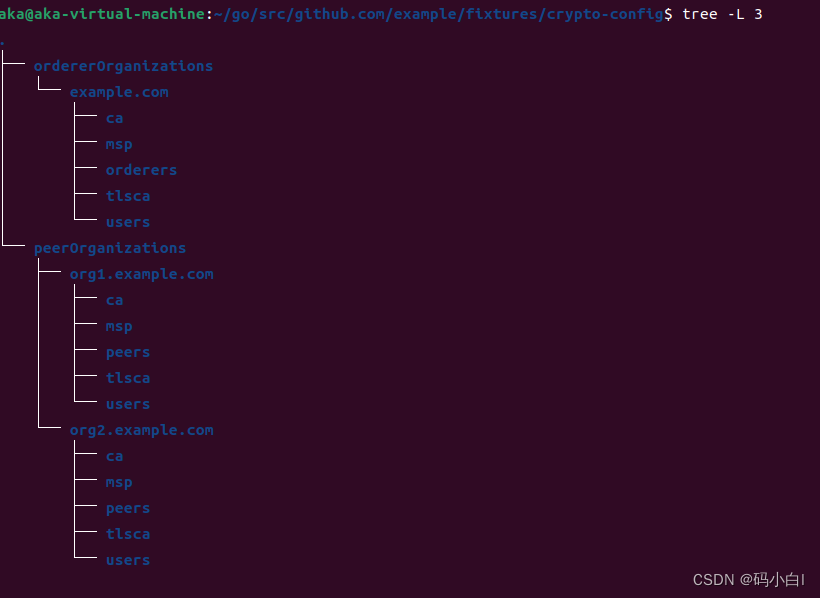
使用tree命令查看下目录结构
tree -L 3
进行通道配置
使用configtx.yaml文件进行配置,可以参考官方test-network/config/configtx.yaml文件。
然后使用configtxgen模块配置,创建创世区块。
命令如下:
configtxgen -profile TwoOrgsOrdererGenesis -outputBlock ./channel-artifacts/genesis.block -channelID fabric-chanel

这里的通道名与后面的通道名要不一致。
创建Channel的命令如下:
configtxgen -profile TestTwoOrgsChannel -outputCreateChannelTx ./channel-artifacts/channel.tx -channelID mychannel

接下来是生成组织1和组织2 的锚节点文件
configtxgen -profile  TwoOrgsChannel  -outputAnchorPeersUpdate ./channel-artifact/Org1MSPanchors. tx -channelID  mychannel -asOrg Org1MSP
configtxgen -profile  TwoOrgsChannel  -outputAnchorPeersUpdate ./channel-artifact/Org2MSPanchors. tx -channelID  mychannel -asOrg Org2MSP


创建peer,orderer节点
有两种方式创建peer、orderer节点
使用docker生成节点
配置一个docker-compose.yaml文件,可以参考test-network/docker/docker-compose-net.yaml文件
- CORE_VM_DOCKER_HOSTCONFIG_NETWORKMODE=${

    COMPOSE_PROJECT_NAME}_test
这条语句中网络名要改成:文件名_网络名。
配置docker-compose.yaml 文件生成orderer,peer,cli节点。
# Copyright IBM Corp. All Rights Reserved.
#
# SPDX-License-Identifier: Apache-2.0
#

version: '2'

volumes:
  orderer.example.com:
  peer0.org1.example.com:
  peer0.org2.example.com:

networks:
  test:
    name: fixtures_test

services:


  orderer.example.com:
    container_name: orderer.example.com
    image: hyperledger/fabric-orderer:latest
    environment:
      - FABRIC_LOGGING_SPEC=INFO
      - ORDERER_GENERAL_LISTENADDRESS=0.0.0.0
      - ORDERER_GENERAL_LISTENPORT=7050
      - ORDERER_GENERAL_GENESISMETHOD=file
      - ORDERER_GENERAL_GENESISFILE=/var/hyperledger/orderer/orderer.genesis.block
      - ORDERER_GENERAL_LOCALMSPID=OrdererMSP
      - ORDERER_GENERAL_LOCALMSPDIR=/var/hyperledger/orderer/msp
      # enabled TLS
      - ORDERER_GENERAL_TLS_ENABLED=true
      - ORDERER_GENERAL_TLS_PRIVATEKEY=/var/hyperledger/orderer/tls/server.key
      - ORDERER_GENERAL_TLS_CERTIFICATE=/var/hyperledger/orderer/tls/server.crt
      - ORDERER_GENERAL_TLS_ROOTCAS=[/var/hyperledger/orderer/tls/ca.crt]
      - ORDERER_KAFKA_TOPIC_REPLICATIONFACTOR=1
      - ORDERER_KAFKA_VERBOSE=true
      - ORDERER_GENERAL_CLUSTER_CLIENTCERTIFICATE=/var/hyperledger/orderer/tls/server.crt
      - ORDERER_GENERAL_CLUSTER_CLIENTPRIVATEKEY=/var/hyperledger/orderer/tls/server.key
      - ORDERER_GENERAL_CLUSTER_ROOTCAS=[/var/hyperledger/orderer/tls/ca.crt]
    working_dir: /opt/gopath/src/github.com/hyperledger/fabric
    command: orderer
    volumes:
        - ./channel-artifacts/genesis.block:/var/hyperledger/orderer/orderer.genesis.block
        - ./crypto-config/ordererOrganizations/example.com/orderers/orderer.example.com/msp:/var/hyperledger/orderer/msp
        - ./crypto-config/ordererOrganizations/example.com/orderers/orderer.example.com/tls/:/var/hyperledger/orderer/tls
        - orderer.example.com:/var/hyperledger/production/orderer
    ports:
      - 7050:7050
    networks:
      - test


  peer0.org1.example.com:
    container_name: peer0.org1.example.com
    image: hyperledger/fabric-peer:latest
    environment:
      #Generic peer variables
      - CORE_VM_ENDPOINT=unix:///host/var/run/docker.sock
      # the following setting starts chaincode containers on the same
      # bridge network as the peers
      # https://docs.docker.com/compose/networking/
      - CORE_VM_DOCKER_HOSTCONFIG_NETWORKMODE=fixtures_test
      - FABRIC_LOGGING_SPEC=INFO
      #- FABRIC_LOGGING_SPEC=DEBUG
      - CORE_PEER_TLS_ENABLED=true
      - CORE_PEER_GOSSIP_USELEADERELECTION=true
      - CORE_PEER_GOSSIP_ORGLEADER=false
      - CORE_PEER_PROFILE_ENABLED=true
      - CORE_PEER_TLS_CERT_FILE=/etc/hyperledger/fabric/tls/server.crt
      - CORE_PEER_TLS_KEY_FILE=/etc/hyperledger/fabric/tls/server.key
      - CORE_PEER_TLS_ROOTCERT_FILE=/etc/hyperledger/fabric/tls/ca.crt
      # Peer specific variabes
      - CORE_PEER_ID=peer0.org1.example.com
      - CORE_PEER_ADDRESS=peer0.org1.example.com:7051
      - CORE_PEER_LISTENADDRESS=0.0.0.0:7051
      - CORE_PEER_CHAINCODEADDRESS=peer0.org1.example.com:7052
      - CORE_PEER_CHAINCODELISTENADDRESS=0.0.0.0:7052
      - CORE_PEER_GOSSIP_BOOTSTRAP=peer0.org1.example.com:7051
      - CORE_PEER_GOSSIP_EXTERNALENDPOINT=peer0.org1.example.com:7051
      - CORE_PEER_LOCALMSPID=Org1MSP
    volumes:
        - /var/run/:/host/var/run/
        - ./crypto-config/peerOrganizations/org1.example.com/peers/peer0.org1.example.com/msp:/etc/hyperledger/fabric/msp
        - ./crypto-config/peerOrganizations/org1.example.com/peers/peer0.org1.example.com/tls:/etc/hyperledger/fabric/tls
        - peer0.org1.example.com:/var/hyperledger/production
    working_dir: /opt/gopath/src/github.com/hyperledger/fabric/peer
    command: peer node start
    ports:
      - 7051:7051
    networks:
      - test

  peer0.org2.example.com:
    container_name: peer0.org2.example.com
    image: hyperledger/fabric-peer:latest
    environment:
      #Generic peer variables
      - CORE_VM_ENDPOINT=unix:///host/var/run/docker.sock
      # the following setting starts chaincode containers on the same
      # bridge network as the peers
      # https://docs.docker.com/compose/networking/
      - CORE_VM_DOCKER_HOSTCONFIG_NETWORKMODE=fixtures_test
      - FABRIC_LOGGING_SPEC=INFO
      #- FABRIC_LOGGING_SPEC=DEBUG
      - CORE_PEER_TLS_ENABLED=true
      - CORE_PEER_GOSSIP_USELEADERELECTION=true
      - CORE_PEER_GOSSIP_ORGLEADER=false
      - CORE_PEER_PROFILE_ENABLED=true
      - CORE_PEER_TLS_CERT_FILE=/etc/hyperledger/fabric/tls/server.crt
      - CORE_PEER_TLS_KEY_FILE=/etc/hyperledger/fabric/tls/server.key
      - CORE_PEER_TLS_ROOTCERT_FILE=/etc/hyperledger/fabric/tls/ca.crt
      # Peer specific variabes
      - CORE_PEER_ID=peer0.org2.example.com
      - CORE_PEER_ADDRESS=peer0.org2.example.com:9051
      - CORE_PEER_LISTENADDRESS=0.0.0.0:9051
      - CORE_PEER_CHAINCODEADDRESS=peer0.org2.example.com:9052
      - CORE_PEER_CHAINCODELISTENADDRESS=0.0.0.0:9052
      - CORE_PEER_GOSSIP_EXTERNALENDPOINT=peer0.org2.example.com:9051
      - CORE_PEER_GOSSIP_BOOTSTRAP=peer0.org2.example.com:9051
      - CORE_PEER_LOCALMSPID=Org2MSP
    volumes:
        - /var/run/:/host/var/run/
        - ./crypto-config/peerOrganizations/org2.example.com/peers/peer0.org2.example.com/msp:/etc/hyperledger/fabric/msp
        - ./crypto-config/peerOrganizations/org2.example.com/peers/peer0.org2.example.com/tls:/etc/hyperledger/fabric/tls
        - peer0.org2.example.com:/var/hyperledger/production
    working_dir: /opt/gopath/src/github.com/hyperledger/fabric/peer
    command: peer node start
    ports:
      - 9051:9051
    networks:
      - test


  cli1:
    container_name: cli1
    image: hyperledger/fabric-tools:latest
    tty: true
    stdin_open: true
    environment:
      - GOPATH=/opt/gopath
      - CORE_VM_ENDPOINT=unix:///host/var/run/docker.sock
      #- FABRIC_LOGGING_SPEC=DEBUG
      - FABRIC_LOGGING_SPEC=INFO
      - CORE_PEER_ID=cli1
      - CORE_PEER_ADDRESS=peer0.org1.example.com:7051
      - CORE_PEER_LOCALMSPID=Org1MSP
      - CORE_PEER_TLS_ENABLED=true
      - CORE_PEER_TLS_CERT_FILE=/opt/gopath/src/github.com/hyperledger/fabric/peer/crypto/peerOrganizations/org1.example.com/peers/peer0.org1.example.com/tls/server.crt
      - CORE_PEER_TLS_KEY_FILE=/opt/gopath/src/github.com/hyperledger/fabric/peer/crypto/peerOrganizations/org1.example.com/peers/peer0.org1.example.com/tls/server.key
      - CORE_PEER_TLS_ROOTCERT_FILE=/opt/gopath/src/github.com/hyperledger/fabric/peer/crypto/peerOrganizations/org1.example.com/peers/peer0.org1.example.com/tls/ca.crt
      - CORE_PEER_MSPCONFIGPATH=/opt/gopath/src/github.com/hyperledger/fabric/peer/crypto/peerOrganizations/org1.example.com/users/Admin@org1.example.com/msp
    working_dir: /opt/gopath/src/github.com/hyperledger/fabric/peer
    command: /bin/bash
    volumes:
      - /var/run/:/host/var/run/
      - ../chaincode/go/:/opt/gopath/src/github.com/hyperledger/multiple-deployment/chaincode/go
      - ./crypto-config:/opt/gopath/src/github.com/hyperledger/fabric/peer/crypto/
      - ./channel-artifacts:/opt/gopath/src/github.com/hyperledger/fabric/peer/channel-artifacts
    networks:
      - test

  cli2:
    container_name: cli2
    image: hyperledger/fabric-tools:latest
    tty: true
    stdin_open: true
    environment:
      - GOPATH=/opt/gopath
      - CORE_VM_ENDPOINT=unix:///host/var/run/docker.sock
      #- FABRIC_LOGGING_SPEC=DEBUG
      - FABRIC_LOGGING_SPEC=INFO
      - CORE_PEER_ID=cli2
      - CORE_PEER_ADDRESS=peer0.org2.example.com:9051
      - CORE_PEER_LOCALMSPID=Org2MSP
      - CORE_PEER_TLS_ENABLED=true
      - CORE_PEER_TLS_CERT_FILE=/opt/gopath/src/github.com/hyperledger/fabric/peer/crypto/peerOrganizations/org2.example.com/peers/0.org2.example.com/tls/server.crt
      - CORE_PEER_TLS_KEY_FILE=/opt/gopath/src/github.com/hyperledger/fabric/peer/crypto/peerOrganizations/org2.example.com/peers/peer0.org2.example.com/tls/server.key
      - CORE_PEER_TLS_ROOTCERT_FILE=/opt/gopath/src/github.com/hyperledger/fabric/peer/crypto/peerOrganizations/org2.example.com/peers/peer0.org2.example.com/tls/ca.crt
      - CORE_PEER_MSPCONFIGPATH=/opt/gopath/src/github.com/hyperledger/fabric/peer/crypto/peerOrganizations/org2.example.com/users/Admin@org2.example.com/msp
    working_dir: /opt/gopath/src/github.com/hyperledger/fabric/peer
    command: /bin/bash
    volumes:
      - /var/run/:/host/var/run/
      - ../chaincode/go/:/opt/gopath/src/github.com/hyperledger/multiple-deployment/chaincode/go
      - ./crypto-config:/opt/gopath/src/github.com/hyperledger/fabric/peer/crypto/
      - ./channel-artifacts:/opt/gopath/src/github.com/hyperledger/fabric/peer/channel-artifacts

    networks:
      - test
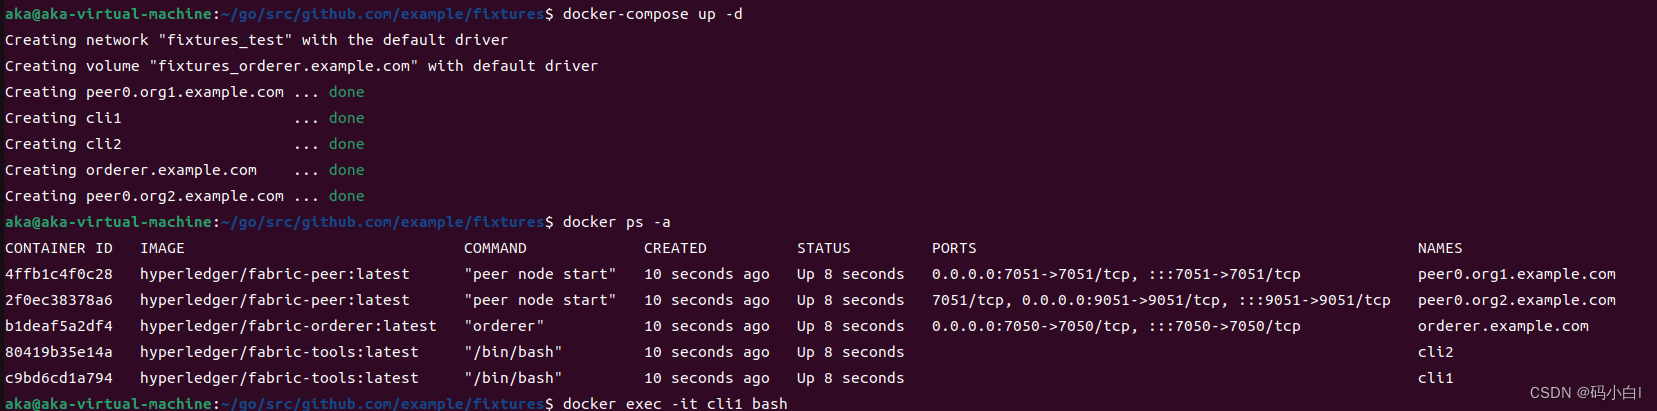
然后运行docker-compose.yaml文件:
docker-compse up -d
查看docker容器
docker ps -a
输出结果如下:
创建通道channel
分为三步:创建通道、将已运行的Peer模块加入通道、更新锚节点。
创建通道
使用客户端进行创建,首先进入cli1中,命令如下:
docker exec -it cli1 bash
然后创建通道
peer channel create -o orderer.example.com:7050 -c mychannel -f ./channel-artifacts/channel.tx --tls true --cafile /opt/gopath/src/github.com/hyperledger/fabric/peer/crypto/ordererOrganizations/example.com/msp/tlscacerts/tlsca.example.com-cert.pem
-o表示指定的排序节点,-c指定通道名称 -f指定通道文件的路径, --tls是否使用tls --cafile ca 的文件路径。
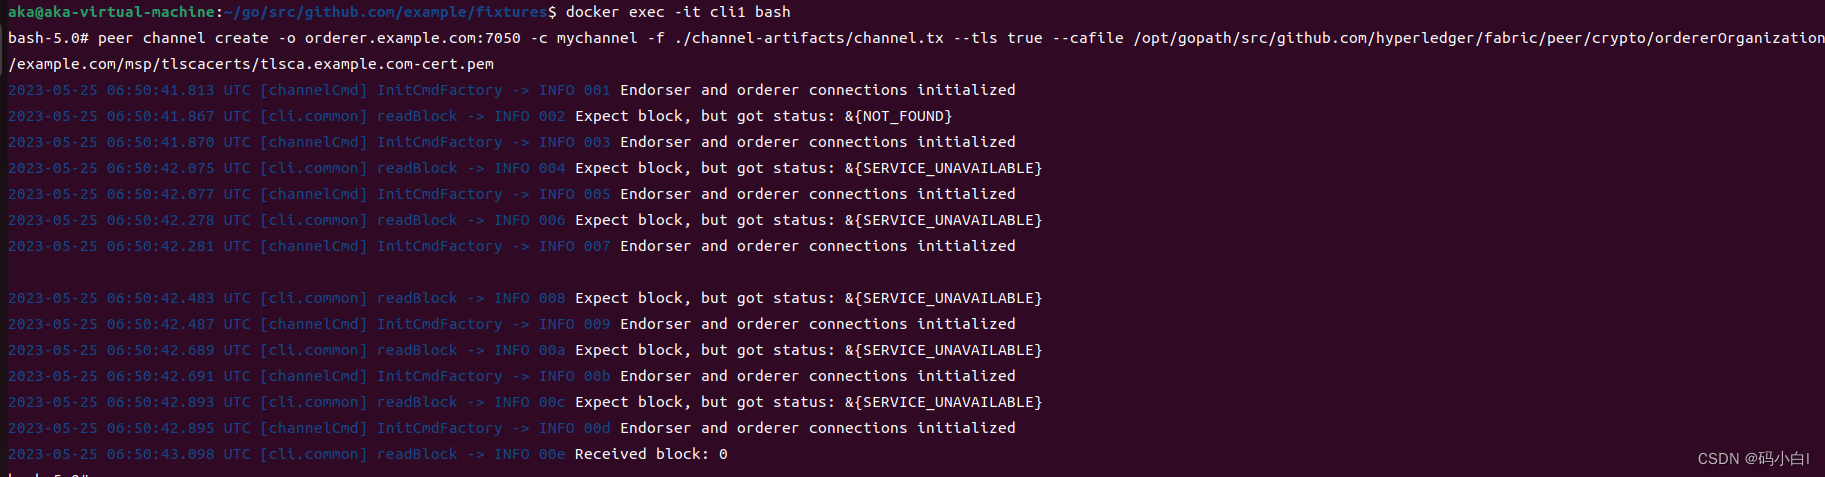
查看下文件内容:

生成了mychannel.block文件。
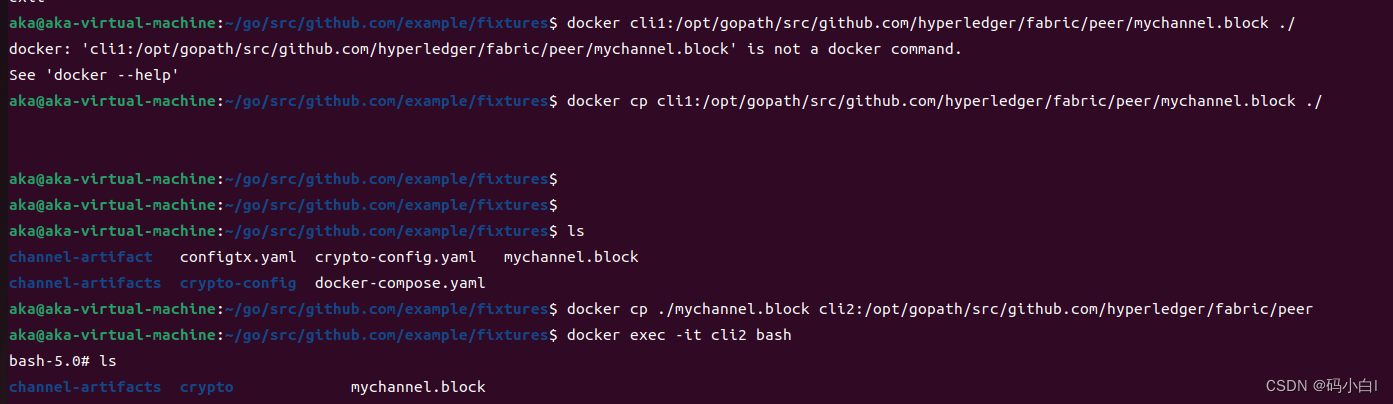
然后将生成的文件复制到cli2中,cli1和cli2要加入同一个通道,要保证通道文件一致。(不允许跨容器复制,只能先复制到系统中,再复制到cli2中)
copying between containers is not supported
docker cp cli1:/opt/gopath/src/github.com/hyperledger/fabric/peer/mychannel.block ./
docker cp ./mychannel.block cli2:/opt/gopath/src/github.com/hyperledger/fabric/peer
加入通道
将peer加入通道,分别进入cli1和cli2中进行操作:

更新锚节点
分别更新锚节点
peer channel update -o orderer.example.com:7050 -c mychannel -f ./channel-artifacts/Org1MSPanchors.tx --tls --cafile /opt/gopath/src/github.com/hyperledger/fabric/peer/crypto/ordererOrganizations/example.com/msp/tlscacerts/tlsca.example.com-cert.pem


Chaincode的部署和调用
从Hyperledger Fabric V2.0版本开始,新增了链码生命周期的管理通道,这使得链码的操作和管理变得更加便捷和安全。如果遵循链码生命周期的定义和推荐操作,可以更容易地开发、测试和部署链码。
Hyperledger Fabric中的链码生命周期指的是链码开发、安装、批准、提交、调用和升级等一系列的过程和状态。以下是链码的生命周期阶段的详细说明:
-
链码开发阶段
在这个阶段,开发人员编写链码源代码并使用一个编程语言将其实现。Hyperledger Fabric支持多种编程语言,包括Go语言、JavaScript和TypeScript等。开发人员可以使用扩展SDK和其他工具来增强其开发体验。
-
链码安装阶段
在这个阶段,开发人员将开发好的链码安装到系统中的Peer节点上。需要注意的是,一个链码只需要在Peer节点上安装一次,安装后的链码将被用于支持后续的批准和提交等操作。
-
链码批准阶段
在这个阶段,系统管理员或其他有权机构对安装的链码进行批准。这个过程通常包括:检查链码源代码、分配chaincode definition ids等。只有在链码被批准之后,才能进行后续的提交操作。
-
链码提交阶段
在这个阶段,已安装和批准的链码提交到系统中。通过
peer lifecycle chaincode commit命令可进行链码提交操作,此命令需要声明链码名称、版本、背书策略等参数。 -
链码调用阶段
在这个阶段,用户使用链码对应用程序进行交互,通过调用链码中的方法或函数来实现具体的业务逻辑。
-
链码升级阶段
当业务需求更改或代码升级时,可能需要对已有链码进行升级。在这个阶段,链码的升级可以通过
peer lifecycle chaincode upgrade命令实现。链码升级需要追加新的版本信息,同时需要与原来的版本兼容。
链码的打包
peer lifecycle chaincode package sacc.tar.gz --path /opt/gopath/src//github.com/hyperledger/multiple-deployment/chaincode/go/ --label sacc_1

再复制到cli2中

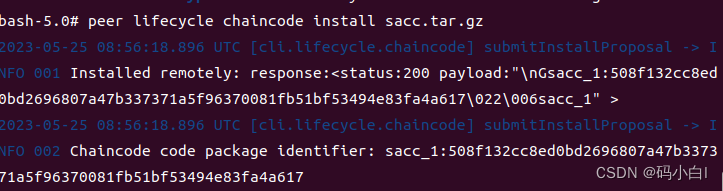
安装链码
peer lifecycle chaincode install sacc.tar.gz

同理在cli2中安装链码
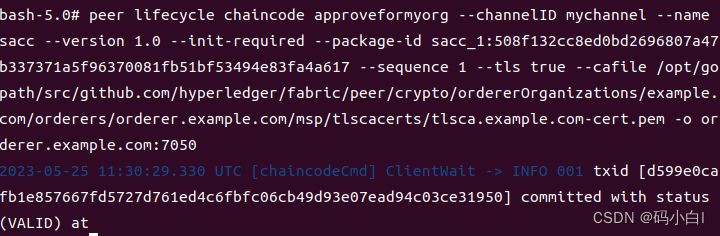
批准链码
peer lifecycle chaincode approveformyorg --channelID mychannel --name sacc --version 1.0 --init-required --package-id sacc_1:508f132cc8ed0bd2696807a47b337371a5f96370081fb51bf53494e83fa4a617 --sequence 1 --tls true --cafile /opt/gopath/src/github.com/hyperledger/fabric/peer/crypto/ordererOrganizations/example.com/orderers/orderer.example.com/msp/tlscacerts/tlsca.example.com-cert.pem -o orderer.example.com:7050
查看链码是否批准
peer lifecycle chaincode checkcommitreadiness --channelID mychannel --name sacc --version 1.0 --init-required --sequence 1 --tls true --cafile /opt/gopath/src/github.com/hyperledger/fabric/peer/crypto/ordererOrganizations/example.com/orderers/orderer.example.com/msp/tlscacerts/tlsca.example.com-cert.pem -o orderer.example.com:7050 --output json

表示已成功批准。
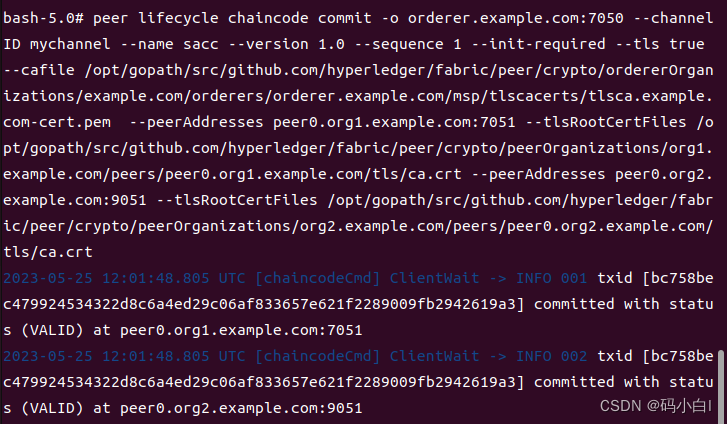
提交已经安装和批准的链码
一旦链码被安装和批准,然后就可以提交链代码并将其部署到网络中。这是通过在CLI终端中使用peer lifecycle chaincode commit命令来完成的。
peer lifecycle chaincode commit -o orderer.example.com:7050 --channelID mychannel --name sacc --version 1.0 --sequence 1 --init-required --tls true --cafile /opt/gopath/src/github.com/hyperledger/fabric/peer/crypto/ordererOrganizations/example.com/orderers/orderer.example.com/msp/tlscacerts/tlsca.example.com-cert.pem --peerAddresses peer0.org1.example.com:7051 --tlsRootCertFiles /opt/gopath/src/github.com/hyperledger/fabric/peer/crypto/peerOrganizations/org1.example.com/peers/peer0.org1.example.com/tls/ca.crt --peerAddresses peer0.org2.example.com:9051 --tlsRootCertFiles /opt/gopath/src/github.com/hyperledger/fabric/peer/crypto/peerOrganizations/org2.example.com/peers/peer0.org2.example.com/tls/ca.crt
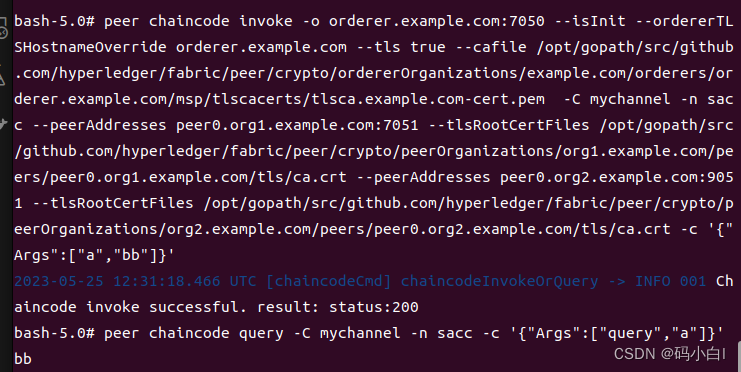
链码调用
主要使用Invoke和Query两个命令
调用链码
peer chaincode invoke -o orderer.example.com:7050 --isInit --ordererTLSHostnameOverride orderer.example.com --tls true --cafile /opt/gopath/src/github.com/hyperledger/fabric/peer/crypto/ordererOrganizations/example.com/orderers/orderer.example.com/msp/tlscacerts/tlsca.example.com-cert.pem -C mychannel -n sacc --peerAddresses peer0.org1.example.com:7051 --tlsRootCertFiles /opt/gopath/src/github.com/hyperledger/fabric/peer/crypto/peerOrganizations/org1.example.com/peers/peer0.org1.example.com/tls/ca.crt --peerAddresses peer0.org2.example.com:9051 --tlsRootCertFiles /opt/gopath/src/github.com/hyperledger/fabric/peer/crypto/peerOrganizations/org2.example.com/peers/peer0.org2.example.com/tls/ca.crt -c '{"Args":["a","bb"]}'
查询链码
peer chaincode query -C mychannel -n sacc -c '{"Args":["query","a"]}'
修改a的值
peer chaincode invoke -o orderer.example.com:7050 --ordererTLSHostnameOverride orderer.example.com --tls true --cafile /opt/gopath/src/github.com/hyperledger/fabric/peer/crypto/ordererOrganizations/example.com/orderers/orderer.example.com/msp/tlscacerts/tlsca.example.com-cert.pem -C mychannel -n sacc --peerAddresses peer0.org1.example.com:7051 --tlsRootCertFiles /opt/gopath/src/github.com/hyperledger/fabric/peer/crypto/peerOrganizations/org1.example.com/peers/peer0.org1.example.com/tls/ca.crt --peerAddresses peer0.org2.example.com:9051 --tlsRootCertFiles /opt/gopath/src/github.com/hyperledger/fabric/peer/crypto/peerOrganizations/org2.example.com/peers/peer0.org2.example.com/tls/ca.crt -c '{"Args":["set","a","bbcc"]}'
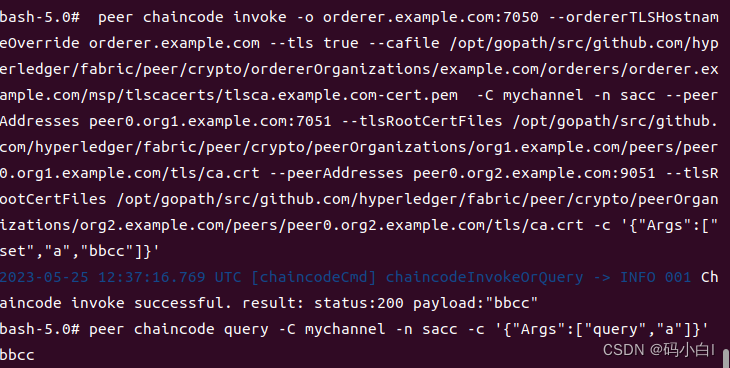
修改成功!!
完成一个简易的区块链网络。