最近在写后台管理系统,之前有写过关于relation-graph关系图的文章。
vue插件——relation-graph——实现关系图功能——技能提升:http://t.csdn.cn/I0fub
文章中写了此模块的基本使用方法。
现在的场景是:一次性渲染的节点过多时,导致页面很乱,看不清节点之间的关系。为了能够达到目的,暂定的解决方案就是:先加载一级节点,如果一级节点过多,则分批次加载,此处就可以通过右击节点的操作来处理了,根据子节点的数量,来判断是否分批加载或者折叠。
下面介绍节点右击或者点击时的实现方式:
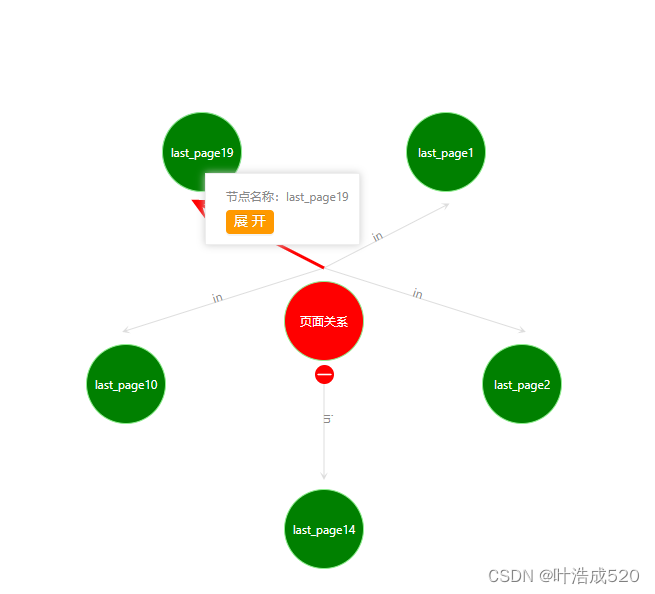
效果图如下:
代码如下:
1.html部分
<div style="height: calc(100vh - 130px); border: 1px solid #ebebeb"
  ref="myPage"
  @click="otherClick"
>
  <RelationGraph
    ref="seeksRelationGraph"
    :options="graphOptions"
    :on-node-click="onNodeClick"
    :on-line-click="onLineClick"
  >
    <div
      slot="node"
      slot-scope="{ node }"
      style="height: 100%"
      @click.stop="showNodeMenus(node, $event)"
      @contextmenu.prevent.stop="showNodeMenus(node, $event)"
    >
      <div
        style="
          border-radius: 50%;
          cursor: pointer;
          word-break: break-all;
          display: flex;
          justify-content: center;
          align-items: center;
          color: #fff;
          height: 100%;
          font-size: 12px;
          overflow: hidden;
        "
      >
        {

    {

    node.text}}
      </div>
    </div>
  </RelationGraph>
</div>
<div
  v-if="isShowNodeTipsPanel"
  :style="{


    left: nodeMenuPanelPosition.x + 'px',
    top: nodeMenuPanelPosition.y + 'px',
  }"
  style="
    z-index: 999;
    padding: 10px;
    background-color: #ffffff;
    border: #eeeeee solid 1px;
    box-shadow: 0px 0px 8px #cccccc;
    position: absolute;
  "
>
  <div
    style="
      line-height: 25px;
      padding-left: 10px;
      color: #888888;
      font-size: 12px;
    "
  >
    节点名称:{

    {

     currentNode.text }}
    <div>
      <a-space>
        <a-button
          v-if="
            currentNode.all_num &&
            currentNode.all_num > currentNode.currentNum
          "
          size="small"
          type="primary"
          @click.stop="doAction(currentNode, '展开')"
        >
          展开
        </a-button>
      </a-space>
    </div>
  </div>
</div>
2.js部分——其余部分跟文章开头的链接中一样,不再赘述
 doAction(node, actionName) {


  this.isShowNodeTipsPanel = false;
  //加载数据
  if (actionName == '展开') {


    this.loadChildNodesFromRemoteServer(node, (new_data) => {


      this.$refs.seeksRelationGraph
        .getInstance()
        .appendJsonData(new_data, (graphInstance) => {


          // 这些写上当图谱初始化完成后需要执行的代码
          this.$refs.seeksRelationGraph.refresh();
        });
    });
  }
},
loadChildNodesFromRemoteServer(node, callback) {


  getRelationship({


    node_id: node.id,
    num: this.currentNode.currentNum + 5,
  }).then((res) => {


    const _new_json_data = {


      nodes: res.node_list,
      links: res.edge_list,
    };
    this.links = this.links.concat(res.edge_list);
    this.nodes = this.nodes.concat(res.node_list);
    this.currentNode.currentNum = res.edge_list.length;
    console.log('this.currentNode', this.currentNode);
    this.$forceUpdate();
    callback(_new_json_data);
  });
},
showNodeMenus(nodeObject, $event) {


  this.currentNode = nodeObject;
  const _base_position = this.$refs.myPage.getBoundingClientRect();

  let obj = this.nodes.find((item) => item.id == nodeObject.id);
  if (obj && obj.id) {


    this.currentNode.all_num = obj.all_num;
  }
  let arr = this.links.filter((item) => item.from == nodeObject.id);
  this.currentNode.currentNum = arr.length;
  this.isShowNodeTipsPanel = true;
  console.log(
    'showNodeMenus:',
    $event,
    _base_position,
    nodeObject,
    nodeObject.id,
    this.currentNode
  );
  this.nodeMenuPanelPosition.x = $event.clientX - _base_position.x;
  this.nodeMenuPanelPosition.y = $event.clientY - _base_position.y;
},
完成!!!多多积累,多多收获!