pygame入门
说明
在学习pygame时,主要参考了目光博客的教程。目光博客
原教程是2011年写的,年代比较久远了,使用Python2。我学习时使用python3将代码重新实现了一遍,同时补充了一些细节。相比较原博客,少了一些实例。
一、pygame的安装
pip install pygame安装好后,可以用下面的方法确认有没有安装成功
>>>import pygame
>>>print(pygame.ver)
1.9.3
二、pygame模块概览
三、pygame的“hello world”
#!/usr/bin/env python
# -*- coding:utf-8 -*-

import pygame
from pygame.locals import *
from sys import exit

background_image = 'image/sushiplate.jpg'
mouse_image = 'image/fugu.png'

# 初始化pygame,为使用硬件做准备
pygame.init()
# 创建了一个窗口
screen = pygame.display.set_mode((640, 480), 0, 32)
# 设置窗口标题
pygame.display.set_caption("hello world")

# 加载并转换图像
background = pygame.image.load(background_image).convert()
mouse_cursor = pygame.image.load(mouse_image).convert_alpha()

while True:
    for event in pygame.event.get():
        if event.type == QUIT:  # 接收到退出事件后退出程序
            exit()
    screen.blit(background, (0, 0))  # 画上背景图

    x, y = pygame.mouse.get_pos()  # 获得鼠标位置
    # 计算光标左上角位置
    x -= mouse_cursor.get_width()/2
    y -= mouse_cursor.get_height()/2
    # 画上光标
    screen.blit(mouse_cursor, (x, y))

    # 刷新画面
pygame.display.update()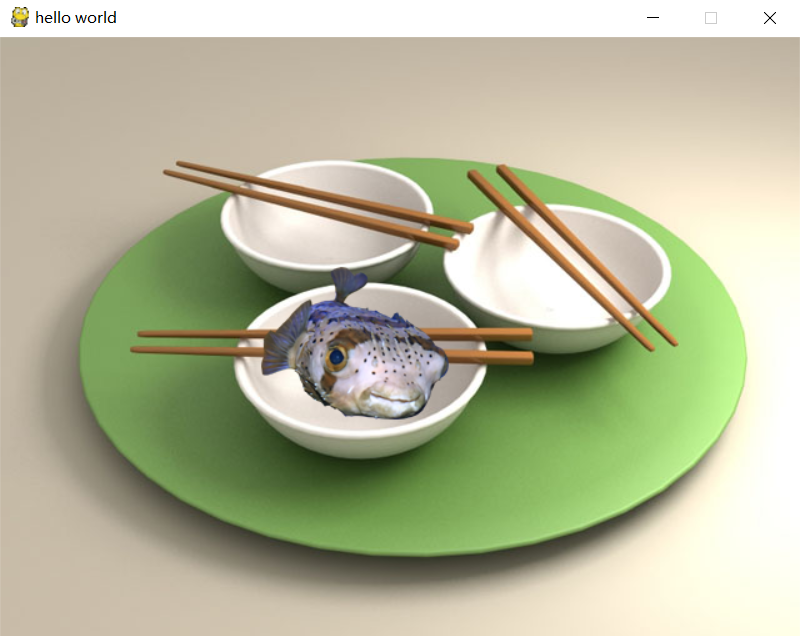 ](https://i.loli.net/2018/01/25/5a6978dd4f545.png)
set_mode:返回一个Surface对象,代表了桌面上出现的窗口。第一个参数代表分辨率;第二个参数是标志位,如果不需要使用热河特性,则指定为0;第三个为色深。
| 标志位 | 功能 |
|---|---|
| FULLSCREEN | 创建一个全屏窗口 (create a fullscreen display) |
| DOUBLEBUF | 创建一个“双缓冲”窗口,建议在HWSURFACE或者OPENGL时使用( recommended for HWSURFACE or OPENGL) |
| HWSURFACE | 创建一个硬件加速的窗口,必须和FULLSCREEN同时使用( hardware accelerated, only in FULLSCREEN) |
| OPENGL | 创建一个OPENGL渲染的窗口 (create an OpenGL-renderable display) |
| RESIZABLE | 创建一个可以改变大小的窗口 (display window should be sizeable) |
| NOFRAME | 创建一个没有边框的窗口 (display window will have no border or controls) |
convert: 将图像转化为Surface对象,每次加载完图像后就要使用这个函数.
convert_alpha:相比convert,保留了Alpha 通道信息(可以简单理解为透明的部分),这样我们的光标才可以是不规则的形状。可以试试不用convert_alpha()生成的效果。
blit:第一个参数为一个Surface对象,第二个为左上角位置。画完以后得用update更新,否则画面一片漆黑。
四、事件
理解事件
我们上一个程序,一直运行直到关闭窗口而产生了一个QUIT事件,Pygame会接受用户的各种操作(比如按键盘,移动鼠标等)产生事件。事件随时可能发生,而且量也可能会很大,Pygame的做法是把一系列的事件存放一个队列里,逐个的处理。
事件检索
上个程序中,使用了pygame.event.get()来处理所有的事件;也可以使用pygame.event.wait(),pygame会等到发生一个时间才继续下去;另外一个方法pygame.event.poll(),一旦调用,它会根据现在的情形返回一个真实的事件,或者一个“什么都没有”。下表是一个常用事件集:
| 事件 | 产生途径 | 参数 |
|---|---|---|
| QUIT | 用户按下关闭按钮 | none |
| ATIVEEVENT | Pygame被激活或者隐藏 | gain, state |
| KEYDOWN | 键盘被按下 | unicode, key, mod |
| KEYUP | 键盘被放开 | key, mod |
| MOUSEMOTION | 鼠标移动 | pos, rel, buttons |
| MOUSEBUTTONDOWN | 鼠标按下 | pos, button |
| MOUSEBUTTONUP | 鼠标放开 | pos, button |
| JOYAXISMOTION | 游戏手柄(Joystick or pad)移动 | joy, axis, value |
| JOYBALLMOTION | 游戏球(Joy ball)?移动 | joy, axis, value |
| JOYHATMOTION | 游戏手柄(Joystick)?移动 | joy, axis, value |
| JOYBUTTONDOWN | 游戏手柄按下 | joy, button |
| JOYBUTTONUP | 游戏手柄放开 | joy, button |
| VIDEORESIZE | Pygame窗口缩放 | size, w, h |
| VIDEOEXPOSE | Pygame窗口部分公开(expose)? | none |
| USEREVENT | 触发了一个用户事件 | code |
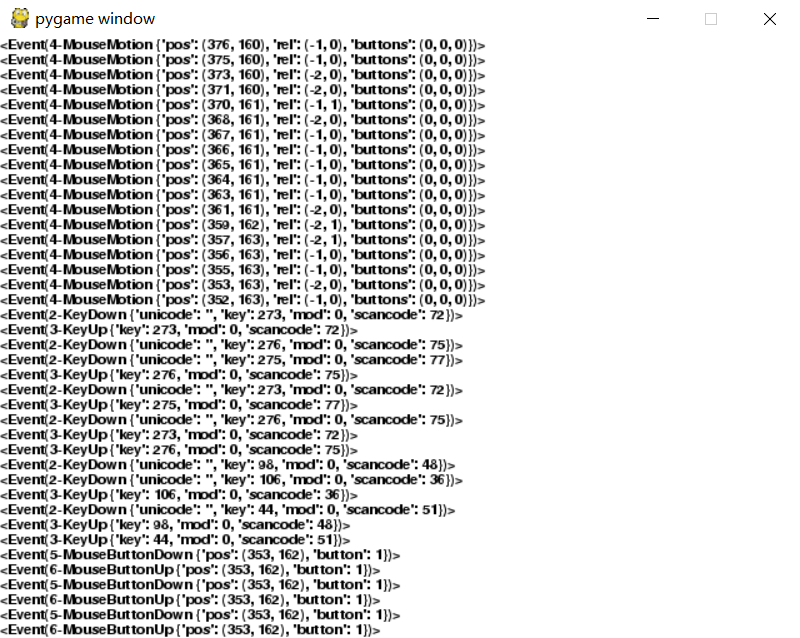
接下来我们写一个把所有发生的事件输出的程序
#!/usr/bin/env python
# -*- coding:utf-8 -*-

import pygame
from pygame.locals import *
from sys import exit

pygame.init()
SCREEN_SIZE = (640, 480)
screen = pygame.display.set_mode(SCREEN_SIZE, 0, 32)

font = pygame.font.SysFont("MicrosoftYaHei", 16)
font_height = font.get_linesize()
event_text = []

while True:
    event = pygame.event.wait()
    event_text.append(str(event))
    # 保证event_text里面只保留一个屏幕的文字
    event_text = event_text[-SCREEN_SIZE[1]//font_height:]

    if event.type == QUIT:
        exit()

    screen.fill((255, 255, 255))

    # 寻找一个合适的起笔位置,最下面开始,留一行的空
    y = SCREEN_SIZE[1] - font_height
    for text in reversed(event_text):
        screen.blit(font.render(text, True, (0, 0, 0)), (0, y))
        y -= font_height
    pygame.display.update()
结果如下,会将发生的事件列出。在程序中使用wait(),因为这个程序只要在有动作时执行就好了。
处理鼠标事件
MOUSEMOTION事件会在鼠标动作的时候发生,它有三个参数:
- buttons – 一个含有三个数字的元组,三个值分别代表左键、中键和右键,1就是按下了。
- pos – 位置
- rel – 代表了现在距离上次产生鼠标事件时的距离
和MOUSEMOTION类似的,我们还有MOUSEBUTTONDOWN和MOUSEBUTTONUP两个事件。它们的参数为:
button – 这个值代表了哪个按键被操作
pos – 位置
处理键盘事件
键盘的事件为KEYDOWN和KEYUP 。
下面这个例子演示的是使用方向键来移动图片。
#!/usr/bin/env python
# -*- coding:utf-8 -*-

import pygame
from pygame.locals import *
from sys import exit

background_image = '../image/sushiplate.jpg'
screen = pygame.display.set_mode((640, 480), 0, 32)
background = pygame.image.load(background_image).convert()

x, y = 0, 0
move_x, move_y = 0, 0
while True:
    for event in pygame.event.get():
        if event.type == QUIT:
            exit()

        if event.type == KEYDOWN:
            if event.key == K_LEFT:
                move_x = -1
            elif event.key == K_RIGHT:
                move_x = 1
            elif event.key == K_UP:
                move_y = -1
            elif event.key == K_DOWN:
                move_y = 1
        elif event.type == KEYUP:
            move_x = 0
            move_y = 0

    x += move_x
    y += move_y

    screen.fill((0, 0, 0))
    screen.blit(background, (x,y))

pygame.display.update()KEYDOWN和KEYUP的参数描述如下:具体描述请点击这里
- key – 按下或者放开的键值,是一个数字,Pygame中可以使用K_xxx来表示,比如字母a就是K_a,还有K_SPACE和K_RETURN等。
- mod – 包含了组合键信息,如果mod & KMOD_CTRL是真的话,表示用户同时按下了Ctrl键。类似的还有KMOD_SHIFT,KMOD_ALT。
- unicode – 代表了按下键的Unicode值
事件过滤
并不是所有的事件都需要处理。我们使用pygame.event.set_blocked(type)来完成。如果有好多事件需要过滤,可以传递一个列表,比如pygame.event.set_blocked([KEYDOWN, KEYUP]),如果你设置参数None,那么所有的事件有被打开了。与之相对的,我们使用pygame.event.set_allowed()来设定允许的事件。
产生事件
通常玩家做什么,Pygame就产生对应的事件就可以了,不过有的时候我们需要模拟出一些事件来,比如录像回放的时候,我们就要把用户的操作再现一遍。
为了产生事件,必须先造一个出来,然后再传递它:
my_event = pygame.event.Event(KEYDOWN, key=K_SPACE, mod=0, unicode=' ')
# 你也可以像下面这样写
my_event = pygame.event.Event(KEYDOWN, {"key":K_SPACE, "mod":0, "unicode":' '})
pygame.event.post(my_event)Event():Event(type, dict) 或者 Event(type, **attributes),
post(): 把新的事件放在事件队列的最后。
也可以产生一个完全自定义的全新事件。
import pygame
from pygame.locals import *

pygame.init()

my_event = pygame.event.Event(KEYDOWN, key=K_SPACE, mod=0, unicode=' ')
# my_event = pygame.event.Event(KEYDOWN,{"key":K_SPACE, "mod":0, "unicode":' '})
pygame.event.post(my_event)

###############
# 产生一个自定义的全新事件
CATONKEYBOARD = USEREVENT + 1
my_event = pygame.event.Event(CATONKEYBOARD, message="bad act!")
pygame.event.post(my_event)
# 获得这个事件
for event in pygame.event.get():
    if event.type == CATONKEYBOARD:
        print( event.message)
五、显示
全屏显示
在第一个例子“hello world”中,使用了如下语句
screen = pygame.display.set_mode((640, 480), 0, 32)如果把第二个参数设置成FULLSCREEN,就会得到一个全屏显示的窗口。
在全屏模式下,显卡可能就切换了一种模式,你可以用如下代码获得您的机器支持的显示模式
>>> import pygame
>>> pygame.init()
>>> pygame.display.list_modes()
接下来这个程序,按“f键实现全屏和窗口之间的切换。
#!/usr/bin/env python
# -*- coding:utf-8 -*-

import pygame
from pygame.locals import *
from sys import exit

background_image = '../image/sushiplate.jpg'

pygame.init()
screen = pygame.display.set_mode((640, 480), 0, 32)
background = pygame.image.load(background_image).convert()

Fullscreen = False

while True:

    for event in pygame.event.get():
        if event.type == QUIT:
            exit()
        if event.type == KEYDOWN:
            if event.key == K_f:
                Fullscreen = not Fullscreen
                if Fullscreen:
                    screen = pygame.display.set_mode((640, 480), FULLSCREEN, 32)
                else:
                    screen = pygame.display.set_mode((640, 480), 0, 32)

    screen.blit(background, (0, 0))
    pygame.display.update()
改变窗口尺寸
pygame的默认显示窗口是不支持拖动边框改变大小的,改变set_mode函数的参数后可以实现。
screen = pygame.display.set_mode(SCREEN_SIZE, RESIZABLE, 32)#!/usr/bin/env python
# -*- coding:utf-8 -*-
import pygame
from pygame.locals import *
from sys import exit
background_image = '../image/sushiplate.jpg'
SCREEN_SIZE = (640, 480)
pygame.init()
screen = pygame.display.set_mode(SCREEN_SIZE, RESIZABLE, 32)
background = pygame.image.load(background_image).convert()
while True:
event = pygame.event.wait()
if event.type == QUIT:
exit()
if event.type == VIDEORESIZE:
SCREEN_SIZE = event.size
screen = pygame.display.set_mode(SCREEN_SIZE, RESIZABLE, 32)
pygame.display.set_caption("Window resized to " + str(event.size))
# 这里需要重新填满窗口
screen_width, screen_height = SCREEN_SIZE
for y in range(0, screen_height, background.get_height()):
for x in range(0, screen_width, background.get_width()):
screen.blit(background, (x, y))
pygame.display.update()VIDEORESIZE 事件,它包含如下内容:
- size — 一个二维元组,值为更改后的窗口尺寸,size[0]为宽,size[1]为高
- w — 宽
- h — 高
复合模式
screen = pygame.display.set_mode(SCREEN_SIZE, HWSURFACE | FULLSCREEN, 32)其他
当使用OPENGL时,不能使用pygame.display.update()来更新窗口,而是pygame.display.flip()。
flip和update的说明如下:


六、字体
创建font对象
Pygame可以直接调用系统字体,或者也可以使用TTF字体。
SysFont(name, size, bold=False, italic=False)
my_font = pygame.font.SysFont("arial", 16)第一个参数是字体名,第二个是大小。该函数返回一个系统字体,这个字体与“bold”和“italic”两个flag相匹配。如果找不到,就会使用pygame的默认字体。可以使用pygame.font.get_fonts()来获得当前系统所有可用字体。
Font(filename, size) 或者Font(object, size)
my_font = pygame.font.Font("simsun.ttf", 16)使用这个方法,需要把字体文件随同游戏一起发送,这样可以避免使用者机器上没有所需的字体
使用字体
render(text, antialias, color, background=None)
text_surface = my_font.render("Pygame is cool!", True, (0,0,0), (255, 255, 255))第一个参数文字;第二个参数是个布尔值,表示是否开启抗锯齿,如果为True,字体会比较平滑,不过相应的速度有一点点影响;第三个参数是字体的颜色;第四个是背景色,如果你想没有背景色(也就是透明),就不加这第四个参数。
中文字体
下面这个例子演示了用pygame书写中文
#!/usr/bin/env python
# -*- coding:utf-8 -*-

import pygame
from pygame.locals import *
from sys import exit

pygame.init()
screen = pygame.display.set_mode((640, 480), 0, 32)

background_image = 'image/sushiplate.jpg'
background = pygame.image.load(background_image).convert()

# 以下两种方法都可以,第一种需要把字体文件复制到代码文件目录下
font = pygame.font.Font("simsun.ttc", 40)
# font = pygame.font.SysFont("simsunnsimsun", 40)

text_surface = font.render("你好", True, (0, 0, 255))

x = 0
y = (480 - text_surface.get_height())/2

while True:
    for event in pygame.event.get():
        if event.type == QUIT:
            exit()
    screen.blit(background, (0, 0))

    x -= 1
    if x < -text_surface.get_width():
        x = 640 - text_surface.get_width()

    screen.blit(text_surface, (x, y))

    pygame.display.update()
七、颜色
一般的32位RGB,每个像素可以显示16.7百万种颜色。
第一个例子,可以生成所有的颜色。
#!/usr/bin/env python
# -*- coding:utf-8 -*-

import pygame

pygame.init()

screen = pygame.display.set_mode((640, 480))
all_colors = pygame.Surface((4096, 4096), depth=24)

for r in range(256):
    print(r + 1, "out of 256")
    x = (r & 15) * 256
    y = (r >> 4) * 256
    for g in range(256):
        for b in range(256):
            all_colors.set_at((x + g, y + b), (r, g, b))

pygame.image.save(all_colors, "allcolors.bmp")
第二个例子,用鼠标移动三个点,代表三原色的值,下方是三原色混合得到的结果。
#!/usr/bin/env python
# -*- coding:utf-8 -*-

import pygame
from pygame.locals import *
from sys import exit

pygame.init()

screen = pygame.display.set_mode((640, 480), 0, 32)

def create_scales(height):
    red_scale_surface = pygame.surface.Surface((640, height))
    green_scale_surface = pygame.surface.Surface((640, height))
    blue_scale_surface = pygame.surface.Surface((640, height))
    for x in range(640):
        c = int((x / 640) * 255)
        red = (c, 0, 0)
        green = (0, c, 0)
        blue = (0, 0, c)
        line_rect = Rect(x, 0, 1, height)
        pygame.draw.rect(red_scale_surface, red, line_rect)
        pygame.draw.rect(green_scale_surface, green, line_rect)
        pygame.draw.rect(blue_scale_surface, blue, line_rect)
    return red_scale_surface, green_scale_surface, blue_scale_surface


red_scale, green_scale, blue_scale = create_scales(80)

color = [127, 127, 127]

while True:
    for event in pygame.event.get():
        if event.type == QUIT:
            exit()

    screen.fill((0, 0, 0))

    screen.blit(red_scale, (0, 0))
    screen.blit(green_scale, (0, 80))
    screen.blit(blue_scale, (0, 160))

    x, y = pygame.mouse.get_pos()

    if pygame.mouse.get_pressed()[0]:
        for component in range(3):
            if y > component * 80 and y < (component + 1) * 80:
                color[component] = int((x / 639) * 255)
        pygame.display.set_caption("PyGame Color Test - " + str(tuple(color)))

    for component in range(3):
        pos = (int((color[component] / 255) * 639), component * 80 + 40)
        pygame.draw.circle(screen, (255, 255, 255), pos, 20)

    pygame.draw.rect(screen, tuple(color), (0, 240, 640, 240))

    pygame.display.update()
八、图像
使用Surface对象
加载图片用pygame.image.load,返回一个Surface对象。事实上,屏幕也只是一个surface对象,pygame.display.set_mode返回一个屏幕的surface对象。
创建Surface对象
除了上面说的pygame.image.load外,还可以指定尺寸创建一个空的surface。
>>> a = pygame.Surface((256,256))这个Surface对象是全黑的。除了大小外,Surface函数还有flags和depth两个参数。
- HWSURFACE – creates the image in video memory
- SRCALPHA – the pixel format will include a per-pixel alpha。创建有Alpha通道的surface,选择这个选项需要depth为32。
alpha_surface = pygame.Surface((256,256), flags=SRCALPHA, depth=32)转换Surfaces
convert(): Creates a new copy of the Surface with the pixel format changed. 当一个surface多次使用blit时,最好使用convert。转换后的surface没有alpha。
convert_alpha(): change the pixel format of an image including per pixel alphas.
矩形对象(Rectangle Objects)
pygame中有Rect类,用来存储和处理矩形对象(包含在pygame.locals)中。
Rect(left, top, width, height)
Rect((left, top), (width, height))
有了Rect对象之后,可以对其做很多操作,例如调整大小、位置,判断一个点是否在其中等。
剪裁(Clipping)
surface中有裁剪区域(clip area),是一个矩形,定义了哪部分会被绘制,即若定义了这个区域,只有这个区域内的像素会被修改。
set_clip(screen_rect=None): 设定区域,当参数为None时,重置。一个surface对象默认的剪裁区域为这个surface。
get_clip() : 得到剪裁区域,返回一个Rect对象。
子表面(Subsurfaces)
Subsurfaces是在一个surface中再提取出一个surface。当在subsurface上操作时,同时也向父表面上操作。这可以用来绘制图形文字,比如吧文字变成多种颜色。把整张图读入后,用subsurface将每个字分隔开。
my_font_image = Pygame.load("font.png")
letters = []
letters["a"] = my_font_image.subsurface((0,0), (80,80))
letters["b"] = my_font_image.subsurface((80,0), (80,80))
填充Surface
fill(color, rect=None, special_flags=0)
当rect参数为默认参数时,整个surface都会被填充。color参数可以为RGB或者RGBA。如果使用RGBA,除非surface有alpha通道(使用了SRCALPHA flag),否则RGBA的Alpha会被忽略。
设置Surface的像素
set_at((x, y), Color) : 设置单个像素的颜色
get_at((x, y)) : 得到单个像素的颜色
锁定Surface
当对像素进行读或写操作时,surface会被锁定。一个锁定的surface,经常不能被显示或被pygame操作,所以除非必要,在手动lock之后不要忘了unlock。
所有pygame的函数如过需要锁定和解锁,这些操作时自动发生的。如果不想发生自动的lock和unlock(有些时候为了提高效率),可以在一些会造成自动锁定和解锁的语句前后注释掉这两句。
import pygame
from pygame.locals import *
from sys import exit
from random import randint

pygame.init()
screen = pygame.display.set_mode((640, 480), 0, 32)

while True:
    for event in pygame.event.get():
        if event.type == QUIT:
            exit()

    rand_col = (randint(0, 255), randint(0, 255), randint(0, 255))

    # screen.lock)()
    for _ in range(100):
        rand_pos = (randint(0, 639), randint(0, 479))
        screen.set_at(rand_pos, rand_col)
    # screen.unlock()
    pygame.display.update()
blit
blit(source, dest, area=None, special_flags = 0)
将源图像画到目标位置,dest可以为一个点,也可以是一个矩形,但只有矩形的左上角会被使用,矩形的大小不会造成影响。
area参数可以指定源图像中的一部分被画到目标位置。
九、绘制各种图形
pygame使用pygame.draw来绘制图形。其包含以下几种函数。
| 函数 | 作用 | 用法 |
|---|---|---|
| rect | 绘制矩形 | rect(Surface, color, Rect, width=0) |
| polygon | 绘制多边形 | polygon(Surface, color, pointlist, width=0) |
| circle | 绘制圆 | circle(Surface, color, pos, radius, width=0) |
| ellipse | 绘制椭圆 | ellipse(Surface, color, Rect, width=0) |
| arc | 绘制圆弧 | arc(Surface, color, Rect, start_angle, stop_angle, width=1) |
| line | 绘制线 | line(Surface, color, start_pos, end_pos, width=1) |
| lines | 绘制一系列的线 | lines(Surface, color, closed, pointlist, width=1) |
| aaline | 绘制一根平滑的线 | aaline(Surface, color, startpos, endpos, blend=1) |
| aalines | 绘制一系列平滑的线 | aalines(Surface, color, closed, pointlist, blend=1) |
一些说明
width参数:width参数为0或省略,则填充。
画填充的矩形,有另一个方法Surface.fill(),事实上,这种方法速度更快。
- lines函数的closed为一个布尔变量,如果closed为真,则会画一条连接第一个和最后一个点的线,是整个图形闭合。
十、运动
直线运动
下面这个程序让“hello world”程序中的鱼动起来。
#!/usr/bin/env python
# -*- coding:utf-8 -*-

import pygame
from pygame.locals import *
from sys import exit

background_image = '../image/sushiplate.jpg'
sprite_image = '../image/fugu.png'

pygame.init()

screen = pygame.display.set_mode((640, 480), 0, 32)
background = pygame.image.load(background_image).convert()
sprite = pygame.image.load(sprite_image)

# sprite的起始坐标
x = 0

while True:
    for event in pygame.event.get():
        if event.type == QUIT:
            exit()

    screen.blit(background, (0, 0))
    screen.blit(sprite, (x, 100))
    x += 1

    if x>640:
        x = 0

    pygame.display.update()
时间
在上面的程序中,帧率是很高的。而且电脑的性能不同,鱼的速度就会不同,如果动画的的元素很多,速度就会下降。
为了解决这个问题,可以使用pygame的时间模块。
clock = pygame.time.Clock()
time_passed = clock.tick()
time_passed = clock.tick(30)
第一行初始化了一个Clock对象。第二行返回了距上一次调用这个函数,过去了多长时间(注意,得到的值是以毫秒为单位的)。第三行,在函数中添加了framerate参数,这个函数会延时使得游戏的帧率不会超过给定值。
给定的值仅仅是最大帧率,当动作复杂或机器性能不足时,实际帧率无法达到这个值,需要一种手段控制动画效果。比如给吾提一个恒定的速度,再通过时间,计算出移动的距离。
#!/usr/bin/env python
# -*- coding:utf-8 -*-

import pygame
from pygame.locals import *
from sys import exit

background_image = '../image/sushiplate.jpg'
sprite_image = '../image/fugu.png'

pygame.init()

screen = pygame.display.set_mode((640, 480), 0, 32)
background = pygame.image.load(background_image).convert()
sprite = pygame.image.load(sprite_image)

# clock对象
clock = pygame.time.Clock()

x = 0
speed = 250

while True:
    for event in pygame.event.get():
        if event.type == QUIT:
            exit()

    screen.blit(background, (0, 0))
    screen.blit(sprite, (x, 100))

    time_passed = clock.tick()
    time_passed_seconds = time_passed/1000

    distance_moved = time_passed_seconds * speed
    x += distance_moved

    if x > 640:
        x -= 640

    pygame.display.update()
斜线运动
接下来这个程序,使得物体斜线运动并且触边反弹。
#!/usr/bin/env python
# -*- coding:utf-8 -*-

import pygame
from pygame.locals import *
from sys import exit

background_image = '../image/sushiplate.jpg'
sprite_image = '../image/fugu.png'

pygame.init()

screen = pygame.display.set_mode((640, 480), 0, 32)
background = pygame.image.load(background_image).convert()
sprite = pygame.image.load(sprite_image)

clock = pygame.time.Clock()
x, y = 100, 100
speed_x, speed_y = 133, 170

while True:
    for event in pygame.event.get():
        if event.type == QUIT:
            exit()

    screen.blit(background, (0, 0))
    screen.blit(sprite, (x, y))

    time_passed = clock.tick(30)
    time_passed_seconds = time_passed/1000
    x += speed_x * time_passed_seconds
    y += speed_y * time_passed_seconds

    # 到达边界后速度反向
    if x > 640 - sprite.get_width():
        speed_x = -speed_x
        x = 640 - sprite.get_width()
    elif x < 0:
        speed_x = -speed_x
        x = 0

    if y > 480 - sprite.get_height():
        speed_y = -speed_y
        y = 480 - sprite.get_height()
    elif y < 0:
        speed_y = -speed_y
        y = 0

    pygame.display.update()
向量
下面这个例子,使用向量代替之前的x和y的计算,实现了鱼在鼠标周围游动的效果。
使用向量类来存储和计算向量。
#!/usr/bin/env python
# -*- coding:utf-8 -*-

import pygame
from pygame.locals import *
from sys import exit
from vector import Vec2d

background_image = '../image/sushiplate.jpg'
sprite_image = '../image/fugu.png'

pygame.init()

screen = pygame.display.set_mode((640, 480), 0, 32)
background = pygame.image.load(background_image).convert()
sprite = pygame.image.load(sprite_image)

clock = pygame.time.Clock()

position = Vec2d(100, 100)
heading = Vec2d((0, 0))

while True:
    for event in pygame.event.get():
        if event.type == QUIT:
            exit()

    screen.blit(background, (0, 0))
    screen.blit(sprite, position)

    time_passed = clock.tick(30)
    time_passed_seconds = time_passed/1000

    # 在参数前面加*意味着把列表或元组展开
    destination = Vec2d(*pygame.mouse.get_pos()) - Vec2d(*sprite.get_size())/2
    # 计算当鱼儿当前位置到鼠标位置的向量
    vector_to_mouse = Vec2d.__sub__(destination, position)
    vector_to_mouse.normalized()

    # heading可以看做是鱼的速度,鱼的速度大小、方向不断改变
    heading = heading + (vector_to_mouse * 0.1)
    position += heading * time_passed_seconds

    pygame.display.update()
十一、用户输入
键盘输入
在之前的例子中使用过键盘输入,使用pygame.event.get()获取所有事件,当event.type==KEYDOWN时,再判断event.key的种类。也可以使用pygame.key.get_pressed()来获取所有按下的键值,它会返回一个元组,这个元祖的索引就是键值,对应的值为True就是按下。
但是,如果要处理文本输入,这个函数不是正确的方法。因为我们不知道按键被按下的顺序。
key模块下还有如下的函数:
key.get_focused —— 返回当前的pygame窗口是否激活
key.get_mods —— 按下的组合键(Alt, Ctrl, Shift)
if pygame.key.get_mods() & KMOD_SHIFT:key.set_mods —— 你也可以模拟按下组合键的效果(KMOD_ALT, KMOD_CTRL, KMOD_SHIFT)
key.set_repeat —— 参数为(delay,interval)。当有参数时,即repeat被激活时,被按住的键会产生多次KEYDOWN事件。第一次发送KEYDOWN事件后,经过delay时间(ms)发送第二次,然后每隔interval时间(ms)发送一次事件。如果没有参数,不产生重复按键事件。当pygame初始化之后,重复按键默认为disabled
key.name —— 接受键值返回键名
使用键盘控制方向
下面这个例子使用ASDW控制方向。
#!/usr/bin/env python
# -*- coding:utf-8 -*-

import pygame
from pygame.locals import *
from sys import exit
from vector import Vec2d

background_image = '../image/sushiplate.jpg'
sprite_image = '../image/fugu.png'

pygame.init()

screen = pygame.display.set_mode((640, 480), 0, 32)
background = pygame.image.load(background_image).convert()
sprite = pygame.image.load(sprite_image)
clock = pygame.time.Clock()
sprite_pos = Vec2d(200, 150)
sprite_speed = 300

while True:
    for event in pygame.event.get():
        if event.type == QUIT:
            exit()

    pressed_keys = pygame.key.get_pressed()
    key_direction = Vec2d(0, 0)
    if pressed_keys[K_LEFT]:
        key_direction.x = -1
    elif pressed_keys[K_RIGHT]:
        key_direction.x = +1
    if pressed_keys[K_UP]:
        key_direction.y = -1
    elif pressed_keys[K_DOWN]:
        key_direction.y = +1
    key_direction.normalized()

    screen.blit(background, (0, 0))
    screen.blit(sprite, sprite_pos)

    time_passed = clock.tick(30)
    time_passed_seconds = time_passed/1000
    sprite_pos += key_direction * sprite_speed * time_passed_seconds

    pygame.display.update()
接下来这个例子,使鱼做到全方位移动。先转向,再移动。
#!/usr/bin/env python
# -*- coding:utf-8 -*-

import pygame
from pygame.locals import *
from sys import exit
from vector import Vec2d
from math import *

background_image = '../image/sushiplate.jpg'
sprite_image = '../image/fugu.png'

pygame.init()

screen = pygame.display.set_mode((640, 480), 0, 32)
background = pygame.image.load(background_image).convert()
sprite = pygame.image.load(sprite_image)
clock = pygame.time.Clock()
sprite_pos = Vec2d(200, 150)
sprite_speed = 300
sprite_rotation = 0
sprite_rotation_speed = 360

while True:
    for event in pygame.event.get():
        if event.type == QUIT:
            exit()
    pressed_keys = pygame.key.get_pressed()
    rotation_direction = 0
    movement_direction = 0

    # 更改角度
    if pressed_keys[K_LEFT]:
        rotation_direction = +1
    elif pressed_keys[K_RIGHT]:
        rotation_direction = -1
    # 前进、后退
    if pressed_keys[K_UP]:
        movement_direction = +1.
    if pressed_keys[K_DOWN]:
        movement_direction = -1.

    screen.blit(background, (0, 0))
    # 将鱼转向
    rotated_sprite = pygame.transform.rotate(sprite, sprite_rotation)
    # 转向后,图片的长宽会变化,因为图片永远是矩形,为了放得下一个转向后的矩形,外接的矩形势必会比较大
    w, h = rotated_sprite.get_size()
    sprite_draw_pos = Vec2d(sprite_pos.x - w / 2, sprite_pos.y - h / 2)
    screen.blit(rotated_sprite, sprite_draw_pos)

    time_passed = clock.tick(30)
    time_passed_seconds = time_passed/1000

    # 图片的转向速度也通过时间来
    控制
    sprite_rotation += rotation_direction * sprite_rotation_speed * time_passed_seconds

    # 获得前进(x方向和y方向)
    heading_x = sin(sprite_rotation * pi / 180)
    heading_y = cos(sprite_rotation * pi / 180)
    # 转换为单位速度向量
    heading = Vec2d(heading_x, heading_y)
    # 转换为速度
    heading *= movement_direction
    sprite_pos += heading * sprite_speed * time_passed_seconds

    pygame.display.update()
鼠标控制
我们可以从MOUSEMOTION和pygame.mouse.get_pos()获得鼠标坐标。我们可以使用这个坐标来控制方向,如使用鼠标的偏移量来控制视角。在接下来的这个例子中,使用鼠标左右移动来转动鱼。
#!/usr/bin/env python
# -*- coding:utf-8 -*-

import pygame
from pygame.locals import *
from sys import exit
from vector import Vec2d
from math import *

background_image = '../image/sushiplate.jpg'
sprite_image = '../image/fugu.png'

pygame.init()

screen = pygame.display.set_mode((640, 480), 0, 32)
background = pygame.image.load(background_image).convert()
sprite = pygame.image.load(sprite_image)
clock = pygame.time.Clock()

pygame.mouse.set_visible(False)
# 使所有的输入都锁定在这个程序中
pygame.event.set_grab(True)

sprite_pos = Vec2d(200, 150)
sprite_speed = 300
sprite_rotation = 0
sprite_rotation_speed = 360

while True:
    for event in pygame.event.get():
        if event.type == QUIT:
            exit()
        # 按Esc,退出游戏
        if event.type == KEYDOWN:
            if event.key == K_ESCAPE:
                exit()

    pressed_keys = pygame.key.get_pressed()
    pressed_mouse = pygame.mouse.get_pressed()

    rotation_direction = 0
    movement_direction = 0
    # 得到鼠标的偏移量(x, y)
    rotation_direction = pygame.mouse.get_rel()[0]/5

    if pressed_keys[K_LEFT]:
        rotation_direction = -1
    elif pressed_keys[K_RIGHT]:
        rotation_direction = +1
    if pressed_keys[K_UP] or pressed_mouse[0]:
        movement_direction = -1
    if pressed_keys[K_DOWN] or pressed_mouse[2]:
        movement_direction = +1

    screen.blit(background, (0, 0))
    rotated_sprite = pygame.transform.rotate(sprite, sprite_rotation)
    w, h = rotated_sprite.get_size()
    sprite_draw_pos = Vec2d(sprite_pos.x - w / 2, sprite_pos.y - h / 2)
    screen.blit(rotated_sprite, sprite_draw_pos)

    time_passed = clock.tick(30)
    time_passed_seconds = time_passed/1000

    sprite_rotation += rotation_direction * sprite_rotation_speed * time_passed_seconds

    heading_x = sin(sprite_rotation * pi / 180)
    heading_y = cos(sprite_rotation * pi / 180)
    heading = Vec2d(heading_x, heading_y)
    heading *= movement_direction

    sprite_pos += heading * sprite_speed * time_passed_seconds

    pygame.display.update()
pygame.mouse的函数:
pygame.mouse.get_pressed —— 返回按键按下情况,返回的是一元组,分别为(左键, 中键, 右键),如按下则为True
pygame.mouse.get_rel —— 返回相对偏移量,(x方向, y方向)的一元组
pygame.mouse.get_pos —— 返回当前鼠标位置(x, y)
pygame.mouse.set_pos —— 设置鼠标位置
pygame.mouse.set_visible —— 设置鼠标光标是否可见
pygame.mouse.get_focused —— 检查窗口是否接受鼠标事件,即鼠标是否focus到窗口
pygame.mouse.set_cursor —— 设置鼠标光标式样
pyGame.mouse.get_cursor ——得到鼠标图片
版本信息
1.0 20180209