0.项目概述
项目实现了将两张图片基于OpenCvSharp进行基本的的图像简单拼接,并在picturebox上显示结果,最后将图片保存到本地磁盘。
源代码及测试图片:https://download.csdn.net/download/sunsoldeir1/86738201

1基础步骤和界面设计
参考之前博客:https://blog.csdn.net/sunsoldeir1/article/details/126073489
1.1引用using OpenCvSharp;using OpenCvSharp.Extensions;
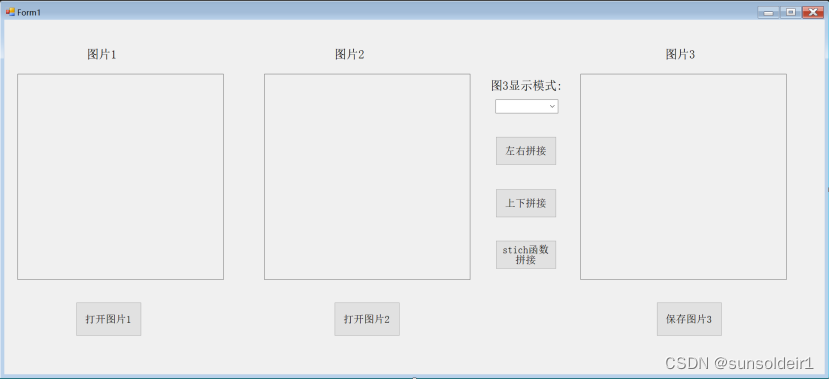
1.2将Picturebox、Label、Button、ComBobox等控件进行布局、改名、调整形状和字体,形成如下界面:
2功能实现
2.1初始化变量
        Mat Img1;//用 Mat类定义图片1
        Mat Img2;//用 Mat类定义图片2
        Mat Img3;//用 Mat类定义图片3
        Bitmap bitmap;//Bitmap类定义picturebox3要显示的图片
2.2打开图片
分别双击:两个Button控件

在button1_Click的中部署以下代码,实现点击“打开图片1”后在Picturebox1中显示图片1:
  private void button1_Click(object sender, EventArgs e)
        {


            OpenFileDialog file = new OpenFileDialog();//OpenFileDialog是一个类,实例化此类可以设置弹出一个文件对话框
            file.Filter = "JPG(*.JPG;*.JPEG);PNG文件(*.PNG);bmp文件(*.BMP);gif文件(*.GIF)|*.jpg;*.jpeg;*.png;*.bmp;*.gif";//文件类型过滤,只可选择图片的类型
            file.ShowDialog();//显示通用对话框
            string pathname;//定义图片打开路径
            if (file.FileName != string.Empty)
            {


                try
                {


                    pathname = file.FileName;
                    Img1 = Cv2.ImRead(pathname);//读取路径下的图片
                    pictureBox1.Load(pathname); //pictureBox1直接加载
                }
                catch (Exception ex)
                {


                    MessageBox.Show(ex.Message);
                }
            }
        }
2.3选择图3显示模式
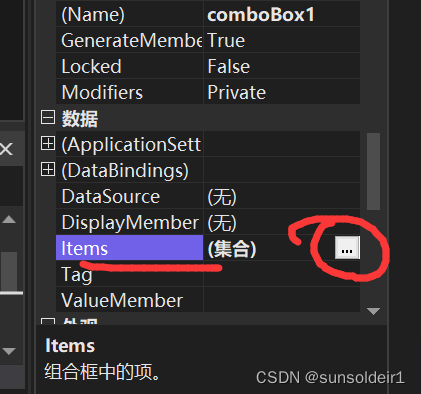
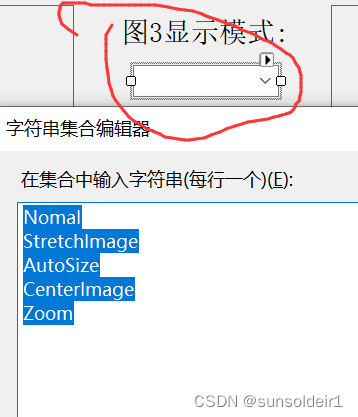
左键点击combobox1控件,在“数据”的“Items”中点击省略号的按钮,打开字符串集合编辑器,换行输入:Nomal、StretchImage、AutoSize、CenterImage、Zoom,然后点击“确认”。
注:Normal(常规模式)
StretchImage(完全填充)、AutoSize(正常大小显示)、CenterImage(显示图像的中心部分)、Zoom(缩小或放大完全显示)
不改变图片大小,原始图片多大,显示就多大。
StretchImage、Zoom都会改变图片大小以适应picturebox,但是zoom感觉会被调整的更小
AutoSize 则是控件适应图片大小
CenterImage则是控件显示图片中部内容
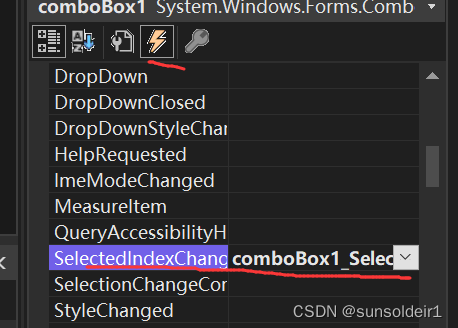
在comboBox1_SelectedIndexChanged设置选择点击combobox1控件后所触发函数
 private void comboBox1_SelectedIndexChanged(object sender, EventArgs e)
        {


            pictureBox3.SizeMode = (PictureBoxSizeMode)comboBox1.SelectedIndex;
            //将 pictureBox3的SizeMode设置为comboBox1选择标签的ID
            }
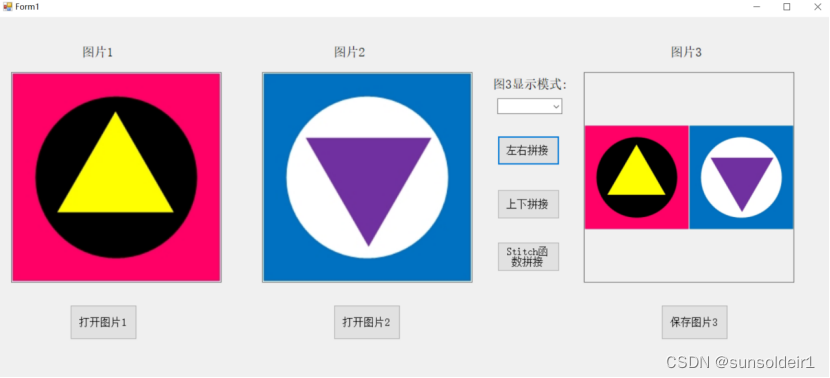
2.4左右拼接
双击“左右拼接运算”的button,首先要判断“图片1”、“图片2”是否加载图片,以及两图的高度或行数是否进行相等,如果不相等则返回,并进行信息提示。
 if (pictureBox1.Image == null || pictureBox2.Image == null )//判断图片或下拉栏目是否为空
            {


                MessageBox.Show("没有打开图片1或打开图片2或选择运算符");
                return;
            }
            else
            {


                if (Img1.Rows== Img2.Rows)
                {


                    Cv2.HConcat(Img1, Img2, Img3);
                }

                else
                {


                    MessageBox.Show("图片1和图片2要有相同的长度");
                    return;
                }


                bitmap = BitmapConverter.ToBitmap(Img3); //把Mat格式的图片转换成Bitmap
                pictureBox3.Image = bitmap;

            }
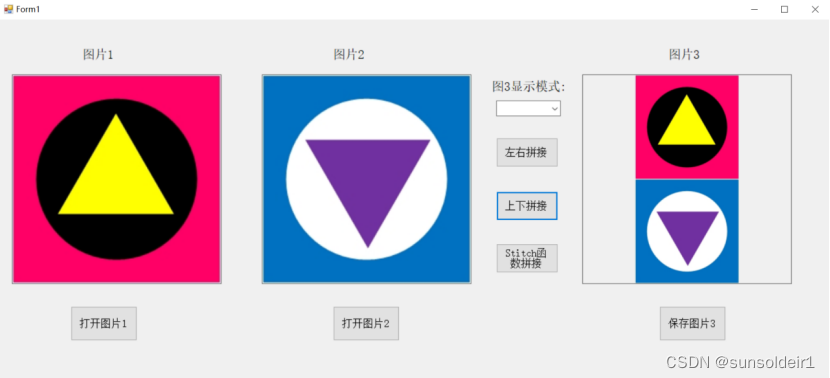
2.5上下拼接
双击“左右拼接运算”的button,首先要判断“图片1”、“图片2”是否加载图片,以及两图的宽度或列数是否进行相等,如果不相等则返回,并进行信息提示。
if (pictureBox1.Image == null || pictureBox2.Image == null)//判断图片或下拉栏目是否为空
{
MessageBox.Show(“没有打开图片1或打开图片2或选择运算符”);
return;
}
else
{
            if (Img1.Cols == Img2.Cols)
            {

                Cv2.VConcat(Img1, Img2, Img3);
            }

            else
            {
                MessageBox.Show("图片1和图片2要有相同的宽度");
                return;
            }


            bitmap = BitmapConverter.ToBitmap(Img3); //把Mat格式的图片转换成Bitmap
            pictureBox3.Image = bitmap;
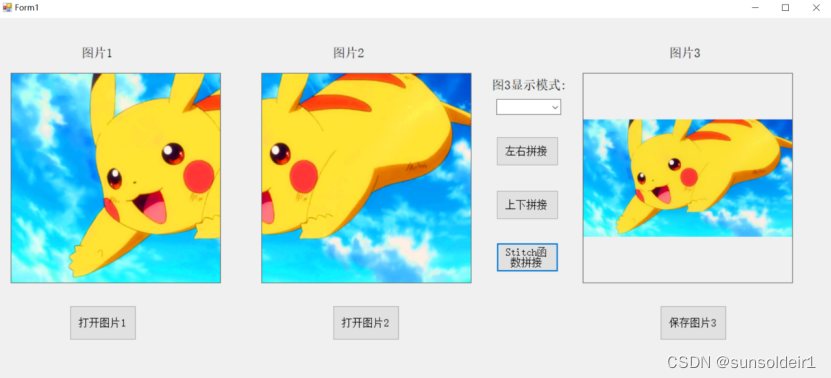
2.6Stitch函数拼接
双击“Stitch函数拼接”的button,首先要判断“图片1”、“图片2”是否加载图片,之后判断Stitch是否执行成功若无则返回,并进行信息提示。
Mat[] images = new Mat[] {

     Img1, Img2 };
            Stitcher stitcher = Stitcher.Create(Stitcher.Mode.Scans);
            Mat pano = new Mat();
            var status = stitcher.Stitch(images, pano);
            if (status != Stitcher.Status.OK)
            {


                MessageBox.Show("失败:" + status.ToString());
                return;
            }
            else
            {


                bitmap = BitmapConverter.ToBitmap(pano); //把Mat格式的图片转换成Bitmap
                pictureBox3.Image = bitmap;

            }
2.7图片保存
使用SaveFileDialog类实现。
 private void button3_Click(object sender, EventArgs e)
        {


            SaveFileDialog saveImageDialog = new SaveFileDialog();
            saveImageDialog.Title = "图片保存";
            saveImageDialog.Filter = "jpg图片|*.JPG|gif图片|*.GIF|png图片|*.PNG|jpeg图片|*.JPEG|BMP图片|*.BMP";//文件类型过滤,只可选择图片的类型
            saveImageDialog.FilterIndex = 1;//设置默认文件类型显示顺序
            saveImageDialog.FileName = "图片保存"; //设置默认文件名,可为空
            saveImageDialog.RestoreDirectory = true; //OpenFileDialog与SaveFileDialog都有RestoreDirectory属性,这个属性默认是false,打开一个文件后,那么系统默认目录就会指向刚才打开的文件。如果设为true就会使用系统默认目录
            if (saveImageDialog.ShowDialog() == DialogResult.OK)
            {


                string fileName = saveImageDialog.FileName.ToString();
                if (fileName != "" && fileName != null)
                {


                    string fileExtName = fileName.Substring(fileName.LastIndexOf(".") + 1).ToString();
                    System.Drawing.Imaging.ImageFormat imgformat = null;
                    if (fileExtName != "")
                    {


                        switch (fileExtName)
                        {


                            case "jpg":
                                imgformat = System.Drawing.Imaging.ImageFormat.Jpeg;
                                break;
                            case "png":
                                imgformat = System.Drawing.Imaging.ImageFormat.Png;
                                break;
                            case "gif":
                                imgformat = System.Drawing.Imaging.ImageFormat.Gif;
                                break;
                            case "bmp":
                                imgformat = System.Drawing.Imaging.ImageFormat.Bmp;
                                break;
                            default:
                                imgformat = System.Drawing.Imaging.ImageFormat.Jpeg;
                                break;
                        }
                        try
                        {


                            MessageBox.Show("保存路径:" + fileName, "提示", MessageBoxButtons.OK, MessageBoxIcon.Information);
                            pictureBox3.Image.Save(fileName, imgformat);
                        }
                        catch
                        {


                            MessageBox.Show("图片保存失败!");
                        }
                    }
                }
            }
        }