Jpress简介:
JPress 是一个使用 Java 开发的、开源免费的建站神器,灵感来源于 WordPress,目前已经有超过 10w+ 的网站使用 JPress 搭建,其中包括多个政府机构,200+上市公司,中科院、红十字会等。
系统整体比较整洁,干净,上手挺不错的。
环境说明:
系统:Linux CentOS_7.5
MySQL:二进制包,8.0.27版本
Tomcat:9.0.62版本
JDK:8u331版本
Jpress:4.1.4
开始搭建
下载并配置MySQL
这里使用清华源镜像:
下载和配置MySQL的详细参考:二进制包安装mysql(5.7,8.0)通用版_让我三行代码的博客-CSDN博客
1、下载MySQL
[root@zhengbo976 ~]# yum install -y wget [root@zhengbo976 ~]# wget https://mirrors.tuna.tsinghua.edu.cn/mysql/downloads/MySQL-8.0/mysql-8.0.27-linux-glibc2.12-x86_64.tar.xz --no-check-certificate
2、解压MySQL,这里需要说明一下:由于下载下来的是个tar.xz(和tar.gz不同)包,因此需要先用xz命令将xz部分解压掉,然后再用tar命令将tar包解压
[root@zhengbo976 ~]# xz -d mysql-8.0.27-linux-glibc2.12-x86_64.tar.xz [root@zhengbo976 ~]# tar xvf mysql-8.0.27-linux-glibc2.12-x86_64.tar
3、配置MySQL,创建数据目录(用于存放数据库的数据)
[root@zhengbo976 ~]# mv mysql-8.0.27-linux-glibc2.12-x86_64 /usr/local/mysql [root@zhengbo976 ~]# useradd -s /sbin/nologin mysql #创建mysql用户,因为启动mysql需要该用户 [root@zhengbo976 ~]# mkdir -p /data/mysql #创建datadir,数据库文件会放在这里 [root@zhengbo976 ~]# chown -R mysql:mysql /data/mysql/ #更改权限,此文件需要使用mysql用户进行操作,要不然操作会报错 [root@zhengbo976 ~]# vi /etc/my.cnf [mysqld] datadir=/data/mysql #存放数据库文件的目录 socket=/tmp/mysql.sock #mysql的套接字文件路径,套接字用于mysql进程之间通信,用于mysql Server和mysql Client之间通信。 innodb_buffer_pool_size=128M #缓存池大小 port=3306 #定义mysql端口,如果不写,默认也是3306 basedir=/usr/local/mysql/ #存档mysql程序的目录 # Disabling symbolic-links is recommended to prevent assorted security risks symbolic-links=0 # Settings user and group are ignored when systemd is used. # If you need to run mysqld under a different user or group, # customize your systemd unit file for mariadb according to the # instructions in http://fedoraproject.org/wiki/Systemd [mysqld_safe] log-error=/var/log/mariadb/mariadb.log pid-file=/var/run/mariadb/mariadb.pid # # include all files from the config directory # !includedir /etc/my.cnf.d
4、 创建pid,log文件,并授权 以下操作对应的是/etc/my.cnf文件中的[mysqld_safe]部分
[root@zhengbo976 ~]# mkdir /var/log/mariadb/ [root@zhengbo976 ~]# touch /var/log/mariadb/mariadb.log [root@zhengbo976 ~]# mkdir /var/run/mariadb/ [root@zhengbo976 ~]# touch /var/run/mariadb/mariadb.pid [root@zhengbo976 ~]# chown -R mysql:mysql /var/log/mariadb/ [root@zhengbo976 ~]# chown -R mysql:mysql /var/run/mariadb/
5、初始化MySQL
[root@zhengbo976 ~]# yum install -y libaio #安装初始化mysql所依赖的包 [root@zhengbo976 ~]# /usr/local/mysql/bin/mysqld --initialize --user=mysql 2022-04-23T11:41:08.217341Z 0 [Warning] TIMESTAMP with implicit DEFAULT value is deprecated. Please use --explicit_defaults_for_timestamp server option (see documentation for more details). 2022-04-23T11:41:08.563371Z 0 [Warning] InnoDB: New log files created, LSN=45790 2022-04-23T11:41:08.631758Z 0 [Warning] InnoDB: Creating foreign key constraint system tables. 2022-04-23T11:41:08.706278Z 0 [Warning] No existing UUID has been found, so we assume that this is the first time that this server has been started. Generating a new UUID: 446a260e-c2fa-11ec-859a-000c29d6ee76. 2022-04-23T11:41:08.707704Z 0 [Warning] Gtid table is not ready to be used. Table 'mysql.gtid_executed' cannot be opened. 2022-04-23T11:41:09.399711Z 0 [Warning] A deprecated TLS version TLSv1 is enabled. Please use TLSv1.2 or higher. 2022-04-23T11:41:09.399738Z 0 [Warning] A deprecated TLS version TLSv1.1 is enabled. Please use TLSv1.2 or higher. 2022-04-23T11:41:09.401410Z 0 [Warning] CA certificate ca.pem is self signed. 2022-04-23T11:41:09.629326Z 1 [Note] A temporary password is generated for root@localhost: 2>6.lj(t>i9J #A temporary password is generated for root@localhost: 2>6.lj(t>i9J ,其中"2>6.lj(t>i9J"就是临时密码。
补充:如果发现初始化写错了咋办?直接删除数据库的数据即可
rm -rf /data/mysq/*
6、设置环境变量,并将MySQL加入system服务管理
[root@zhengbo976 ~]# vi .bash_profile
PATH=$PATH:$HOME/bin:/usr/local/mysql/bin       #将/usr/loca/mysql/bin添加上
#刷新变量
[root@zhengbo976 ~]# source .bash_profile
#复制启动项
[root@zhengbo976 ~]# cp /usr/local/mysql/support-files/mysql.server /etc/init.d/mysqld
#添加启动项
[root@zhengbo976 ~]# chkconfig --add mysqld
#开启mysql服务
[root@zhengbo976 ~]# systemctl restart mysqld
#查看端口3306
[root@zhengbo976 ~]# ss -ntpul
...
tcp    LISTEN     0      80                                  :::3306                                            :::*                   users:(("mysqld",pid=19215,fd=20))
7、设置新密码,并登录MySQL
[root@zhengbo976 ~]# mysqladmin -uroot -p2>6.lj(t>i9J password '123456' #设置新密码 mysqladmin: [Warning] Using a password on the command line interface can be insecure. #警告信息不用管 [root@zhengbo976 ~]# mysql -uroot -p123456 mysql: [Warning] Using a password on the command line interface can be insecure. Welcome to the MySQL monitor. Commands end with ; or \g. Your MySQL connection id is 4 Server version: 5.7.35 MySQL Community Server (GPL) Copyright (c) 2000, 2021, Oracle and/or its affiliates. Oracle is a registered trademark of Oracle Corporation and/or its affiliates. Other names may be trademarks of their respective owners. Type 'help;' or '\h' for help. Type '\c' to clear the current input statement. mysql> #可以看到成功登陆 mysql> create database jpress; #创建个jpress数据库,后面用于存放jpress的数据。 Query OK, 1 row affected (0.00 sec)
至此MySQL配置完毕
下载并配置JDK
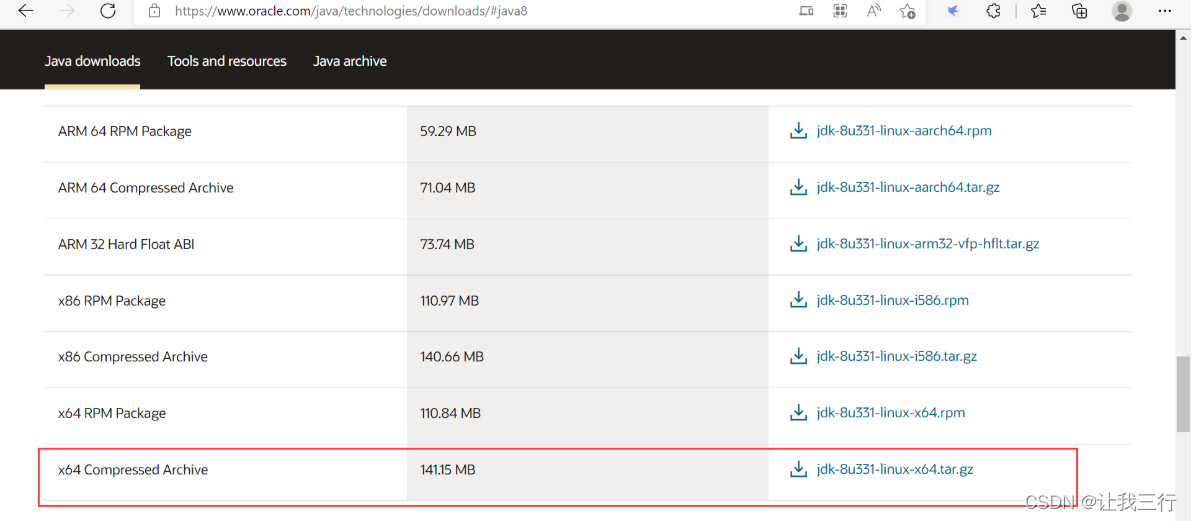
说明:这里下载sunJDK,如果是open JDK,直接Yum下载即可。
1、下载JDK
2、安装与配置JDK
[root@zhengbo976 ~]# tar xzvf jdk-8u331-linux-x64.tar.gz [root@zhengbo976 ~]# vi /etc/profile ... export JAVA_HOME=/root/jdk1.8.0_331 export JRE_HOME=/root/jdk1.8.0_331/jre export CLASS_PATH=.:$JAVA_HOME/lib:$JRE_HOME/lib export PATH=$PATH:$JAVA_HOME/bin:$JRE_HOME/bin ... #测试 [root@zhengbo976 ~]# java -version #如果出现如下信息,表示JDK安装成功! java version "1.8.0_331" Java(TM) SE Runtime Environment (build 1.8.0_331-b09) Java HotSpot(TM) 64-Bit Server VM (build 25.331-b09, mixed mode)
至此JDK配置完毕
下载并配置Tomcat
1、下载Tomcat
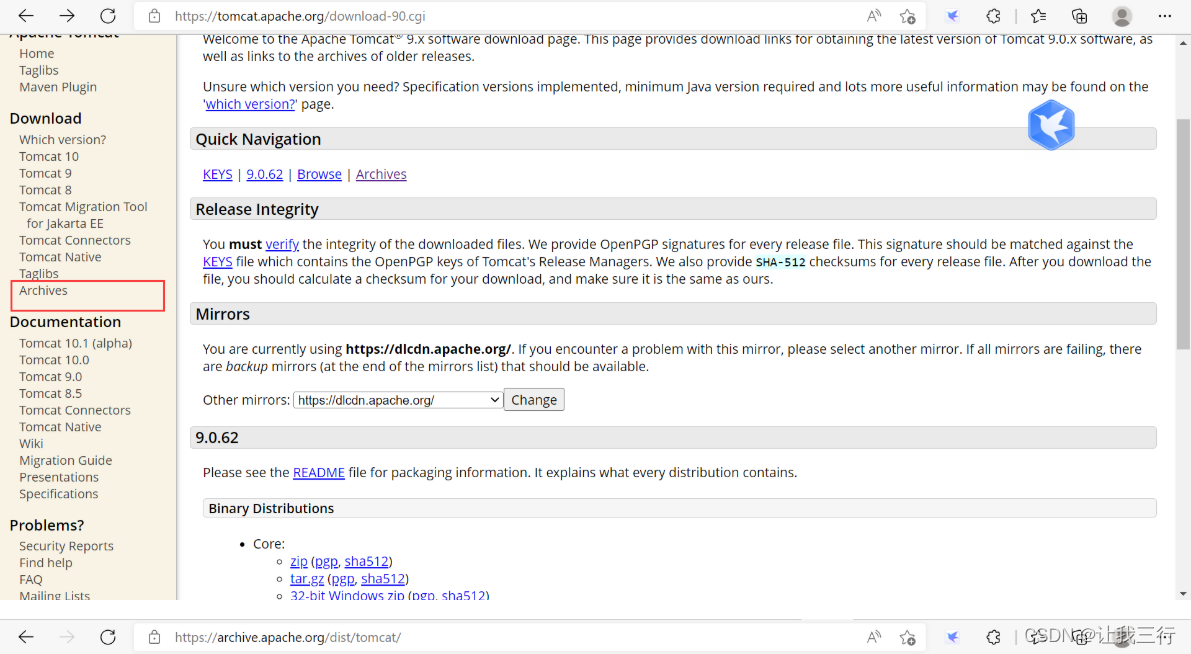


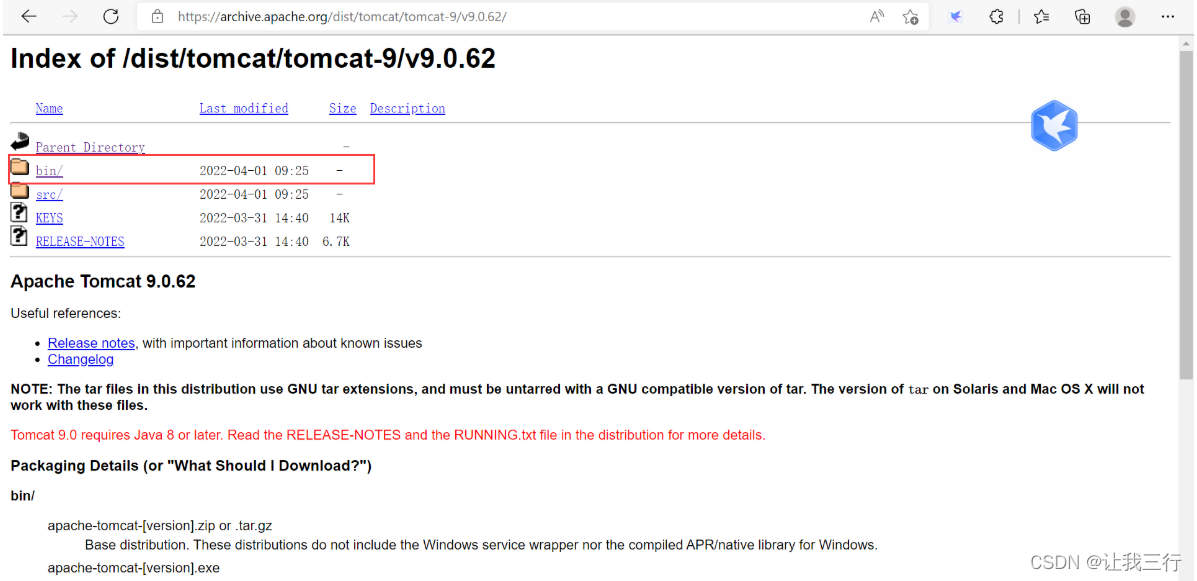

命令行实现:
[root@zhengbo976 ~]# wget https://archive.apache.org/dist/tomcat/tomcat-9/v9.0.62/bin/apache-tomcat-9.0.62.tar.gz
2、解压,并启动Tomcat
#解压
[root@zhengbo976 ~]# tar xzvf apache-tomcat-9.0.62.tar.gz
#该个名字,便于操作
[root@zhengbo976 ~]# mv apache-tomcat-9.0.62 tomcat
#启动服务
[root@zhengbo976 ~]# /root/tomcat/bin/startup.sh
#查看监听端口,默认是8080
[root@zhengbo976 ~]# ss -ntpul
...
tcp LISTEN 0 100 :::8080 :::* users:(("java",pid=19427,fd=57))
...
3、浏览器访问
出现如下界面即可:

至此Tomcat配置完毕
下载Jpress
1、下载Jpress
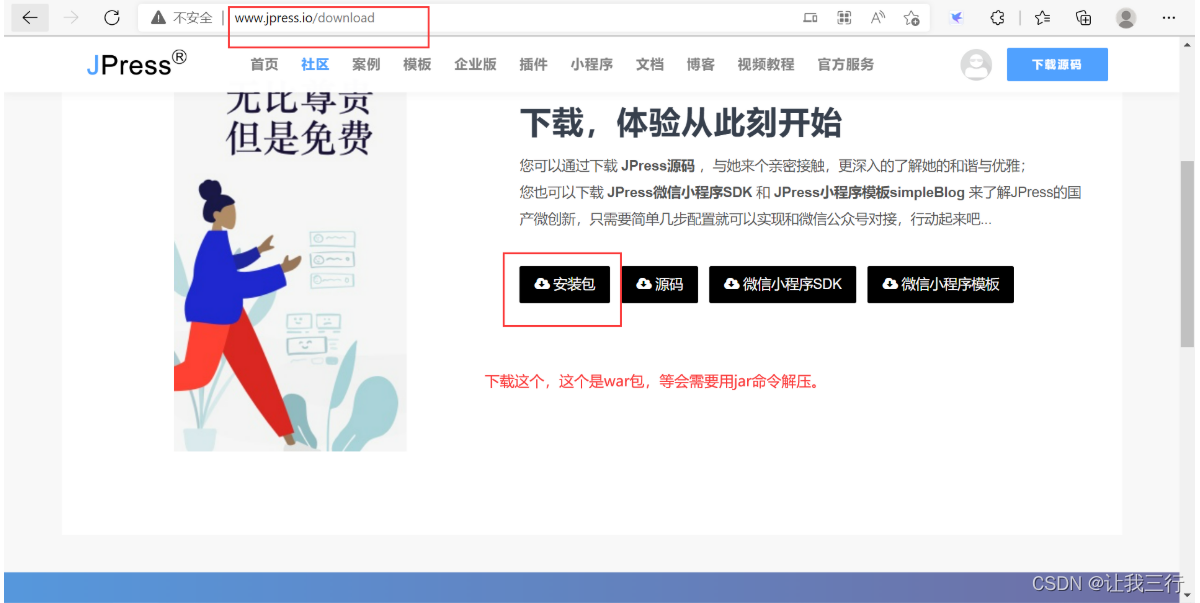
官网地址:下载-欢迎访问JPress官方网站
需要关注公众号,这里我们我的网盘链接放在这里,你们自取吧:
链接: 百度网盘 请输入提取码 提取码: ehu2
2、将jpress-v4.1.4.war移动至/root/tomcat/webapps/目录下,然后解压:
[root@zhengbo976 ~]# mv jpress-v4.1.4.war /root/tomcat/webapps/
[root@zhengbo976 ~]# jar -xvf /root/tomcat/webapps/jpress-v4.1.4.war
浏览器访问与配置Jpress
浏览器输入:http://192.168.9.132:8080/jpress


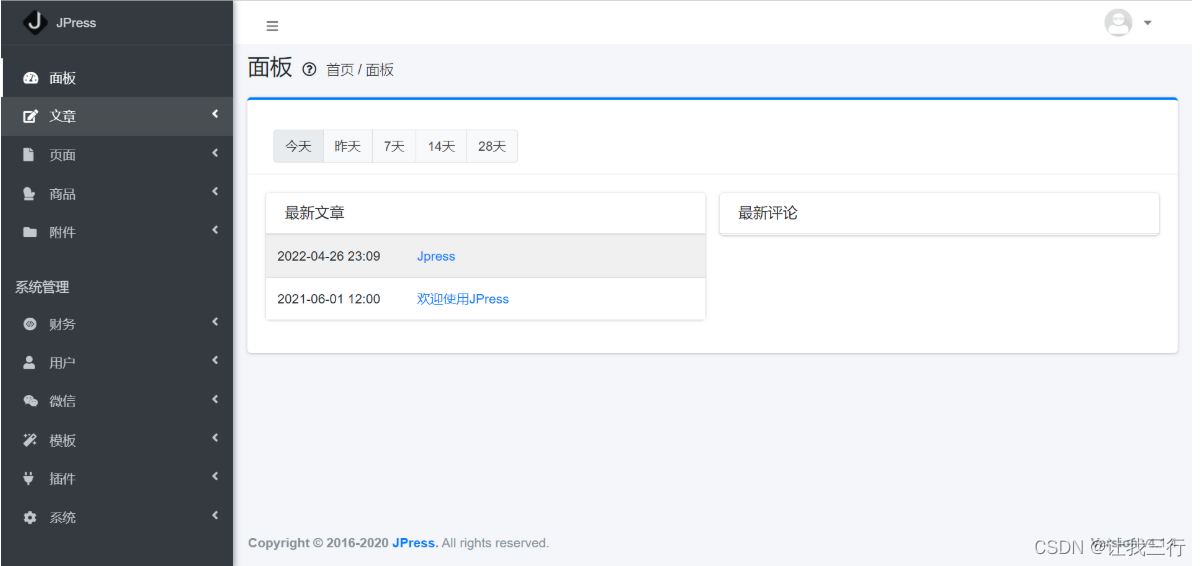
进入使用主界面:

至此Jpress部署io。