目录
一、序言
上节我们在 WebSocket的那些事(3-STOMP实操篇)中介绍了STOMP协议以及和Spring集成的简单示例,这一节我们我们将用一个聊天Demo程序详细介绍相关注解使用和原理、拦截器、用户身份校验、还有事件。
二、Spring对STOMP支持的相关注解
@MessageMapping:消息路由注解,功能和MVC的@RequestMapping等注解类似,被注解的方法会基于目的地路由对消息进行处理。@SubscribeMapping:和@MessageMapping功能类似,但不同点是被该注解修饰的方法的返回值不会经过brokerChannel发送给消息代理,而是直接通过clientOutboundChannel返回给客户端。@MessageExceptionHandler:消息处理异常注解,主要用来处理来自@MessageMapping注解方法引发的异常。@SendTo:指定消息发送目的地,如果消息处理方法上不带该注解,则会自动使用消息订阅前缀 +@MessageMapping上的值作为消息发送目的地。@SendToUser:指定推送给某个用户的消息发送目的地,加上该注解后,消息将会基于SessionId推送给单个用户。
三、聊天Demo代码示例
Maven依赖如下:
<dependency>
      <groupId>org.springframework.boot</groupId>
       <artifactId>spring-boot-starter-web</artifactId>
   </dependency>
   <dependency>
       <groupId>org.springframework.boot</groupId>
       <artifactId>spring-boot-starter-websocket</artifactId>
   </dependency>
   <dependency>
       <groupId>org.springframework.boot</groupId>
       <artifactId>spring-boot-starter-thymeleaf</artifactId>
</dependency>
备注:为了方便调试,可以在application.yml中将
spring.thymeleaf.cache设为false禁用模板缓存。
1、前端页面chat.html
<!DOCTYPE html>
<html lang="en" xmlns:th="http://www.thymeleaf.org">
<head>
    <meta charset="UTF-8">
    <title>greeting</title>
    <script src="https://cdnjs.cloudflare.com/ajax/libs/sockjs-client/1.6.1/sockjs.min.js"></script>
    <script src="https://cdnjs.cloudflare.com/ajax/libs/stomp.js/2.3.3/stomp.min.js"></script>
    <script src="https://cdnjs.cloudflare.com/ajax/libs/jquery/3.6.4/jquery.min.js"></script>
    <style>
        #mainWrapper {


            width: 600px;
            margin: auto;
        }
    </style>
</head>
<body>
<div id="mainWrapper">
    <div>
        <label for="username" style="margin-right: 5px">姓名:</label><input id="username" type="text"/>
    </div>
    <div id="msgWrapper">
        <p style="vertical-align: top">发送的消息:</p>
        <textarea id="msgSent" style="width: 600px;height: 100px"></textarea>
        <p style="vertical-align: top">收到的群聊消息:</p>
        <textarea id="groupMsgReceived" style="width: 600px;height: 100px"></textarea>
        <p style="vertical-align: top">收到的私聊消息:</p>
        <textarea id="privateMsgReceived" style="width: 600px;height: 200px"></textarea>
    </div>
    <div style="margin-top: 5px;">
        <button onclick="connect()">连接</button>
        <button onclick="sendGroupMessage()">发送群聊消息</button>
        <button onclick="sendPrivateMessage()">发送私聊消息</button>
        <button onclick="disconnect()">断开连接</button>
    </div>
</div>
<script type="text/javascript">
    $(() => {


        $('#msgSent').val('');
        $("#groupMsgReceived").val('');
        $("#privateMsgReceived").val('');
    });

    let stompClient = null;


    // 连接服务器
    const connect = () => {


        const header = {

      "User-ID": new Date().getTime().toString(), "User-Name": $('#username').val()};
        const ws = new SockJS('http://localhost:8080/websocket');
        stompClient = Stomp.over(ws);
        stompClient.connect(header, () => subscribeTopic());
    }

    // 订阅主题
    const subscribeTopic = () => {


        alert("连接成功!");

        // 订阅广播消息
        stompClient.subscribe('/topic/chat/group', function (message) {


                console.log(`Group message received : ${
        message.body}`);
                const resp = JSON.parse(message.body);
                const previousMsg = $("#groupMsgReceived").val();
                $("#groupMsgReceived").val(`${
        previousMsg}${
        resp.content}\n`);
            }
        );
        // 订阅单播消息
        stompClient.subscribe('/user/topic/chat/private', message => {


                console.log(`Private message received : ${
        message.body}`);
                const resp = JSON.parse(message.body);
                const previousMsg = $("#privateMsgReceived").val();
                $("#privateMsgReceived").val(`${
        previousMsg}${
        resp.content}\n`);
            }
        );
        // 订阅定时推送的单播消息
        stompClient.subscribe(`/user/topic/chat/push`, message => {


                console.log(`Private message received : ${
        message.body}`);
                const resp = JSON.parse(message.body);
                const previousMsg = $("#privateMsgReceived").val();
                $("#privateMsgReceived").val(`${
        previousMsg}${
        resp.content}\n`);
            }
        );
    };

    // 断连
    const disconnect = () => {


        stompClient.disconnect(() => {


            $("#msgReceived").val('Disconnected from WebSocket server');
        });
    }

    // 发送群聊消息
    const sendGroupMessage = () => {


        const msg = {

      name: $('#username').val(), content: $('#msgSent').val()};
        stompClient.send('/app/chat/group', {

      }, JSON.stringify(msg));
    }

    // 发送私聊消息
    const sendPrivateMessage = () => {


        const msg = {

      name: $('#username').val(), content: $('#msgSent').val()};
        stompClient.send('/app/chat/private', {

      }, JSON.stringify(msg));
    }
</script>
</body>
</html>
备注:在建立连接时,我们在STOMP请求头里指定了随机的
User-ID和User-Name信息,服务端可以根据User-ID确定唯一用户。
2、相关实体
(1) 请求消息参数
@Data
public class WebSocketMsgDTO {


	private String name;

	private String content;
}
(2) 响应消息内容
@Data
@Builder
@AllArgsConstructor
@NoArgsConstructor
public class WebSocketMsgVO {


	private String content;
}
(3) 自定义认证用户信息
@Data
@AllArgsConstructor
@NoArgsConstructor
public class StompAuthenticatedUser implements Principal {


	/**
	 * 用户唯一ID
	 */
	private String userId;

	/**
	 * 用户昵称
	 */
	private String nickName;

	/**
	 * 用于指定用户消息推送的标识
	 * @return
	 */
	@Override
	public String getName() {


		return this.userId;
	}

}
3、自定义用户认证拦截器
@Slf4j
public class UserAuthenticationChannelInterceptor implements ChannelInterceptor {


	private static final String USER_ID = "User-ID";
	private static final String USER_NAME = "User-Name";

	@Override
	public Message<?> preSend(Message<?> message, MessageChannel channel) {


		StompHeaderAccessor accessor = MessageHeaderAccessor.getAccessor(message, StompHeaderAccessor.class);
		// 如果是连接请求,记录userId
		if (StompCommand.CONNECT.equals(accessor.getCommand())) {


			String userID = accessor.getFirstNativeHeader(USER_ID);
			String username = accessor.getFirstNativeHeader(USER_NAME);

			log.info("Stomp User-Related headers found, userID: {}, username:{}", userID, username);
			accessor.setUser(new StompAuthenticatedUser(userID, username));
		}

		return message;
	}

}
备注:该拦截器用来从STOMP消息头取出
User-ID和User-Name相关用户信息,并且注入到STOMP为simpUser的消息头中,后续可以通过SimpUserRegistry实例读取用户信息。
4、WebSocket消息代理配置
@Configuration
@EnableWebSocketMessageBroker
public class WebsocketMessageBrokerConfig implements WebSocketMessageBrokerConfigurer {


	@Override
	public void registerStompEndpoints(StompEndpointRegistry registry) {


		registry.addEndpoint("/websocket") // WebSocket握手端口
			.addInterceptors(new HttpSessionHandshakeInterceptor())
			.setAllowedOriginPatterns("*") // 设置跨域
			.withSockJS(); // 开启SockJS回退机制
	}

	@Override
	public void configureClientInboundChannel(ChannelRegistration registration) {


		// 拦截器配置
		registration.interceptors(new UserAuthenticationChannelInterceptor());
	}

	@Override
	public void configureWebSocketTransport(WebSocketTransportRegistration registry) {


		// 这里我们设置入站消息最大为8K
		registry.setMessageSizeLimit(8 * 1024);
	}

	@Override
	public void configureMessageBroker(MessageBrokerRegistry registry) {


		registry.setApplicationDestinationPrefixes("/app") // 发送到服务端目的地前缀
			.enableSimpleBroker("/topic");// 开启简单消息代理,指定消息订阅前缀
	}

}
5、ChatController控制器
@Slf4j
@Controller
@RequiredArgsConstructor
public class ChatController {


	private final SimpUserRegistry simpUserRegistry;
	private final SimpMessagingTemplate simpMessagingTemplate;

	@GetMapping("/page/chat")
	public ModelAndView turnToChatPage() {


		return new ModelAndView("chat");
	}

	/**
	 * 群聊消息处理
	 * 这里我们通过@SendTo注解指定消息目的地为"/topic/chat/group",如果不加该注解则会自动发送到"/topic" + "/chat/group"
	 * @param webSocketMsgDTO 请求参数,消息处理器会自动将JSON字符串转换为对象
	 * @return 消息内容,方法返回值将会广播给所有订阅"/topic/chat/group"的客户端
	 */
	@MessageMapping("/chat/group")
	@SendTo("/topic/chat/group")
	public WebSocketMsgVO groupChat(WebSocketMsgDTO webSocketMsgDTO) {


		log.info("Group chat message received: {}", FastJsonUtils.toJsonString(webSocketMsgDTO));
		String content = String.format("来自[%s]的群聊消息: %s", webSocketMsgDTO.getName(), webSocketMsgDTO.getContent());
		return WebSocketMsgVO.builder().content(content).build();
	}

	/**
	 * 私聊消息处理
	 * 这里我们通过@SendToUser注解指定消息目的地为"/topic/chat/private",发送目的地默认会拼接上"/user/"前缀
	 * 实际发送目的地为"/user/topic/chat/private"
	 * @param webSocketMsgDTO 请求参数,消息处理器会自动将JSON字符串转换为对象
	 * @return 消息内容,方法返回值将会基于SessionID单播给指定用户
	 */
	@MessageMapping("/chat/private")
	@SendToUser("/topic/chat/private")
	public WebSocketMsgVO privateChat(WebSocketMsgDTO webSocketMsgDTO) {


		log.info("Private chat message received: {}", FastJsonUtils.toJsonString(webSocketMsgDTO));
		String content = "私聊消息回复:" + webSocketMsgDTO.getContent();
		return WebSocketMsgVO.builder().content(content).build();
	}

	/**
	 * 定时消息推送,这里我们会列举所有在线的用户,然后单播给指定用户。
	 * 通过SimpMessagingTemplate实例可以在任何地方推送消息。
	 */
	@Scheduled(fixedRate = 10 * 1000)
	public void pushMessageAtFixedRate() {


		log.info("当前在线人数: {}", simpUserRegistry.getUserCount());
		if (simpUserRegistry.getUserCount() <= 0) {


			return;
		}

		// 这里的Principal为StompAuthenticatedUser实例
		Set<StompAuthenticatedUser> users = simpUserRegistry.getUsers().stream()
			.map(simpUser -> StompAuthenticatedUser.class.cast(simpUser.getPrincipal()))
			.collect(Collectors.toSet());

		users.forEach(authenticatedUser -> {


			String userId = authenticatedUser.getUserId();
			String nickName = authenticatedUser.getNickName();
			WebSocketMsgVO webSocketMsgVO = new WebSocketMsgVO();
			webSocketMsgVO.setContent(String.format("定时推送的私聊消息, 接收人: %s, 时间: %s", nickName, LocalDateTime.now()));

			log.info("开始推送消息给指定用户, userId: {}, 消息内容:{}", userId, FastJsonUtils.toJsonString(webSocketMsgVO));
			simpMessagingTemplate.convertAndSendToUser(userId, "/topic/chat/push", webSocketMsgVO);
		});
	}

}
备注:
- 使用
@SendTo或者@SendToUser注解时,一定要带上registry.enableSimpleBroker("/topic")指定的目的地前缀/topic,否则消息发送会失败。@SendTo("/topic/chat/group")相当于调用simpMessagingTemplate.convertAndSend(“/topic/chat/group”, payload) 方法进行消息发送。@SendToUser("/topic/chat/private")相当于调用 simpMessagingTemplate.convertAndSendToUser(userId, “/topic/chat/push”, webSocketMsgVO) 方法发送消息,使用注解时会自动根据SessionID发送消息到指定用户。
四、测试用例
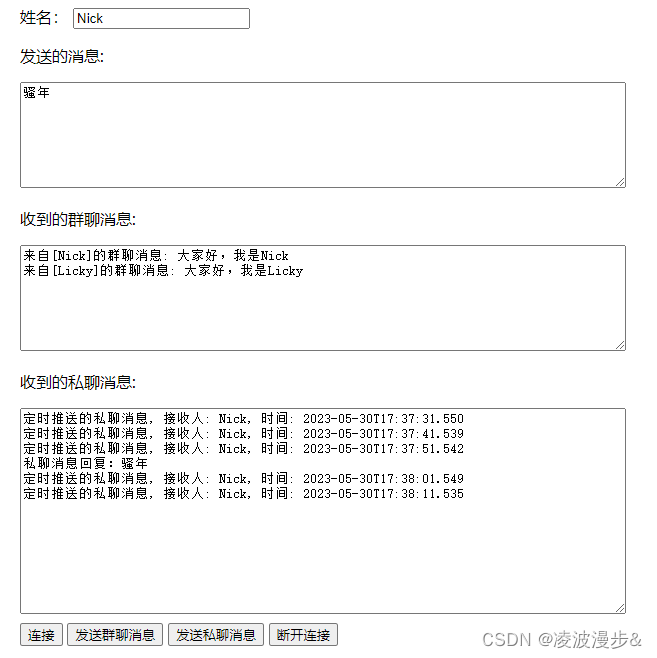
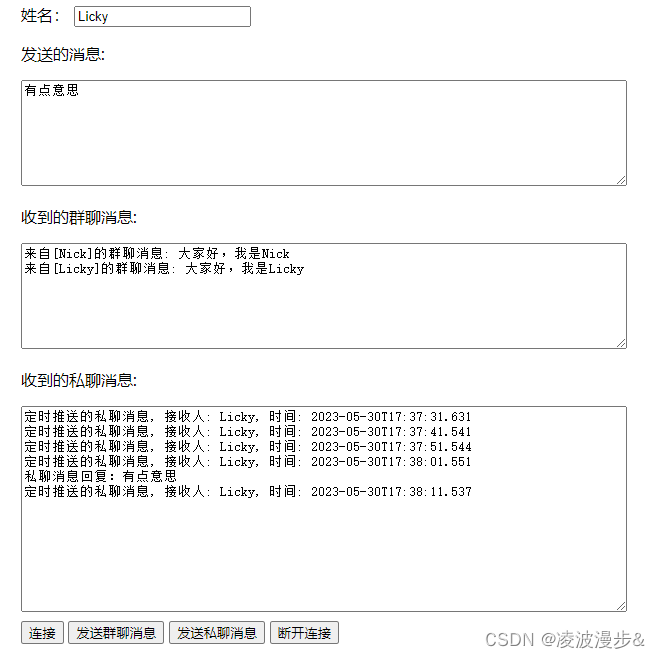
打开浏览器访问http://localhost:8080/page/chat可进入聊天页,同时打开两个窗口访问,点击连接按钮。
1、指定用户定时消息推送测试
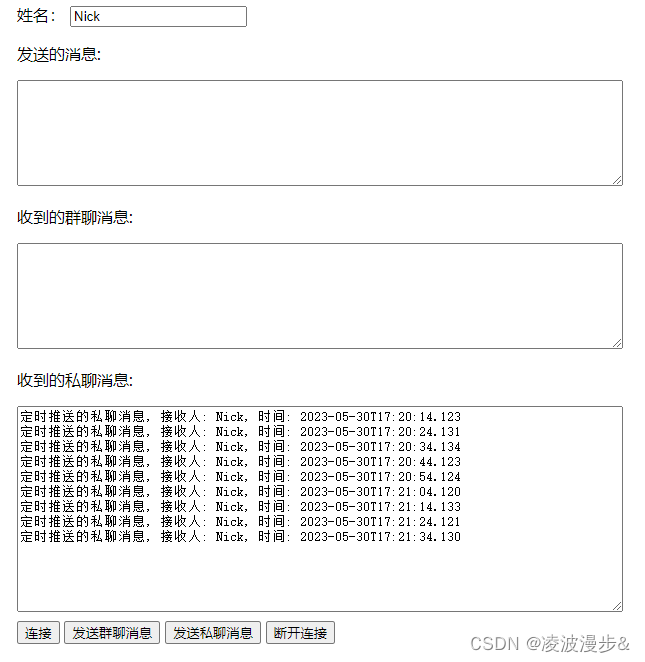
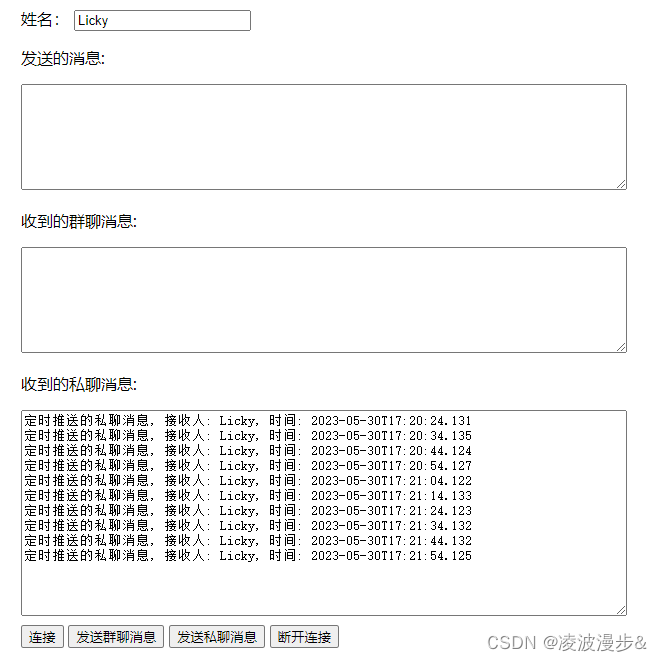
可以看到,后台会每隔10秒推送消息给所有在线的指定用户。

2、群聊和私聊消息测试
分别点击发送群聊消息和发送私聊消息按钮,可以看到群聊消息和私聊消息分别展示在不同文本框里。
五、@SendToUser和SimpMessagingTemplate#convertAndSendToUser原理
1、关于UserDestinationMessageHandler
当发送或者订阅消息时,如果消息目的地前缀以/user/开头,那么该消息目的地将会由UserDestinationMessageHandler进行转义,并且和用户SessionID对应,那么该UserDestinationMessageHandler是怎么运作的呢?
举个栗子,上面的聊天示例中我们有个定时任务在后台推送消息给所有在线的用户,我们调用了simpMessagingTemplate.convertAndSendToUser(userId, “/topic/chat/push”, webSocketMsgVO) 方法进行消息推送,那么消息发送目的地逻辑上为/user/topic/chat/push,经过UserDestinationMessageHandler处理后实际发送目的地会转义成/user/topic/chat/push-user123这种,后面的后缀其实就是-user + sessionId拼接起来的值。
通过这种方式我们就可以指定推送消息给某个用户,同时客户端在订阅以/user开头的消息时,同样会进行转义,最后实际订阅的消息目的也是/user/topic/chat/push-user123这种形式,实现唯一订阅。
2、UserDestinationMessageHandler源码分析
接下来,我们从UserDestinationMessageHandler的源码看下里面的实现细节,还是以SimpMessagingTemplate#convertAndSendToUser调用为例,首先看到handleMessage方法,如下:
@Override
public void handleMessage(Message<?> message) throws MessagingException {


	Message<?> messageToUse = message;
	if (this.broadcastHandler != null) {


		messageToUse = this.broadcastHandler.preHandle(message);
		if (messageToUse == null) {


			return;
		}
	}

	// 解析实际消息发送目的地
	UserDestinationResult result = this.destinationResolver.resolveDestination(messageToUse);
	if (result == null) {


		return;
	}

	// 如果没有目标发送目的地,则直接广播消息
	if (result.getTargetDestinations().isEmpty()) {


		if (logger.isTraceEnabled()) {


			logger.trace("No active sessions for user destination: " + result.getSourceDestination());
		}
		if (this.broadcastHandler != null) {


			this.broadcastHandler.handleUnresolved(messageToUse);
		}
		return;
	}

	SimpMessageHeaderAccessor accessor = SimpMessageHeaderAccessor.wrap(messageToUse);
	initHeaders(accessor);
	accessor.setNativeHeader(SimpMessageHeaderAccessor.ORIGINAL_DESTINATION, result.getSubscribeDestination());
	accessor.setLeaveMutable(true);

	messageToUse = MessageBuilder.createMessage(messageToUse.getPayload(), accessor.getMessageHeaders());
	if (logger.isTraceEnabled()) {


		logger.trace("Translated " + result.getSourceDestination() + " -> " + result.getTargetDestinations());
	}
	// 有目标发送目的地,则一对一推送
	for (String target : result.getTargetDestinations()) {


		this.messagingTemplate.send(target, messageToUse);
	}
}
这段代码逻辑处理也比较简单,如果能解析出目标发送目的地,则一对一进行推送,如果没有解析出发送目的地则直接广播消息。
下面让我们看下目标发送目的地代表什么,是如何解析的?我们看this.destinationResolver.resolveDestination(messageToUse)这段代码,如下:
@Override
@Nullable
public UserDestinationResult resolveDestination(Message<?> message) {


	// 从消息中解析目的地
	ParseResult parseResult = parse(message);
	if (parseResult == null) {


		return null;
	}
	String user = parseResult.getUser();
	String sourceDestination = parseResult.getSourceDestination();
	Set<String> targetSet = new HashSet<>();
	for (String sessionId : parseResult.getSessionIds()) {


		String actualDestination = parseResult.getActualDestination();
		String targetDestination = getTargetDestination(
				sourceDestination, actualDestination, sessionId, user);
		if (targetDestination != null) {


			targetSet.add(targetDestination);
		}
	}
	String subscribeDestination = parseResult.getSubscribeDestination();
	return new UserDestinationResult(sourceDestination, targetSet, subscribeDestination, user);
}
目标发送目的地实际上就是上面的targetSet,targetSet集合中的targetDestination结构为actualDestination + “-user” + sessionId,这里就是我们前面说到的会对消息目的地以/user/开头的消息进行目的地转义。
而targetSet来源于parseResult#getSessionIds,我们再看看parse(message)的源码:
@Nullable
	private ParseResult parse(Message<?> message) {


		MessageHeaders headers = message.getHeaders();
		String sourceDestination = SimpMessageHeaderAccessor.getDestination(headers);
		if (sourceDestination == null || !checkDestination(sourceDestination, this.prefix)) {


			return null;
		}
		SimpMessageType messageType = SimpMessageHeaderAccessor.getMessageType(headers);
		if (messageType != null) {


			switch (messageType) {


				case SUBSCRIBE:
				case UNSUBSCRIBE:
					return parseSubscriptionMessage(message, sourceDestination);
				case MESSAGE:
					return parseMessage(headers, sourceDestination);
			}
		}
		return null;
	}
发送消息时,消息类型为Message,我们直接看parseMessage(headers, sourceDestination)方法的源码:
private ParseResult parseMessage(MessageHeaders headers, String sourceDest) {


	int prefixEnd = this.prefix.length();
	int userEnd = sourceDest.indexOf('/', prefixEnd);
	Assert.isTrue(userEnd > 0, "Expected destination pattern \"/user/{userId}/**\"");
	String actualDest = sourceDest.substring(userEnd);
	String subscribeDest = this.prefix.substring(0, prefixEnd - 1) + actualDest;
	String userName = sourceDest.substring(prefixEnd, userEnd);
	userName = StringUtils.replace(userName, "%2F", "/");

	String sessionId = SimpMessageHeaderAccessor.getSessionId(headers);
	Set<String> sessionIds;
	if (userName.equals(sessionId)) {


		userName = null;
		sessionIds = Collections.singleton(sessionId);
	}
	else {


		sessionIds = getSessionIdsByUser(userName, sessionId);
	}

	if (isRemoveLeadingSlash()) {


		actualDest = actualDest.substring(1);
	}
	return new ParseResult(sourceDest, actualDest, subscribeDest, sessionIds, userName);
}
这里的核心逻辑其实就是获取SessionId,如果userName和SessionId相同,则直接返回SessionId。如果不相同,则调用getSessionIdsByUser(userName, sessionId) 获取,我们再看下该方法的源码:
private Set<String> getSessionIdsByUser(String userName, @Nullable String sessionId) {


	Set<String> sessionIds;
	SimpUser user = this.userRegistry.getUser(userName);
	if (user != null) {


		if (sessionId != null && user.getSession(sessionId) != null) {


			sessionIds = Collections.singleton(sessionId);
		}
		else {


			Set<SimpSession> sessions = user.getSessions();
			sessionIds = new HashSet<>(sessions.size());
			for (SimpSession session : sessions) {


				sessionIds.add(session.getId());
			}
		}
	}
	else {


		sessionIds = Collections.emptySet();
	}
	return sessionIds;
}
可以看到,SessionId是从SimpUser实例中获取的,而SimpUser是从userRegistry(SimpUserRegistry实例) 中获取。
这里有一个问题,SimpUserRegistry中的信息是从什么时候初始化的呢?经过代码调试,这里的SimpUserRegistry实例类型为DefaultSimpUserRegistry。
在DefaultSimpUserRegistry中,监听了应用事件,如下:
public void onApplicationEvent(ApplicationEvent event) {


	AbstractSubProtocolEvent subProtocolEvent = (AbstractSubProtocolEvent) event;
	Message<?> message = subProtocolEvent.getMessage();
	MessageHeaders headers = message.getHeaders();

	String sessionId = SimpMessageHeaderAccessor.getSessionId(headers);
	Assert.state(sessionId != null, "No session id");

	if (event instanceof SessionSubscribeEvent) {


		LocalSimpSession session = this.sessions.get(sessionId);
		if (session != null) {


			String id = SimpMessageHeaderAccessor.getSubscriptionId(headers);
			String destination = SimpMessageHeaderAccessor.getDestination(headers);
			if (id != null && destination != null) {


				session.addSubscription(id, destination);
			}
		}
	}
	else if (event instanceof SessionConnectedEvent) {


		// 这里的用户信息从SessionConnectedEvent事件获取
		Principal user = subProtocolEvent.getUser();
		if (user == null) {


			return;
		}
		String name = user.getName();
		if (user instanceof DestinationUserNameProvider) {


			name = ((DestinationUserNameProvider) user).getDestinationUserName();
		}
		synchronized (this.sessionLock) {


			LocalSimpUser simpUser = this.users.get(name);
			if (simpUser == null) {


				simpUser = new LocalSimpUser(name, user);
				// 这里会在会话建立成功时保存用户信息
				this.users.put(name, simpUser);
			}
			LocalSimpSession session = new LocalSimpSession(sessionId, simpUser);
			simpUser.addSession(session);
			this.sessions.put(sessionId, session);
		}
	}
	else if (event instanceof SessionDisconnectEvent) {


		synchronized (this.sessionLock) {


			LocalSimpSession session = this.sessions.remove(sessionId);
			if (session != null) {


				LocalSimpUser user = session.getUser();
				user.removeSession(sessionId);
				if (!user.hasSessions()) {


					this.users.remove(user.getName());
				}
			}
		}
	}
	else if (event instanceof SessionUnsubscribeEvent) {


		LocalSimpSession session = this.sessions.get(sessionId);
		if (session != null) {


			String subscriptionId = SimpMessageHeaderAccessor.getSubscriptionId(headers);
			if (subscriptionId != null) {


				session.removeSubscription(subscriptionId);
			}
		}
	}
}
我们主要看SessionConnectedEvent会话连接建立事件,在会话连接建立完成时,这段代码this.users.put(name, simpUser);会保存用户信息,而用户信息来自Principal user = subProtocolEvent.getUser();,因此我们这里需要看下SessionConnectedEvent事件是什么时候发布的。
经过一番查找,在StompSubProtocolHandler类中发现了SessionConnectedEvent事件发布的源码,如下:
public void handleMessageToClient(WebSocketSession session, Message<?> message) {


	if (!(message.getPayload() instanceof byte[])) {


		if (logger.isErrorEnabled()) {


			logger.error("Expected byte[] payload. Ignoring " + message + ".");
		}
		return;
	}

	StompHeaderAccessor accessor = getStompHeaderAccessor(message);
	StompCommand command = accessor.getCommand();

	if (StompCommand.MESSAGE.equals(command)) {


		if (accessor.getSubscriptionId() == null && logger.isWarnEnabled()) {


			logger.warn("No STOMP \"subscription\" header in " + message);
		}
		String origDestination = accessor.getFirstNativeHeader(SimpMessageHeaderAccessor.ORIGINAL_DESTINATION);
		if (origDestination != null) {


			accessor = toMutableAccessor(accessor, message);
			accessor.removeNativeHeader(SimpMessageHeaderAccessor.ORIGINAL_DESTINATION);
			accessor.setDestination(origDestination);
		}
	}
	else if (StompCommand.CONNECTED.equals(command)) {


		this.stats.incrementConnectedCount();
		accessor = afterStompSessionConnected(message, accessor, session);
		if (this.eventPublisher != null) {


			try {


				SimpAttributes simpAttributes = new SimpAttributes(session.getId(), session.getAttributes());
				SimpAttributesContextHolder.setAttributes(simpAttributes);
				// 通过session找到用户信息
				Principal user = getUser(session);
				// 这里会发布会话连接建立事件,同时会附带用户信息
				publishEvent(this.eventPublisher, new SessionConnectedEvent(this, (Message<byte[]>) message, user));
			}
			finally {


				SimpAttributesContextHolder.resetAttributes();
			}
		}
	}

	byte[] payload = (byte[]) message.getPayload();
	if (StompCommand.ERROR.equals(command) && getErrorHandler() != null) {


		Message<byte[]> errorMessage = getErrorHandler().handleErrorMessageToClient((Message<byte[]>) message);
		if (errorMessage != null) {


			accessor = MessageHeaderAccessor.getAccessor(errorMessage, StompHeaderAccessor.class);
			Assert.state(accessor != null, "No StompHeaderAccessor");
			payload = errorMessage.getPayload();
		}
	}

	Runnable task = OrderedMessageChannelDecorator.getNextMessageTask(message);
	if (task != null) {


		Assert.isInstanceOf(ConcurrentWebSocketSessionDecorator.class, session);
		((ConcurrentWebSocketSessionDecorator) session).setMessageCallback(m -> task.run());
	}

	sendToClient(session, accessor, payload);
}
接下来我们主要看Principal user = getUser(session);这段代码,根据Session查找会话信息,源码如下:
private Principal getUser(WebSocketSession session) {


	Principal user = this.stompAuthentications.get(session.getId());
	return (user != null ? user : session.getPrincipal());
}
这里可以看到用户信息是直接从stompAuthentications中读取,stompAuthentications是一个Map,那么该Map还会在什么时候进行初始化呢?
点击调用链,发现在StompSubProtocolHandler类中的handleMessageFromClient方法中发现一段赋值的代码,代码有点长,这里直接贴图:

可以看到设置了一个回调,当接下来我们看看该回调函数在哪里会调用,从命名上看,是用户信息变化时会触发,点击调用链,在SimpMessageHeaderAccessor类中发现了下面的方法:
public void setUser(@Nullable Principal principal) {


	setHeader(USER_HEADER, principal);
	if (this.userCallback != null) {


		this.userCallback.accept(principal);
	}
}
还记得我们在前面的聊天Demo示例中,自定义的拦截器UserAuthenticationChannelInterceptor吗?我们调用了StompHeaderAccessor#setUser方法,实际上就是调用了父类的SimpMessageHeaderAccessor#setUser方法,这下真相大白了。
下面再让我们梳理一下STOMP会话建立各调用链的先后顺序,
- 先调用StompSubProtocolHandler#handleMessageFromClient处理原生WebSocket消息,然后通过MessageChannel#send方法进行发送,发送完后发布事件,比如会话建立,订阅和取消订阅事件。
- 通过MessageChannel#send 方法发送消息时会调用
ChannelInterceptor拦截器链,在拦截器链中我们可以设置一些自定义信息,比如用户信息。 - 经过拦截器链处理后,消息会交给
MessageHandler进行处理。处理完后再会调用StompSubProtocolHandler#handleMessageToClient 将响应内容返回给客户端。
六、结语
研究了大半天源代码,加上debug才摸清了这些个调用链,还是得仔细研读官方文档,一个单词都不能落下,先得把概念给理清楚,研读源码才能事半功倍。
下一节将会带来集成支持STOMP协议的外部中间件使用示例,比如:RabbitMQ。