前言:
最近在做三维重建,尤其是Nerf方面多视角合成工作的时候,意识到了cuda的编程计算可以大大提高其中渲染的计算,最明显的例子是Instant-ngp,Plenoxels等文章,因此后面会学Cuda一段时间,同时也就开了这个新坑。
因为笔者也是cuda新手,所以大家有问题的话可以评论区指出,一起学习进步!
运行环境:
Windows10,Visual Studio2019,显卡3050Ti
(大家自行根据自己笔记本情况去配环境,或者没有gpu,租借云服务器去学习也是可以的)
1:C++模板
首先从下面的C++代码开始
其作用为把2个数组元素相加,代码里设为1<<20,也就是在二进制下把00001左移20位,最终值为2^20,为1048576,大约位1million(百万),相加的值最终减去3.0,判断有没有误差。
#include <iostream>
#include <math.h>

// function to add the elements of two arrays
void add(int n, float *x, float *y)
{


  for (int i = 0; i < n; i++)
      y[i] = x[i] + y[i];
}

int main(void)
{


  int N = 1<<20; // 1M elements

  float *x = new float[N];
  float *y = new float[N];

  // initialize x and y arrays on the host
  for (int i = 0; i < N; i++) {


    x[i] = 1.0f;
    y[i] = 2.0f;
  }

  // Run kernel on 1M elements on the CPU
  add(N, x, y);

  // Check for errors (all values should be 3.0f)
  float maxError = 0.0f;
  for (int i = 0; i < N; i++)
    maxError = fmax(maxError, fabs(y[i]-3.0f));
    //fabs() 求浮点数的绝对值 fmax()返回2个参数最大的1个
  std::cout << "Max error: " << maxError << std::endl;

  // Free memory
输出如下

2:编写核函数cuda
(1)__global__可以理解为一个关键词,其告诉编译器该函数可以在GPU上运行,并且可以从CPU代码上调用
(2)这些__global__函数被称为内核,在GPU上运行的代码通常被称为device code,而在CPU上运行的代码被称为host code
// CUDA Kernel function to add the elements of two arrays on the GPU
__global__
void add(int n, float *x, float *y)
{


  for (int i = 0; i < n; i++)
      y[i] = x[i] + y[i];
}
3:Cuda下的内存分配(Memory Allocation)
(1)为了在GPU上进行计算,我需要分配GPU可访问的内存。CUDA中的统一内存通过提供系统中所有gpu和cpu可访问的单一内存空间使这一点变得容易。
(2)要在统一内存中分配数据,调用cudaMallocManaged(),它返回一个指针,您可以从host(CPU)code或device(GPU)code访问。要释放数据,只需将指针传递给cudaFree()。
(3)我只需要用对cudaMallocManaged()的调用替换上面代码中的new调用,并用对cudaFree()来执行释放数值操作
  // Allocate Unified Memory -- accessible from CPU or GPU
  float *x, *y;
  cudaMallocManaged(&x, N*sizeof(float));
  cudaMallocManaged(&y, N*sizeof(float));
//理解为,分配空间指向 指针x指向的空间地址,大小为 N* x  x表示float的空间大小,因为有N个浮点数据,大约为1 million

  ...

  // Free memory
  cudaFree(x);
  cudaFree(y);
(4)在GPU上调用核函数需要在参数列表前添加符号<<< >>>
简单理解,启动1个GPU线程来运行add()函数
add<<<1, 1>>>(N, x, y);
(5)目前为止,完整代码如下
#include <iostream>
#include <math.h>
// Kernel function to add the elements of two arrays
__global__
void add(int n, float *x, float *y)
{


  for (int i = 0; i < n; i++)
    y[i] = x[i] + y[i];
}

int main(void)
{


  int N = 1<<20;
  float *x, *y;

  // Allocate Unified Memory – accessible from CPU or GPU
  cudaMallocManaged(&x, N*sizeof(float));
  cudaMallocManaged(&y, N*sizeof(float));

  // initialize x and y arrays on the host
  for (int i = 0; i < N; i++) {


    x[i] = 1.0f;
    y[i] = 2.0f;
  }

  // Run kernel on 1M elements on the GPU
  add<<<1, 1>>>(N, x, y);

  // Wait for GPU to finish before accessing on host
  cudaDeviceSynchronize();

  // Check for errors (all values should be 3.0f)
  float maxError = 0.0f;
  for (int i = 0; i < N; i++)
    maxError = fmax(maxError, fabs(y[i]-3.0f));
  std::cout << "Max error: " << maxError << std::endl;

  // Free memory
  cudaFree(x);
  cudaFree(y);

  return 0;
}
这只是第一步,因为正如所写的那样,这个内核只适用于单个线程,因为运行它的每个线程都会对整个数组执行add操作。此外,由于多个并行线程会读取和写入相同的位置,因此存在竞争条件。
4:并行线程计算
(1)找出内核运行时间的最简单方法是使用nvprof来运行它,nvprof是CUDA工具包附带的命令行GPU分析器。
(2)上述代码我们体验了利用GPU上一个线程来进行计算。那如何并行呢!
下面代码表示CUDA运行时在GPU上启动要使用多少并行线程,这里选取256个线程
add<<<1, 256>>>(N, x, y);
(3)如果我在运行代码时只做了这样的修改,它将对每个线程执行一次计算,而不是将计算分散到并行线程上。为了正确地做到这一点,我需要修改内核,引入了两个量:
threadIdx.x:包含了the index of the thread within the block,块中的线程索引。此例中,index范围为0~255。
blockDim.x:包含了the size of thread block(number of threads in the thread block)线程块的大小,等于线程块中的线程数量。此例中,该值为256

__global__
void add(int n, float *x, float *y)
{


  int index = threadIdx.x;
  int stride = blockDim.x;
  for (int i = index; i < n; i += stride)
      y[i] = x[i] + y[i];
}
下面是运行结果(这里其实计算给出结果相较之前会更快)
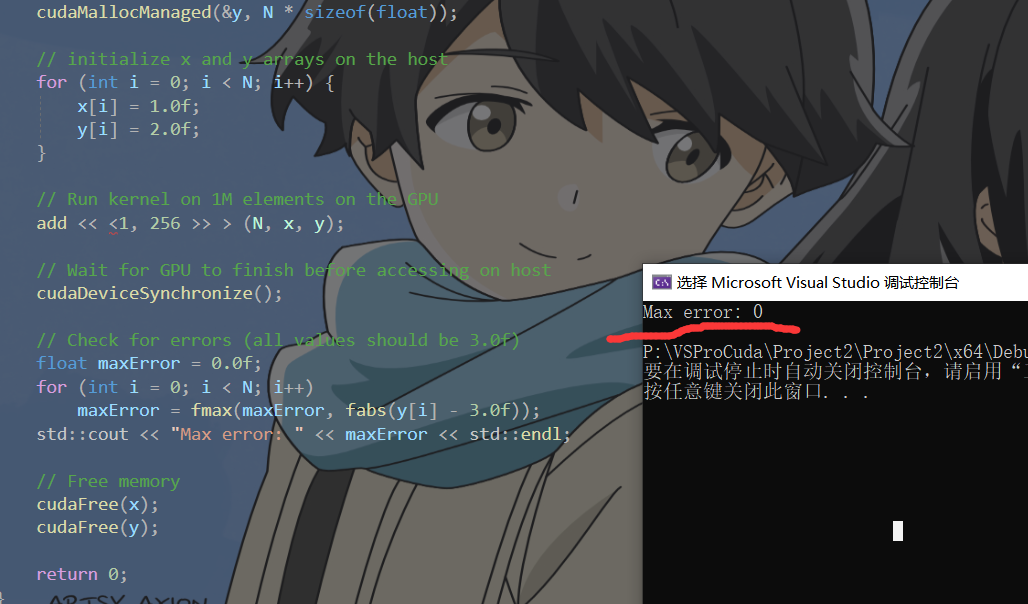
官网给出的比较:
这是一个很大的加速(从463ms减少到2.7ms)。

5:Out of the Blocks
(1)CUDA gpu有许多并行处理器,它们被分组为流多处理器(SMs)。每个SM可以运行多个并发线程块。为了充分利用CUDA GPU,kernel应启动多个thread blocks。
(2)到目前为止,我们可以想到执行配置的第一个参数指定了线程块的数量。这些并行线程块一起构成了所谓的网格grid。因为我有N个元素要处理,每个块有256个线程,所以我只需要计算块的数量来获得至少N个线程。我只是用N除以块大小(注意,如果N不是blockSize的倍数,就要四舍五入)。
int blockSize = 256;//并行线程数量
//使用N 除以块大小,表示 线程块数量
int numBlocks = (N + blockSize - 1) / blockSize;
add<<<numBlocks, blockSize>>>(N, x, y);
(3)我还需要更新内核代码,以考虑到线程块的整个网格。CUDA提供gridDim.x,其中包含网格中的块数量,以及blockIdx.x ,它包含网格中当前线程块的索引。
再引入两个量:
blockIdx.x:包含the index of the block with in the grid。网格中线程块的索引
gridDim.x:包含the size of the grid。网格大小,可以理解为网格中块的数量
图1说明了在CUDA中使用blockDim.x , gridDim.x 和 threadIdx.x对数组(一维)进行索引的方法。其思想是,每个线程通过计算其块开始的偏移量(块索引乘以块大小:blockIdx)来获得其索引。
这个想法是,每个线程通过计算其块开始的偏移量(块索引乘以块大小)来获得其索引:blockIdx.x* blockDim.x)。并在块中添加线程的索引threadIdx.x。
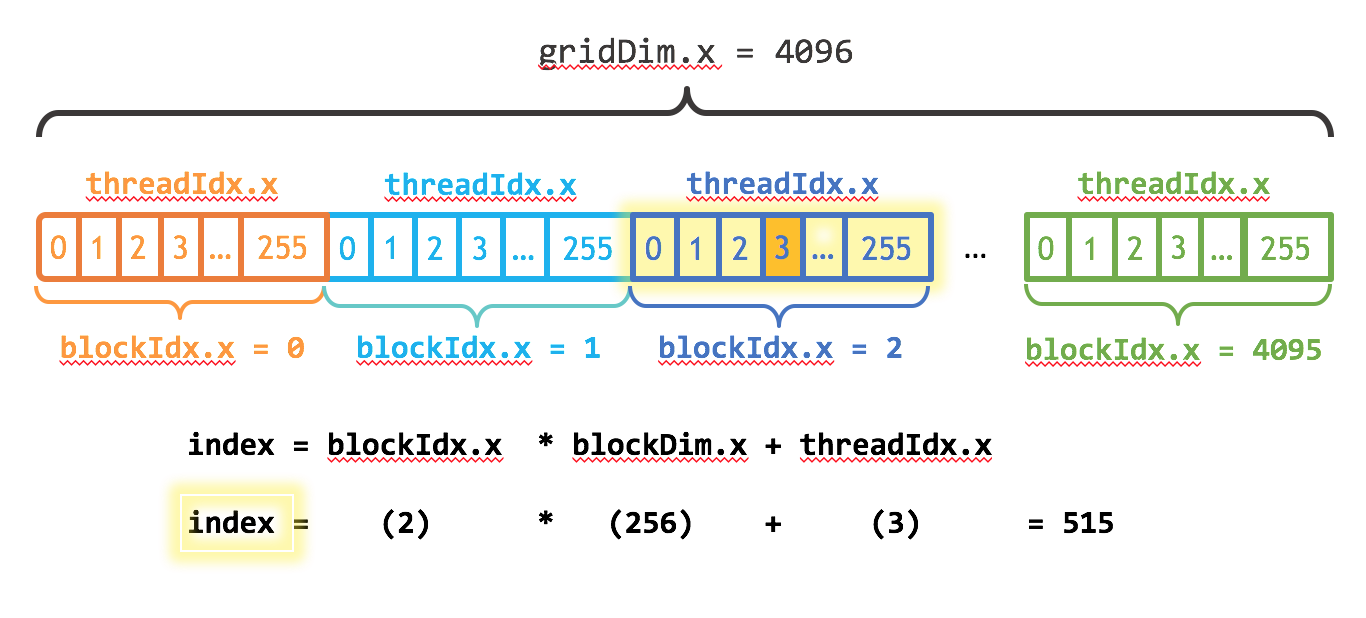
__global__
void add(int n, float *x, float *y)
{


  int index = blockIdx.x * blockDim.x + threadIdx.x;
  int stride = blockDim.x * gridDim.x;
  for (int i = index; i < n; i += stride)
    y[i] = x[i] + y[i];
}
更新后的kernel还将stride设置为网格中(blockDim.x*gridDim.x)的线程总数。在CUDA内核中,这种类型的循环通常被称为网格跨步循环。
最终代码如下
#include <iostream>
#include <math.h>
#include<stdint.h>
#include<cuda.h>
#include "cuda_runtime.h"
#include "device_launch_parameters.h"
#include <stdio.h>
// Kernel function to add the elements of two arrays
__global__
void add(int n, float* x, float* y)
{


    int index = blockIdx.x * blockDim.x + threadIdx.x;
    int stride = blockDim.x * gridDim.x;
    for (int i = index; i < n; i += stride)
        y[i] = x[i] + y[i];
}

int main(void)
{


    int N = 1 << 20;
    float* x, * y;

    // Allocate Unified Memory – accessible from CPU or GPU
    cudaMallocManaged(&x, N * sizeof(float));
    cudaMallocManaged(&y, N * sizeof(float));

    // initialize x and y arrays on the host
    for (int i = 0; i < N; i++) {


        x[i] = 1.0f;
        y[i] = 2.0f;
    }

    // Run kernel on 1M elements on the GPU
  //  add <<<1, 256 >>> (N, x, y);


    int blockSize = 256;//并行线程数量
//使用N 除以块大小,表示 线程块数量
    int numBlocks = (N + blockSize - 1) / blockSize;
    add << <numBlocks, blockSize >> > (N, x, y);


    // Wait for GPU to finish before accessing on host
    cudaDeviceSynchronize();

    // Check for errors (all values should be 3.0f)
    float maxError = 0.0f;
    for (int i = 0; i < N; i++)
        maxError = fmax(maxError, fabs(y[i] - 3.0f));
    std::cout << "Max error: " << maxError << std::endl;

    // Free memory
    cudaFree(x);
    cudaFree(y);

    return 0;
}
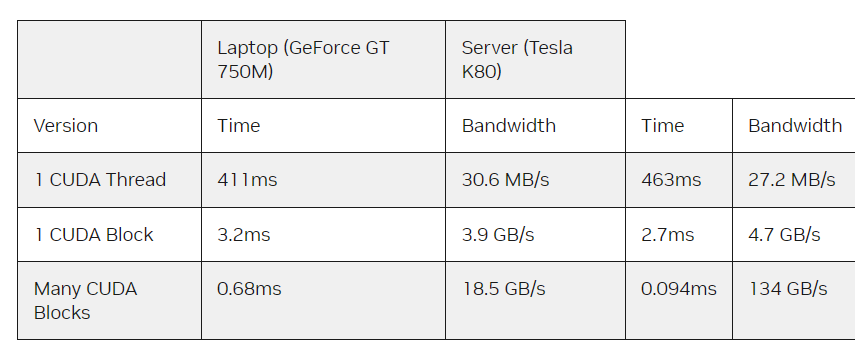
6:结果比较(性能)
额外知识补充
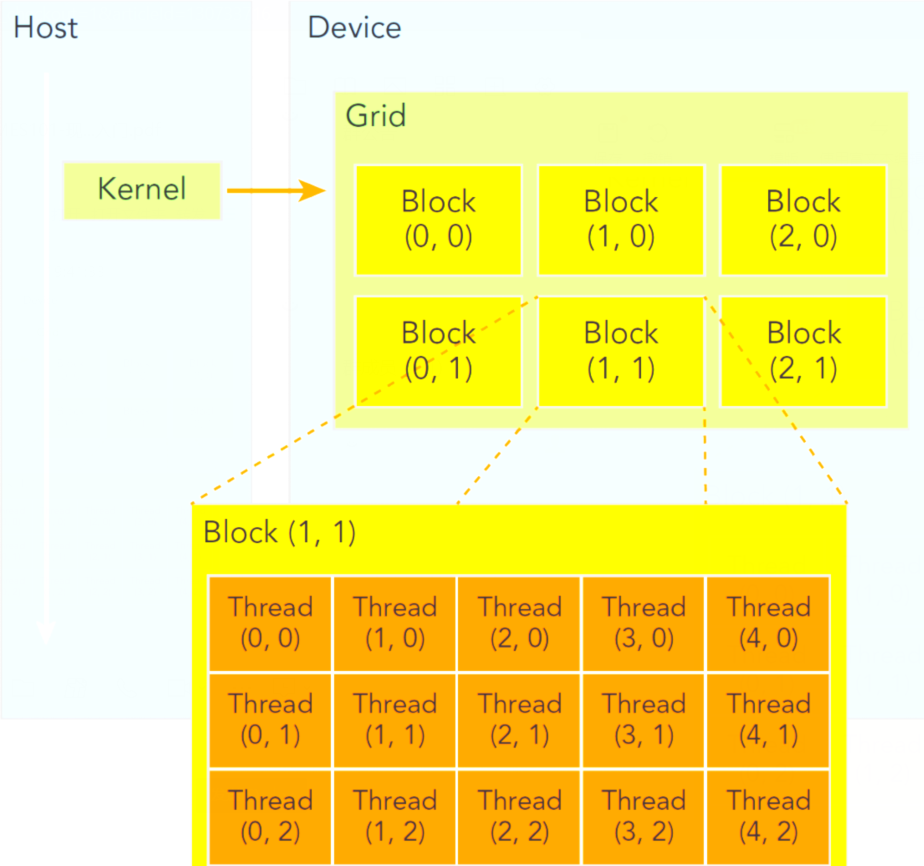
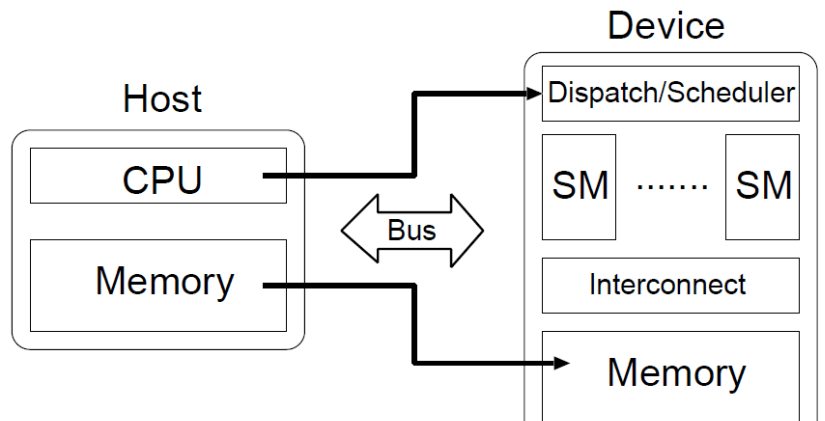
代码被分成两部分,一部分是在CPU上,也称之为在Host上,另一部分是在GPU上,也称之为在device上。他们两者的关系如下图所示
网格grids和线程块blocks
网格grids,在上层,至多可以分成三维的blocks,在不同block当中的线程是不能通信的;线程块blocks在相对较低的层级,同样可以将线程分成三维,而在同一个块中的线程是可以通信的。
对于一个核函数,只能有一个grid,但是可以有多个block,之所以将线程划分为grid和block是为了使得结构更清晰,便于线程管理,灵活运用。