1.依赖注入
简单来说:依赖注入就是把创建对象的权利交给框架
2.依赖注入解释
先看一下没有使用依赖注入的时候我们的代码。我们举例:个人 类,华为手机类,人需要使用手机。代码如下
- 人类
package DI;
public class Person {
private String name;
private HuaWeiPhone huaWeiPhone = new HuaWeiPhone();
public Person() {
this.name = "小明";
}
public void play() {
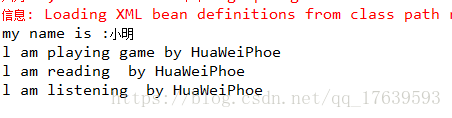
System.out.println("my name is :"+name);
huaWeiPhone.playGame();
huaWeiPhone.read();
huaWeiPhone.music();
}
}- 华为手机类
package DI;

public class HuaWeiPhone  implements Phone{

    @Override
    public void playGame() {
        System.out.println("l am playing game by HuaWeiPhoe");

    }

    @Override
    public void read() {
        System.out.println("l am reading  by HuaWeiPhoe");
    }

    @Override
    public void music() {
        System.out.println("l am listening  by HuaWeiPhoe");

    }

}- 输出结果
这样输出是没用的什么问题的,然后我们看看依赖注入怎么做?
- person 类
package DI;
public class Person {
private String name;
private Phone phone;
public Person(Phone phone) {
this.name = "小明";
this.phone =phone;
}
public void play() {
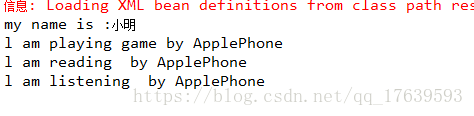
System.out.println("my name is :"+name);
phone.playGame();
phone.read();
phone.music();
}
}- 添加 Phone 接口
package DI;

public interface Phone {

    public void playGame();

    public void read();

    public void music();

}- 添加新的实现类
package DI;

public class ApplePhone implements Phone {

    @Override
    public void playGame() {
        System.out.println("l am playing game by ApplePhone");

    }

    @Override
    public void read() {
        System.out.println("l am reading  by ApplePhone");
    }

    @Override
    public void music() {
        System.out.println("l am listening  by ApplePhone");

    }

}- xml 配置
<?xml version="1.0" encoding="UTF-8"?>

<beans xmlns="http://www.springframework.org/schema/beans"
    xmlns:xsi="http://www.w3.org/2001/XMLSchema-instance"
    xsi:schemaLocation="http://www.springframework.org/schema/beans
    http://www.springframework.org/schema/beans/spring-beans-3.0.xsd">

   <bean id="helloWorld" class="hello.HelloWorld">
       <property name="message" value="Hello World!"/>
   </bean>

   <bean id="person" class="DI.Person">
        <constructor-arg ref="apple"> </constructor-arg>
   </bean>

   <bean id="huawei" class="DI.HuaWeiPhone"></bean>

   <bean id="apple" class="DI.ApplePhone"> </bean>


</beans>- 测试类
package DI;

import org.springframework.context.ApplicationContext;
import org.springframework.context.support.ClassPathXmlApplicationContext;

public class PersonTest {

    public static void main(String[] args) {
        ApplicationContext application = new ClassPathXmlApplicationContext("classpath:Beans.xml");
        Person person = (Person) application.getBean("person");
        person.play();
    }

}- 运行结果
3.对比总结
- 以上两种方法的不同点有
- 第一种方法使用 new 具体类 ,实现类的依赖。
- 第二种方法没有使用 new ,同时 第二种方法传入的是接口。
- 第二种方法在 xml 配置中实现了具体类的依赖
- 思考
第一种方法有什么不好?
答: 使用new 方法需要自己去查找依赖的类。在一个就是实现的是具体类,如果具体的手机类修改了,比如不用华为手机了改换苹果了,那同时也要修改person类。
第二种方法 有什么好?
答: 不适用new ,将new 的权利交给spring,spring创建对象(上节说的),同时注入依赖对象(看xml 配置)。通过使用接口可以不用管具体的实现。
为什么将new 的权利交给第三方就好呢?
答: 这就要从设计原则和软件维护方面来说了。设计原则中有个解耦合,越是独立的模块越好维护,所有spring 依赖注入的意义就在于他提供了类之间解耦合的依赖方式。让代码更好维护。
4.依赖注入的实现方式
- 4.1 通过构造方法(上面举例就是)
- 4.2 通过set 和get 方法。(不具体举例)
5.依赖注入比较特殊值类型
- 5.1 注入内部bean
- 5.2 注入集合
完!