Spring依赖注入:
- Spring 基于构造函数的依赖注入
- Spring 基于设值函数的依赖注入
- Spring 注入内部Beans
- Spring 注入集合
一、Spring基于构造函数的依赖注入:
当容器调用带有一组参数的类构造函数时,基于构造函数的id就可以完成,其中每个参数代表一个对其他类的依赖,我们用一个例子来理解Spring基于构造函数的依赖注入:
| 步骤 | 描述 |
|---|---|
| 1 | 创建一个名为 SpringExample 的项目,并在创建的项目中的 src 文件夹下创建包 com.tutorialspoint 。 |
| 2 | 使用 Add External JARs 选项添加必需的 Spring 库 |
| 3 | 在 com.tutorialspoint 包下创建 Java类 TextEditor,SpellChecker 和 MainApp |
| 4 | 在 src 文件夹下创建 Beans 的配置文件 spring-conf.xml |
| 5 | 最后一步是创建所有 Java 文件和 Bean 配置文件的内容并按照如下所示的方法运行应用程序。 |
TextEditor.java文件的内容:
package studio_day_2;

public class TextEditor {
    private SpellChecker spellChecker;
    public TextEditor(SpellChecker spellChecker){
        System.out.println("Inside TextEditor constructor." );
        this.spellChecker=spellChecker;
    }
    public void spellCheck() {
        spellChecker.checkSpelling();
    }
}
SpellChecker.java文件内容:
package studio_day_2;

public class SpellChecker {
    public SpellChecker(){
        System.out.println("Inside SpellChecker constructor." );
    }
    public void checkSpelling() {
        System.out.println("Inside checkSpelling." );
    }
}
Main文件内容:
package studio_day_2;

import org.springframework.context.ApplicationContext;
import org.springframework.context.support.ClassPathXmlApplicationContext;

public class Main {
    public static void main(String[] args) {
        ApplicationContext context=new ClassPathXmlApplicationContext("spring-conf.xml");
        TextEditor re = (TextEditor) context.getBean("texteditor");
        re.spellCheck();
    }
}
spring-conf.xml配置文件内容:
<?xml version="1.0" encoding="UTF-8"?>
<beans xmlns="http://www.springframework.org/schema/beans"
       xmlns:xsi="http://www.w3.org/2001/XMLSchema-instance"
       xsi:schemaLocation="http://www.springframework.org/schema/beans http://www.springframework.org/schema/beans/spring-beans.xsd">


    <bean id="texteditor" class="studio_day_2.TextEditor">
        <constructor-arg ref="spellChecker" />
    </bean>

    <bean id="spellChecker" class="studio_day_2.SpellChecker"/>

</beans>
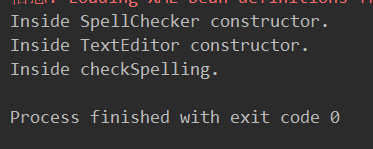
配置正常的情况,运行Main主函数:
其他情况:
- 当如果存在不止一个参数的时候,我们把参数传递给构造函数的时候,可能会存在歧义,所以我们在bean配置定义的时候,参数的顺序与构造函数的顺序相一致就可以了。
比如:
package x.y;
public class Foo {
   public Foo(Bar bar, Baz baz) {
      // ...
   }
}
spring-conf.xml配置文件
<beans>
   <bean id="foo" class="x.y.Foo">
      <constructor-arg ref="bar"/>
      <constructor-arg ref="baz"/>
   </bean>

   <bean id="bar" class="x.y.Bar"/>
   <bean id="baz" class="x.y.Baz"/>
</beans>
- 还有一种情况就是,多个参数,并且每种参数的类型不相同,我们只需要用不同的类型传递即可,添加bean定义中的type属性:
package x.y;
public class Foo {
   public Foo(int year, String name) {
      // ...
   }
}
spring-conf.xml文件
<beans>

   <bean id="exampleBean" class="examples.ExampleBean">
      <constructor-arg type="int" value="2001"/>
      <constructor-arg type="java.lang.String" value="Zara"/>
   </bean>

</beans>
- 最简单的传递方式,还是使用index属性来显式的指定构造函数的索引:
<beans>

   <bean id="exampleBean" class="examples.ExampleBean">
      <constructor-arg index="0" value="2001"/>
      <constructor-arg index="1" value="Zara"/>
   </bean>

</beans>
使用index的顺序给构造参数进行赋值即可。
二、Spring基于设值函数的依赖注入:
当容器用一个无参的构造函数或者一个无参的静态factory方法来初始化你的bean后,通过容器在你的bean上调用设值函数,基于设值函数的DI就可以完成。
下面给出一个例子,来理解Spring基于设值函数的依赖注入
| 步骤 | 描述 |
|---|---|
| 1 | 创建一个名为 SpringExample 的项目,并在创建的项目中的 src 文件夹下创建包 com.tutorialspoint 。 |
| 2 | 使用 Add External JARs 选项添加必需的 Spring 库 |
| 3 | 在 com.tutorialspoint 包下创建 Java类 TextEditor,SpellChecker 和 MainApp |
| 4 | 在 src 文件夹下创建 Beans 的配置文件 spring-conf.xml |
| 5 | 最后一步是创建所有 Java 文件和 Bean 配置文件的内容并按照如下所示的方法运行应用程序。 |
以下是TextEditor.java文件内容:
package studio_day_2;

public class TextEditor {
    private SpellChecker spellChecker;
    // a setter method to inject the dependency.
    public void setSpellChecker(SpellChecker spellChecker) {
        System.out.println("Inside setSpellChecker." );
        this.spellChecker = spellChecker;
    }
    // a getter method to return spellChecker
    public SpellChecker getSpellChecker() {
        return spellChecker;
    }
    public void spellCheck() {
        spellChecker.checkSpelling();
    }
}
以下是SpellChecker.java文件内容:
package studio_day_2;

public class SpellChecker {
    public SpellChecker(){
        System.out.println("Inside SpellChecker constructor." );
    }
    public void checkSpelling() {
        System.out.println("Inside checkSpelling." );
    }
}
以下是spring-conf.xml文件内容:
<?xml version="1.0" encoding="UTF-8"?>
<beans xmlns="http://www.springframework.org/schema/beans"
       xmlns:xsi="http://www.w3.org/2001/XMLSchema-instance"
       xsi:schemaLocation="http://www.springframework.org/schema/beans http://www.springframework.org/schema/beans/spring-beans.xsd">


    <bean id="texteditor" class="studio_day_2.TextEditor">
        <property name="spellChecker" ref="spellChecker"/>
    </bean>

    <bean id="spellChecker" class="studio_day_2.SpellChecker"/>


</beans>
基于设值函数的依赖注入和构造函数的依赖注入唯一的区别在于bean定义的不同,定义属性 的ref等于bean对应的id类就成为了设值函数的依赖注入,但是在TextEditor.java中我们必须定义POJO的类似set和get函数。自己的理解就是在bean定义中,定义我们在创建对象的时候,我们所需要的赋值操作,我们可以使用bean的依赖注入机制,对容器new的新对象进行赋值操作,比如这个例子中texteditor这个bean,就使用了spellChecker的值。
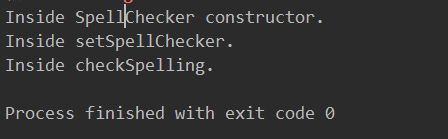
运行结果:
三、Spring注入内部bean
Spring注入内部bean实质就是在一个bean中再去定义一个内部的bean,这个bean归该bean所有的定义方式就是Spring的内部注入方式,其他代码和上一节基于设值函数的依赖注入完全相同。
如下所示:
<?xml version="1.0" encoding="UTF-8"?>

<beans xmlns="http://www.springframework.org/schema/beans"
    xmlns:xsi="http://www.w3.org/2001/XMLSchema-instance"
    xsi:schemaLocation="http://www.springframework.org/schema/beans
    http://www.springframework.org/schema/beans/spring-beans-3.0.xsd">

   <bean id="outerBean" class="...">
      <property name="target">
         <bean id="innerBean" class="..."/>
      </property>
   </bean>

</beans>
把以下这spring-conf.xml带入到上一节基于设值函数的依赖注入即可:
<?xml version="1.0" encoding="UTF-8"?>
<beans xmlns="http://www.springframework.org/schema/beans"
       xmlns:xsi="http://www.w3.org/2001/XMLSchema-instance"
       xsi:schemaLocation="http://www.springframework.org/schema/beans http://www.springframework.org/schema/beans/spring-beans.xsd">


    <bean id="texteditor" class="studio_day_2.TextEditor">

        <property name="spellChecker">
            <bean id="spellChecker" class="studio_day_2.SpellChecker"/>
        </property>

    </bean>

</beans>
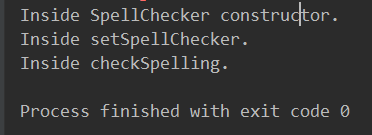
运行结果如下:
四、Spring注入集合
我们从前面的学习可以学到如何使用value属性来配置基本数据类型和在你的bean配置文件中使用标签的ref属性来配置对象引用。这两种情况下处理奇异值传递给一个bean。
但是如果我们现在想要传递多个值,那怎么办呢?
我们可以使用Java Collection类型:List、Set、Map和Properties来传递多个值:
| 元素 | 描述 |
|---|---|
| list | 它有助于连线,如注入一列值,允许重复。 |
| set | 它有助于连线一组值,但不能重复。 |
| map | 它可以用来注入名称-值对的集合,其中名称和值可以是任何类型。 |
| props | 它可以用来注入名称-值对的集合,其中名称和值都是字符串类型。 |
你可以使用list或者set来连接任何java.util.Collection的实现或数组。
你可能会遇到两种情况:
- 1. 传递集合中直接的值
- 2. 传递一个bean的引用作为集合的元素
我们用一个例子来理解这个集合注入机制:
| 步骤 | 描述 |
|---|---|
| 1 | 创建一个Spring的项目 |
| 2 | 使用 Add External JARs 选项,添加所需的 Spring 库 |
| 3 | 创建类JavaCollection、Main类 |
| 4 | 在 src 文件夹中创建 Beans 配置文件 spring-conf.xml |
| 5 | 最后一步是创建的所有Java文件和Bean配置文件的内容,并运行应用程序,解释如下所示。 |
这是javaCollection.java文件的内容:
package studio_day_2;
import java.util.*;

public class JavaCollection {
    List addressList;
    Set  addressSet;
    Map  addressMap;
    Properties addressProp;
    // a setter method to set List
    public void setAddressList(List addressList) {
        this.addressList = addressList;
    }
    // prints and returns all the elements of the list.
    public List getAddressList() {
        System.out.println("List Elements :"  + addressList);
        return addressList;
    }
    // a setter method to set Set
    public void setAddressSet(Set addressSet) {
        this.addressSet = addressSet;
    }
    // prints and returns all the elements of the Set.
    public Set getAddressSet() {
        System.out.println("Set Elements :"  + addressSet);
        return addressSet;
    }
    // a setter method to set Map
    public void setAddressMap(Map addressMap) {
        this.addressMap = addressMap;
    }
    // prints and returns all the elements of the Map.
    public Map getAddressMap() {
        System.out.println("Map Elements :"  + addressMap);
        return addressMap;
    }
    // a setter method to set Property
    public void setAddressProp(Properties addressProp) {
        this.addressProp = addressProp;
    }
    // prints and returns all the elements of the Property.
    public Properties getAddressProp() {
        System.out.println("Property Elements :"  + addressProp);
        return addressProp;
    }
}
下面是Main.java文件的内容:
package studio_day_2;

import org.springframework.context.ApplicationContext;
import org.springframework.context.support.ClassPathXmlApplicationContext;

public class Main {
    public static void main(String[] args) {
        ApplicationContext context=new ClassPathXmlApplicationContext("spring-conf.xml");
        JavaCollection javaCollection=(JavaCollection) context.getBean("javaCollection");
        javaCollection.getAddressList();
        javaCollection.getAddressMap();
        javaCollection.getAddressProp();
        javaCollection.getAddressSet();
    }
}
下面是spring-conf.xml配置文件:
<?xml version="1.0" encoding="UTF-8"?>
<beans xmlns="http://www.springframework.org/schema/beans"
       xmlns:xsi="http://www.w3.org/2001/XMLSchema-instance"
       xsi:schemaLocation="http://www.springframework.org/schema/beans http://www.springframework.org/schema/beans/spring-beans.xsd">


    <bean id="javaCollection" class="studio_day_2.JavaCollection">
        <!-- results in a setAddressList(java.util.List) call -->
        <property name="addressList">
            <list>
                <value>INDIA</value>
                <value>Pakistan</value>
                <value>USA</value>
                <value>USA</value>
            </list>
        </property>

        <!-- results in a setAddressSet(java.util.Set) call -->
        <property name="addressSet">
            <set>
                <value>INDIA</value>
                <value>Pakistan</value>
                <value>USA</value>
                <value>USA</value>
            </set>
        </property>

        <!-- results in a setAddressMap(java.util.Map) call -->
        <property name="addressMap">
            <map>
                <entry key="1" value="INDIA"/>
                <entry key="2" value="Pakistan"/>
                <entry key="3" value="USA"/>
                <entry key="4" value="USA"/>
            </map>
        </property>

        <!-- results in a setAddressProp(java.util.Properties) call -->
        <property name="addressProp">
            <props>
                <prop key="one">INDIA</prop>
                <prop key="two">Pakistan</prop>
                <prop key="three">USA</prop>
                <prop key="four">USA</prop>
            </props>
        </property>
    </bean>
</beans>
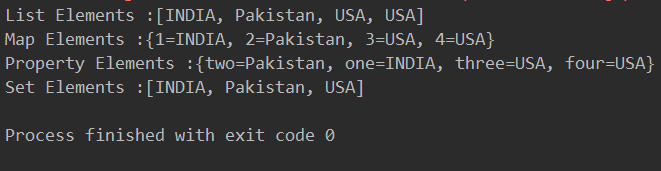
一切正常的情况下,运行结果如下:
注入Bean引用:
<?xml version="1.0" encoding="UTF-8"?>

<beans xmlns="http://www.springframework.org/schema/beans"
    xmlns:xsi="http://www.w3.org/2001/XMLSchema-instance"
    xsi:schemaLocation="http://www.springframework.org/schema/beans
    http://www.springframework.org/schema/beans/spring-beans-3.0.xsd">

   <!-- Bean Definition to handle references and values -->
   <bean id="..." class="...">

      <!-- Passing bean reference  for java.util.List -->
      <property name="addressList">
         <list>
            <ref bean="address1"/>
            <ref bean="address2"/>
            <value>Pakistan</value>
         </list>
      </property>

      <!-- Passing bean reference  for java.util.Set -->
      <property name="addressSet">
         <set>
            <ref bean="address1"/>
            <ref bean="address2"/>
            <value>Pakistan</value>
         </set>
      </property>

      <!-- Passing bean reference  for java.util.Map -->
      <property name="addressMap">
         <map>
            <entry key="one" value="INDIA"/>
            <entry key ="two" value-ref="address1"/>
            <entry key ="three" value-ref="address2"/>
         </map>
      </property>

   </bean>

</beans>
在使用 以上的bean定义的时候,我们必须定义setter方法。
注入null和空字符串的值
<bean id="..." class="exampleBean">
   <property name="email" value=""/>
</bean>
这个代码相当于java代码中的:exampleBean.setEmail("")
如果你需要传递一个NULL值:
<bean id="..." class="exampleBean">
   <property name="email"><null/></property>
</bean>
前面的例子相当于 Java 代码:exampleBean.setEmail(null)
总的来说spring的依赖注入机制是为了能更加灵活的管理Bean之间的依赖关系。
