fitlog包是用于自动版本管理和自动日志记录的Python包,是fastNLP团队开发的。
fitlog 中文文档 — fitlog 文档
我下载的是fitlog 0.9.15版本。
他们团队的文档写的真的不行,崩溃,FastNLP也很难用,fitlog也很难用,中文读起来比transformers和wandb的英文很难懂。
最近更新时间:2023.4.24
最早更新时间:2023.4.23
1. 安装
直接:pip install fitlog
2. 快速上手
fitlog init example
输出:

会在当前目录下创建example文件夹。其中,logs 文件夹是 fitlog 默认存放日志的文件夹;main.py 是训练程序的入口文件。
将main.py修改为训练代码:
import fitlog
import random
import argparse

# 从命令行传入参数
parser = argparse.ArgumentParser()
parser.add_argument('--demo', type=int, default=2)

# fitlog.commit(__file__)             # 自动 commit 你的代码
fitlog.set_log_dir("logs/")         # 设定日志存储的目录

args = parser.parse_args()
fitlog.add_hyper(args)  # 通过这种方式记录ArgumentParser的参数
fitlog.add_hyper_in_file(__file__)  # 记录本文件中写死的超参数

######hyper
rand_seed = 123
######hyper

random.seed(rand_seed)
best_acc, best_step, step = 0, 0, 0

for i in range(200):
    step += 1
    if step % 20 == 0:
        loss = random.random()
        acc = random.random()
        fitlog.add_loss(loss,name="Loss",step=step)
        fitlog.add_metric({

    "dev":{

    "Acc":acc}}, step=step)
        if acc>best_acc:
            best_acc = acc
            fitlog.add_best_metric({

    "dev":{

    "Acc":best_acc}})
            # 当dev取得更好的performance就在test上evaluate一下
            test_acc = random.random()
            fitlog.add_best_metric({

    "test":{

    "Acc":test_acc}})
fitlog.finish()                     # finish the logging
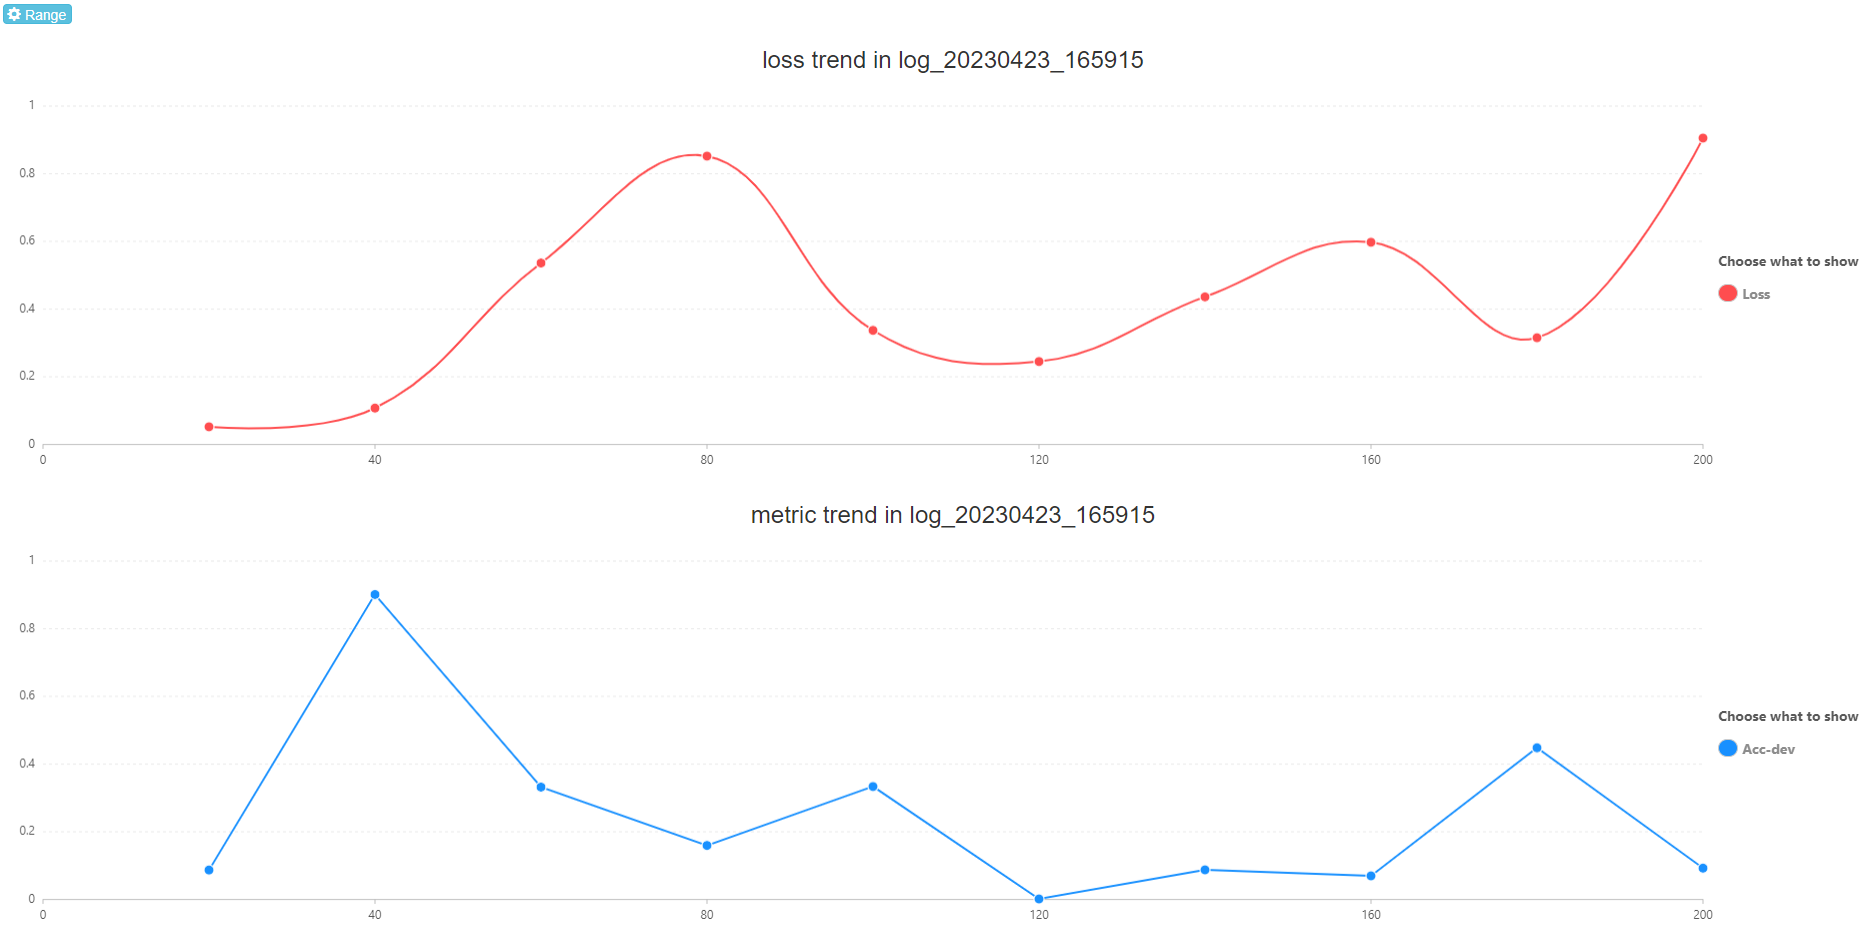
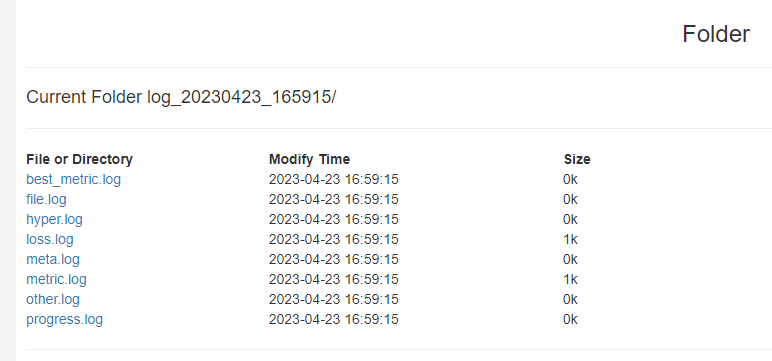
把工作目录切换到example文件夹下,更换代码中的rand_seed为124/123,分别运行一次,然后用fitlog log logs命令行打开网页(我用的是VSCode,所以这个IP地址是自动映射到本地的):
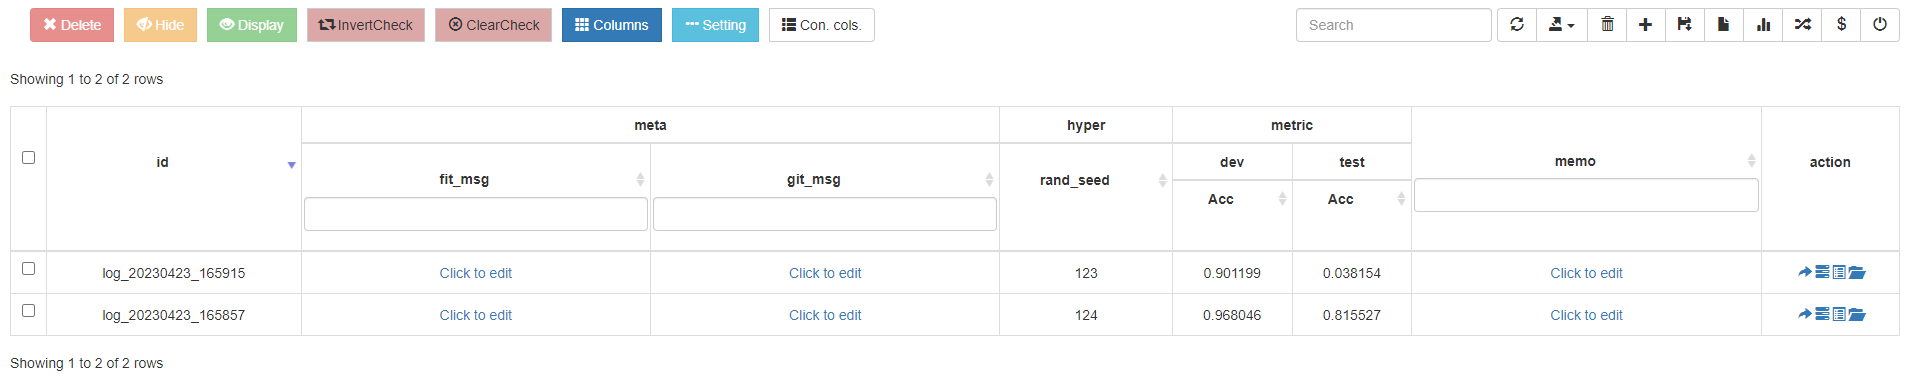
trend:
folder:
3. 命令行工具
Usage:
    fitlog <command> [<args>...]
    fitlog help <command>
    fitlog -h | --help
    fitlog --version

Supported commands
    init            Initialize a fitlog project
    list            List committed versions
    revert          Revert to a specific version
    log             Visualize logs by a server

See "fitlog help <command>" for more information on a specific command
init:初始化项目- 可以指定项目名称
<name>,或者默认把当前文件夹变成 fitlog 项目 - 给了–hide选项来隐藏.fitconfig 文件
- –with-git:创建 fitlog 时创建常规的 git
- 可以指定项目名称
Usage:
    fitlog init [<name>] [--hide] [--with-git]
    fitlog -h | --help

Arguments:
    name                    Name of the fitlog project

Options:
    -h --help               This is a command to initialize a fitlog project
    --hide                  Hide .fitconfig inside .fitlog folder
    --with-git              Initialize fitlog with a standard git

Examples:
    fitlog init project     Create a your project named project
    fitlog init             Init the current directory with fitlog
list:查看已有记录revert:版本回退
以上两项都被建议使用fitlog 提供的网页服务来完成,但是网页服务相关文档还没有写。
Usage:
    fitlog list [<num>] [--show-now]
    fitlog revert <fit_id>  [<path>] [--id-suffix]

Arguments:
    num                     The number of recent commits you want to list
    fit_id                  The id of the commit you want to revert
    path                    The path to revert the old commit version

Options:
    --show-now              Show the current version
    --id-suffix             Use commit id as the suffix of reverted folder
log:启动日志网页- 参数
<log-dir>表示日志存放的位置(set_log_dir指定的logs文件夹的位置) - 配置文件的名称
- 网页对应的端口号
- 服务器停止的时间
- 参数
Usage:
    fitlog log <log-dir> [--log-config-name=L] [--port=P] [--standby-hours=S] [--token=T] [--ip=I]

Arguments:
    log-dir                 Where to find logs.

Options:
    -h --help               This is a command to start fitlog server to visualize logs.
    -l=L --log-config-name  Log server config name. Must under the folder of <log-dir>. [default: default.cfg]
    -p=P --port             Which port to start to looking for usable port.[default: 5000]
    -s=S --standby-hours    How long to wait before the server . [default: 48]
    -t=T --token            If this is used, your have to specify the token when accessing. Default no token.
    -i=I --ip               Which ip to bind to. Default is 0.0.0.0 [default: 0.0.0.0]
4. 环境变量
在新版的 fitlog 中,用户可以在运行程序前使用环境变量 FITLOG_FLAG 影响 fitlog 的作用。 注意,该环境变量发生作用的时刻在于 fitlog 被 import 的瞬间,之后再改变环境变量不影响 fitlog 的作用。
环境变量 FITLOG_FLAG 有三种值: DEBUG , NO_COMMIT 和其它(包括为空)。
当 FITLOG_FLAG=DEBUG 时,程序中对 fitlog 的所有调用都不起作用。你也可以在代码中使用 fitlog.debug() 产生类似的效果。
当 FITLOG_FLAG=NO_COMMIT 时,程序中使用 fitlog 记录数据的调用正常,但 fitlog.commit() 失效。你可以在同时运行多个实验时,只进行一次自动 commit。
当 FITLOG_FLAG 为空或等于其它值时,不产生额外的效果。
5. 配置文件
待补
6. 常见问题
原文档中就写了的:
-
如果在debug阶段,不希望fitlog发生任何作用,那么直接在入口代码处加入fitlog.debug() 就可以让所有的fitlog调用不起任何作用,debug结束再注释掉这一行就可以了。
-
fitlog 默认只有在产生了第一个metric或loss的时候才会创建log文件夹,防止因为其它bug还没运行 到model就崩溃产生大量无意义的log。
-
如果使用了分布式训练,一般只需要主进程记录fitlog就好。这个时候可以通过将非主进程的fitlog设置fitlog.debug()
import torch
import fitlog

if torch.distributed.get_rank()>0:
    fitlog.debug()
-
不要通过多进程使用fitlog,即multiprocessing模块。
-
fitlog.commit()只需要在某个python文件调用就可以了,一般就在入口python文件即可。
-
传入到fitlog的各种参数、metric的名称,请 避免特殊符号(例如$%!#@空格),请只使用_与各种字母的组合 , 因为特殊符号可能导致网页端显示不正常。
7. fitlog API
未完待续。
set_log_dir(log_dir: str, new_log: bool = False):设定 log 文件夹的路径add_metric(value: Union[int, str, float, dict], step: int, name: str = None, epoch: int = None):用于添加 metric 。用此方法添加的值不会显示在表格中,但可以在单次训练的详情曲线图中查看。add_loss(value: Union[int, str, float, dict], step: int, name: str = None, epoch: int = None):用于添加 loss。用此方法添加的值不会显示在表格中,但可以在单次训练的详情曲线图中查看。add_best_metric(value: Union[int, str, float, dict], name: str = None):用于添加最好的 metric 。用此方法添加的值,会被显示在表格中的 metric 列及其子列中。相同key的内容将只保留最后一次传入的值。add_hyper(value: Union[int, str, float, dict, argparse.Namespace, configparser.ConfigParser], name=None):用于添加超参数。用此方法添加到值,会被放置在表格中的 hyper 列及其子列中add_hyper_in_file(file_path: str = None)
从文件读取参数。如下面的文件所示,两行”#####hyper”(至少5个#)之间的参数会被读取出来,并组成一个字典。每个变量最多只能出现在一行中, 如果多次出现,只会记录第一次出现的值。demo.py:
from numpy as np
import fitlog
# do something

fitlog.add_hyper_in_file(__file__)  # 会把本python文件的hyper加入进去
############hyper
lr = 0.01 # some comments
char_embed = word_embed = 300

hidden_size = 100
....
############hyper

# do something
model = Model(xxx)
相当于转换为如下字典,并添加到入参中:
{


    'lr': '0.01',
    'char_embed': '300'
    'word_embed': '300'
    'hidden_size': '100'
}
finish(status: int = 0, send_to_bot: str = None):使用此方法告知 fitlog 你的实验已经正确结束。你可以使用此方法来筛选出失败的实验。