学习Spring的简化开发,框架整合
目录
IoC(Inversion of Control)控制反转
使用对象时,由主动new产生对象转换为由外部提供对象,此过程中对象创建控制权由程序转移到外部,此思想称为控制反转。通俗的讲就是“将new对象的权利交给Spring,我们从Spring中获取对象使用即可”
-
Spring技术对IoC思想进行了实现
- Spring提供了一个容器,称为IoC容器,用来充当IoC思想中的“外部”
- IoC容器负责对象的创建、初始化等一系列工作,被创建或被管理的对象在IoC容器中统称为Bean
DI(Dependency Injection)依赖注入
- 在容器中建立bean与bean之间的依赖关系的整个过程,称为依赖注入。
- 目标:充分解耦
- 使用IoC容器管理bean(IoC)
- 在IoC容器内将有依赖关系的bean进行关系绑定(DI)
- 最终效果
- 使用对象时不仅可以直接从IoC容器中获取,并且获取到的bean已经绑定了所有的依赖关系
依赖注入的方式
- setter注入
- 简单类型
- 引用类型
- 构造器注入
- 简单类型
- 引用类型
方式选择
- 强制依赖使用构造器进行,使用setter注入有概率不进行注入导致null对象出现
- 可选依赖使用setter注入进行,灵活性强
- Spring框架倡导使用构造器,第三方框架内部大多数采用构造器注入的形式进行数据初始化,相对严谨
- 如果有必要可以两者同时使用,使用构造器注入完成强制依赖的注入,使用setter注入完成可选依赖的注入
- 实际开发过程中还要根据实际情况分析,如果受控对象没有提供setter方法就必须使用构造器注入
- 自己开发的模块推荐使用setter注入
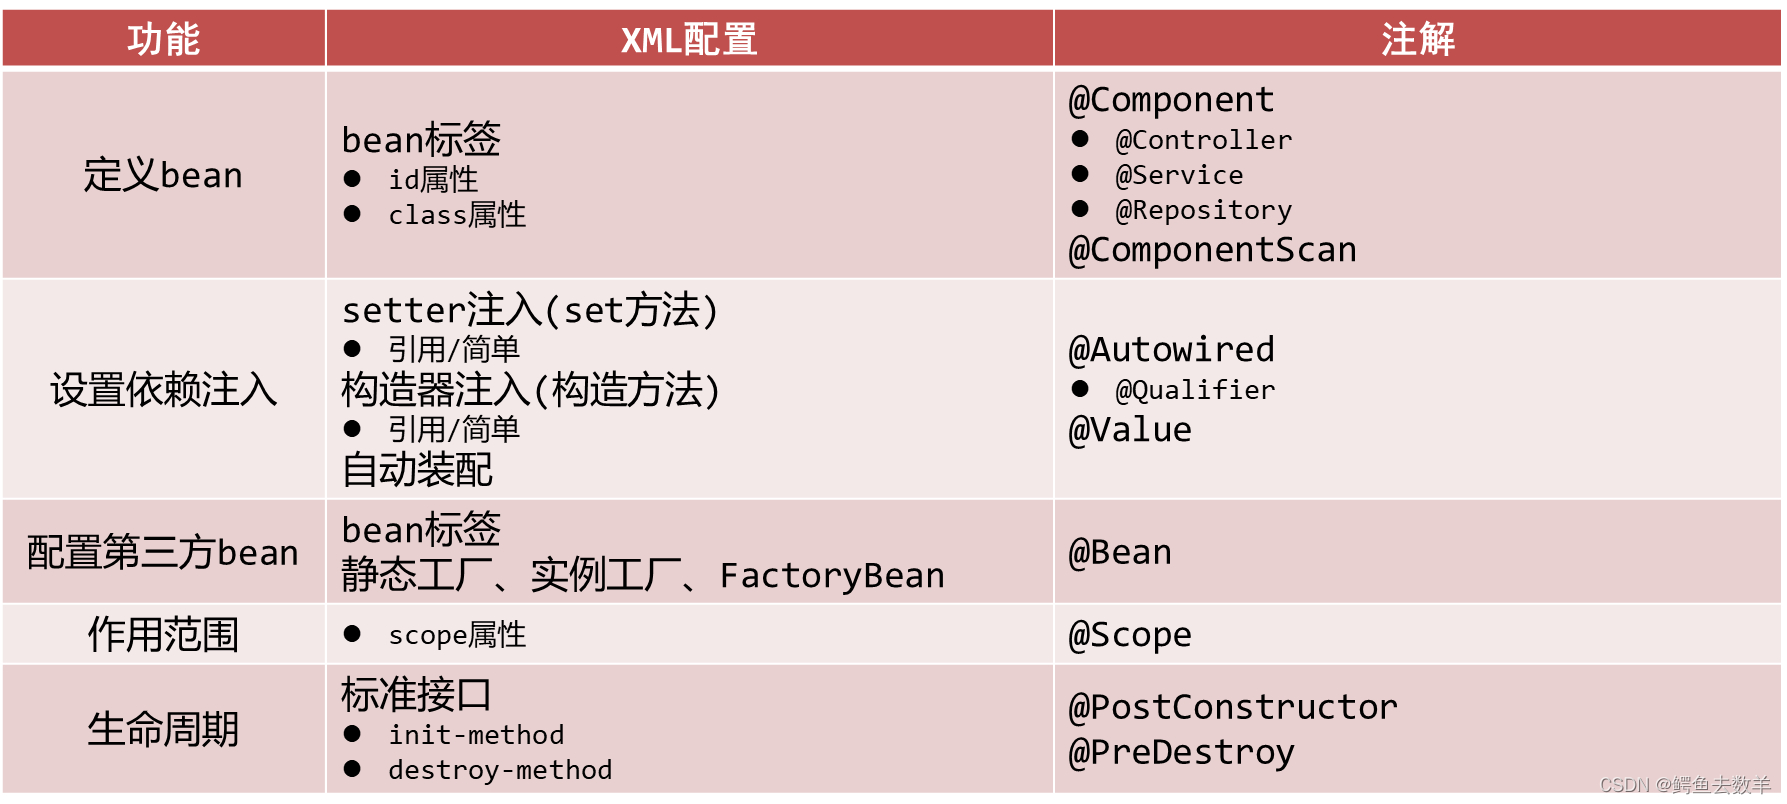
纯注解开发模式
Spring3.0开启了纯注解开发模式,使用Java类替代配置文件,开启了Spring快速开发赛道,Java类代替Spring核心配置文件
示例:整合MyBatis
【前置工作】
- 在pom.xml中添加spring-context、druid、mybatis、mysql-connector-java等基础依赖。
- 准备dao和service层基础代码
dao:
public interface AccountDao {


    @Insert("insert into tbl_account(name,money)values(#{name},#{money})")
    void save(Account account);

    @Delete("delete from tbl_account where id = #{id} ")
    void delete(Integer id);

    @Update("update tbl_account set name = #{name} , money = #{money} where id = #{id} ")
    void update(Account account);

    @Select("select * from tbl_account")
    List<Account> findAll();

    @Select("select * from tbl_account where id = #{id} ")
    Account findById(Integer id);

}
service:
AccountService:
public interface AccountService {


    void save(Account account);

    void delete(Integer id);

    void update(Account account);

    List<Account> findAll();

    Account findById(Integer id);

}
AccountServiceImpl:
//标注一个类为Spring容器的Bean
@Service("AccountService")
public class AccountServiceImpl implements AccountService {


    @Autowired//自动装配
    @Qualifier("accountDao")//开启指定名称装配bean
    private AccountDao accountDao;

    public void save(Account account) {


        accountDao.save(account);
    }

    public void update(Account account){


        accountDao.update(account);
    }

    public void delete(Integer id) {


        accountDao.delete(id);
    }

    public Account findById(Integer id) {


        return accountDao.findById(id);
    }

    public List<Account> findAll() {


        return accountDao.findAll();
    }

}
【第一步】导入Spring整合Mybatis依赖
<dependency>
    <groupId>org.springframework</groupId>
    <artifactId>spring-jdbc</artifactId>
    <version>5.2.10.RELEASE</version>
</dependency>

<dependency>
    <groupId>org.mybatis</groupId>
    <artifactId>mybatis-spring</artifactId>
    <version>1.3.0</version>
</dependency>
【第二步】创建JdbcConfig配置DataSource数据源
//第三方bean管理
public class JdbcConfig {


    @Value("${jdbc.driver}")
    private String DriverClassName;
    @Value("${jdbc.url}")
    private String Url;
    @Value("${jdbc.username}")
    private String Username;
    @Value("${jdbc.password}")
    private String Password;

    @Bean("dataSource")
    public DataSource dataSource(){


        DruidDataSource source = new DruidDataSource();
        source.setDriverClassName(DriverClassName);
        source.setUrl(Url);
        source.setUsername(Username);
        source.setPassword(Password);
        return source;
    }
}
【第三步】创建MybatisConfig整合mybatis
//Spring整合Mybatis,其实就是通过spring框架接管mybatis框架中核心对象的创建。
// Mybatis的核心对象为: SqlSessionFactory 整合就是通过Spring管理SqlSessionFactory对象的创建。
public class MybatisConfig {


//    返回SqlSessionFactory对象
    @Bean
    public SqlSessionFactoryBean sqlSessionFactory(DataSource dataSource){


        SqlSessionFactoryBean factoryBean = new SqlSessionFactoryBean();
        factoryBean.setTypeAliasesPackage("com.lic.pojo");
        //配druid
        factoryBean.setDataSource(dataSource);
        return factoryBean;
    }
//定义bean,返回MapperScannerConfigurer对象
    @Bean
    public MapperScannerConfigurer mapperScannerConfigurer(){


        MapperScannerConfigurer mapper = new MapperScannerConfigurer();
        mapper.setBasePackage("com.lic.dao");
        return mapper;
    }
}
【第四步】创建SpringConfig主配置类进行包扫描和加载其他配置类
- @Configuration注解用于设定当前类为配置类
- @ComponentScan注解用于设定扫描路径,此注解只能添加一次,多个数据请用数组格式
- @PropertySource注解加载properties文件
@Configuration//设定当前类为配置类
@ComponentScan("com.lic")//设定扫描路径
@PropertySource("classpath:jdbc.properties")//加载properties文件
@Import({

    JdbcConfig.class,MybatisConfig.class})//导到ioc的组件
public class SpringConfig {


}
【第五步】定义测试类进行测试
public class app {


    public static void main(String[] args) {


        AnnotationConfigApplicationContext context = new AnnotationConfigApplicationContext(SpringConfig.class);

        AccountService bean = context.getBean(AccountService.class);
        List<Account> all = bean.findAll();
        System.out.println(all);
        System.out.println(bean.findById(2));
    }
}
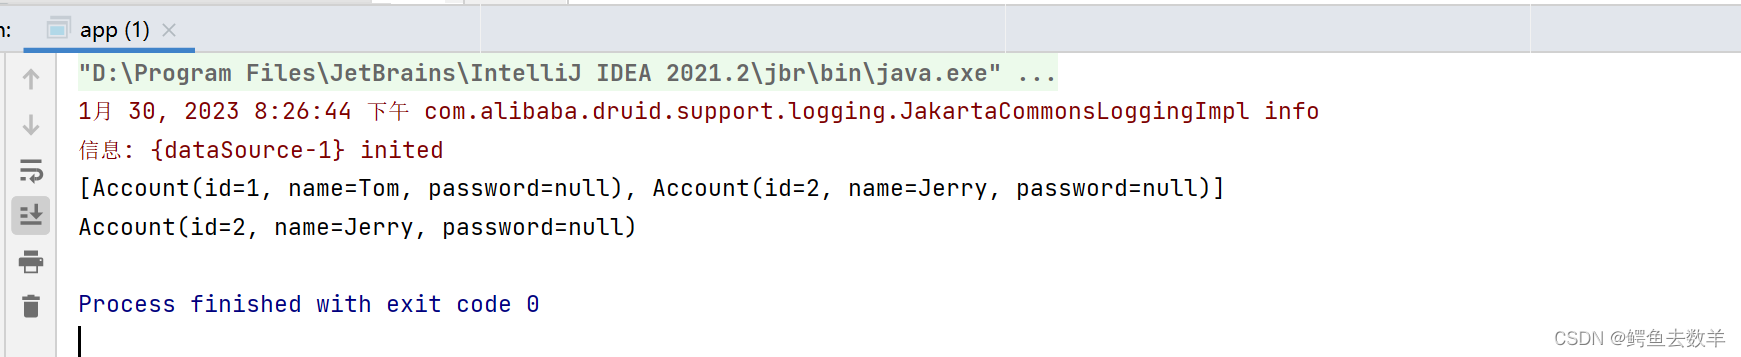
运行截图: