1、什么是Spring Security
顾名思义,Security的意思是安全,本质上就是一个很纯粹的权限管理框架,提供认证和授权两大核心功能。在目前主流的Spring生态中的项目,说到安全框架,基本上SpringSecurity是首选。当然,也可以使用Apache的Shiro框架,这两个基本上在国内安全性框架这一块几乎垄断。Java 领域老牌的权限管理框架当属 Shiro 了,Shiro 有着众多的优点,例如轻量、简单、易于集成等。当然 Shiro 也有不足,例如对 OAuth2 支持不够,在 Spring Boot 面前无法充分展示自己的优势等等,特别是随着现在 Spring Boot 和 Spring Cloud 的流行,Spring Security 正在走向舞台舞台中央。 Spring Security 是一个比 Shiro 优秀很多的权限管理框架,但是重量级、配置繁琐、门槛高这些问题一直困扰着 Spring Security 的开发者,也让很多初学者望而却步。直到 SpringBoot 横空出世,这些问题统统都得到缓解。在 SpringBoot 或者 Spring Cloud 中,如果想选择一个权限管理框架,几乎毫无疑问的选择 Spring Security,Shiro 在这个环境下已经不具备优势了。Spring Security是Spring采用 AOP思想,基于Servlet过滤器实现的安全框架。它提供了完善的认证机制和方法级的授权功能,是一款非常优秀的权限管理框架。
Spring Security开始于2003年年底,起因是Spring开发者邮件列表中的一个问题,有人提问是否考虑提供一个基于Spring的安全实现。 在当时Spring的社区相对较小,和今天的规模不可同日而语。其实Spring本身是从2003年初才作为一个sourceforge的项目出现的。 对这个问题的回应是,这的确是一个值得研究的领域,虽然限于时间问题阻碍了对它的继续研究。有鉴于此,一个简单的安全实现建立起来了,但没有发布。 几周之后,Spring社区的其他成员询问安全问题,代码就被提供给了他们。 随后又有人请求,在2004年一月左右,有20人在使用这些代码。 另外一些人加入到这些先行者中来,并建议在sourceforge上建立一个项目,项目在2004年3月正式建立起来。
2、Spring Security有多方便
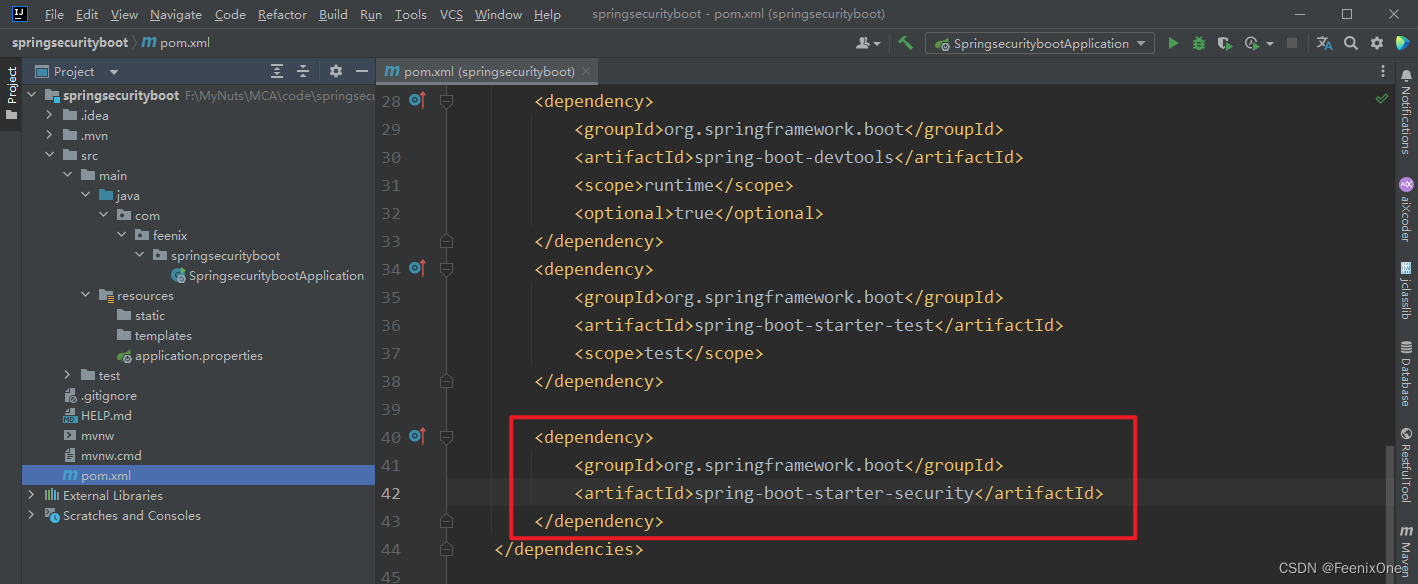
新建一个SpringBoot项目,引入Spring Security依赖
启动项目。是的,你没有看错,引入依赖之后,一项配置不用配,一句代码不用写,直接启动项目即可,启动成功之后访问:http://localhost:8080,会直接跳转到:http://localhost:8080/login
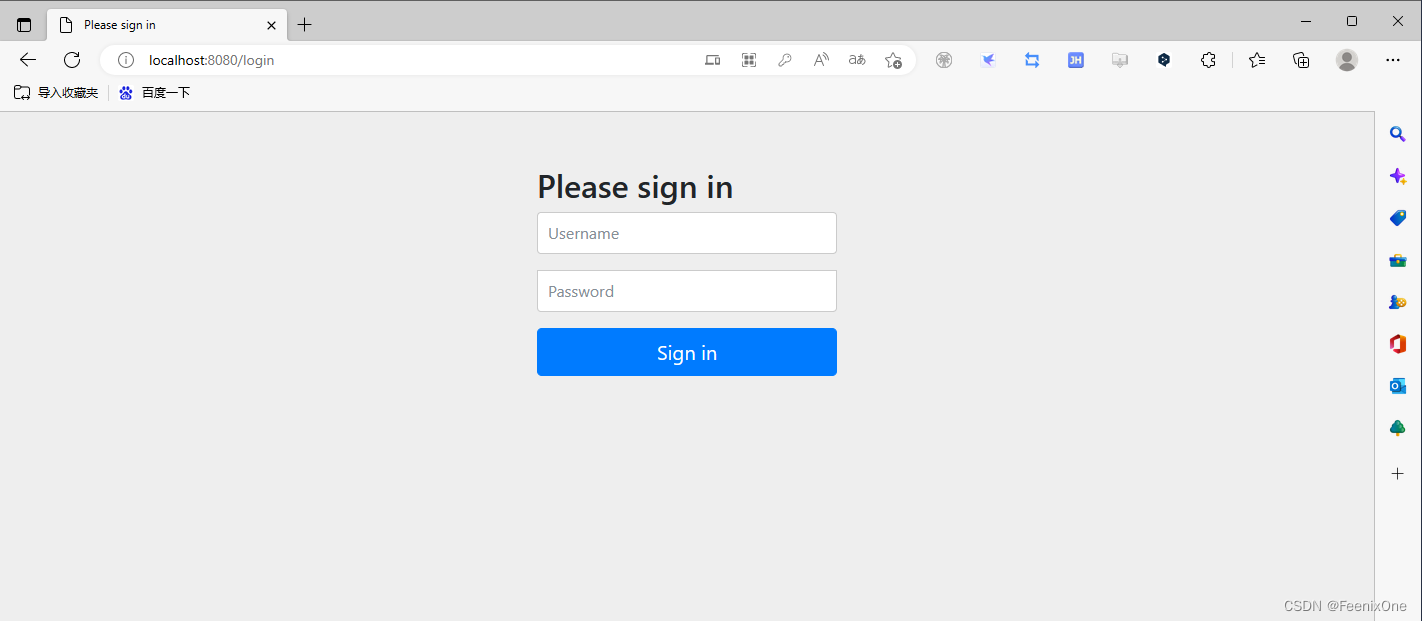
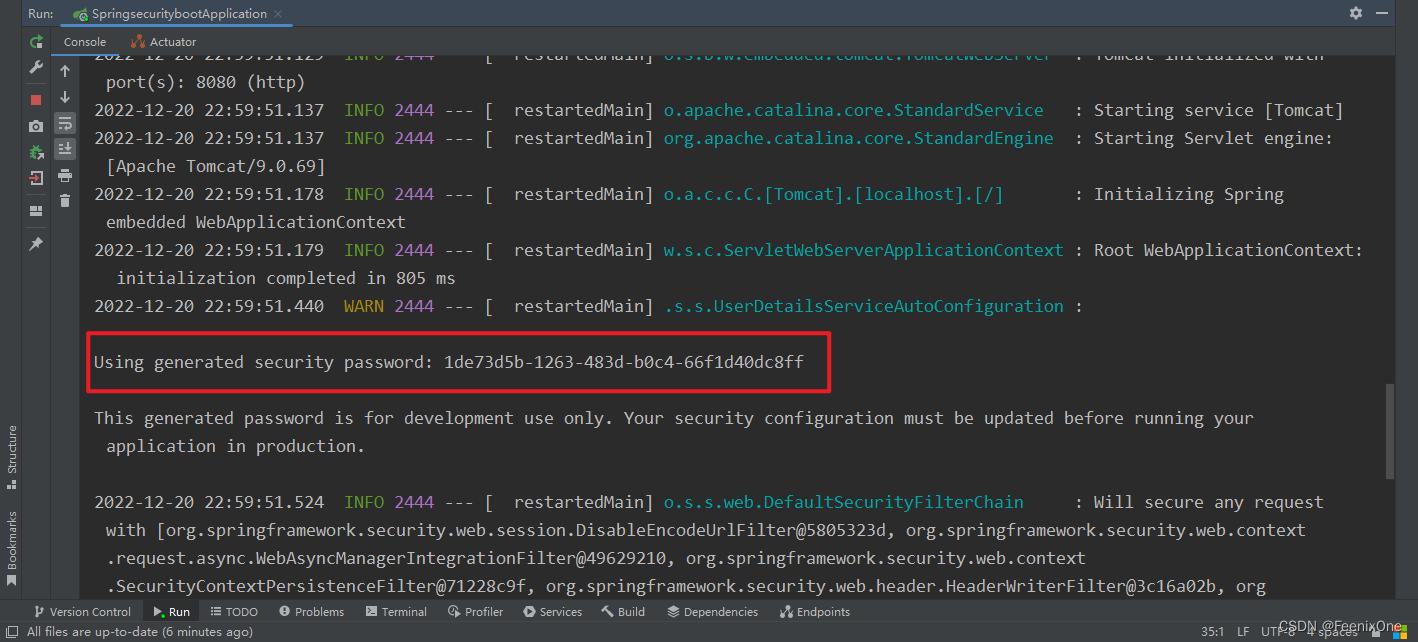
这就说明Spring Security已经生效,自动为项目做了登录拦截,那这个账号和密码又是什么呢?Security默认的账号是user,对应的密码在项目启动的时候已经在控制台上打印出来了
使用默认的账号密码进行登录

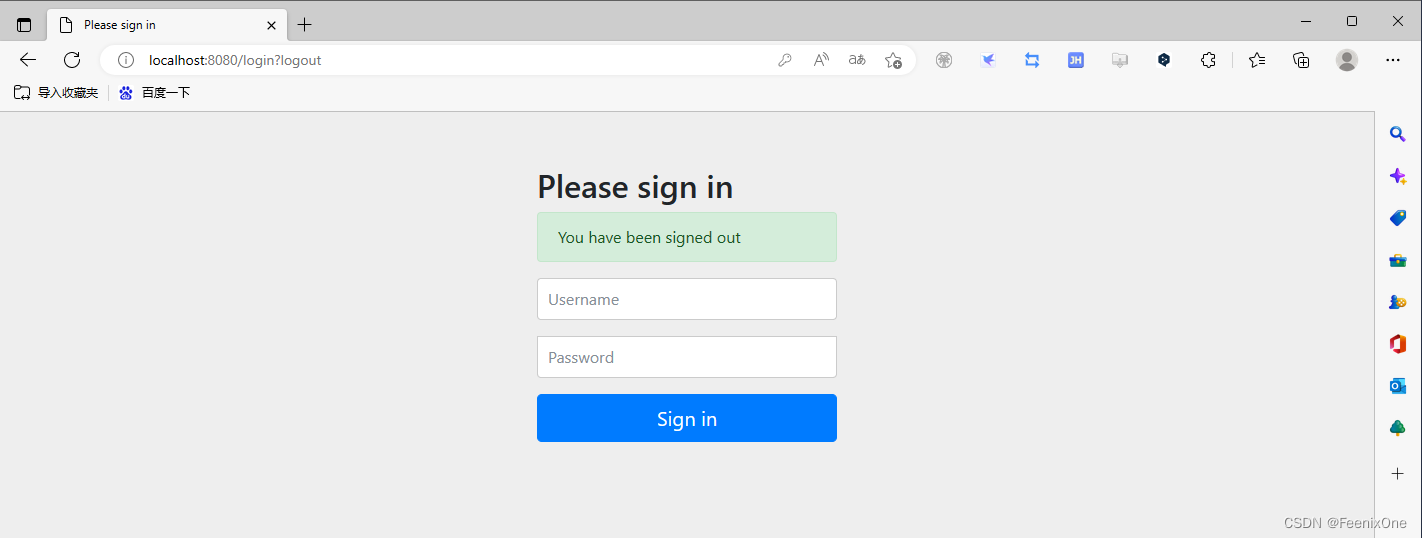
登录成功,报错是因为登录成功之后没地方给它跳转,那也没法去写个登出按钮,只能直接访问:http://localhost:8080/logout 进行登出
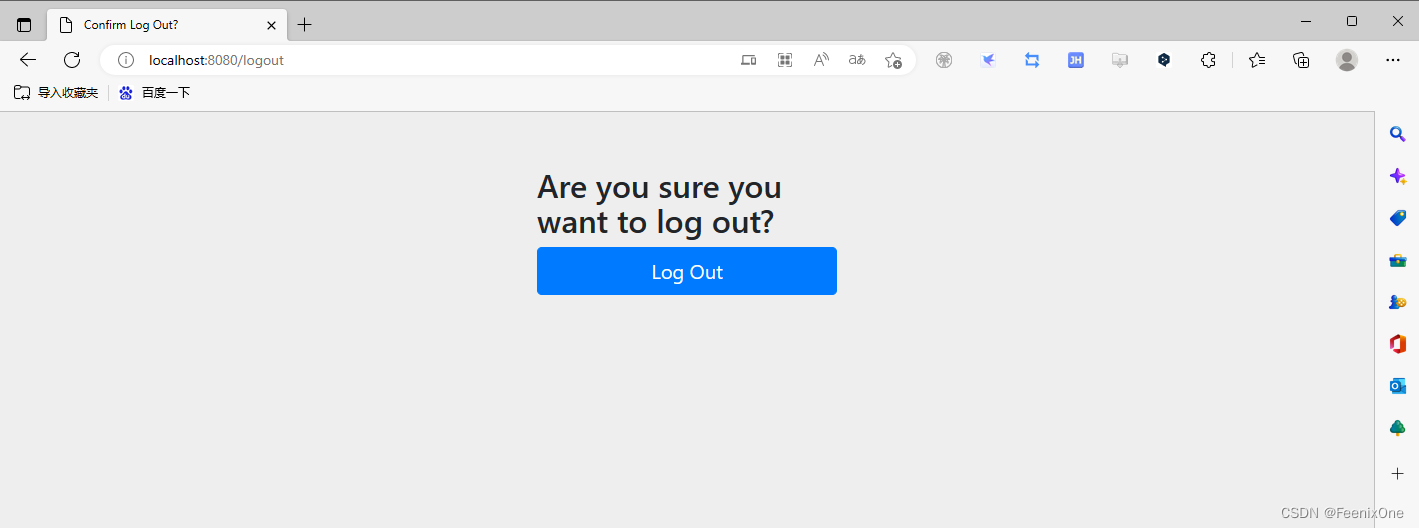
登出成功后,跳回登录页面
通过上面一个小小的演示,已经通过Security实现最基本的登录登出功能。当然,这也是个简易的不能再简易的演示,实际开发中肯定会使用到自定的登录页面,用户的认证,权限的管理,授权的方式....后面有机会都会一一介绍。主要是这一篇我主要想梳理一下Security的设计原理,后面如果有空的话,就把Security的应用一并加入,顺便说一说Security如何实现JWT认证,以及分布式授权OAuth2.0的本质究竟是怎样。
3、Spring Security使用详解
Web项目环境搭建
引入相关的一些依赖,thymeleaf、MyBatis、MySQL、Druid等

配置文件该写的要写
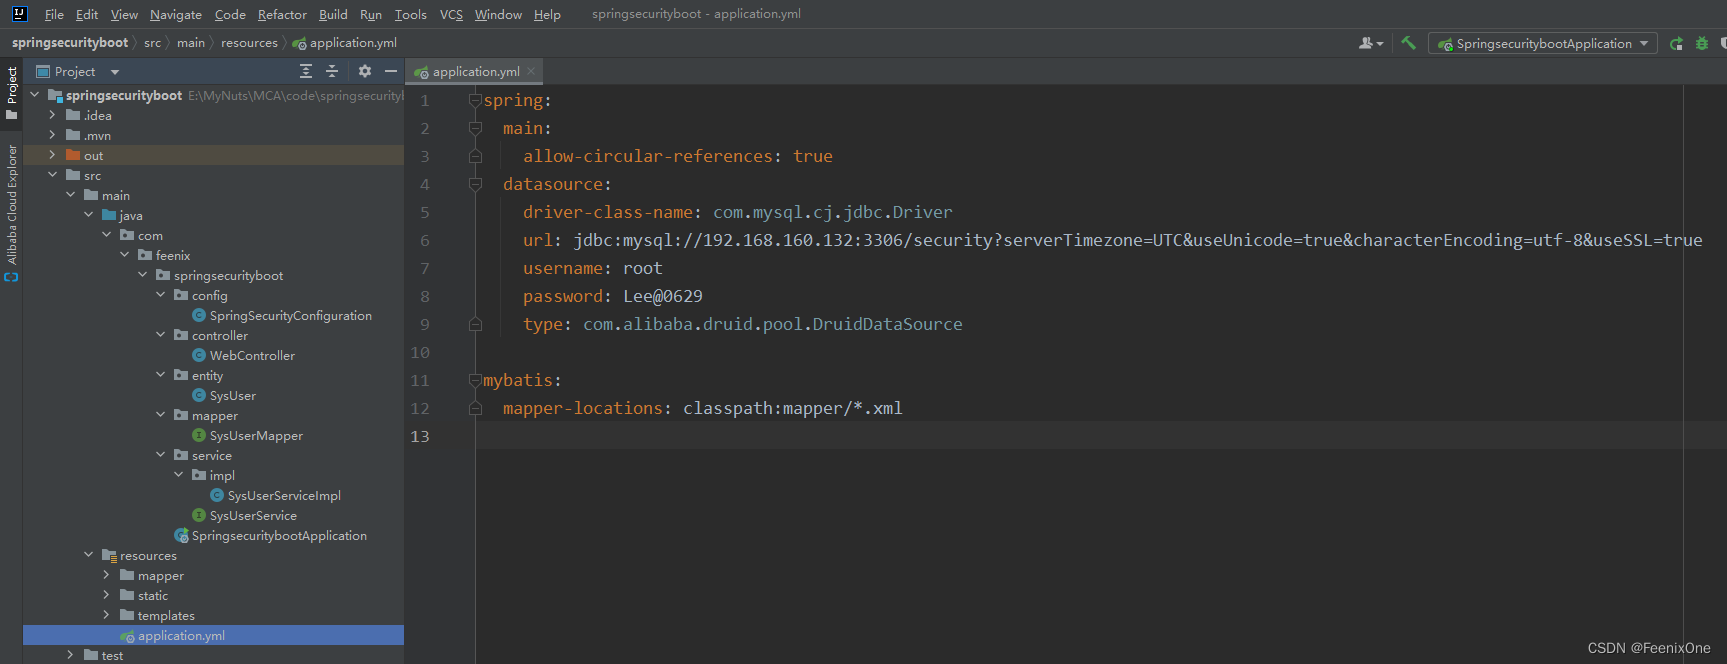
spring:
main:
allow-circular-references: true
这是为了解决SpringBoot 2.6版本之后产生的循环依赖问题,依赖循环引用是不鼓励的,默认情况下是禁止的。不过作为最后的手段,可以通过设置对应的参数来自动打破循环。
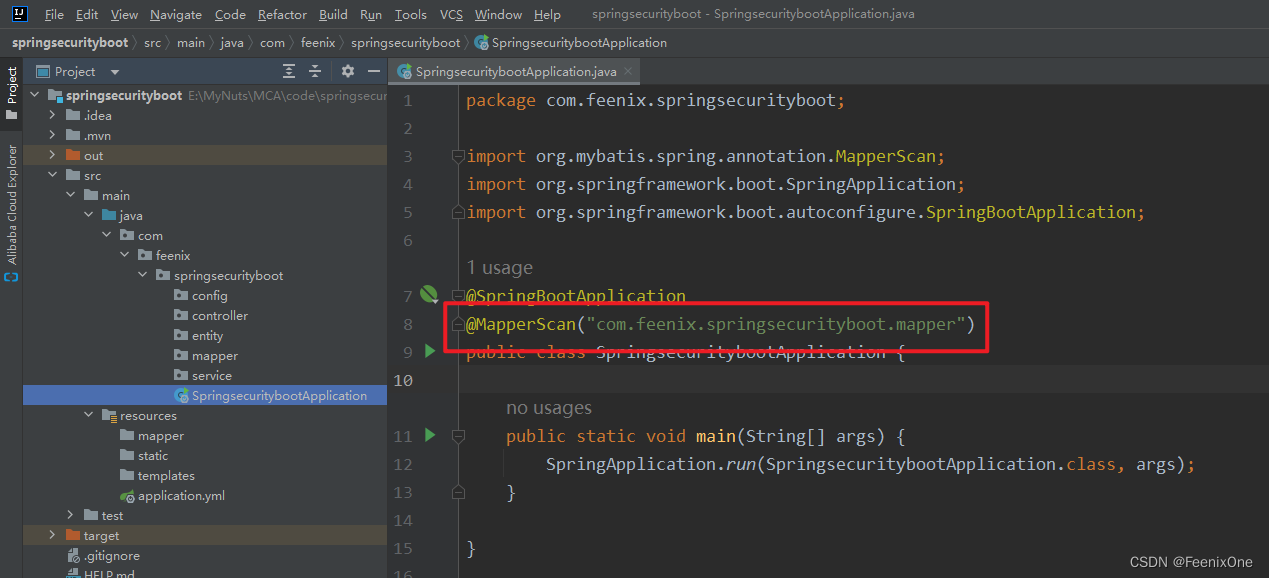
主启动类不要忘记加上MyBatis的扫描注解
创建用户对象相关
创建User实体
package com.feenix.springsecurityboot.entity;

public class User {

    private Integer id;
    private String userName;
    private String password;
    private String salt;

    public Integer getId() {
        return id;
    }

    public void setId(Integer id) {
        this.id = id;
    }

    public String getUserName() {
        return userName;
    }

    public void setUserName(String userName) {
        this.userName = userName;
    }

    public String getPassword() {
        return password;
    }

    public void setPassword(String password) {
        this.password = password;
    }

    public String getSalt() {
        return salt;
    }

    public void setSalt(String salt) {
        this.salt = salt;
    }

    @Override
    public String toString() {
        return "User{" +
                "id=" + id +
                ", userName='" + userName + '\'' +
                ", password='" + password + '\'' +
                ", salt='" + salt + '\'' +
                '}';
    }
}
创建UserService接口
package com.feenix.springsecurityboot.service;

import org.springframework.security.core.userdetails.UserDetailsService;

public interface SysUserService extends UserDetailsService {
}
创建UserServiceImpl实现类
package com.feenix.springsecurityboot.service.impl;
import com.feenix.springsecurityboot.entity.SysUser;
import com.feenix.springsecurityboot.mapper.SysUserMapper;
import com.feenix.springsecurityboot.service.SysUserService;
import org.springframework.beans.factory.annotation.Autowired;
import org.springframework.security.core.authority.SimpleGrantedAuthority;
import org.springframework.security.core.userdetails.User;
import org.springframework.security.core.userdetails.UserDetails;
import org.springframework.security.core.userdetails.UsernameNotFoundException;
import org.springframework.stereotype.Service;
import java.util.ArrayList;
import java.util.List;
@Service
public class SysUserServiceImpl implements SysUserService {
@Autowired
private SysUserMapper userMapper;
/**
* 根据用户名查询用户信息
*/
@Override
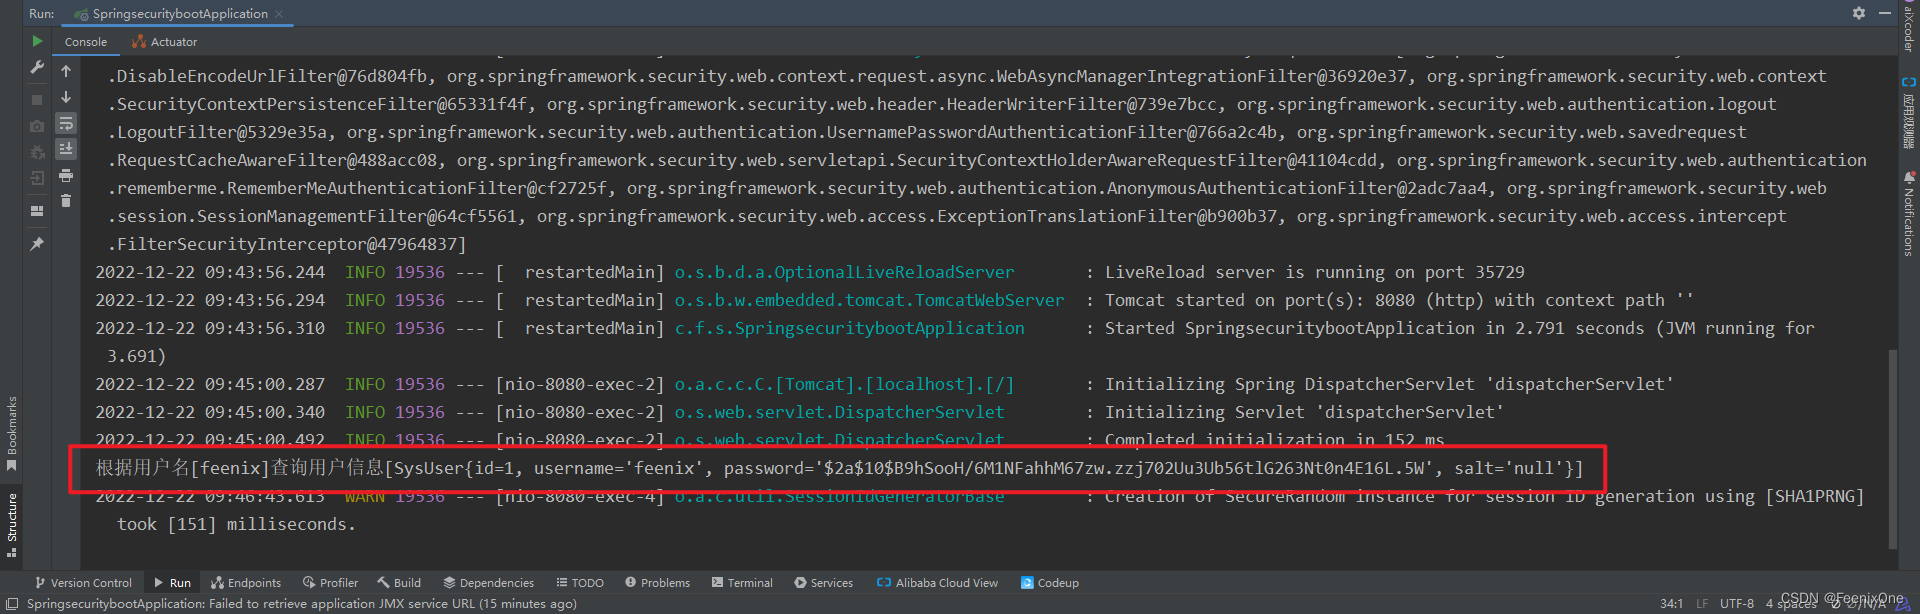
public UserDetails loadUserByUsername(String username) throws UsernameNotFoundException {
SysUser sysUser = userMapper.findByUsername(username);
System.out.println("根据用户名[" + username + "]查询用户信息[" + sysUser.toString() + "]");
if (null != sysUser) {
List<SimpleGrantedAuthority> authorityList = new ArrayList<>();
authorityList.add(new SimpleGrantedAuthority("ROLE_FEENIX"));
UserDetails userDetails = new User(username,
sysUser.getPassword(),
true,
true,
true,
true,
authorityList) {
};
return userDetails;
}
return null;
}
}
这里需要注意一下,authorityList.add(new SimpleGrantedAuthority("ROLE_FEENIX")); 就是给当前用户赋予了[FEENIX]这个角色。Security的对于角色名的要求是前面必须加上"ROLE_"前缀,且必须为大写。
创建UserMapper
package com.feenix.springsecurityboot.mapper;

import com.feenix.springsecurityboot.entity.SysUser;

public interface SysUserMapper {

    SysUser findByUsername(String username);

}
创建UserMapper.xml
<?xml version="1.0" encoding="UTF-8" ?>
<!DOCTYPE mapper PUBLIC "-//mybatis.org//DTD Mapper 3.0//EN"
                        "http://mybatis.org/dtd/mybatis-3-mapper.dtd">

<!-- 使用接口 代理的方式 namespace必须和接口的全路径名称一致 -->
<mapper namespace="com.feenix.springsecurityboot.mapper.UserMapper">
    <select id="findByUsername" resultType="com.feenix.springsecurityboot.entity.SysUser">
        select
            id,
            username,
            password,
            salt
        from
            sys_user
        where
            username = #{username}
    </select>
</mapper>
构建Security配置类
SpringBoot 2.7版本之前,对于Security的构建是通过继承WebSecurityConfigurerAdapter类,并重写其中的configure来配置自定义的过滤器链
package com.feenix.springsecurityboot.config;

import com.feenix.springsecurityboot.service.SysUserService;
import org.springframework.beans.factory.annotation.Autowired;
import org.springframework.context.annotation.Bean;
import org.springframework.context.annotation.Configuration;
import org.springframework.security.config.annotation.authentication.builders.AuthenticationManagerBuilder;
import org.springframework.security.config.annotation.web.builders.HttpSecurity;
import org.springframework.security.config.annotation.web.builders.WebSecurity;
import org.springframework.security.config.annotation.web.configuration.EnableWebSecurity;
import org.springframework.security.config.annotation.web.configuration.WebSecurityConfigurerAdapter;
import org.springframework.security.crypto.bcrypt.BCryptPasswordEncoder;
import org.springframework.security.web.authentication.rememberme.JdbcTokenRepositoryImpl;
import org.springframework.security.web.authentication.rememberme.PersistentTokenRepository;

import javax.sql.DataSource;

/**
 * 可以理解成是 SpringSecurity的配置文件
 * WebSecurityCofniguration中 @Bean注解 把 FilterChainProxy 注入到了容器中 而且名称为springSecurityFilterChain
 * 而 FilterChainProxy 对象是通过 WebSecurity 构建的
 */
@Configuration
@EnableWebSecurity
public class SpringSecurityConfiguration extends WebSecurityConfigurerAdapter {

    @Autowired
    private SysUserService sysUserService;

    @Autowired
    private BCryptPasswordEncoder bCryptPasswordEncoder;

    @Autowired
    private PersistentTokenRepository persistentTokenRepository;

    @Override
    protected void configure(AuthenticationManagerBuilder auth) throws Exception {
        auth.userDetailsService(sysUserService)      // 数据库认证
            .passwordEncoder(bCryptPasswordEncoder); // 设置加密处理的方式
    }

    @Override
    public void configure(WebSecurity web) throws Exception {
        super.configure(web);
    }

    /**
     * HttpSecurity 相当于 SpringSecurity 配置文件中 http 标签
     */
    @Override
    protected void configure(HttpSecurity http) throws Exception {
        http.authorizeRequests()
            .antMatchers("/login.html", "/css/**", "/img/**").permitAll() // 可以匿名访问的资源(通通放过)
            .antMatchers("/**").hasAnyRole("FEENIX").anyRequest().authenticated() // 所有的请求都需要角色认证
            .and().formLogin().loginPage("/login.html").loginProcessingUrl("/login").defaultSuccessUrl("/home.html").permitAll() // 自定义登录界面、登录地址不拦截、登录成功后跳转界面
            .and().rememberMe().tokenRepository(persistentTokenRepository) // 开启[记住我]功能,并将记住我的相关信息持久化到数据库中
            .and().csrf().disable(); // 关闭CSRF
    }

    @Bean
    public BCryptPasswordEncoder bCryptPasswordEncoder() {
        return new BCryptPasswordEncoder();
    }

    @Bean
    public PersistentTokenRepository persistentTokenRepository(DataSource dataSource){
        JdbcTokenRepositoryImpl tokenRepository = new JdbcTokenRepositoryImpl();
        tokenRepository.setDataSource(dataSource);
        return tokenRepository;
    }

}
值得注意的是,配置需要对应角色访问的用户:
.antMatchers("/**").hasAnyRole("FEENIX").anyRequest().authenticated()
这句代表,所有的访问资源(/**)得要有(FEENIX)这个角色才可以访问。上面在UserServiceImpl中对用户进行了授权,通过authorityList.add(new SimpleGrantedAuthority("ROLE_FEENIX"))给当前用户赋予了[FEENIX]这个角色,所以才可以通过拦截访问资源。
SpringBoot升级到 2.7 版本之后,因为WebSecurityConfigurerAdapter已经过期,应该使用新的写法:如果想要配置过滤器链,可以通过自定义 SecurityFilterChain Bean 来实现,如果想要配置WebSecurity,可以通过 WebSecurityCustomizer Bean 来实现。
访问:http://localhost:8080/login.html,输入账号密码,可以看到Security从自定义的SysUserService中走数据库查询用户查看是否具有相应的权限。
4、深入理解HttpSecurity设计
从上面的代码中可以看出,Security的核心过滤器链的配置便是继承WebSecurityConfigurerAdapter之后,重写其protected void configure(HttpSecurity http)方法。在这个方法中,通过HttpSecurity对象提供的各种方法设置拦截的各种权限。那么HttpSecurity这块是如何处理的呢,先看下HttpSecurity的类图结构
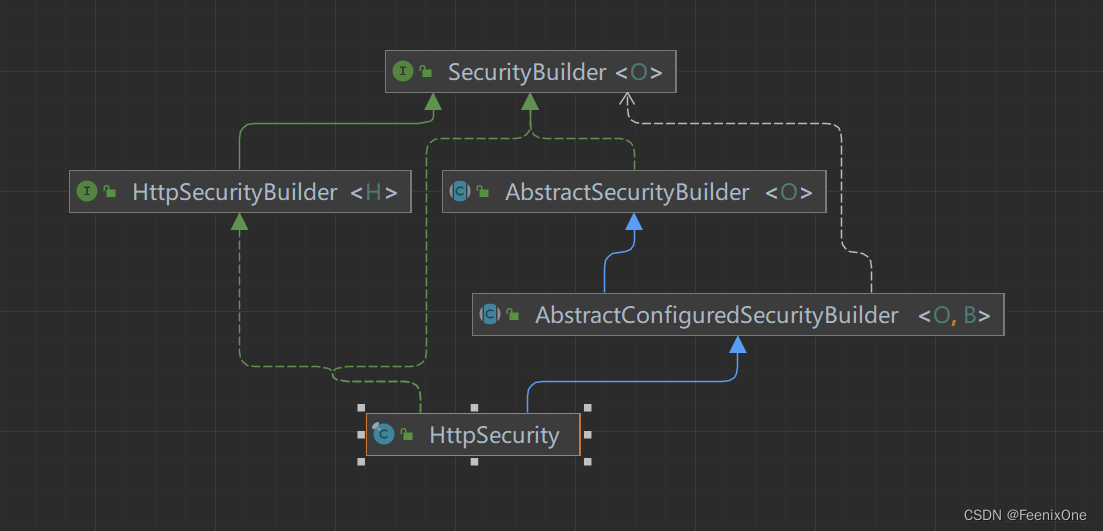
其实HttpSecurity的类图结构相对比较简单,继承了一个父类,实现了两个接口。
SecurityBuilder接口
先来看看SecurityBuilder接口,通过字面含义就可以知道这是一个创建对象的工具类
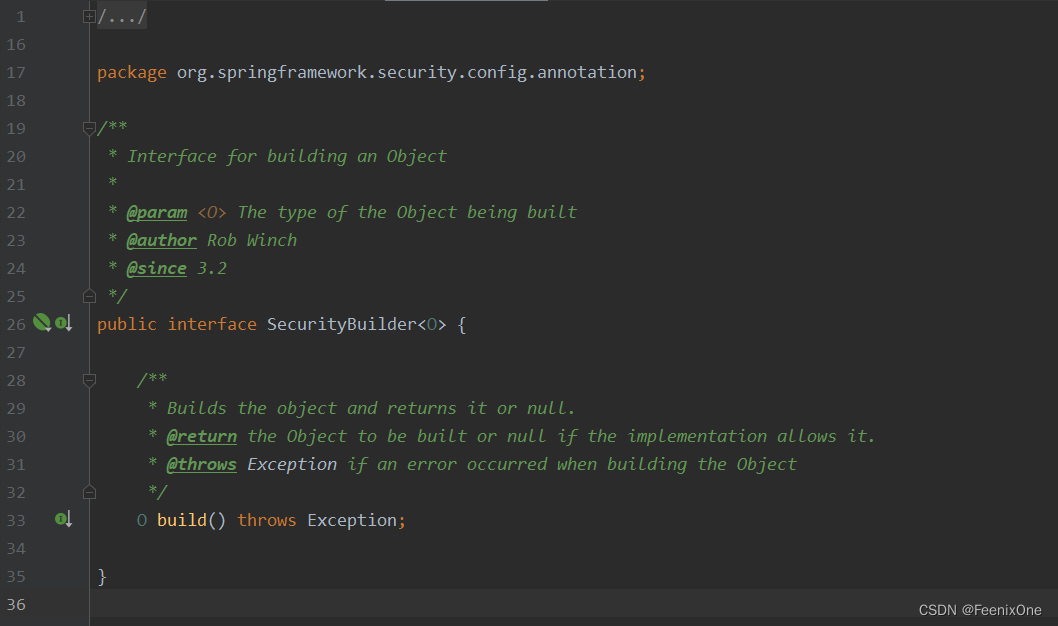
通过源码可以看到在SecurityBuilder中提供了一个build()方法。在接口名称处声明了一个泛型,而build()方法返回的正好是这个泛型的对象,其实就很好理解了:也就是SecurityBuilder会创建指定类型的对象。结合HttpSecurity中实现SecurityBuilder接口时指定的泛型,可以看出创建的具体对象是什么类型:SecurityBuilder会通过build方法创建一个DefaultSecurityFilterChain对象,也就是拦截请求的那个默认的过滤器链对象。
打开AbstractSecurityBuilder,进入到build()方法中的doBuild()方法

就会进入到AbstractConfiguredSecurityBuilder中的方法

进入到HttpSecurity中可以查看performBuild()方法的具体实现

在构造方法中绑定了对应的请求匹配器和过滤器集合:
private RequestMatcher requestMatcher = AnyRequestMatcher.INSTANCE;
对应的请求匹配器则是 AnyRequestMatcher 匹配所有的请求。当然现在比较关心默认的过滤器链中的过滤器是哪来的?
AbstractConfiguredSecurityBuilder抽象类
然后现在再来看看AbstractConfiguredSecurityBuilder这个抽象类,它其实是SecurityBuilder的实现,在这儿需要搞清楚它们之间的关系:
1、SecurityBuilder 声明了build方法;
2、AbstractSecurityBuilder 提供了获取对象的方法以及控制一个对象只能build一次;
3、AbstractConfiguredSecurityBuilder 除了提供对对象细粒度的控制外,还扩展了对configurer的操作;
首先 AbstractConfiguredSecurityBuilder 中定义了一个枚举类,将整个构建过程分为 5 种状态,也可 以理解为构建过程生命周期的五个阶段,通过这些状态来管理需要构建的对象的不同阶段:
    /**
	 * The build state for the application
	 *
	 * @author Rob Winch
	 * @since 3.2
	 */
	private enum BuildState {

		/**
		 * This is the state before the {@link Builder#build()} is invoked
		 */
		UNBUILT(0),

		/**
		 * The state from when {@link Builder#build()} is first invoked until all the
		 * {@link SecurityConfigurer#init(SecurityBuilder)} methods have been invoked.
		 */
		INITIALIZING(1),

		/**
		 * The state from after all {@link SecurityConfigurer#init(SecurityBuilder)} have
		 * been invoked until after all the
		 * {@link SecurityConfigurer#configure(SecurityBuilder)} methods have been
		 * invoked.
		 */
		CONFIGURING(2),

		/**
		 * From the point after all the
		 * {@link SecurityConfigurer#configure(SecurityBuilder)} have completed to just
		 * after {@link AbstractConfiguredSecurityBuilder#performBuild()}.
		 */
		BUILDING(3),

		/**
		 * After the object has been completely built.
		 */
		BUILT(4);

		private final int order;

		BuildState(int order) {
			this.order = order;
		}

		public boolean isInitializing() {
			return INITIALIZING.order == this.order;
		}

		/**
		 * Determines if the state is CONFIGURING or later
		 * @return
		 */
		public boolean isConfigured() {
			return this.order >= CONFIGURING.order;
		}

	}
然后来看看AbstractConfiguredSecurityBuilder中的add方法
	/**
	 * Adds {@link SecurityConfigurer} ensuring that it is allowed and invoking
	 * {@link SecurityConfigurer#init(SecurityBuilder)} immediately if necessary.
	 * @param configurer the {@link SecurityConfigurer} to add
	 */
	@SuppressWarnings("unchecked")
	private <C extends SecurityConfigurer<O, B>> void add(C configurer) {
		Assert.notNull(configurer, "configurer cannot be null");
		Class<? extends SecurityConfigurer<O, B>> clazz = (Class<? extends SecurityConfigurer<O, B>>) configurer
				.getClass();
		synchronized (this.configurers) {
			if (this.buildState.isConfigured()) {
				throw new IllegalStateException("Cannot apply " + configurer + " to already built object");
			}
			List<SecurityConfigurer<O, B>> configs = null;
			if (this.allowConfigurersOfSameType) {
				configs = this.configurers.get(clazz);
			}
			configs = (configs != null) ? configs : new ArrayList<>(1);
			configs.add(configurer);
			this.configurers.put(clazz, configs);
			if (this.buildState.isInitializing()) {
				this.configurersAddedInInitializing.add(configurer);
			}
		}
	}
add 方法,这相当于是在收集所有的配置类。将所有的 xxxConfigure 收集起来存储到 configurers
中,将来再统一初始化并配置,configurers 本身是一个 LinkedHashMap ,key 是配置类的 class,value 是一个集合,集合里边放着 xxxConfigure 配置类。当需要对这些配置类进行集中配置的时候,会通过 getConfigurers 方法获取配置类,这个获取过程就是把 LinkedHashMap 中的 value 拿出来,放到一个集合中返回。
然后来看看AbstractConfiguredSecurityBuilder中的doBuild方法
	/**
	 * Executes the build using the {@link SecurityConfigurer}'s that have been applied
	 * using the following steps:
	 *
	 * <ul>
	 * <li>Invokes {@link #beforeInit()} for any subclass to hook into</li>
	 * <li>Invokes {@link SecurityConfigurer#init(SecurityBuilder)} for any
	 * {@link SecurityConfigurer} that was applied to this builder.</li>
	 * <li>Invokes {@link #beforeConfigure()} for any subclass to hook into</li>
	 * <li>Invokes {@link #performBuild()} which actually builds the Object</li>
	 * </ul>
	 */
	@Override
	protected final O doBuild() throws Exception {
		synchronized (this.configurers) {
			this.buildState = BuildState.INITIALIZING;
			beforeInit();
			init();
			this.buildState = BuildState.CONFIGURING;
			beforeConfigure();
			configure();
			this.buildState = BuildState.BUILDING;
			O result = performBuild();
			this.buildState = BuildState.BUILT;
			return result;
		}
	}
init方法:完成所有相关过滤器的初始化;
configure方法:完成HttpSecurity和对应的过滤器的绑定;
HttpSecurity实现类
HttpSecurity 做的事情,就是进行各种各样的 xxxConfigurer 配置。HttpSecurity 中有大量类似的方法,过滤器链中的过滤器就是这样一个一个配置的,每个配置方法的结尾都会来一句 getOrApply,这个是干嘛的?
	/**
	 * If the {@link SecurityConfigurer} has already been specified get the original,
	 * otherwise apply the new {@link SecurityConfigurerAdapter}.
	 * @param configurer the {@link SecurityConfigurer} to apply if one is not found for
	 * this {@link SecurityConfigurer} class.
	 * @return the current {@link SecurityConfigurer} for the configurer passed in
	 * @throws Exception
	 */
	@SuppressWarnings("unchecked")
	private <C extends SecurityConfigurerAdapter<DefaultSecurityFilterChain, HttpSecurity>> C getOrApply(C configurer)
			throws Exception {
		C existingConfig = (C) getConfigurer(configurer.getClass());
		if (existingConfig != null) {
			return existingConfig;
		}
		return apply(configurer);
	}
getConfigurer 方法是在它的父类 AbstractConfiguredSecurityBuilder 中定义的,目的就是去查看当前 这个 xxxConfigurer 是否已经配置过了。如果当前 xxxConfigurer 已经配置过了,则直接返回,否则调用 apply 方法,这个 apply 方法最终会调 用到 AbstractConfiguredSecurityBuilder中的add 方法,将当前配置 configurer 收集起来 HttpSecurity 中还有一个 addFilter 方法
	@Override
	public HttpSecurity addFilter(Filter filter) {
		Integer order = this.filterOrders.getOrder(filter.getClass());
		if (order == null) {
			throw new IllegalArgumentException("The Filter class " + filter.getClass().getName()
					+ " does not have a registered order and cannot be added without a specified order. Consider using addFilterBefore or addFilterAfter instead.");
		}
		this.filters.add(new OrderedFilter(filter, order));
		return this;
	}
这个 addFilter 方法的作用,主要是在各个 xxxConfigurer 进行配置的时候,会调用到这个方法, (xxxConfigurer 就是用来配置过滤器的),把 Filter 都添加到 fitlers 变量中。
这就是 HttpSecurity 的一个大致工作流程。把握住了这个工作流程,剩下的就只是一些简单的重 复的 xxxConfigurer 配置了。
5、深入理解SecurityConfigurer设计
SecurityConfigurer 在 Spring Security 中是一个非常重要的角色。在前面的内容中曾经多次提到过,Spring Security 过滤器链中的每一个过滤器,都是通过 xxxConfigurer 来进行配置的,而这些 xxxConfigurer 实际上都是 SecurityConfigurer 的实现。
/**
 * Allows for configuring a {@link SecurityBuilder}. All {@link SecurityConfigurer} first
 * have their {@link #init(SecurityBuilder)} method invoked. After all
 * {@link #init(SecurityBuilder)} methods have been invoked, each
 * {@link #configure(SecurityBuilder)} method is invoked.
 *
 * @param <O> The object being built by the {@link SecurityBuilder} B
 * @param <B> The {@link SecurityBuilder} that builds objects of type O. This is also the
 * {@link SecurityBuilder} that is being configured.
 * @author Rob Winch
 * @see AbstractConfiguredSecurityBuilder
 */
public interface SecurityConfigurer<O, B extends SecurityBuilder<O>> {

	/**
	 * Initialize the {@link SecurityBuilder}. Here only shared state should be created
	 * and modified, but not properties on the {@link SecurityBuilder} used for building
	 * the object. This ensures that the {@link #configure(SecurityBuilder)} method uses
	 * the correct shared objects when building. Configurers should be applied here.
	 * @param builder
	 * @throws Exception
	 */
	void init(B builder) throws Exception;

	/**
	 * Configure the {@link SecurityBuilder} by setting the necessary properties on the
	 * {@link SecurityBuilder}.
	 * @param builder
	 * @throws Exception
	 */
	void configure(B builder) throws Exception;

}
这个接口里的方法不多就两个:void init(B builder)和void configure(B builder)。在init方法和configure方法中的形参都是SecurityBuilder类型,而SecurityBuilder是用来构建过滤器链 的【DefaultSecurityFilterChainProxy】 SecurityConfigurer的实现当然很多。具体的Configurer实现可以先不关注,目前需要了解的SecurityConfigurer的核心实现有三个

SecurityConfigurerAdapter抽象类
SecurityConfigurerAdapter 实现了 SecurityConfigurer 接口,我们所使用的大部分的xxxConfigurer 也都是 SecurityConfigurerAdapter 的子类。SecurityConfigurerAdapter 在 SecurityConfigurer 的基础上,还扩展出来了几个非常好用的方法
CompositeObjectPostProcessor
	/**
	 * An {@link ObjectPostProcessor} that delegates work to numerous
	 * {@link ObjectPostProcessor} implementations.
	 *
	 * @author Rob Winch
	 */
	private static final class CompositeObjectPostProcessor implements ObjectPostProcessor<Object> {

		private List<ObjectPostProcessor<?>> postProcessors = new ArrayList<>();

		@Override
		@SuppressWarnings({ "rawtypes", "unchecked" })
		public Object postProcess(Object object) {
			for (ObjectPostProcessor opp : this.postProcessors) {
				Class<?> oppClass = opp.getClass();
				Class<?> oppType = GenericTypeResolver.resolveTypeArgument(oppClass, ObjectPostProcessor.class);
				if (oppType == null || oppType.isAssignableFrom(object.getClass())) {
					object = opp.postProcess(object);
				}
			}
			return object;
		}

		/**
		 * Adds an {@link ObjectPostProcessor} to use
		 * @param objectPostProcessor the {@link ObjectPostProcessor} to add
		 * @return true if the {@link ObjectPostProcessor} was added, else false
		 */
		private boolean addObjectPostProcessor(ObjectPostProcessor<?> objectPostProcessor) {
			boolean result = this.postProcessors.add(objectPostProcessor);
			this.postProcessors.sort(AnnotationAwareOrderComparator.INSTANCE);
			return result;
		}

	}
首先一开始声明了一个 CompositeObjectPostProcessor 实例,CompositeObjectPostProcessor 是 ObjectPostProcessor 的一个实现,ObjectPostProcessor 本身是一个后置处理器,该后置处理器默认有两个实现:AutowireBeanFactoryObjectPostProcessor 和 CompositeObjectPostProcessor。
其中 AutowireBeanFactoryObjectPostProcessor 主要是利用 了 AutowireCapableBeanFactory 对 Bean 进行手动注册,因为在 Spring Security 中,很多对象都是手动 new 出来的,这些 new 出来的对象和容器没有任何关系,利用AutowireCapableBeanFactory 可以将这些手动 new 出来的对象注入到容器中,而AutowireBeanFactoryObjectPostProcessor 的主要作用就是完成这件事;
CompositeObjectPostProcessor 则是一个复合的对象处理器,里边维护了一个 List 集合,这个List 集合中,大部分情况下只存储一条数据,那就是AutowireBeanFactoryObjectPostProcessor ,用来完成对象注入到容器的操作,如果用户自己手动调用了 addObjectPostProcessor 方法,那么 CompositeObjectPostProcessor 集合中维护的数据就会多出来一条,CompositeObjectPostProcessor 的 postProcess 方法中,会遍历集合中的所有 ObjectPostProcessor,挨个调用其 postProcess 方法对对象进行后置处理。
and
	/**
	 * Return the {@link SecurityBuilder} when done using the {@link SecurityConfigurer}.
	 * This is useful for method chaining.
	 * @return the {@link SecurityBuilder} for further customizations
	 */
	public B and() {
		return getBuilder();
	}
该方法返回值是一个 securityBuilder,securityBuilder 实际上就是 HttpSecurity,在HttpSecurity 中去配置不同的过滤器时,可以使用 and 方法进行链式配置,就是因为这里定义了 and 方法并返回了 securityBuilder 实例。
这就是 SecurityConfigurerAdapter 的主要功能,后面大部分的 xxxConfigurer 都是基于此类来实 现的。
GlobalAuthenticationConfigurerAdapter抽象类
这玩意儿看名字就知道是一个跟全局配置有关的东西,它本身实 现了 SecurityConfigurerAdapter 接口,但是并未对方法做具体的实现,只是将泛型具体化了。
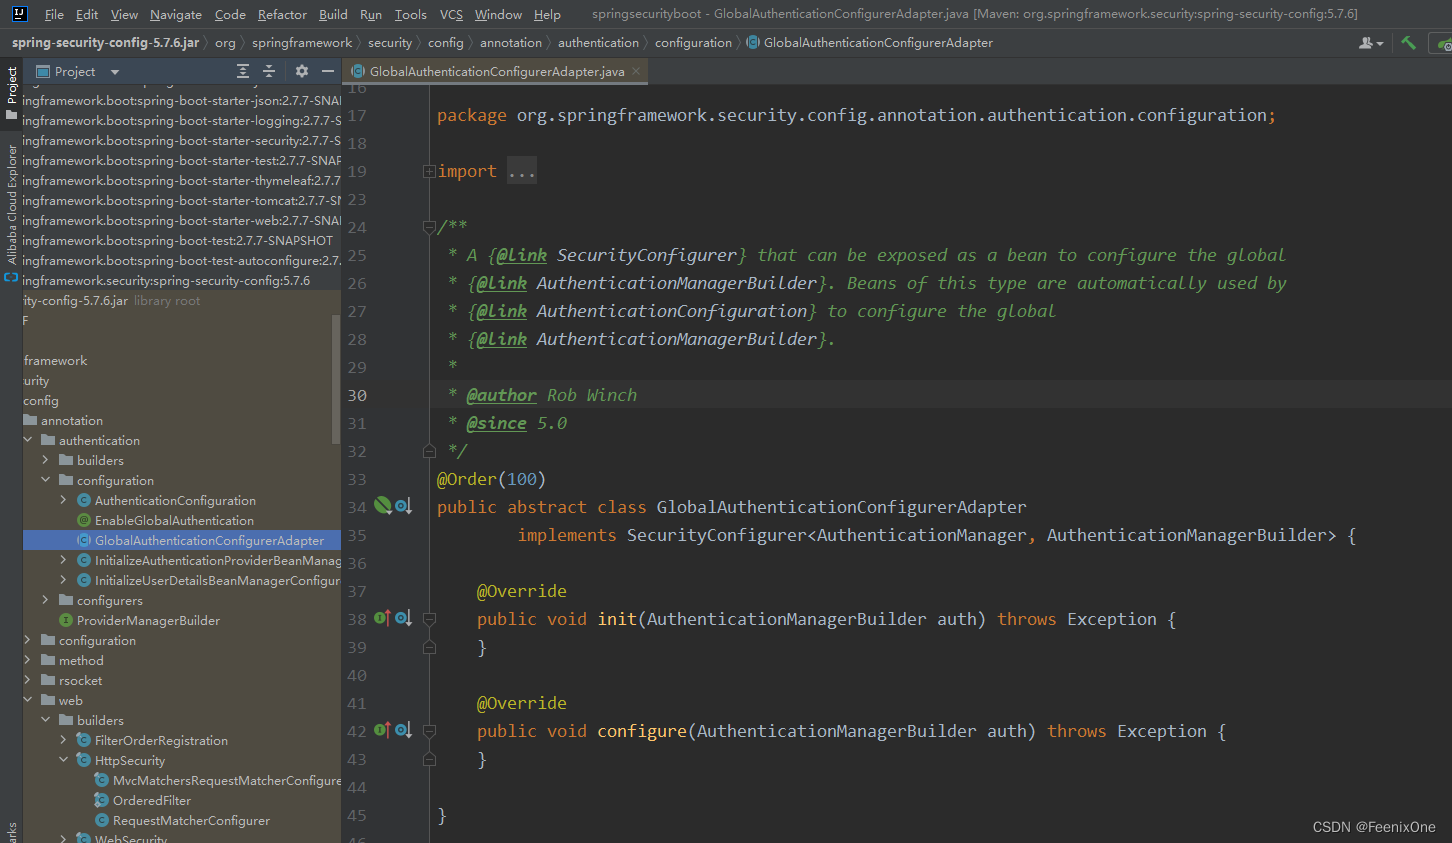
SecurityConfigurer 中的泛型,现在明确成了 AuthenticationManager 和 AuthenticationManagerBuilder。所以 GlobalAuthenticationConfigurerAdapter 的实现类将来主要 是和配置 AuthenticationManager 有关。当然也包括默认的用户名密码也是由它的实现类来进行配置 的。在 Spring Security 中使用的 AuthenticationManager 其实可以分为两种,一种是局部的,另一种是全局的,这里主要是全局的配置 。
WebSecurityConfigurer接口
这个可能有的小伙伴比较陌生,其实就是经常使用的 WebSecurityConfigurerAdapter 的父接口。 所以 WebSecurityConfigurer 的作用就很明确了,用户扩展用户自定义的配置。
SecurityConfigurerAdapter抽象类
SecurityConfigurerAdapter 的实现主要也是三大类:
-
UserDetailsAwareConfigurer
-
AbstractHttpConfigurer
-
LdapAuthenticationProviderConfigurer
考虑到 LDAP 现在使用很少,所以这里重点介绍下前两个。
UserDetailsAwareConfigurer
这个配置类看名字大概就知道这是用来配置用户类的。

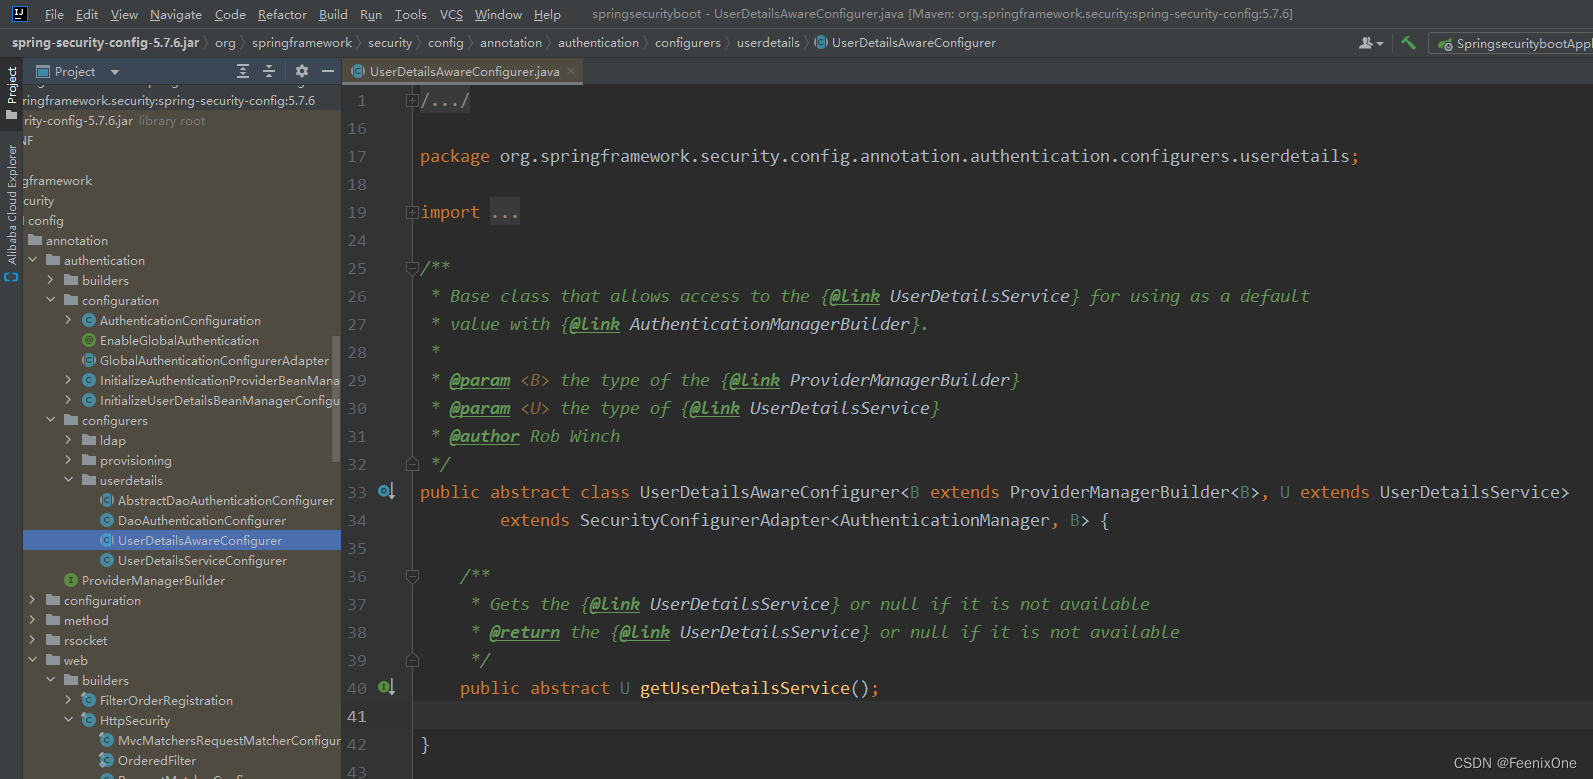
通过定义可以看到泛型U必须是UserDetailsService接口的实现,也就是 getUserDetailsService()方法返回的肯定是UserDetailsService接口的实现,还有通过泛型B及继承SecurityConfigurerAdapter来看会构建一个AuthenticationManager对象AbstractDaoAuthenticationConfigurer。再看下UserDetailsAwareConfigurer下的一个抽象类 AbstractDaoAuthenticationConfigurer 在类的头部声明了一堆的泛型,继承自UserDetailsAwareConfigurer。
看下它的实现类

UserDetailsServiceConfigurer 这个类就比较简单,扩展了AbstractDaoAuthenticationConfigurer中的configure方法,在 configure 方法执行之前加入了 initUserDetailsService 方法,以方便开发展按照自己的方式去初始化 UserDetailsService,不过这里的 initUserDetailsService 方法是空方法。
UserDetailsManagerConfigurer 中实现了 UserDetailsServiceConfigurer 中定义的 initUserDetailsService 方法,具体的实现逻辑就是将 UserDetailsBuilder 所构建出来的 UserDetails 以及提前准备好的 UserDetails 中的用户存储到 UserDetailsService 中。该类同时添加了 withUser 方法用来添加用户,同时还增加了一个 UserDetailsBuilder 用来构建用 户,这些逻辑都比较简单。
JdbcUserDetailsManagerConfigurer 在父类的基础上补充了 DataSource 对象,同时还提供了相应 的数据库查询方法。
InMemoryUserDetailsManagerConfigurer 在父类的基础上重写了构造方法,将父类中的 UserDetailsService 实例定义为 InMemoryUserDetailsManager。
6、Spring Security权限管理
在Security配置类中添加注解:@EnableGlobalMethodSecurity(prePostEnabled = true),使用Security提供的表达式来进行权限校验
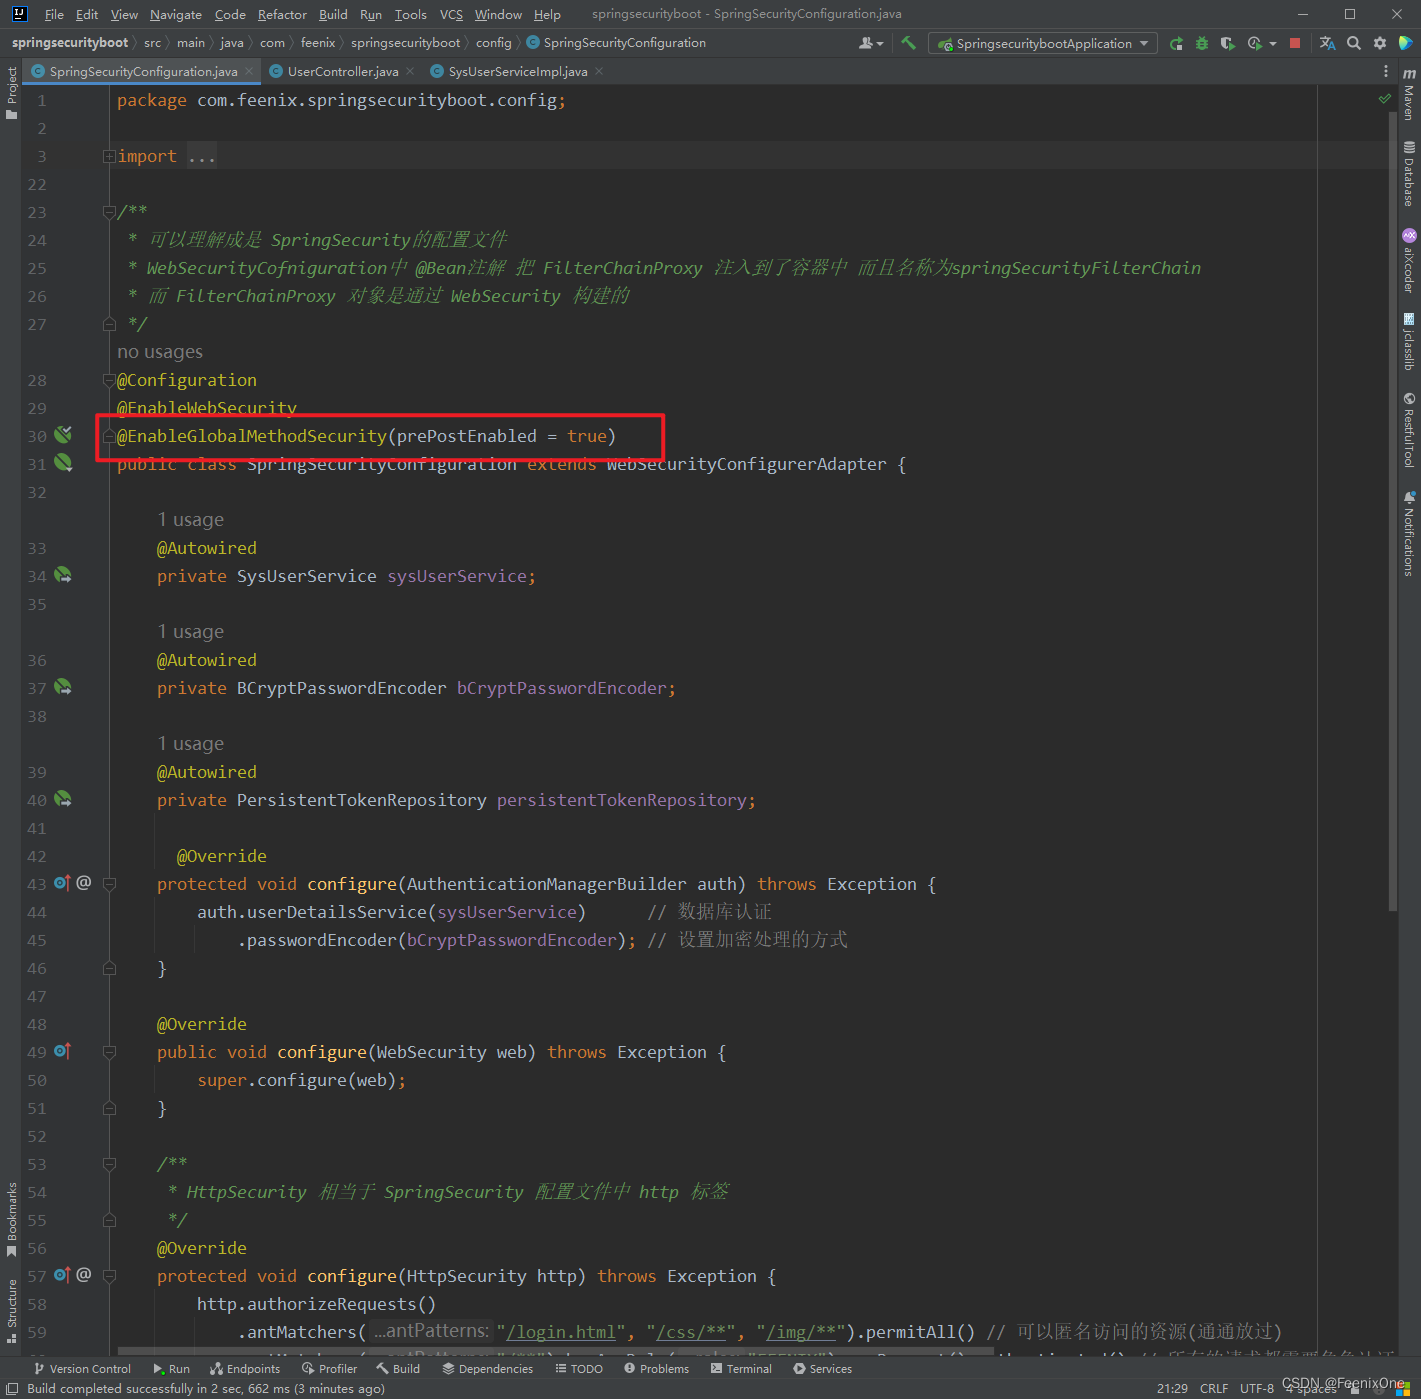
在查询用户信息的时候,赋予用户权限

Controller方法根据不同的权限访问不同的资源
package com.feenix.springsecurityboot.controller;

import org.springframework.security.access.prepost.PreAuthorize;
import org.springframework.security.core.Authentication;
import org.springframework.security.core.context.SecurityContextHolder;
import org.springframework.security.core.userdetails.UserDetails;
import org.springframework.web.bind.annotation.GetMapping;
import org.springframework.web.bind.annotation.RequestMapping;
import org.springframework.web.bind.annotation.RestController;

@RestController
@RequestMapping("/user")
public class UserController {

    /**
     * 需要[FEENIX]角色,才可访问
     */
    @PreAuthorize("hasAnyRole('FEENIX')")
    @GetMapping("/hello")
    public String hello() {
        Authentication authentication = SecurityContextHolder.getContext().getAuthentication();
        Object principal = authentication.getPrincipal();
        if (principal instanceof UserDetails) {
            UserDetails userDetails = (UserDetails) principal;
            String username = userDetails.getUsername();
            return "hello:当前登录的账号是:" + userDetails.getUsername();
        }

        return "当前登录的账号是:" + principal.toString();
    }

    /**
     * 需要[query]权限,才可访问
     */
    @PreAuthorize("hasAuthority('query')")
    @GetMapping("/query")
    public String query() {
        Authentication authentication = SecurityContextHolder.getContext().getAuthentication();
        Object principal = authentication.getPrincipal();
        if (principal instanceof UserDetails) {
            UserDetails userDetails = (UserDetails) principal;
            String username = userDetails.getUsername();
            return "query:当前登录的账号是:" + userDetails.getUsername();
        }

        return "当前登录的账号是:" + principal.toString();
    }

    /**
     * 需要[update]权限,才可访问
     */
    @PreAuthorize("hasAuthority('update')")
    @GetMapping("/update")
    public String update() {
        Authentication authentication = SecurityContextHolder.getContext().getAuthentication();
        Object principal = authentication.getPrincipal();
        if (principal instanceof UserDetails) {
            UserDetails userDetails = (UserDetails) principal;
            String username = userDetails.getUsername();
            return "update:当前登录的账号是:" + userDetails.getUsername();
        }

        return "当前登录的账号是:" + principal.toString();
    }


}
启动项目,访问不同的资源,验证权限是否生效


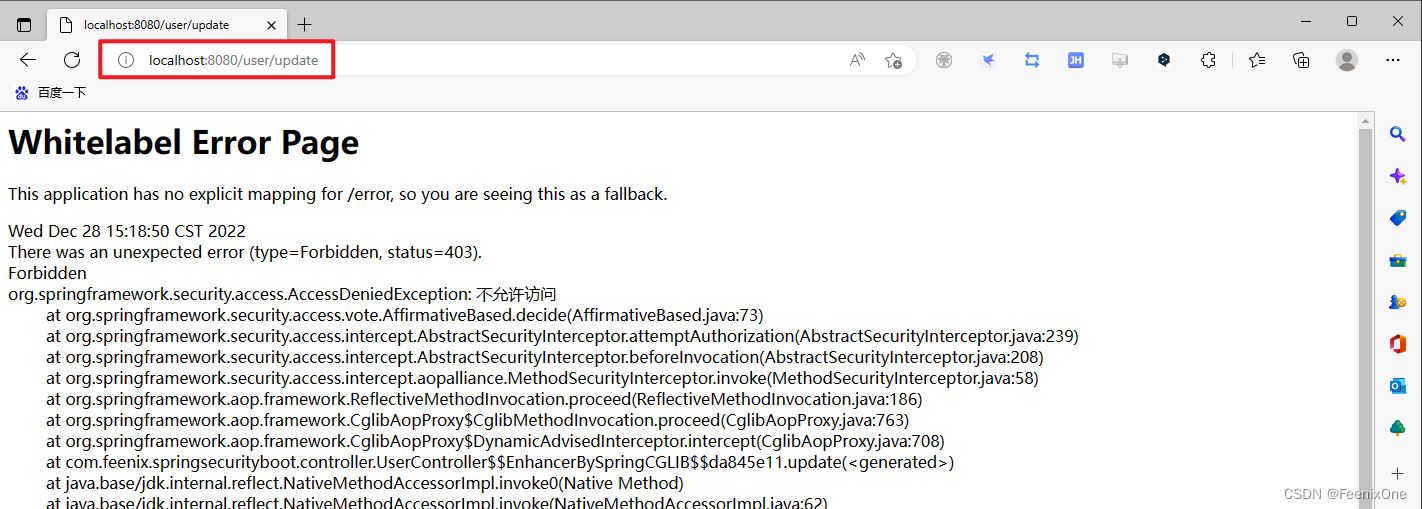
因为用户只赋予了FEENIX角色和query权限,没有赋予update权限,所以update资源不可访问。值得一提的是,Security的安全表达式不仅仅可以用于Controller层,在任何方法前加上都可以使用,甚至在Service的接口上加上也可生效
package com.feenix.springsecurityboot.service;

import org.springframework.security.access.prepost.PreAuthorize;
import org.springframework.security.core.userdetails.UserDetailsService;

public interface SysUserService extends UserDetailsService {

    @PreAuthorize("hasAuthority('query')")
    void query(String username, String password);

    @PreAuthorize("hasAuthority('save')")
    void save(String username, String password);

}
Security安全表达式
Security提供的表达式类型多种多样,一般的权限管理需求基本都可以满足:
hasRole:判定是否有指定的角色,若指定的角色中没有以”ROLE_”开头,则会自动加上,如hasRole(“admin”) 则表示判断是否有”ROLE_admin”角色,而非判断是否有”admin”角色.”ROLE_”可以在DefaultWebSecurityExpressionHandler类中修改默认设置;
hasAnyRole:多个角色以逗号分隔的字符串,如果当前用户拥有指定角色中的任意一个则允许访问,返回true;
hasAuthority:当前用户拥有指定权限标识的允许访问,返回true。注意:和 hasRole区别是,hasAuthority 不会在前面拼接 ROLE_;
hasAnyAuthority:多个权限标识是以逗号分隔的字符串。如果当前用户拥有指定权限标识中的任意一个则允许访问,返回true;
hasIpAddress:限制指定IP或指定范围内的IP才可以访问;
isFullyAuthenticated:如果当前用户既不是一个匿名用户,同时也不是通过Remember-Me自 动登录的,则允许访问(可以理解为通过页面输入帐户信息认证的);
isAuthenticated:当前用户是已经登录认证成功的允许访问(包含了rememberMe自动登录的),返回true;
isRememberMe:当前用户是通过Remember-Me自动登录的允许访问,返回true;
isAnonymous:当前用户是一个匿名用户(未登录用户)允许访问,返回true;
denyAll:总是返回false,表示拒绝所有访问(永远访问不到指定的 URL或方法);
permitAll:总是返回true,表示允许所有访问(认证不认证都可访问 URL或方法);
当Security所提供的满足不了项目中使用时,也可以自定义表达式来使用:
package com.feenix.springsecurityboot.config;

import org.springframework.context.annotation.Configuration;
import org.springframework.security.core.Authentication;

import javax.servlet.http.HttpServletRequest;

@Configuration
public class MyWebSecurityCheck {

    public boolean check1(Authentication authentication, HttpServletRequest request) {
        System.out.println("---MyWebSecurityCheck---" + authentication + "---" + request + "--->");
        return true;
    }

}
将自定义的检验类配置进过滤链中,注意,check1方法中的两个参数,第一个参数可以直接填,第二个参数需要通过自动注入的方式注入到容器中才可以使用:
@Autowired
private HttpServletRequest request;

在访问对应的URL的时候就可以看到相关的拦截信息:

Security权限原理
接下来看看在用户提交请求后Security是如何对用户的请求资源做出权限校验的,首先回顾下Security处理请求的过滤器链

通过前面介绍,当一个请求到来的时候会经过上面的过滤器来一个个来处理对应的请求,最后在FilterSecurityInterceptor中做认证和权限的校验操作
进入FilterSecurityInterceptor中找到对应的doFilter方法
	/**
	 * Method that is actually called by the filter chain. Simply delegates to the
	 * {@link #invoke(FilterInvocation)} method.
	 * @param request the servlet request
	 * @param response the servlet response
	 * @param chain the filter chain
	 * @throws IOException if the filter chain fails
	 * @throws ServletException if the filter chain fails
	 */
	@Override
	public void doFilter(ServletRequest request, ServletResponse response, FilterChain chain)
			throws IOException, ServletException {
		invoke(new FilterInvocation(request, response, chain));
	}
看看FilterInvocation的构造方法,可以看到FilterInvocation其实就是对Request,Response和FilterChain做了一个非空的校验
	public FilterInvocation(ServletRequest request, ServletResponse response, FilterChain chain) {
		Assert.isTrue(request != null && response != null && chain != null, "Cannot pass null values to constructor");
		this.request = (HttpServletRequest) request;
		this.response = (HttpServletResponse) response;
		this.chain = chain;
	}
然后进入到invoke方法中
	public void invoke(FilterInvocation filterInvocation) throws IOException, ServletException {
		if (isApplied(filterInvocation) && this.observeOncePerRequest) {
			// filter already applied to this request and user wants us to observe
			// once-per-request handling, so don't re-do security checking
			filterInvocation.getChain().doFilter(filterInvocation.getRequest(), filterInvocation.getResponse());
			return;
		}
		// first time this request being called, so perform security checking
		if (filterInvocation.getRequest() != null && this.observeOncePerRequest) {
			filterInvocation.getRequest().setAttribute(FILTER_APPLIED, Boolean.TRUE);
		}
		InterceptorStatusToken token = super.beforeInvocation(filterInvocation);
		try {
			filterInvocation.getChain().doFilter(filterInvocation.getRequest(), filterInvocation.getResponse());
		}
		finally {
			super.finallyInvocation(token);
		}
		super.afterInvocation(token, null);
	}
关键方法调用:InterceptorStatusToken token = super.beforeInvocation(filterInvocation);在该方法中完成了认证校验和权限校验操作,进入到beforeInvocation方法中
	protected InterceptorStatusToken beforeInvocation(Object object) {
		Assert.notNull(object, "Object was null");
		if (!getSecureObjectClass().isAssignableFrom(object.getClass())) {
			throw new IllegalArgumentException("Security invocation attempted for object " + object.getClass().getName()
					+ " but AbstractSecurityInterceptor only configured to support secure objects of type: "
					+ getSecureObjectClass());
		}
		Collection<ConfigAttribute> attributes = this.obtainSecurityMetadataSource().getAttributes(object);
		if (CollectionUtils.isEmpty(attributes)) {
			Assert.isTrue(!this.rejectPublicInvocations,
					() -> "Secure object invocation " + object
							+ " was denied as public invocations are not allowed via this interceptor. "
							+ "This indicates a configuration error because the "
							+ "rejectPublicInvocations property is set to 'true'");
			if (this.logger.isDebugEnabled()) {
				this.logger.debug(LogMessage.format("Authorized public object %s", object));
			}
			publishEvent(new PublicInvocationEvent(object));
			return null; // no further work post-invocation
		}
		if (SecurityContextHolder.getContext().getAuthentication() == null) {
			credentialsNotFound(this.messages.getMessage("AbstractSecurityInterceptor.authenticationNotFound",
					"An Authentication object was not found in the SecurityContext"), object, attributes);
		}
		Authentication authenticated = authenticateIfRequired();
		if (this.logger.isTraceEnabled()) {
			this.logger.trace(LogMessage.format("Authorizing %s with attributes %s", object, attributes));
		}
		// Attempt authorization
		attemptAuthorization(object, attributes, authenticated);
		if (this.logger.isDebugEnabled()) {
			this.logger.debug(LogMessage.format("Authorized %s with attributes %s", object, attributes));
		}
		if (this.publishAuthorizationSuccess) {
			publishEvent(new AuthorizedEvent(object, attributes, authenticated));
		}

		// Attempt to run as a different user
		Authentication runAs = this.runAsManager.buildRunAs(authenticated, object, attributes);
		if (runAs != null) {
			SecurityContext origCtx = SecurityContextHolder.getContext();
			SecurityContext newCtx = SecurityContextHolder.createEmptyContext();
			newCtx.setAuthentication(runAs);
			SecurityContextHolder.setContext(newCtx);

			if (this.logger.isDebugEnabled()) {
				this.logger.debug(LogMessage.format("Switched to RunAs authentication %s", runAs));
			}
			// need to revert to token.Authenticated post-invocation
			return new InterceptorStatusToken(origCtx, true, attributes, object);
		}
		this.logger.trace("Did not switch RunAs authentication since RunAsManager returned null");
		// no further work post-invocation
		return new InterceptorStatusToken(SecurityContextHolder.getContext(), false, attributes, object);

}首先是obtainSecurityMetadataSource()方法,该方法的作用是根据当前的请求获取对应的需要具备的权限信息,比如访问/login.jsp需要的信息是 permitAll 也就是可以匿名访问;然后就是decide()方法,该方法中会完成权限的校验。这里会通过AccessDecisionManager来处理。
AccessDecisionManager
按照源码中给出的注释,AccessDecisionManager的作用是:做出最终访问控制(授权)决策,它有三个默认的实现

AffirmativeBased
在SpringSecurity中默认的权限决策对象就是AffirmativeBased。AffirmativeBased的作用是在众多的投票者中只要有一个返回肯定的结果,就会授予访问权限。
	/**
	 * This concrete implementation simply polls all configured
	 * {@link AccessDecisionVoter}s and grants access if any
	 * <code>AccessDecisionVoter</code> voted affirmatively. Denies access only if there
	 * was a deny vote AND no affirmative votes.
	 * <p>
	 * If every <code>AccessDecisionVoter</code> abstained from voting, the decision will
	 * be based on the {@link #isAllowIfAllAbstainDecisions()} property (defaults to
	 * false).
	 * </p>
	 * @param authentication the caller invoking the method
	 * @param object the secured object
	 * @param configAttributes the configuration attributes associated with the method
	 * being invoked
	 * @throws AccessDeniedException if access is denied
	 */
	@Override
	@SuppressWarnings({ "rawtypes", "unchecked" })
	public void decide(Authentication authentication, Object object, Collection<ConfigAttribute> configAttributes)
			throws AccessDeniedException {
		int deny = 0;
		for (AccessDecisionVoter voter : getDecisionVoters()) {
			int result = voter.vote(authentication, object, configAttributes);
			switch (result) {
			case AccessDecisionVoter.ACCESS_GRANTED:
				return;
			case AccessDecisionVoter.ACCESS_DENIED:
				deny++;
				break;
			default:
				break;
			}
		}
		if (deny > 0) {
			throw new AccessDeniedException(
					this.messages.getMessage("AbstractAccessDecisionManager.accessDenied", "Access is denied"));
		}
		// To get this far, every AccessDecisionVoter abstained
		checkAllowIfAllAbstainDecisions();
	}
ConsensusBased
ConsensusBased则是基于少数服从多数的方案来实现授权的决策方案。
	/**
	 * This concrete implementation simply polls all configured
	 * {@link AccessDecisionVoter}s and upon completion determines the consensus of
	 * granted against denied responses.
	 * <p>
	 * If there were an equal number of grant and deny votes, the decision will be based
	 * on the {@link #isAllowIfEqualGrantedDeniedDecisions()} property (defaults to true).
	 * <p>
	 * If every <code>AccessDecisionVoter</code> abstained from voting, the decision will
	 * be based on the {@link #isAllowIfAllAbstainDecisions()} property (defaults to
	 * false).
	 * @param authentication the caller invoking the method
	 * @param object the secured object
	 * @param configAttributes the configuration attributes associated with the method
	 * being invoked
	 * @throws AccessDeniedException if access is denied
	 */
	@Override
	@SuppressWarnings({ "rawtypes", "unchecked" })
	public void decide(Authentication authentication, Object object, Collection<ConfigAttribute> configAttributes)
			throws AccessDeniedException {
		int grant = 0;
		int deny = 0;
		for (AccessDecisionVoter voter : getDecisionVoters()) {
			int result = voter.vote(authentication, object, configAttributes);
			switch (result) {
			case AccessDecisionVoter.ACCESS_GRANTED:
				grant++;
				break;
			case AccessDecisionVoter.ACCESS_DENIED:
				deny++;
				break;
			default:
				break;
			}
		}
		if (grant > deny) {
			return;
		}
		if (deny > grant) {
			throw new AccessDeniedException(
					this.messages.getMessage("AbstractAccessDecisionManager.accessDenied", "Access is denied"));
		}
		if ((grant == deny) && (grant != 0)) {
			if (this.allowIfEqualGrantedDeniedDecisions) {
				return;
			}
			throw new AccessDeniedException(
					this.messages.getMessage("AbstractAccessDecisionManager.accessDenied", "Access is denied"));
		}
		// To get this far, every AccessDecisionVoter abstained
		checkAllowIfAllAbstainDecisions();
	}
代码的逻辑还是非常简单的,只需要注意下授予权限和否决权限相等时的逻辑就可以了。决策器也考虑到了这一点,所以提供了 allowIfEqualGrantedDeniedDecisions 参数,用于给用户提供自定义的机会,其默认值为 true,即代表允许授予权限和拒绝权限相等,且同时也代表授予访问权限。
UnanimousBased
UnanimousBased是最严格的决策器,要求所有的AccessDecisionVoter都授权,才代表授予资源权限,否则就拒绝。
	/**
	 * This concrete implementation polls all configured {@link AccessDecisionVoter}s for
	 * each {@link ConfigAttribute} and grants access if <b>only</b> grant (or abstain)
	 * votes were received.
	 * <p>
	 * Other voting implementations usually pass the entire list of
	 * <tt>ConfigAttribute</tt>s to the <code>AccessDecisionVoter</code>. This
	 * implementation differs in that each <code>AccessDecisionVoter</code> knows only
	 * about a single <code>ConfigAttribute</code> at a time.
	 * <p>
	 * If every <code>AccessDecisionVoter</code> abstained from voting, the decision will
	 * be based on the {@link #isAllowIfAllAbstainDecisions()} property (defaults to
	 * false).
	 * @param authentication the caller invoking the method
	 * @param object the secured object
	 * @param attributes the configuration attributes associated with the method being
	 * invoked
	 * @throws AccessDeniedException if access is denied
	 */
	@Override
	@SuppressWarnings({ "rawtypes", "unchecked" })
	public void decide(Authentication authentication, Object object, Collection<ConfigAttribute> attributes)
			throws AccessDeniedException {
		int grant = 0;
		List<ConfigAttribute> singleAttributeList = new ArrayList<>(1);
		singleAttributeList.add(null);
		for (ConfigAttribute attribute : attributes) {
			singleAttributeList.set(0, attribute);
			for (AccessDecisionVoter voter : getDecisionVoters()) {
				int result = voter.vote(authentication, object, singleAttributeList);
				switch (result) {
				case AccessDecisionVoter.ACCESS_GRANTED:
					grant++;
					break;
				case AccessDecisionVoter.ACCESS_DENIED:
					throw new AccessDeniedException(
							this.messages.getMessage("AbstractAccessDecisionManager.accessDenied", "Access is denied"));
				default:
					break;
				}
			}
		}
		// To get this far, there were no deny votes
		if (grant > 0) {
			return;
		}
		// To get this far, every AccessDecisionVoter abstained
		checkAllowIfAllAbstainDecisions();
	}
AccessDecisionVoter
AccessDecisionVoter是一个投票器,负责对授权决策进行表决。表决的结构最终由AccessDecisionManager统计,并做出最终的决策。
/*
 * Copyright 2004, 2005, 2006 Acegi Technology Pty Limited
 *
 * Licensed under the Apache License, Version 2.0 (the "License");
 * you may not use this file except in compliance with the License.
 * You may obtain a copy of the License at
 *
 *      https://www.apache.org/licenses/LICENSE-2.0
 *
 * Unless required by applicable law or agreed to in writing, software
 * distributed under the License is distributed on an "AS IS" BASIS,
 * WITHOUT WARRANTIES OR CONDITIONS OF ANY KIND, either express or implied.
 * See the License for the specific language governing permissions and
 * limitations under the License.
 */

package org.springframework.security.access;

import java.util.Collection;

import org.springframework.security.core.Authentication;

/**
 * Indicates a class is responsible for voting on authorization decisions.
 * <p>
 * The coordination of voting (ie polling {@code AccessDecisionVoter}s, tallying their
 * responses, and making the final authorization decision) is performed by an
 * {@link org.springframework.security.access.AccessDecisionManager}.
 *
 * @author Ben Alex
 */
public interface AccessDecisionVoter<S> {

	int ACCESS_GRANTED = 1;

	int ACCESS_ABSTAIN = 0;

	int ACCESS_DENIED = -1;

	/**
	 * Indicates whether this {@code AccessDecisionVoter} is able to vote on the passed
	 * {@code ConfigAttribute}.
	 * <p>
	 * This allows the {@code AbstractSecurityInterceptor} to check every configuration
	 * attribute can be consumed by the configured {@code AccessDecisionManager} and/or
	 * {@code RunAsManager} and/or {@code AfterInvocationManager}.
	 * @param attribute a configuration attribute that has been configured against the
	 * {@code AbstractSecurityInterceptor}
	 * @return true if this {@code AccessDecisionVoter} can support the passed
	 * configuration attribute
	 */
	boolean supports(ConfigAttribute attribute);

	/**
	 * Indicates whether the {@code AccessDecisionVoter} implementation is able to provide
	 * access control votes for the indicated secured object type.
	 * @param clazz the class that is being queried
	 * @return true if the implementation can process the indicated class
	 */
	boolean supports(Class<?> clazz);

	/**
	 * Indicates whether or not access is granted.
	 * <p>
	 * The decision must be affirmative ({@code ACCESS_GRANTED}), negative (
	 * {@code ACCESS_DENIED}) or the {@code AccessDecisionVoter} can abstain (
	 * {@code ACCESS_ABSTAIN}) from voting. Under no circumstances should implementing
	 * classes return any other value. If a weighting of results is desired, this should
	 * be handled in a custom
	 * {@link org.springframework.security.access.AccessDecisionManager} instead.
	 * <p>
	 * Unless an {@code AccessDecisionVoter} is specifically intended to vote on an access
	 * control decision due to a passed method invocation or configuration attribute
	 * parameter, it must return {@code ACCESS_ABSTAIN}. This prevents the coordinating
	 * {@code AccessDecisionManager} from counting votes from those
	 * {@code AccessDecisionVoter}s without a legitimate interest in the access control
	 * decision.
	 * <p>
	 * Whilst the secured object (such as a {@code MethodInvocation}) is passed as a
	 * parameter to maximise flexibility in making access control decisions, implementing
	 * classes should not modify it or cause the represented invocation to take place (for
	 * example, by calling {@code MethodInvocation.proceed()}).
	 * @param authentication the caller making the invocation
	 * @param object the secured object being invoked
	 * @param attributes the configuration attributes associated with the secured object
	 * @return either {@link #ACCESS_GRANTED}, {@link #ACCESS_ABSTAIN} or
	 * {@link #ACCESS_DENIED}
	 */
	int vote(Authentication authentication, S object, Collection<ConfigAttribute> attributes);

}

来看看常见的几种投票器
WebExpressionVoter
最常用的,也是SpringSecurity中默认的 FilterSecurityInterceptor实例中 AccessDecisionManager默认的投票器,它其实就是 http.authorizeRequests()基于 Spring-EL进行控制权限的授权决策类。
AuthenticatedVoter
AuthenticatedVoter针对的是ConfigAttribute#getAttribute() 中配置为 IS_AUTHENTICATED_FULLY 、IS_AUTHENTICATED_REMEMBERED、IS_AUTHENTICATED_ANONYMOUSLY 权限标识时的授权决策。因此,其投票策略比较简单。
	@Override
	public int vote(Authentication authentication, Object object, Collection<ConfigAttribute> attributes) {
		int result = ACCESS_ABSTAIN;
		for (ConfigAttribute attribute : attributes) {
			if (this.supports(attribute)) {
				result = ACCESS_DENIED;
				if (IS_AUTHENTICATED_FULLY.equals(attribute.getAttribute())) {
					if (isFullyAuthenticated(authentication)) {
						return ACCESS_GRANTED;
					}
				}
				if (IS_AUTHENTICATED_REMEMBERED.equals(attribute.getAttribute())) {
					if (this.authenticationTrustResolver.isRememberMe(authentication)
							|| isFullyAuthenticated(authentication)) {
						return ACCESS_GRANTED;
					}
				}
				if (IS_AUTHENTICATED_ANONYMOUSLY.equals(attribute.getAttribute())) {
					if (this.authenticationTrustResolver.isAnonymous(authentication)
							|| isFullyAuthenticated(authentication)
							|| this.authenticationTrustResolver.isRememberMe(authentication)) {
						return ACCESS_GRANTED;
					}
				}
			}
		}
		return result;
	}
PreInvocationAuthorizationAdviceVoter
用于处理基于注解 @PreFilter 和 @PreAuthorize 生成的 PreInvocationAuthorizationAdvice,来处理授权决策的实现
	@Override
	public int vote(Authentication authentication, MethodInvocation method, Collection<ConfigAttribute> attributes) {
		// Find prefilter and preauth (or combined) attributes
		// if both null, abstain else call advice with them
		PreInvocationAttribute preAttr = findPreInvocationAttribute(attributes);
		if (preAttr == null) {
			// No expression based metadata, so abstain
			return ACCESS_ABSTAIN;
		}
		return this.preAdvice.before(authentication, method, preAttr) ? ACCESS_GRANTED : ACCESS_DENIED;
	}
RoleVoter
角色投票器。用于 ConfigAttribute#getAttribute() 中配置为角色的授权决策。其默认前缀为 ROLE_,可以自定义,也可以设置为空,直接使用角色标识进行判断。这就意味着,任何属性都可以使用该投票器投票,也就偏离了该投票器的本意,是不可取的。
	@Override
	public int vote(Authentication authentication, Object object, Collection<ConfigAttribute> attributes) {
		if (authentication == null) {
			return ACCESS_DENIED;
		}
		int result = ACCESS_ABSTAIN;
		Collection<? extends GrantedAuthority> authorities = extractAuthorities(authentication);
		for (ConfigAttribute attribute : attributes) {
			if (this.supports(attribute)) {
				result = ACCESS_DENIED;
				// Attempt to find a matching granted authority
				for (GrantedAuthority authority : authorities) {
					if (attribute.getAttribute().equals(authority.getAuthority())) {
						return ACCESS_GRANTED;
					}
				}
			}
		}
		return result;
	}
注意,决策策略比较简单,用户只需拥有任一当前请求需要的角色即可,不必全部拥有 。
RoleHierarchyVoter
基于 RoleVoter,唯一的不同就是该投票器中的角色是附带上下级关系的。也就是说,角色A包含角色B,角色B包含 角色C。此时,如果用户拥有角色A,那么理论上可以同时拥有角色B、角色C的全部资源访问权限。
	/**
	 * Calls the <tt>RoleHierarchy</tt> to obtain the complete set of user authorities.
	 */
	@Override
	Collection<? extends GrantedAuthority> extractAuthorities(Authentication authentication) {
		return this.roleHierarchy.getReachableGrantedAuthorities(authentication.getAuthorities());
	}
什么是CSRF
跨站请求伪造(英语:Cross-site request forgery),也被称为 one-click attack 或者 session riding,通常缩写为 CSRF 或者 XSRF, 是一种挟制用户在当前已登录的 Web 应用程序上执行非本意的操作的攻击方法。跟跨网站脚本(XSS)相比,XSS利用的是用户对指定网站的信任,CSRF 利用的是网站对用户网页浏览器的信任。
简单地说,是攻击者通过一些技术手段欺骗用户的浏览器去访问一个自己曾经认证过的网站并运行一些操作(如发邮件,发消息,甚至财产操作如转账和购买商品)。由于浏览器曾经认证过,所以被访问的网站会认为是真正的用户操作而去运行。这利用了 web 中用户身份验证的一个漏洞:简单的身份验证只能保证请求发自某个用户的浏览器,却不能保证请求本身是用户自愿发出的。

CSRF的解决方案
检查Referer字段
HTTP头中有一个Referer字段,这个字段用以标明请求来源于哪个地址。在处理敏感数据请求时,通常来说,Referer字段应和请求的地址位于同一域名下。以上文银行操作为例,Referer字段地址通常应该是转账按钮所在的网页地址,应该也位于www.bankchina.com之下。而如果是CSRF攻击传来的请求,Referer字段会是包含恶意网址的地址,不会位于www.bankhacker.com之下,这时候服务器就能识别出恶意的访问。
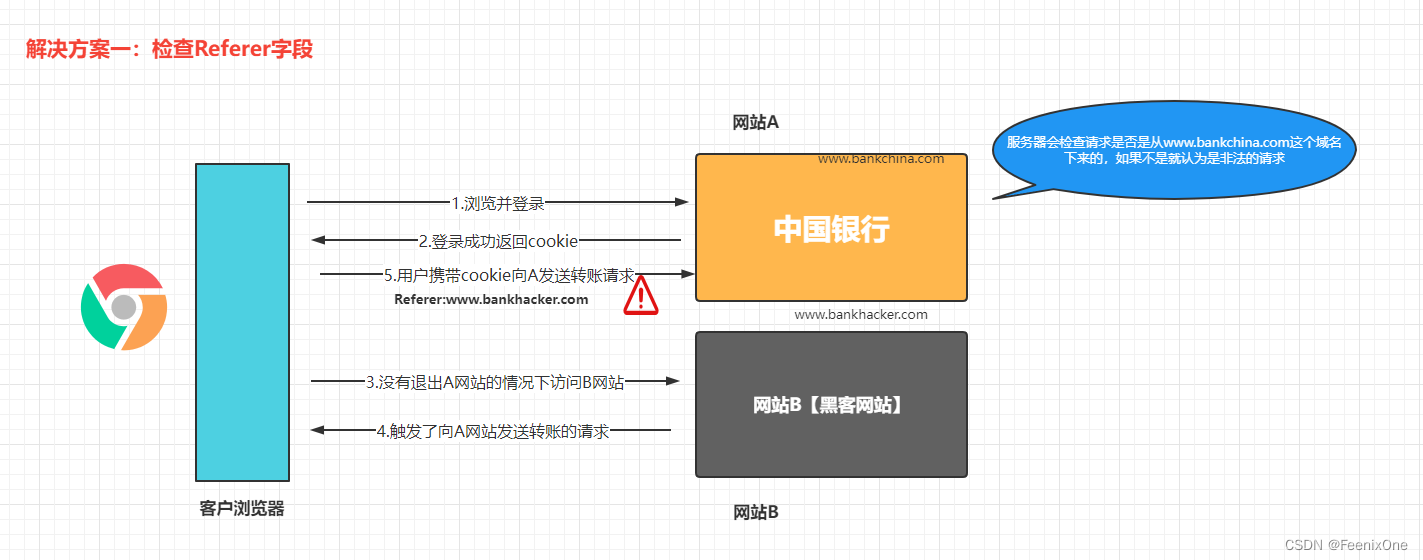
这种办法简单易行,工作量低,仅需要在关键访问处增加一步校验。但这种办法也有其局限性,因其完全依赖浏览器发送正确的Referer字段。虽然http协议对此字段的内容有明确的规定,但并无法保证来访的浏览器的具体实现,亦无法保证浏览器没有安全漏洞影响到此字段。并且也存在攻击者攻击某些浏览器,篡改其Referer字段的可能。
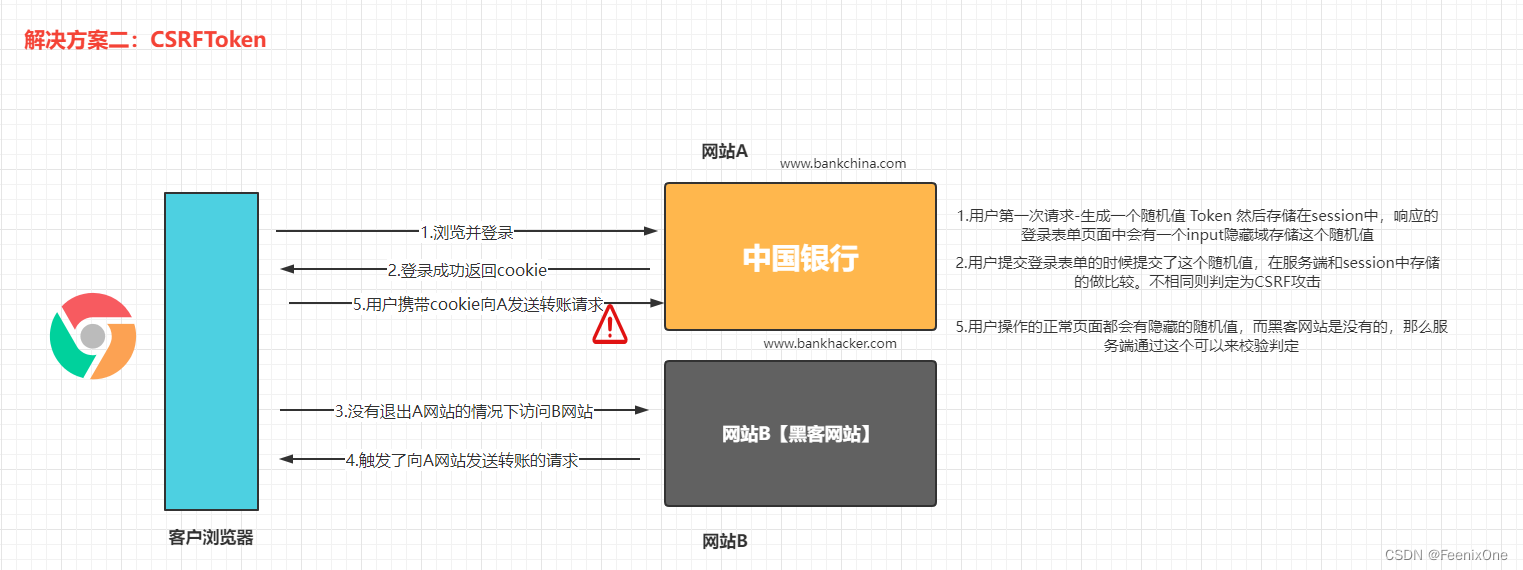
CSRFToken
其实CSRF攻击是在用户登录且没有退出浏览器的情况下访问了第三方的站点而被攻击的,完全是携带了认证的cookie来实现的,我们只需要在服务端响应给客户端的页面中绑定随机的信息,然后提交请求后在服务端校验,如果携带的数据和之前的不一致就认为是CSRF攻击,拒绝这些请求即可。
Security中CSRFToken的使用
只要在Security配置的过滤器链中不对CSRF进行关闭即可,因为默认就是开启的。
    @Override
    protected void configure(HttpSecurity http) throws Exception {
        http.authorizeRequests()
            .antMatchers("/login.html", "/css/**", "/img/**").permitAll() // 可以匿名访问的资源(通通放过)
            /*.antMatchers("/user/**").access("@myWebSecurityCheck.check1(authentication, request)")*/
            .antMatchers("/**").hasAnyRole("FEENIX").anyRequest().authenticated() // 所有的请求都需要角色认证
            .and().formLogin().loginPage("/login.html").loginProcessingUrl("/login").defaultSuccessUrl("/home.html").permitAll() // 自定义登录界面、登录地址不拦截、登录成功后跳转界面
            .and().rememberMe().tokenRepository(persistentTokenRepository) // 开启[记住我]功能,并将记住我的相关信息持久化到数据库中
            /*.and().csrf().disable()*/;
    }
.and().csrf().disable()这句不要写上。然后启动项目,访问登录页面
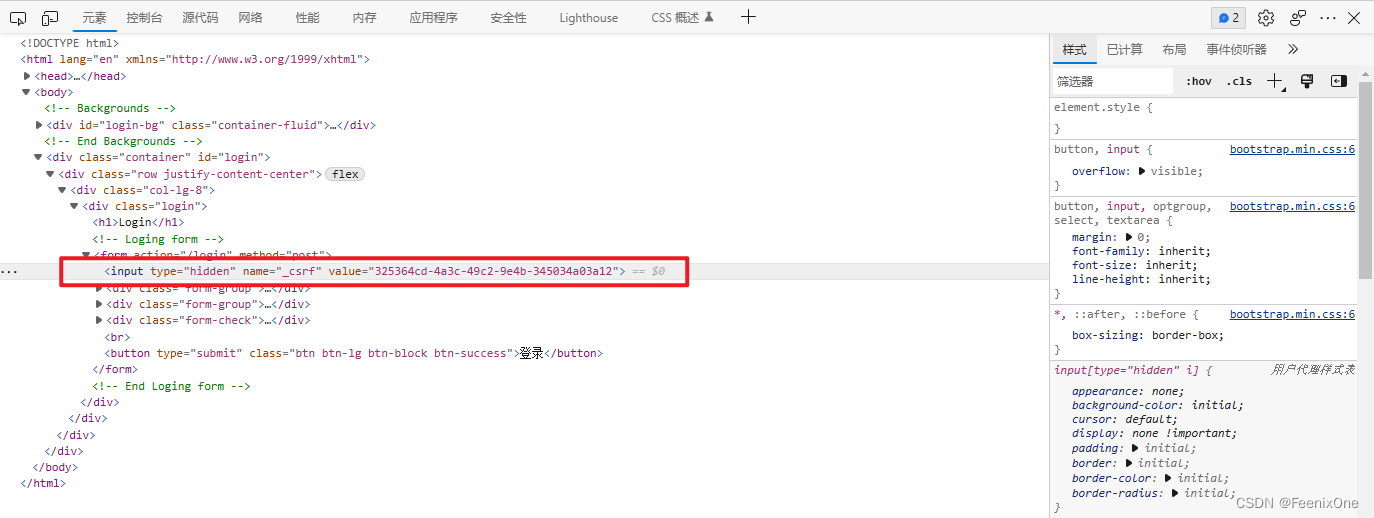
Security会自动在登录页面嵌入一个隐藏域用于存放CSRFToken的值,正常登录即可。
CSRF防御原理
CsrfToken
/**
 * Provides the information about an expected CSRF token.
 *
 * @author Rob Winch
 * @since 3.2
 * @see DefaultCsrfToken
 */
public interface CsrfToken extends Serializable {

	/**
	 * Gets the HTTP header that the CSRF is populated on the response and can be placed
	 * on requests instead of the parameter. Cannot be null.
	 * @return the HTTP header that the CSRF is populated on the response and can be
	 * placed on requests instead of the parameter
	 */
	String getHeaderName();

	/**
	 * Gets the HTTP parameter name that should contain the token. Cannot be null.
	 * @return the HTTP parameter name that should contain the token.
	 */
	String getParameterName();

	/**
	 * Gets the token value. Cannot be null.
	 * @return the token value
	 */
	String getToken();

}
CsrfToken的默认实现是DefaultCsrfToken
	/**
	 * Creates a new instance
	 * @param headerName the HTTP header name to use
	 * @param parameterName the HTTP parameter name to use
	 * @param token the value of the token (i.e. expected value of the HTTP parameter of
	 * parametername).
	 */
	public DefaultCsrfToken(String headerName, String parameterName, String token) {
		Assert.hasLength(headerName, "headerName cannot be null or empty");
		Assert.hasLength(parameterName, "parameterName cannot be null or empty");
		Assert.hasLength(token, "token cannot be null or empty");
		this.headerName = headerName;
		this.parameterName = parameterName;
		this.token = token;
	}
CsrfTokenRepository
CsrfTokenRepository接口也非常简单,定义了Token的生成,存储和获取的相关API
/**
 * An API to allow changing the method in which the expected {@link CsrfToken} is
 * associated to the {@link HttpServletRequest}. For example, it may be stored in
 * {@link HttpSession}.
 *
 * @author Rob Winch
 * @since 3.2
 * @see HttpSessionCsrfTokenRepository
 */
public interface CsrfTokenRepository {

	/**
	 * Generates a {@link CsrfToken}
	 * @param request the {@link HttpServletRequest} to use
	 * @return the {@link CsrfToken} that was generated. Cannot be null.
	 */
	CsrfToken generateToken(HttpServletRequest request);

	/**
	 * Saves the {@link CsrfToken} using the {@link HttpServletRequest} and
	 * {@link HttpServletResponse}. If the {@link CsrfToken} is null, it is the same as
	 * deleting it.
	 * @param token the {@link CsrfToken} to save or null to delete
	 * @param request the {@link HttpServletRequest} to use
	 * @param response the {@link HttpServletResponse} to use
	 */
	void saveToken(CsrfToken token, HttpServletRequest request, HttpServletResponse response);

	/**
	 * Loads the expected {@link CsrfToken} from the {@link HttpServletRequest}
	 * @param request the {@link HttpServletRequest} to use
	 * @return the {@link CsrfToken} or null if none exists
	 */
	CsrfToken loadToken(HttpServletRequest request);

}
CsrfTokenRepository的实现在SpringSecurity中有两个实现

默认的实现是HttpSessionCsrfTokenRepository,是一个基于HttpSession保存csrfToken的实现。
CsrfFilter
CsrfFilter用于处理跨站请求伪造。检查表单提交的_csrf隐藏域的value与内存中保存的的是否一致,如果一致框架则认为当然登录页面是安全的,如果不一致,会报403forbidden错误。
	@Override
	protected void doFilterInternal(HttpServletRequest request, HttpServletResponse response, FilterChain filterChain)
			throws ServletException, IOException {
		request.setAttribute(HttpServletResponse.class.getName(), response);
		CsrfToken csrfToken = this.tokenRepository.loadToken(request);
		boolean missingToken = (csrfToken == null);
		if (missingToken) {
			csrfToken = this.tokenRepository.generateToken(request);
			this.tokenRepository.saveToken(csrfToken, request, response);
		}
		request.setAttribute(CsrfToken.class.getName(), csrfToken);
		request.setAttribute(csrfToken.getParameterName(), csrfToken);
		if (!this.requireCsrfProtectionMatcher.matches(request)) {
			if (this.logger.isTraceEnabled()) {
				this.logger.trace("Did not protect against CSRF since request did not match "
						+ this.requireCsrfProtectionMatcher);
			}
			filterChain.doFilter(request, response);
			return;
		}
		String actualToken = request.getHeader(csrfToken.getHeaderName());
		if (actualToken == null) {
			actualToken = request.getParameter(csrfToken.getParameterName());
		}
		if (!equalsConstantTime(csrfToken.getToken(), actualToken)) {
			this.logger.debug(
					LogMessage.of(() -> "Invalid CSRF token found for " + UrlUtils.buildFullRequestUrl(request)));
			AccessDeniedException exception = (!missingToken) ? new InvalidCsrfTokenException(csrfToken, actualToken)
					: new MissingCsrfTokenException(actualToken);
			this.accessDeniedHandler.handle(request, response, exception);
			return;
		}
		filterChain.doFilter(request, response);
	}
上面介绍的CsrfToken校验,生成的Token信息是存储在HttpSession中的,那么如果在分布式环境下,跨进程的场景下要如何实现Session共享呢?这时可以通过SpringSession来实现,但是这里有个前提就是分布式的项目必须都得是在一个一级域名下的多个二级域名。
8、单点登录及JWT认证
说起单点登录大家肯定不会陌生,在开始后面的介绍之前,先手动写一个简单的单点登录。
手写单点登录实现
创建一个Maven聚合工程:一个用作依赖管理的父工程和三个子工程,三个子工程分别模拟一个服务端和两个客户端,端口号分别为8080、8081、8082

三个module都需要引入 thymeleaf 相关依赖
<dependency>
    <groupId>org.springframework.boot</groupId>
    <artifactId>spring-boot-starter-thymeleaf</artifactId>
</dependency>
server-8080 Controller
package com.feenix.ssoserver.controller;

import org.springframework.stereotype.Controller;
import org.springframework.ui.Model;
import org.springframework.web.bind.annotation.CookieValue;
import org.springframework.web.bind.annotation.GetMapping;
import org.springframework.web.bind.annotation.PostMapping;
import org.springframework.web.bind.annotation.RequestParam;

import javax.servlet.http.Cookie;
import javax.servlet.http.HttpServletResponse;
import java.util.UUID;

@Controller
public class LoginController {

    /**
     * 登录页面
     */
    @GetMapping("/loginPage")
    public String loginPage(@RequestParam(value = "redirectUrl", required = false) String redirectUrl,
                            @CookieValue(value = "sso-token", required = false) String token,
                            Model model) {
        if (null != token && !"".equals(token)) {
            return "redirect:" + redirectUrl + "?token=" + token;
        }

        model.addAttribute("redirectUrl", redirectUrl);
        return "login";
    }

    @PostMapping("/ssoLogin")
    public String ssoLogin(@RequestParam("username") String username,
                           @RequestParam("password") String password,
                           @RequestParam("redirectUrl") String redirectUrl,
                           HttpServletResponse response) {
        if (username.equals("feenix") && password.equals("Lee@0629")) {
            // 生成一个身份令牌信息,并传递给客户端
            String token = UUID.randomUUID().toString().replaceAll("-", "");

            // 生成后的token存放在cookie中
            Cookie cookie = new Cookie("sso-token", token);
            response.addCookie(cookie);

            return "redirect:" + redirectUrl + "?token=" + token;
        }

        return "login";
    }

}
server-8080 登录页面
<!DOCTYPE html>
<html lang="en" xmlns:th="http://www.thymeleaf.org">
<head>
    <meta charset="UTF-8">
    <title>Title</title>
</head>
<body>
    <h1>登录页面</h1>
    <form action="/ssoLogin" method="post">
        账号:<input type="text" name="username"/><br/>
        密码:<input type="password" name="password"/><br/>
        <input type="hidden" name="redirectUrl" th:value="${redirectUrl}">
        <input type="submit" value="确定"/>
    </form>
</body>
</html>
client1-8081 Controller
package com.feenix.ssoclient1.controller;

import org.springframework.stereotype.Controller;
import org.springframework.web.bind.annotation.GetMapping;
import org.springframework.web.bind.annotation.RequestParam;

import javax.servlet.http.HttpSession;

@Controller
public class UserController {

    /**
     * 此请求必须是登录后才可访问
     * 如果没有登录,则必须跳转至server端做登录处理
     */
    @GetMapping("/query")
    public String query(HttpSession session, @RequestParam(value = "token", required = false) String token) {
        if (null != token && !"".equals(token)) {
            // 服务端认证过的,更新session中的信息,用户的信息不是在token中携带,就是通过token去查询获取
            session.setAttribute("userLogin", "feenix");
        }

        Object userLogin = session.getAttribute("userLogin");
        if (null != userLogin) {
            return "user";
        }

        return "redirect:http://localhost:8080/loginPage?redirectUrl=http://localhost:8081/query";
    }

}
client2-8082 Controller
package com.feenix.ssoclient2.controller;

import org.springframework.stereotype.Controller;
import org.springframework.web.bind.annotation.GetMapping;
import org.springframework.web.bind.annotation.RequestParam;

import javax.servlet.http.HttpSession;

@Controller
public class OrderController {

    /**
     * 此请求必须是登录后才可访问
     * 如果没有登录,则必须跳转至server端做登录处理
     */
    @GetMapping("/query")
    public String query(HttpSession session, @RequestParam(value = "token", required = false) String token) {
        if (null != token && !"".equals(token)) {
            // 服务端认证过的,更新session中的信息,用户的信息不是在token中携带,就是通过token去查询获取
            session.setAttribute("userLogin", "feenix");
        }

        Object userLogin = session.getAttribute("userLogin");
        if (null != userLogin) {
            return "order";
        }

        return "redirect:http://localhost:8080/loginPage?redirectUrl=http://localhost:8082/query";
    }

}
启动三个服务后, 访问client1登录成功后,client2也可正常访问,无需登录。问题就在于,这个token是作为明文传输来传输去,很容易被截取使用,所以为了token的安全,诞生了JWT机制。
JWT实现
什么是JWT
JSON Web Token(JWT)是一种开放标准(RFC 7519) ,它定义了一种紧凑和自包含的方式,用于作为 JSON 对象在各方之间安全地传输信息。可以验证和信任此信息,因为它是数字签名的。JWTs 可以使用 secret (使用 HMAC 算法)或使用 RSA 或 ECDSA 的公钥/私钥对进行签名。
通俗的解释:JWT简称 JSON Web Token,也就是JSON形式作为Web应用中的令牌信息,用于在各方之间安全的将信息作为JSON对象传输,在数据传输过程中可以完成数据加密,签名等操作。
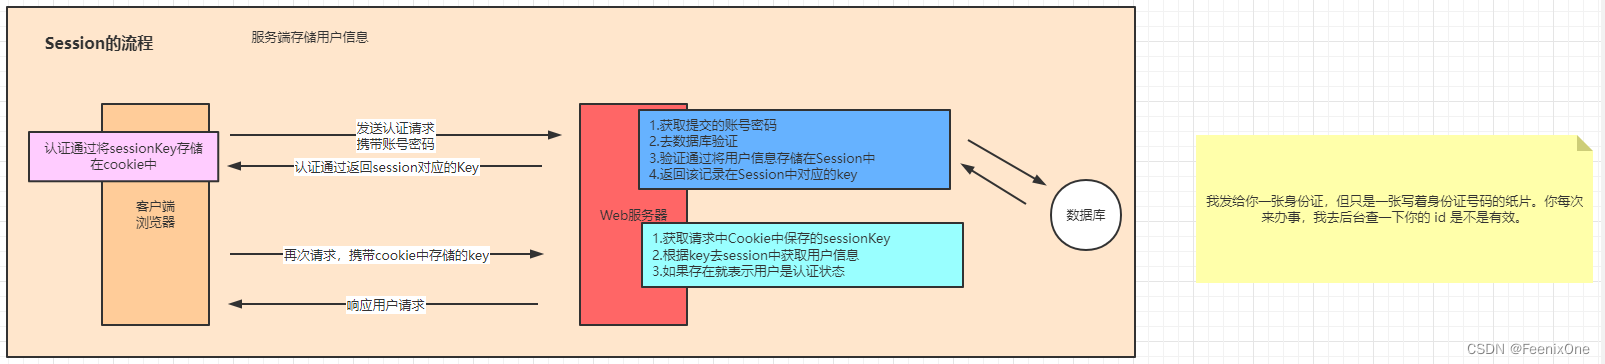
最先接触到的认证方式就是基于Session的认证方式,每一个会话在服务端都会存储在HttpSession中,相当于一个Map,然后通过Cookie的形式给客户端返回一个jsessionid,然后每次访问的时候都需要从HttpSession中根据jsessionid来获取,通过这个逻辑来判断是否是认证的状态。
基于Session的认证存在的问题很多:
1、每个用户都需要做一次记录,而Session一般情况下都会存在内存中,增大了服务器的开销;
2、集群环境下Session需要同步,或者分布式Session来处理;
3、因为是基于Cookie来传输的,如果Cookie被解惑,用户容易受到CSRF攻击;
4、前后端分离项目中会更加的麻烦;
基于JWT认证
用户通过表单把账号密码提交到后端服务后,如果认证成功就会生成一个对应的Token信息,返回给前端存放在localStorage中。之后用户请求资源都会携带这个Token值,后端获取到后校验通过放行,校验不通过则拒绝。

JWT的优势在于:
1、可以通过URL,POST参数或者HTTP header发送,因为数据量小,传输速度快;
2、负载中包含了所有用户所需的信息,避免多次查询数据;
3、以JSON形式保存在客户端;
4、不需要服务端保存信息,适合分布式环境;
JWT的构成
JWT由三部分构成,分别是:标头(Header)、有效载荷(Payload)、签名(Signature)
标头(Header) 通常由两部分组成:令牌的类型【JWT】和所使用的签名算法。例如HMAC、SHA256或者RSA,它会使用 Base64 编码组成 JWT结构的第一部分。注意:Base64是一种编码,是可以被翻译回原来的样子的。
{
"alg":"HS256",
"typ":"JWT"
}
有效载荷(Payload) 是令牌的第二部分,其中包含声明,声明是有关实体(通常是用户信息)和其他数据的声明,它会使用Base64来编码,组成JWT结构的第二部分。因为会通过Base64编码,所以不要把敏感信息(譬如:密码)写在Payload中。
{
"sub": "1234567890",
"name": "John Doe",
"iat": 1516239022
}
签名(Signature) 签名部分,前面两部分都是使用 Base64 进行编码的,即前端可以解开header和payload中的信息,Signature需要使用编码后的 header 和 payload 以及我们提供的一个秘钥,然后使用 header 中指定的前面算法(HS256) 进行签名,签名的作用是保证 JWT 没有被篡改过。
JWT使用
使用JWT进行token的生成和校验非常的简单,直接调用提供的方法即可
package com.feenix.jwtboot;

import com.auth0.jwt.JWT;
import com.auth0.jwt.JWTVerifier;
import com.auth0.jwt.algorithms.Algorithm;
import com.auth0.jwt.interfaces.DecodedJWT;
import org.junit.jupiter.api.Test;
import org.springframework.boot.test.context.SpringBootTest;

import java.util.Calendar;
import java.util.HashMap;
import java.util.TimeZone;

@SpringBootTest
class JwtBootApplicationTests {

    @Test
    void generateToken() {
        // Header
        HashMap<String, Object> header = new HashMap<>();
        header.put("alg", "HS256");
        header.put("typ", "JWT");

        // 过期时间 30分钟
        Calendar calendar = Calendar.getInstance(TimeZone.getTimeZone("GMT+8"));
        calendar.add(Calendar.MINUTE, 30);

        String token = JWT.create().withExpiresAt(calendar.getTime())
                                   .withHeader(header)
                                   .withClaim("userId", 12345)
                                   .withClaim("username", "feenix")
                                   .sign(Algorithm.HMAC256("@72q#@(eY*"));

        System.out.println(token);
    }

    @Test
    void checkToken() {
        String token = "eyJ0eXAiOiJKV1QiLCJhbGciOiJIUzI1NiJ9.eyJleHAiOjE2NzIzNzgyNTAsInVzZXJJZCI6MTIzNDUsInVzZXJuYW1lIjoiZmVlbml4In0.EpJTJJM77mjz-nU_gWH4Ks8UjKRsrWnu2xZAFTg3Xw0";
        JWTVerifier jwtVerifier = JWT.require(Algorithm.HMAC256("@72q#@(eY*")).build();
        DecodedJWT decodedJWT = jwtVerifier.verify(token);

        System.out.println("getExpiresAt:" + decodedJWT.getExpiresAt());
        System.out.println("userId: " + decodedJWT.getClaim("userId").asInt());
        System.out.println("username: " + decodedJWT.getClaim("username").asString());
    }

}
使用JWT实现一个简单的登录校验拦截器,对token进行统一验证处理
Controller

JWT校验工具类

自定义拦截器

配置拦截器使之生效

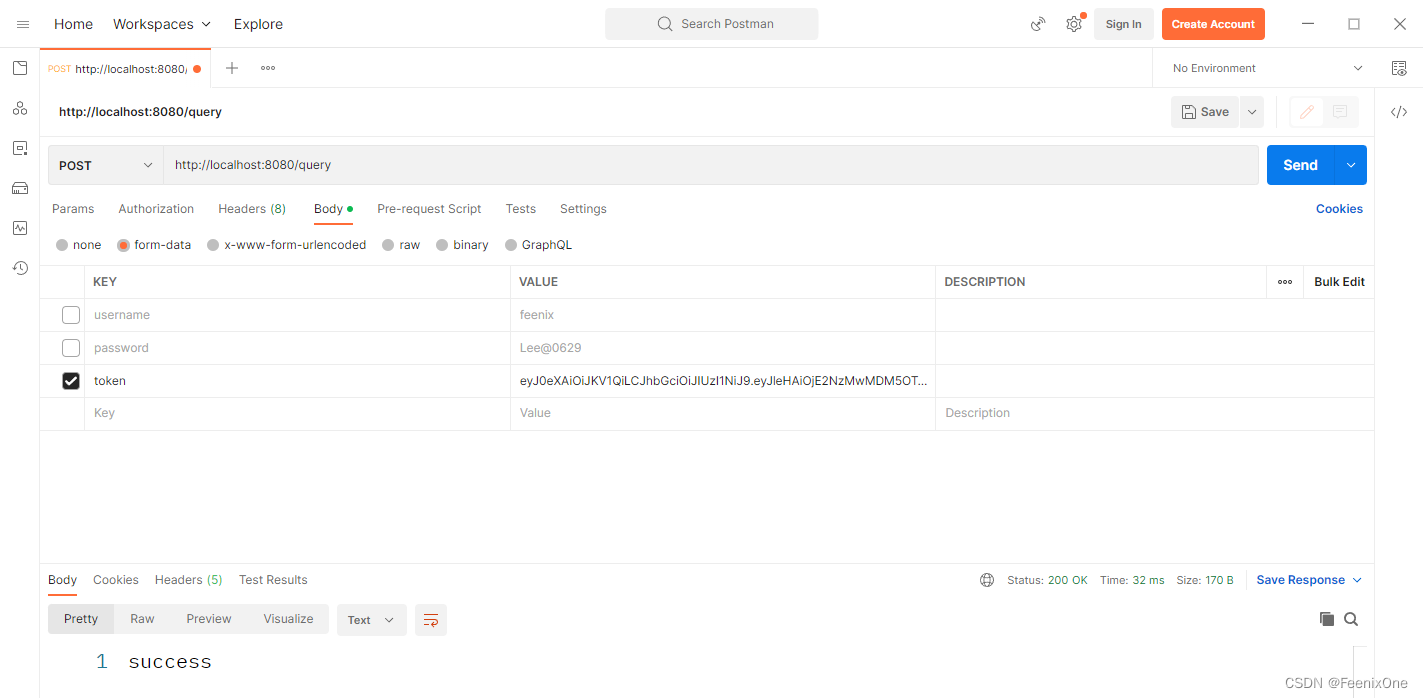
使用Postman模拟前端请求,生成并校验token

9、OAuth2.0相关
什么是OAuth2.0
先说OAuth,OAuth是Open Authorization的简写。OAuth协议为用户资源的授权提供了一个安全的、开放而又简易的标准。与以往的授权方式不同之处是OAuth的授权不会使第三方触及到用户的帐号信息(如用户名与密码),即第三方无需使用用户的用户名与密码就可以申请获得该用户资源的授权,因此OAuth是安全的。OAuth2.0是OAuth协议的延续版本,但不向前兼容,即完全废止了OAuth1.0。
使用场景举个栗子
A网站是一个打印照片的网站,B网站是一个存储照片的网站,二者原本毫无关联。如果一个用户想使用A网站打印自己存储在B网站的照片,那么A网站就需要使用B网站的照片资源才行。按照传统的思考模式,需要A网站具有登录B网站的用户名和密码才行,但是,现在有了OAuth2,只需要A网站获取到使用B网站照片资源的一个通行令牌即可!这个令牌无需具备操作B网站所有资源的权限,也无需永久有效,只要满足A网站打印照片需求即可。这么听来,是不是有点像单点登录?NONONO!千万不要混淆概念!单点登录是用户一次登录,自己可以操作其他关联的服务资源。OAuth2则是用户给一个系统授权,可以直接操作其他系统资源的一种方式。但SpringSecurity的OAuth2也是可以实现单点登录的,也就是说,SpringSecurity的OAuth2可以做服务之间资源共享,也可以实现单点登录!
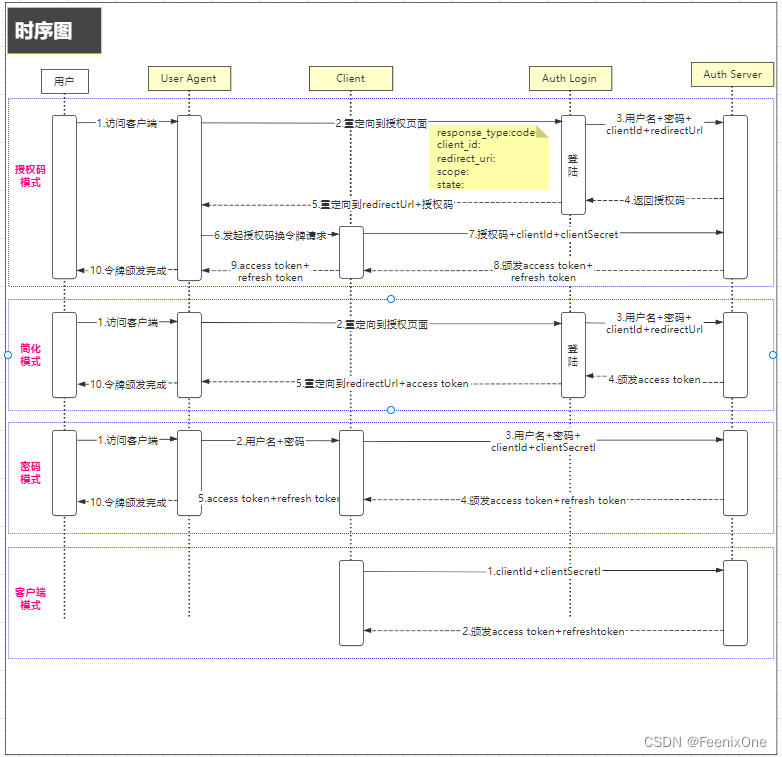
四种授权方式
授权码模式(authorization code)

流程说明:【A服务客户端】需要用到【B服务资源服务】中的资源
1、【A服务客户端】将用户自动导航到【B服务认证服务】,这一步用户需要提供一个回调地址,以备【B服务认证服务】返回授权码使用;
2、用户点击授权按钮表示让【A服务客户端】使用【B服务资源服务】,这一步需要用户登录B服务,也就是说用户要事先具有B服务的使用权限;
3、【B服务认证服务】生成授权码,授权码将通过第一步提供的回调地址,返回给【A服务客户端】(这个授权码并非通行【B服务资源服务】的通行凭证);
4、【A服务认证服务】携带上一步得到的授权码向【B服务认证服务】发送请求,获取通行凭证token;
5、【B服务认证服务】给【A服务认证服务】返回令牌token和更新令牌refresh token;
授权码模式是OAuth2中最安全最完善的一种模式,应用场景最广泛,可以实现服务之间的调用,常见的微信,QQ等第三方登录也可采用这种方式实现。
简化模式(implicit)
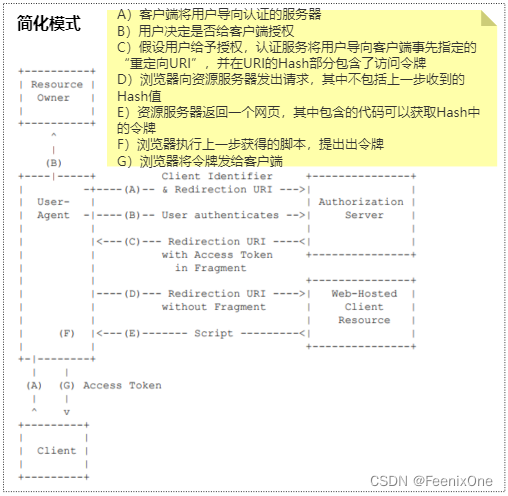
流程说明:简化模式中没有【A服务认证服务】这一部分,全部有【A服务客户端】与B服务交互,整个过程不再有授权码,token直接暴露在浏览器。
1、【A服务客户端】将用户自动导航到【B服务认证服务】,这一步用户需要提供一个回调地址,以备【B服务认证服务】返回token使用,还会携带一个【A服务客户端】的状态标识state;
2、用户点击授权按钮表示让【A服务客户端】使用【B服务资源服务】,这一步需要用户登录B服务,也就是说用户要事先具有B服务的使用权限;
3、【B服务认证服务】生成通行令牌token,token将通过第一步提供的回调地址,返回给【A服务客户端】;
适用于A服务没有服务器的情况。比如:纯手机小程序,JavaScript语言实现的网页插件等。
密码模式(resource owner password credentials)

1、直接告诉【A服务客户端】自己的【B服务认证服务】的用户名和密码;
2、【A服务客户端】携带【B服务认证服务】的用户名和密码向【B服务认证服务】发起请求获取token;
3、【B服务认证服务】给【A服务客户端】颁发token;
此种模式虽然简单,但是用户将B服务的用户名和密码暴露给了A服务,需要两个服务信任度非常高才能使用。
客户端模式(client credentials)
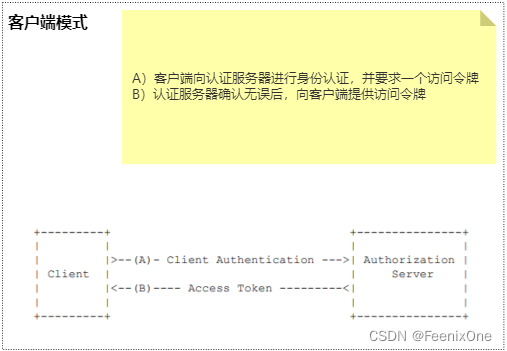
流程说明:这种模式其实已经不太属于OAuth2的范畴了。A服务完全脱离用户,以自己的身份去向B服务索取token。换言之,用户无需具备B服务的使用权也可以。完全是A服务与B服务内部的交互,与用户无关了。
1、A服务向B服务索取token;
2、B服务返回token给A服务;
A服务本身需要B服务资源,与用户无关。
四种模式的时序图
Auth2.0表结构
官方SQL地址:
https://github.com/spring-projects/spring-security-oauth/blob/master/spring-security-oauth2/src/test/resources/schema.sql
oauth_client_details
| 字段名 | 字段说明 |
|---|---|
| client_id | 主键,必须唯一,不能为空. 用于唯一标识每一个客户端(client); 在注册时必须填写(也可由服务 端自动生成). 对于不同的grant_type,该字段都是必须的. 在实际应用中的另一个名称叫 appKey,与client_id是同一个概念. |
| resource_ids | 客户端所能访问的资源id集合,多个资源时用逗号(,)分隔,如: “unity-resource,mobile- resource”. 该字段的值必须来源于与security.xml中标签?oauth2:resource-server的属性 resource-id值一致. 在security.xml配置有几个?oauth2:resource-server标签, 则该字段可以 使用几个该值. 在实际应用中, 我们一般将资源进行分类,并分别配置对应 的?oauth2:resource-server,如订单资源配置一个?oauth2:resource-server, 用户资源又配置 一个?oauth2:resource-server. 当注册客户端时,根据实际需要可选择资源id,也可根据不同的 注册流程,赋予对应的资源id. |
| client_secret | 用于指定客户端(client)的访问密匙; 在注册时必须填写(也可由服务端自动生成). 对于不同的 grant_type,该字段都是必须的. 在实际应用中的另一个名称叫appSecret,与client_secret是 同一个概念. |
| scope | 指定客户端申请的权限范围,可选值包括read,write,trust;若有多个权限范围用逗号(,)分隔,如: “read,write”. scope的值与security.xml中配置的?intercept-url的access属性有关系. 如?intercept-url的配置为?intercept-url pattern="/m/**" access=“ROLE_MOBILE,SCOPE_READ”/>则说明访问该URL时的客户端必须有read权限范 围. write的配置值为SCOPE_WRITE, trust的配置值为SCOPE_TRUST. 在实际应该中, 该值一 般由服务端指定, 常用的值为read,write. |
| authorized_grant_types | 指定客户端支持的grant_type,可选值包括 authorization_code,password,refresh_token,implicit,client_credentials, 若支持多个 grant_type用逗号(,)分隔,如: “authorization_code,password”. 在实际应用中,当注册时,该字 段是一般由服务器端指定的,而不是由申请者去选择的,最常用的grant_type组合有: “authorization_code,refresh_token”(针对通过浏览器访问的客户端); “password,refresh_token”(针对移动设备的客户端). implicit与client_credentials在实际中 很少使用. |
| web_server_redirect_uri | 客户端的重定向URI,可为空, 当grant_type为authorization_code或implicit时, 在Oauth的流 程中会使用并检查与注册时填写的redirect_uri是否一致. 下面分别说明:当 grant_type=authorization_code时, 第一步 从 spring-oauth-server获取 'code’时客户端发 起请求时必须有redirect_uri参数, 该参数的值必须与 web_server_redirect_uri的值一致. 第 二步 用 ‘code’ 换取 ‘access_token’ 时客户也必须传递相同的redirect_uri. 在实际应用中, web_server_redirect_uri在注册时是必须填写的, 一般用来处理服务器返回的code, 验证 state是否合法与通过code去换取access_token值.在spring-oauth-client项目中, 可具体参考 AuthorizationCodeController.java中的authorizationCodeCallback方法.当 grant_type=implicit时通过redirect_uri的hash值来传递access_token值. 如:http://localhost:7777/spring-oauth-client/implicit#access_token=dc891f4a-ac88- 4ba6-8224-a2497e013865&token_type=bearer&expires_in=43199然后客户端通过JS等从 hash值中取到access_token值. |
| authorities | 指定客户端所拥有的Spring Security的权限值,可选, 若有多个权限值,用逗号(,)分隔, 如: "ROLE_ |
| access_token_validity | 设定客户端的access_token的有效时间值(单位:秒),可选, 若不设定值则使用默认的有效时间 值(60 * 60 * 12, 12小时). 在服务端获取的access_token JSON数据中的expires_in字段的值 即为当前access_token的有效时间值. 在项目中, 可具体参考DefaultTokenServices.java中属 性accessTokenValiditySeconds. 在实际应用中, 该值一般是由服务端处理的, 不需要客户端 自定义.refresh_token_validity 设定客户端的refresh_token的有效时间值(单位:秒),可选, 若不设定值则使用默认的有效时间值(60 * 60 * 24 * 30, 30天). 若客户端的grant_type不包 括refresh_token,则不用关心该字段 在项目中, 可具体参考DefaultTokenServices.java中属 性refreshTokenValiditySeconds. 在实际应用中, 该值一般是由服务端处理的, 不需要客户端 自定义. |
| additional_information | 这是一个预留的字段,在Oauth的流程中没有实际的使用,可选,但若设置值,必须是JSON格式的 数据,如:{“country”:“CN”,“country_code”:“086”}按照spring-security-oauth项目中对该字段 的描述 Additional information for this client, not need by the vanilla OAuth protocol but might be useful, for example,for storing descriptive information. (详见 ClientDetails.java的getAdditionalInformation()方法的注释)在实际应用中, 可以用该字段来 存储关于客户端的一些其他信息,如客户端的国家,地区,注册时的IP地址等等.create_time 数据的创建时间,精确到秒,由数据库在插入数据时取当前系统时间自动生成(扩展字段) |
| archived | 用于标识客户端是否已存档(即实现逻辑删除),默认值为’0’(即未存档). 对该字段的具体使用请 参考CustomJdbcClientDetailsService.java,在该类中,扩展了在查询client_details的SQL加上 archived = 0条件 (扩展字段) |
| trusted | 设置客户端是否为受信任的,默认为’0’(即不受信任的,1为受信任的). 该字段只适用于 grant_type="authorization_code"的情况,当用户登录成功后,若该值为0,则会跳转到让用户 Approve的页面让用户同意授权, 若该字段为1,则在登录后不需要再让用户Approve同意授权 (因为是受信任的). 对该字段的具体使用请参考OauthUserApprovalHandler.java. (扩展字 段) |
| autoapprove | 设置用户是否自动Approval操作, 默认值为 ‘false’, 可选值包括 ‘true’,‘false’, ‘read’,‘write’. 该 字段只适用于grant_type="authorization_code"的情况,当用户登录成功后,若该值为’true’或 支持的scope值,则会跳过用户Approve的页面, 直接授权. 该字段与 trusted 有类似的功能, 是 spring-security-oauth2 的 2.0 版本后添加的新属性. 在项目中,主要操作 oauth_client_details表的类是JdbcClientDetailsService.java, 更多的细节请参考该类. 也可 以根据实际的需要,去扩展或修改该类的实现. |
oauth_client_token
| 字段名 | 字段说明 |
|---|---|
| create_time | 数据的创建时间,精确到秒,由数据库在插入数据时取当前系统时间自动生成(扩展字段) |
| token_id | 从服务器端获取到的access_token的值. |
| token | 这是一个二进制的字段, 存储的数据是OAuth2AccessToken.java对象序列化后的二进制数据. |
| authentication_id | 该字段具有唯一性, 是根据当前的username(如果有),client_id与scope通过MD5加密生成的. 具体实现请参考DefaultClientKeyGenerator.java类. |
| user_name | 登录时的用户名 |
| client_id |
oauth_access_token
| 字段名 | 字段说明 |
|---|---|
| create_time | 数据的创建时间,精确到秒,由数据库在插入数据时取当前系统时间自动生成(扩展字段) |
| token_id | 从服务器端获取到的access_token的值. |
| token | 这是一个二进制的字段, 存储的数据是OAuth2AccessToken.java对象序列化后的二进制数据. |
| authentication_id | 该字段具有唯一性, 是根据当前的username(如果有),client_id与scope通过MD5加密生成的. 具体实现请参考DefaultClientKeyGenerator.java类. |
| user_name | 登录时的用户名 |
| client_id | |
| authentication | 存储将OAuth2Authentication.java对象序列化后的二进制数据. |
| refresh_token | 该字段的值是将refresh_token的值通过MD5加密后存储的. 在项目中,主要操作oauth_access_token表的对象是JdbcTokenStore.java. 更多的细节请参考该类 |
oauth_refresh_token
| 字段名 | 字段说明 |
|---|---|
| create_time | 数据的创建时间,精确到秒,由数据库在插入数据时取当前系统时间自动生成(扩展字段) |
| token_id | 该字段的值是将refresh_token的值通过MD5加密后存储的. |
| token | 存储将OAuth2RefreshToken.java对象序列化后的二进制数据 |
| authentication | 存储将OAuth2RefreshToken.java对象序列化后的二进制数据 |
oauth_code
| 字段名 | 字段说明 |
|---|---|
| create_time | 数据的创建时间,精确到秒,由数据库在插入数据时取当前系统时间自动生成(扩展字段) |
| code | 存储服务端系统生成的code的值(未加密). |
| authentication | 存储将AuthorizationRequestHolder.java对象序列化后的二进制数据. |