Retrofit2网络请求框架的简单使用
常用步骤:
步骤1:添加Retrofit库的依赖
步骤2:创建 接收服务器返回数据 的类
步骤3:创建 用于描述网络请求 的接口
步骤4:创建 Retrofit 实例
步骤5:创建 网络请求接口实例 并 配置网络请求参数
步骤6:发送网络请求(异步 / 同步),封装了 数据转换、线程切换的操作
步骤7:处理服务器返回的数据
实例:
步骤1:添加Retrofit库的依赖
implementation 'com.squareup.retrofit2:retrofit:2.6.1'
//实例用到Gson解析,所以要添加此解析器依赖库
implementation 'com.squareup.retrofit2:converter-gson:2.0.2'
步骤2:创建 接收服务器返回数据 的类
此处以和风天气的城市搜索API为例。
- 查看返回的数据
{
  "HeWeather6": [
    {
      "basic": [
        {
          "cid": "CN101281002",
          "location": "吴川",
          "parent_city": "湛江",
          "admin_area": "广东",
          "cnty": "中国",
          "lat": "21.42845345",
          "lon": "110.78050995",
          "tz": "+8.00",
          "type": "city"
        }
      ],
      "status": "ok"
    }
  ]
}
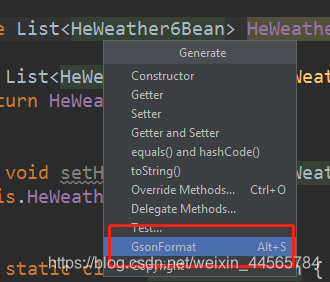
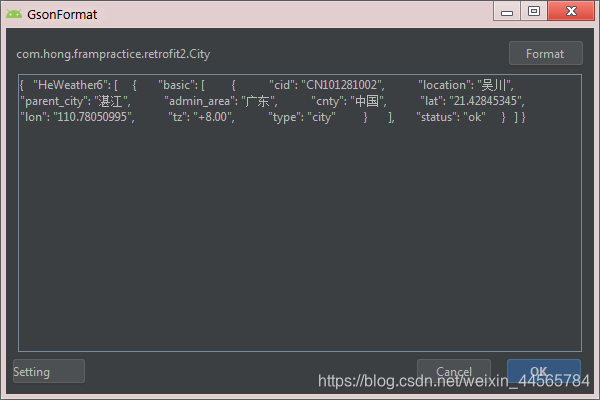
- 在AS中创建 接收服务器返回数据 的类
可以新建类后,在编辑界面按 Alt+Insert 选择GsonFromat或者直接按Alt+S快捷键,在弹出框粘贴json格式的数据,按‘ok’后自动生成json数据处理类。
//City.java
public class City {
    private List<HeWeather6Bean> HeWeather6;
    public List<HeWeather6Bean> getHeWeather6() {
        return HeWeather6;
    }
    public void setHeWeather6(List<HeWeather6Bean> HeWeather6) {
        this.HeWeather6 = HeWeather6;
    }
    public static class HeWeather6Bean {
        /**
         * basic : [{"cid":"CN101281002","location":"吴川","parent_city":"湛江","admin_area":"广东","cnty":"中国","lat":"21.42845345","lon":"110.78050995","tz":"+8.00","type":"city"}]
         * status : ok
         */
        private String status;
        private List<BasicBean> basic;
        public String getStatus() {
            return status;
        }
        public void setStatus(String status) {
            this.status = status;
        }
        public List<BasicBean> getBasic() {
            return basic;
        }
        public void setBasic(List<BasicBean> basic) {
            this.basic = basic;
        }
        public static class BasicBean {
            /**
             * cid : CN101281002
             * location : 吴川
             * parent_city : 湛江
             * admin_area : 广东
             * cnty : 中国
             * lat : 21.42845345
             * lon : 110.78050995
             * tz : +8.00
             * type : city
             */
            private String cid;
            private String location;
            private String parent_city;
            private String admin_area;
            private String cnty;
            private String lat;
            private String lon;
            private String tz;
            private String type;
            public String getCid() {
                return cid;
            }
            public void setCid(String cid) {
                this.cid = cid;
            }
            public String getLocation() {
                return location;
            }
            public void setLocation(String location) {
                this.location = location;
            }
            public String getParent_city() {
                return parent_city;
            }
            public void setParent_city(String parent_city) {
                this.parent_city = parent_city;
            }
            public String getAdmin_area() {
                return admin_area;
            }
            public void setAdmin_area(String admin_area) {
                this.admin_area = admin_area;
            }
            public String getCnty() {
                return cnty;
            }
            public void setCnty(String cnty) {
                this.cnty = cnty;
            }
            public String getLat() {
                return lat;
            }
            public void setLat(String lat) {
                this.lat = lat;
            }

            public String getLon() {
                return lon;
            }
            public void setLon(String lon) {
                this.lon = lon;
            }
            public String getTz() {
                return tz;
            }
            public void setTz(String tz) {
                this.tz = tz;
            }
            public String getType() {
                return type;
            }
            public void setType(String type) {
                this.type = type;
            }
        }
    }
}
步骤3:创建 用于描述网络请求 的接口
参数都必须用注解形式,完整的Url = 创建Retrofit实例设置的baseUrl + @GET注解里的字段 + @Query参数设置(充当url中?后面的参数)
//此处要请求的Url为:https://search.heweather.net/find?location=CN101281002&key=5126356**可自行去和风官网申请key**7286
//baseUrl:https://search.heweather.net/
//@GET:find
//@Query:请求参数,即?后面的参数,@Query("键名")  键值的类型  形参
public interface GetCity_Interface {
	//用GET方式发送请求
    @GET("find")
     其中返回类型为Call<*>,*是接收数据的类(即上面定义的City类)
    // 如果想直接获得Responsebody中的内容,可以定义网络请求返回值为Call<ResponseBody>
    public Call<City> getCall(@Query("mode") String mode,
                              @Query("location") String location,
                              @Query("key") String key);
}
步骤4:创建 Retrofit 实例
Retrofit retrofit = new Retrofit.Builder()
                .baseUrl("https://search.heweather.net/")	//设置(部分)Url
                .addConverterFactory(GsonConverterFactory.create())	//设置解析器,这里用Gson解析器
                .build();
//可拓展 addCallAdapterFactory(RxJavaCallAdapterFactory.create()) // 支持RxJava平台
步骤5:创建 网络请求接口实例 并 配置网络请求参数
//创建 网络请求接口实例,create(刚创建的网络接口)
GetCity_Interface getCity_interface = retrofit.create(GetCity_Interface.class);
//配置网络请求参数,调用接口定义的getCall()方法
Call<City> call = getCity_interface.getCall(mode[0], cityName, "5126356**可自行去和风官网申请key**7286");
步骤6:发送网络请求(异步 / 同步),封装了 数据转换、线程切换的操作
//实例使用enqueue异步请求
call.enqueue(new Callback<City>() {
            @Override
            public void onResponse(Call<City> call, Response<City> response) {
            	//请求成功做相应操作
                cities = response.body().getHeWeather6().get(0).getBasic();
                //此处结合了先前自定义的ListView对返回的数据用列表显示出来
                //文章:https://blog.csdn.net/weixin_44565784/article/details/100023739
                CityAdater cityAdater = new CityAdater(SearchCity.this, R.layout.city_list_item, cities);
                cityListV.setAdapter(cityAdater);
            }

            @Override
            public void onFailure(Call<City> call, Throwable t) {
            	//请求失败
                t.printStackTrace();
            }
        });
// 发送网络请求(同步)
// Response<Reception> response = call.execute();
// 对返回数据进行处理
// response.body().show();
步骤7:处理服务器返回的数据
//即步骤六的 请求成功做相应操作
cities = response.body().getHeWeather6().get(0).getBasic();
 //此处结合了先前自定义的ListView对返回的数据用列表显示出来
CityAdater cityAdater = new CityAdater(SearchCity.this, R.layout.city_list_item, cities);
cityListV.setAdapter(cityAdater);
拓展资料
- Carson_Ho博主 - 很详细的 Retrofit 2.0 使用教程 - 点击直达:https://blog.csdn.net/carson_ho/article/details/73732076
- Carson_Ho博主 - Android:手把手带你深入剖析 Retrofit 2.0 源码 - 点击直达:https://blog.csdn.net/carson_ho/article/details/73732115