Spring
Spring是什么?
Spring是一个开放源代码的设计层面框架,他解决的是业务逻辑层和其他各层的松耦合问题,因此它将面向接口的编程思想贯穿整个系统应用。
目前没能完全理解Spring的定义,随着学习的深入再慢慢理解
spring中有一个非常概念: bean (是java中的任何一种对象javabean/service/action/数据源./dao, ioc(控制反转 inverse of control) di( dependency injection 依赖注入)
di也就是ioc,只不过开发者认为di更符合自己的逻辑
目前在我看来spring的实现通过xml文件来配置,并且通过包中的方法来实现
先要完成一个bean文件
BEAN文件:
HelloService:
public class HelloService {public HelloService() {
System.out.println("第一步:这是实例化的过程");
}
private String name;
public String getName() {
return name;
}
public void setName(String name) {
this.name = name;
}
public void sayBye() {
System.out.println("name is"+name);
}
}
UserService:
public class UserService {
private String name;
private HelloService hiService; //引用HelloService的对象
public UserService() {
System.out.println("这是ApplicationContext创建的bean对象的实例");
}
public HelloService getHiService() {
return hiService;
}
public void setHiService(HelloService hiService) {
this.hiService = hiService;
}
public String getName() {
return name;
}
public void setName(String name) {
this.name = name;
}
public void sayHello() {
System.out.println("hello"+name);
hiService.sayBye();
}
}
XML文件
<?xml version="1.0" encoding="UTF-8"?>
<beans xmlns="http://www.springframework.org/schema/beans"
xmlns:xsi="http://www.w3.org/2001/XMLSchema-instance"
xmlns:context="http://www.springframework.org/schema/context"
xmlns:tx="http://www.springframework.org/schema/tx"
xsi:schemaLocation="http://www.springframework.org/schema/beans http://www.springframework.org/schema/beans/spring-beans-2.5.xsd
http://www.springframework.org/schema/context http://www.springframework.org/schema/context/spring-context-2.5.xsd
http://www.springframework.org/schema/tx http://www.springframework.org/schema/tx/spring-tx-2.5.xsd">
这一步再xml文件中配置bean,id为bean的名称,class是它实现的,property是他的属性,name必须再bean文件中有这样一个私有变量,value里的值将直接传递给他的setxxx()方法中
<bean id="userService" class="it.service.UserService"><property name="name">
<value>余飞</value>
</property>
<!--在userService中引用helloService-->
<property name="hiService" ref="helloService" />在这里调用了helloservice,ref可以完成引用其他类的功能
</bean>
<bean id="helloService" class="it.service.HelloService">
<property name="name" value="杨瑞琪" />
</bean>
</beans>
Test类
public class Text {
public static void main(String[] args) {
// TODO 自动生成的方法存根
//使用上下文创建
ApplicationContext ac=new ClassPathXmlApplicationContext("applicationContext.xml");
UserService us=(UserService) ac.getBean("userService");
us.sayHello();
//使用bean工厂创建
BeanFactory factory =new XmlBeanFactory(new ClassPathResource("applicationContext.xml"));
HelloService hello=(HelloService)factory.getBean("helloService");
hello.sayBye();
}
}
关于spring的创建过程(自我理解):
1.ClassPathXmlApplicationContext读取xml文件。
2.将xml中的提供的bean通过反射(用dom4j+反射实现)来建立对象。并存在ApplicationContext的引用当中,存储的结构类似hashtable(key,value)为id和class。
3.通过spring来得到ApplicationContext对象,进行使用。
tips:当ClassPathXmlApplicationContext(.xml)被执行时spring容器被创建,同时ApplicationContext中的bean就会创建
spring开发提倡接口编程,配合di技术可以层与层的解耦
思路:
1. 创建一个接口 ChangeLetter
2. 两个类实现接口
3. 把对象配置到spring容器中
4. 使用
功能:实现大小写的转换先贴代码
接口代码:
public interface ChangeLetter {
public String change();
}
将字母变小写功能
public class LowerLetter implements ChangeLetter{
private String str;
public String getStr() {
return str;
}
public void setStr(String str) {
this.str = str;
}
public String change() {
// TODO 自动生成的方法存根
return str.toLowerCase();
}
}
将字幕变大写代码
package interfacedemo;public class UpperLetter implements ChangeLetter{
private String str;
public String getStr() {
return str;
}
public void setStr(String str) {
this.str = str;
}
public String change() {
return str.toUpperCase();
}
}
bean代码:
//两部分代码只是class和内容不同,相当于通过更改class的内容可以直接得到不同的bean的实现
<!-- <bean id="changeletter" class="interfacedemo.UpperLetter">
<property name="str"><value>asdd</value>
</property>
</bean> -->这块注释掉了,因为只能存在一个id,
<bean id="changeletter" class="interfacedemo.LowerLetter">
<property name="str">
<value>ASDDD</value>
</property>
</bean>
</beans>
Test代码:
public class Test {
public static void main(String[] args) {
//获取初始化方法
ApplicationContext app=new ClassPathXmlApplicationContext("interfacedemo/beans.xml");
//原始方法,不通过接口
// UpperLetter up= (UpperLetter) app.getBean("changeletter");// System.out.println(up.change());
//LowerLetter up= (LowerLetter) app.getBean("changeletter");
//System.out.println(up.change());
//使用接口
//这样只需要在xml文件更改文件所对应的类,就可以直接实现方法
ChangeLetter up= (ChangeLetter) app.getBean("changeletter");
//本来不可以将object转为接口类型,不过这里却通过Spring实现了
//这里可以直接更改xml文件的class内容,不用动id名称,可以直接更改想要获得的方法,这是今天学习让我最惊叹的一点。
System.out.println(up.change());}
}
从ApplicationContex 应用上下文容器中获取bean和从bean工厂容器中获取bean
从上下文中获取:
ApplicationContext ac=new ClassPathXmlApplicationContext("it/Factory/Context.xml");
从工厂中获取
BeanFactory factory=new XmlBeanFactory(new ClassPathResource("it/factory/factory.xml"));
两个的差别,从上下文中获取是当我们去实例化beans.xml时就会创建bean,前提是bean的scope=singleton(后面会解释)。
而从工厂中获取则会等到getBean(“bean”)时才能创建bean的对象;
验证:将无参构造函数中写一句输出语句,用上下文获取则会输出这条语句,而工厂类要等到getBean时才会输出这条语句
上下文获取
优点:可以预先加载,
缺点:耗内存
工厂中获取
优点:节约内存
缺点:加载速度慢
Bean的作用域
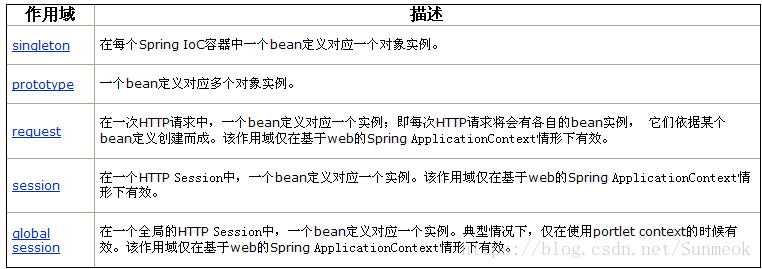
这是官方文档的解释,我觉得时翻译的问题,会增加很多难度,我自己的理解如下
singleton:在这个spring容器中建立一次这个bean的对象,则会一直存在,即使新建也不会改变。
验证方法:建立两个名称不同但是都是getBean(arg)中arg相同的对象,结果两个地址相同。
prototype:每次定义bean都会新建一个对象实例
验证方法:建立两个名称不同但是都是getBean(arg)中arg相同的对象,结果两个地址不同。
request:用于web中,每个request用一个对象实例
session:用于web中,每个session用一个对象实例‘
tips:
前文中提到从下文获取再实例化bean.xml时就会建立bean对像,但是他的作用域必须是singleton才可以实现。,因为singleton只会对一个bean创建一个对象,但是要是prototype作用域的话,一个bean会创建多个对象实例,所以要是使用prototype会预先创建很多对象浪费空间,而singleton不存在这种情况。