第三章 ,Netty服务端与客户端之间的协议传输
基于上一章的内容,我们学习了如何通过发送string数据到服务端,并在进行输出。本章来聊聊如何制定协议,将数据内容转化为对应格式进行通信,并实现简单的登录功能。
上一章的链接在这里 https://blog.csdn.net/sinat_18538231/article/details/101565251
协议制定
通俗来讲,协议就是通信双方能够理解的一种数据格式。在进行开发之前,双端应该统一协议格式,这样当一方收到另一方发来的数据,便可以根据协议格式来进行解析获得正确的数据内容。
要思考如何制定协议,我们一般需要考虑这么三个方面
应用层、安全层、传输层
应用层控制如何将数据内容打包成我们需要的格式。主要有三种类型:文本协议(json等)、二进制协议(字节流)、数据格式协议(protobuf等);
安全层控制对打包好的数据进行加密,减少被破解的可能性;
传输层控制数据传输方式(Tcp或Udp)。
在这里先不展开安全层和传输层,我们暂不进行加密,传输还是用tcp,应用层我们先展开讲最基础的二进制协议的用法。
1.二进制协议
这里我们制定一个二进制协议格式

如图,在我们制定的格式中,一个二进制数据包由一个包头header和一个包体body组成,header中包含了一个16位整型的数据长度length和一个16位整型的协议号cmd组成。length帮助我们解决的粘包和拆包的问题,保证数据的完整性,协议号cmd帮助我们分发body中的数据内容到对应的解析器中进行数据解析并进行逻辑处理。
2.改造服务端
在上一章中,我们处理了客户端与服务端的数据交互,但是使用的编码与解码器是netty自带的StringEncoder和StringDecoder,专门用于处理字符串类型的数据传输。由于我们的协议是自定的,因此编码与解码器我们也需要自定义。
以下代码都可在 https://github.com/GaolengYan/ASimpleGameServer 中找到
BinaryDecoder.java 协议解码器
public class BinaryDecoder extends ByteToMessageDecoder {


    @Override
    protected void decode(ChannelHandlerContext channelHandlerContext, ByteBuf byteBuf, List<Object> list) throws Exception {


        if (byteBuf.readableBytes() < 8) {

      // 因为协议头为length:int16+cmd:int16共32位8个字节
            return;                         // 因此当可读数据小于8位时我们不处理
        }
        short bodyLength = byteBuf.readShortLE();   // 消息体长度
        int cmd = byteBuf.readShortLE();            // 协议号
        byte[] body = new byte[bodyLength];         //
        byteBuf.readBytes(body);                    // 读出消息体
        Pt pt = BinaryRouting.routing(cmd);         // 根据协议号分发消息体到对应的协议解析类
        if (pt != null){


            HashMap argsMap = pt.decode(cmd, body); // 解析得到参数map
            Request request = new Request(cmd, argsMap, channelHandlerContext.channel()); // 打包成Request对象); // 打包成Request对象
            list.add(request);                      // 将解析好的数据放入结果
        }
    }
}
BinaryEncoder .java 协议编码器
public class BinaryEncoder extends MessageToByteEncoder<Response> {


    @Override
    protected void encode(ChannelHandlerContext channelHandlerContext, Response response, ByteBuf byteBuf) throws Exception {


        int cmd = response.getCmd();
        Pt pt = BinaryRouting.routing(cmd);
        System.out.println(response.toString());
        if (pt != null){


            byte[] body = pt.encode(cmd, response.getHashMap());
            byte[] cmdBytes = Protocol.writeInt16(response.getCmd());
            byte[] length = Protocol.writeInt16(body.length);
            byte[] result = Protocol.byteMergerAll(length, cmdBytes, body);
            byteBuf.writeBytes(result);
        }
    }
}
BinaryRouting.java 协议解析分发器
public class BinaryRouting {


    private static HashMap hashMap = new HashMap<Short, Object>(); // 协议号到解析类实例映射map
    private static BinaryRouting binaryRouting = new BinaryRouting();

    private BinaryRouting(){

    init();}

    private void init() {


        hashMap.put(100, new Pt100());
    }

    public static Pt routing(int cmd){


        return (Pt) hashMap.get(cmd / 100); // 只用cmd的前三位来进行映射
    }
}
Pt.java 一个协议解析打包类的接口,根据功能自己实现
public interface Pt {


    HashMap decode(int cmd, byte[] bytes);
    byte[] encode(int cmd, HashMap hashMap);
}
Protocol.java 二进制协议打包类 需要注意的是大小端序的问题
public class Protocol {


    private static final boolean LITTLE_ENDIAN = true; // 是否是小端序
    // 打包字符串
    public static byte[] writeString(String str){


        byte[] strBody = str.getBytes(StandardCharsets.UTF_8);
        short length = (short) strBody.length;
        byte[] strLength = writeInt16(length);
        return byteMerger(strLength, strBody);
    }
    // 读取字符串
    public static Pair<String, byte[]> readString(byte[] bytes){


        Pair pair = readInt16(bytes); // 字符串长度
        int strLength = (int) pair.getValue0();
        byte[] leftBytes = (byte[]) pair.getValue1();
        byte[] strBytes = new byte[strLength];
        System.arraycopy(leftBytes, 0, strBytes, 0, strLength);
        String str = new String(strBytes);
        byte[] lastBytes = new byte[leftBytes.length - strLength];
        System.arraycopy(leftBytes, strLength, lastBytes, 0, lastBytes.length);
        return Pair.with(str, lastBytes);
    }
    // 打包16位无符号整型
    public static byte[] writeInt16(int num){


        byte[] bytes = new byte[2];
        for (int i = 0; i < 2; i++) {


            int offset = LITTLE_ENDIAN ? i * 8 : (bytes.length - 1 - i) * 8;
            bytes[i] = (byte) ((num >>> offset) & 0xff);
        }
        return bytes;
    }
    public static Pair readInt16(byte[] bytes){


        if (bytes.length < 2) {


            return Pair.with(0, new byte[0]);
        }else{


            int num;
            if (LITTLE_ENDIAN){


                num = (bytes[0] & 0xFF) | ((bytes[1] & 0xFF) << 8);
            }else{


                num = (bytes[1] & 0xFF) | ((bytes[0] & 0xFF) << 8);
            }
            byte[] leftBytes = new byte[bytes.length - 2];
            System.arraycopy(bytes, 2, leftBytes, 0, bytes.length - 2);
            return Pair.with(num, leftBytes);
        }
    }
    // 打包32位无符号整型
    public static byte[] writeInt32(long num){


        byte[] bytes = new byte[4];
        for (int i = 0; i < 4; i++) {


            int offset = LITTLE_ENDIAN ? i * 8 : (bytes.length - 1 - i) * 8;
            bytes[i] = (byte) ((num >>> offset) & 0xff);
        }
        return bytes;
    }
    public static Pair readInt32(byte[] bytes){


        if (bytes.length < 4) {


            return Pair.with(0, new byte[0]);
        }else{


            int num;
            if (LITTLE_ENDIAN) {


                num = (int) ((bytes[0] & 0xFF)
                    | ((bytes[1] & 0xFF) << 8)
                    | ((bytes[2] & 0xFF) << 16)
                    | ((bytes[3] & 0xFF) << 24));
            }else{


                num = (int) ((bytes[3] & 0xFF)
                    | ((bytes[2] & 0xFF) << 8)
                    | ((bytes[1] & 0xFF) << 16)
                    | ((bytes[0] & 0xFF) << 24));
            }
            byte[] leftBytes = new byte[bytes.length - 4];
            System.arraycopy(bytes, 4, leftBytes, 0, bytes.length - 4);
            return Pair.with(num, leftBytes);
        }
    }
    // 打包64位无符号整型
    public static byte[] writeInt64(long num){


        byte[] bytes = new byte[8];
        for (int i = 0; i < 8; i++) {


            int offset = LITTLE_ENDIAN ? i * 8 : (bytes.length - 1 - i) * 8;
            bytes[i] = (byte) ((num >>> offset) & 0xFF);
        }
        return bytes;
    }
    // 读64位无符号整型
    public static Pair readInt64(byte[] bytes){


        if (bytes.length < 8) {


            return Pair.with(0, new byte[0]);
        }else{


            long num = 0;
            for(int i = 0; i < 8; i ++){


                int offset=(LITTLE_ENDIAN ? i : (7 - i)) << 3;
                num |=((long)0xff<< offset) & ((long)bytes[i] << offset);
            }
            byte[] leftBytes = new byte[bytes.length - 8];
            System.arraycopy(bytes, 8, leftBytes, 0, bytes.length - 8);
            return Pair.with(num, leftBytes);
        }
    }
    // 拼接2个byte数组
    public static byte[] byteMerger(byte[] header, byte[] body){


        byte[] result = new byte[header.length + body.length];
        System.arraycopy(header, 0, result, 0, header.length);
        System.arraycopy(body, 0, result, header.length, body.length);
        return result;
    }
    // 拼接多个byte数组
    public static byte[] byteMergerAll(byte[]... values) {


        int length_byte = 0;
        for (byte[] value : values) {


            length_byte += value.length;
        }
        byte[] all_byte = new byte[length_byte];
        int countLength = 0;
        for (byte[] b : values) {


            System.arraycopy(b, 0, all_byte, countLength, b.length);
            countLength += b.length;
        }
        return all_byte;
    }
}
其中Pair是javatuples包下的类,要使用它我们需要引入javatuples包,它可以方便地在java程序中提供类似元组的功能。
最后别忘了修改我们的netty启动类。
public class Main {


    private static Properties properties = new Properties();
    public static void main(String[] args) throws Exception {


        loadProperties(properties); // 载入配置
        start();    // 启动服务器
    }
    private static void start() throws InterruptedException {


        EventLoopGroup bossGroup = new NioEventLoopGroup();    // boss对象,用于监听socket连接
        EventLoopGroup workerGroup = new NioEventLoopGroup();  // worker对象,用于数据读写与处理逻辑
        ServerBootstrap bootstrap = new ServerBootstrap();  // 引导类,引导服务器的启动
        bootstrap
                .group(bossGroup, workerGroup)          // 双线程绑定
                .channel(NioServerSocketChannel.class)  // 指定IO模型为NIO
                .childHandler(new MyChannelInitializer(properties.getProperty("pt_type")))
                .bind(properties.getProperty("ip"), Integer.parseInt(properties.getProperty("port"))).sync();
        System.out.println("服务器启动!");
        test();
    }
    // 加载配置
    private static void loadProperties(Properties p){


        InputStream inputStream = Main.class.getClassLoader().getResourceAsStream("Config.properties");
        try {


            p.load(inputStream);
        } catch (IOException e1) {


            e1.printStackTrace();
        }
    }
//    协议测试方法
    private static void test(){


        int a = 25535;
        byte[] bytes = Protocol.writeInt16(a);
        Pair pair = Protocol.readInt16(bytes);
        System.out.println(pair.getValue0());
    }
}
这里我将一些原本写死在代码中的东西放到了一个properties配置文件中,暂不赘述。
可以看到,在netty服务器开启后加上了一个test方法,先调用writeInt16写入测试数据,再调用readInt16读出数据并打印。
3.运行测试
启动服务端。
服务端输出:
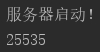
可以看到打包和解包int16位数据的方法没有问题。其他方法也可以照样进行测试。
4.改造客户端
在这里我们制定一份登录协议
cmd:10001{


	c2s{

     // 客户端到服务端
		username:string  // 用户名
		password:string  // 密码
	}
	s2c{

      // 服务端返回客户端
		res:int32		// 结果码 0账号未注册 1登录成功 2密码错误
	}
}
这样一份协议表示,客户端通过10001协议号请求登录,消息体为string类型的用户名和密码。
服务端处理后,返回一个32位整型的结果码表示登录结果。
这里我们手写一个Pt100.java来进行服务端数据的解析
public class Pt100 implements Pt {


	public HashMap decode(int cmd, byte[] bytes){


		HashMap hashMap = new HashMap();
		if (cmd == 10001){


			Pair args1 = Protocol.readString(bytes);
			String accName = (String) args1.getValue0();
			byte[] leftBytes = (byte[]) args1.getValue1();
			Pair args2 = Protocol.readString(leftBytes);
			String passWord = (String) args2.getValue0();
			hashMap.put(1, accName);
			hashMap.put(2, passWord);
		}
		return hashMap;
	}

	public byte[] encode(int cmd, HashMap hashMap){


        if (cmd == 10001){


			int res = (int) hashMap.get(1);
			return Protocol.writeInt32(res);
		}
		return new byte[0];
	}
}
Pt100.java实现了Pt接口,当接受到数据时,调用decode方法解码;返回数据时,调用encode方法编码。
为了使项目结构更加清晰,逻辑处理统一实现Action接口
Action.java
public interface Action {


    void action(int cmd, Request request);
}
使用一个ActionManager来进行命令的分发
ActionManager.java
public class ActionManager {


    private static ActionManager actionManager = new ActionManager();
    private HashMap<Integer, Action> actionMap = new HashMap<>();

    private void init(){


        actionMap.put(100, (Action) new LoginAction()); // 在这里初始化action映射
    }

    public void dispatch(Request request) {


        int cmd = request.getCmd();
        Action action = actionMap.get(cmd);
        if(action != null) {


            action.action(cmd, request);
        }
    }

    private ActionManager(){


        init();
    }

    public static ActionManager getInstance() {


        return actionManager;
    }
}
最后来看看登录action
LoginAction.java
public class LoginAction implements Action {
public void action(int cmd, Request request) {
Channel channel = request.getChannel();
HashMap argsMap = request.getHashMap();
String accName = (String) argsMap.get(1);
String passWord = (String) argsMap.get(2);
HashMap responseArgsMap = new HashMap();
int res;
// 这里先写死测试数据
String testName = "GaolengYan";
String testPassWord = "123456";
// 判断用户名密码对不对
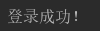
if (testName.equals(accName) && testPassWord.equals(passWord )){
res = 1;
System.out.println("登录成功!");
} else {
res = 2;
System.out.println("密码有误!");
}
responseArgsMap.put(1, res);
Response response = new Response(cmd, responseArgsMap);
channel.writeAndFlush(response);
}
}
打开客户端项目,把Protocol.java复制一份到客户端项目工程中。然后修改代码
public class Main {


    public static void main(String[] args) {


        try {


            InetAddress addr;
            Socket socket = new Socket("127.0.0.1", 9999);
            addr = socket.getInetAddress();
            OutputStream outPutStream = socket.getOutputStream();
            System.out.println("连接到" + addr);
            String accName = "GaolengYan";
            String passWord = "123456";
            byte[] accNameBytes = Protocol.writeString(accName);
            byte[] passWordBytes = Protocol.writeString(passWord);
            byte[] body = Protocol.byteMerger(accNameBytes, passWordBytes);
            int bodyLength = body.length;
            int requestId = 10001;
            byte[] length = Protocol.writeInt16(bodyLength);
            byte[] cmd = Protocol.writeInt16(requestId);
            byte[] result = Protocol.byteMergerAll(length, cmd, body);
            outPutStream.write(result);
        } catch (IOException e) {


            System.out.println("无法连接");
        }
    }
启动服务端在启动客户端。得到结果
客户端接收服务端的代码同理,就不再赘述。有意者可以留言或私信讨论大家一起学习进步。