基于python+opencv的人脸识别打卡
1 创建环境
conda create -n face python=3.7
conda activate face
pip install opencv-python
pip install pillow
pip install opencv-contrib-python
2 准备工作
2.1新建members.csv文件
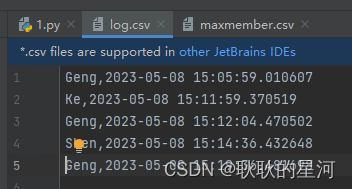
文件内容依次是id,First_name,Last_name,如图:

2.2新建face文件夹
里面存放采集的人脸信息,用于训练
k = cv2.waitKey(1)
        if k == 27:  # 通过esc键退出摄像
            break
        elif count >= 200:  # 得到n个样本后退出摄像(样本越大,精度越高,但采集信息的时间也越长)
            break
2.3注意事项
- 脸部识别特征模块
Path路径为你创建环境下的cv2包中haarcascade_frontalface_default.xml对应的地址
只加了opencv中脸部特征,没加眼部识别。(cv2包中还有眼部特征)
Path = r"C:\Users\11931\.conda\envs\face1\Lib\site-packages\cv2\data\haarcascade_frontalface_default.xml"
- 调用摄像头
手机下载一个ip摄像头,将电脑和手机连一个无线网(建议电脑连手机热点),将参数改为手机ip地址。

3 源码
import cv2
import os
import numpy as np
from PIL import Image
import datetime
import csv
# 调用笔记本内置摄像头,所以参数为0,如果有其他的摄像头可以调整参数为1,2
Path = r"C:\Users\11931\.conda\envs\face1\Lib\site-packages\cv2\data\haarcascade_frontalface_default.xml"
face_detector = cv2.CascadeClassifier(Path)
names = []
zh_name = []
with open("members.csv", "r", encoding='UTF-8') as csv_file:
reader = csv.reader(csv_file)
for item in reader:
# print(item)
names.append(item[2])
zh_name.append(item[1])
# print (zh_name)
def data_collection():
cap = cv2.VideoCapture(0, cv2.CAP_DSHOW)
# cv2.CAP_DSHOW是作为open调用的一部分传递标志,还有许多其它的参数,而这个CAP_DSHOW是微软特有的。
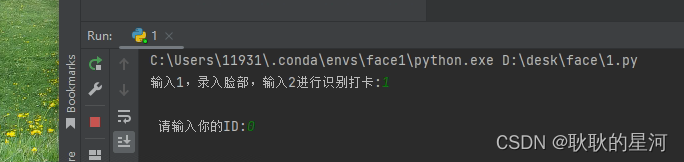
face_id = input('\n 请输入你的ID:')
print('\n 数据初始化中,请直视摄像机录入数据....')
count = 0
while True:
# 从摄像头读取图片
sucess, img = cap.read()
# 转为灰度图片
gray = cv2.cvtColor(img, cv2.COLOR_BGR2GRAY)
# 检测人脸
faces = face_detector.detectMultiScale(gray, 1.3, 5)
for (x, y, w, h) in faces:
cv2.rectangle(img, (x, y), (x + w, y + w), (255, 0, 0))
count += 1
# 保存图像
cv2.imwrite("11/Member." + str(face_id) + '.' + str(count) + '.jpg', gray[y: y + h, x: x + w])
cv2.imshow('data collection', img)
# 保持画面的持续。
k = cv2.waitKey(1)
if k == 27: # 通过esc键退出摄像
break
elif count >= 200: # 得到n个样本后退出摄像
break
cap.release()
cv2.destroyAllWindows()
def face_training():
# 人脸数据路径
path = './face'
recognizer = cv2.face.LBPHFaceRecognizer_create()
def getImagesAndLabels(path):
imagePaths = [os.path.join(path, f) for f in os.listdir(path)] # join函数将多个路径组合后返回
faceSamples = []
ids = []
for imagePath in imagePaths:
PIL_img = Image.open(imagePath).convert('L') # convert it to grayscale
img_numpy = np.array(PIL_img, 'uint8')
id = int(os.path.split(imagePath)[-1].split(".")[1])
faces = face_detector.detectMultiScale(img_numpy)
for (x, y, w, h) in faces:
faceSamples.append(img_numpy[y:y + h, x: x + w])
ids.append(id)
return faceSamples, ids
print('数据训练中')
faces, ids = getImagesAndLabels(path)
recognizer.train(faces, np.array(ids))
recognizer.write(r'.\trainer.yml')
# print("{0} faces trained. Exiting Program".format(len(np.unique(ids))))
def face_ientification():
cap = cv2.VideoCapture(0)
recognizer = cv2.face.LBPHFaceRecognizer_create()
recognizer.read('./trainer.yml')
faceCascade = cv2.CascadeClassifier(Path)
font = cv2.FONT_HERSHEY_SIMPLEX
idnum = 0
global namess
cam = cv2.VideoCapture(0)
# 设置大小
minW = 0.1 * cam.get(3)
minH = 0.1 * cam.get(4)
while True:
ret, img = cam.read()
# 图像灰度处理
gray = cv2.cvtColor(img, cv2.COLOR_BGR2GRAY)
# 将人脸用vector保存各个人脸的坐标、大小(用矩形表示)
faces = faceCascade.detectMultiScale(
gray,
scaleFactor=1.2, # 表示在前后两次相继的扫描中,搜索窗口的比例系数
minNeighbors=5, # 表示构成检测目标的相邻矩形的最小个数(默认为3个)
minSize=(int(minW), int(minH)) # minSize和maxSize用来限制得到的目标区域的范围
)
for (x, y, w, h) in faces:
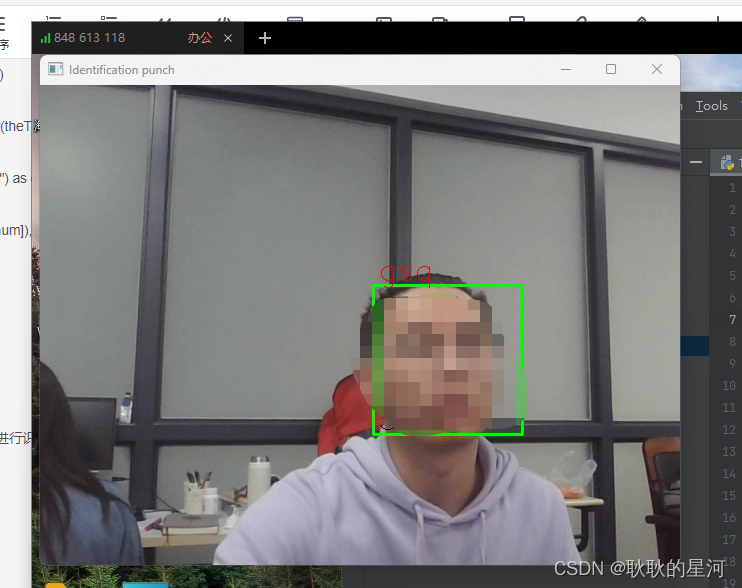
cv2.rectangle(img, (x, y), (x + w, y + h), (0, 255, 0), 2)
idnum, confidence = recognizer.predict(gray[y:y + h, x:x + w])
if confidence < 100:
namess = names[idnum]
confidence = "{0}%".format(round(100 - confidence))
else:
namess = "unknown"
confidence = "{0}%".format(round(100 - confidence))
cv2.putText(img, str(namess), (x + 5, y - 5), font, 1, (0, 0, 255), 1)
cv2.putText(img, str(confidence), (x + 5, y + h - 5), font, 1, (0, 0, 0), 1) # 输出置信度
cv2.imshow(u'Identification punch', img)
k = cv2.waitKey(10)
if k == 13:
theTime = datetime.datetime.now()
# print(zh_name[idnum])
strings = [str(zh_name[idnum]), str(theTime)]
print(strings)
with open("log.csv", "a", newline="") as csvFile:
writer = csv.writer(csvFile)
writer.writerow([str(zh_name[idnum]), str(theTime)])
elif k == 27:
cap.release()
cv2.destroyAllWindows()
break
while True:
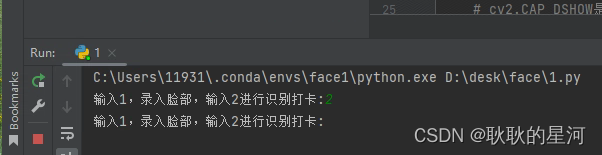
a = int(input("输入1,录入脸部,输入2进行识别打卡:"))
if a == 1:
data_collection()
face_training()
elif a == 2:
face_ientification()
4 操作步骤
- 录入脸部 (输入id,按照之前建立的csv文件序号操作)
2. 识别打卡(按下enter会录入信息,esc退出)
- 查看log(按下enter会录入信息,esc退出)