Android 创建桌面组件Widget——构建应用微件(二)
Android 创建桌面组件Widget——构建应用微件(一)
Android 创建桌面组件Widget——构建应用微件(二)
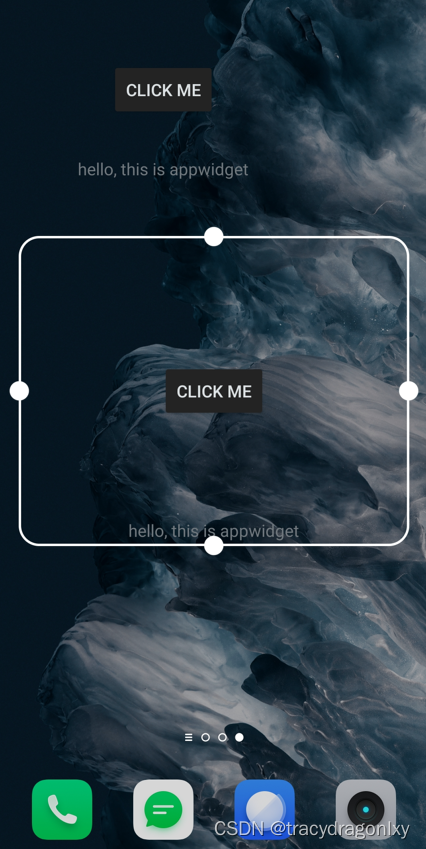
效果图:
创建一个可以改变大小的widget,包含一个Button和一个TextView,点击按钮跳转到指定的Activity。
概览
微件是自定义主屏幕的一个重要方面。您可以将微件想象成“一目了然”的视图,它们让最重要的应用数据和功能一览无余,从用户的主屏幕即可进行访问。用户可以在其主屏幕面板间移动微件,如果系统支持,用户还可以调整微件的大小,按照他们的偏好量身定制微件中的信息量。
使用 AppWidgetProvider 类
AppWidgetProvider类扩展了BroadcastReceiver作为一个辅助类来处理应用微件广播。AppWidgetProvider仅接收与应用微件有关的事件广播,例如当更新、删除、启用和停用应用微件时发出的广播。当发生这些广播事件时,AppWidgetProvider会接收以下方法调用:
onUpdate()
调用此方法可以按AppWidgetProviderInfo中的updatePeriodMillis属性定义的时间间隔来更新应用微件。当用户添加应用微件时也会调用此方法,所以它应执行基本设置,如定义视图的事件处理脚本以及根据需要启动临时的Service。不过,如果您已声明配置Activity,则当用户添加应用微件时不会调用此方法,但会调用它来执行后续更新。由配置Activity负责在配置完成后执行首次更新。onAppWidgetOptionsChanged()
当首次放置微件时以及每当调整微件的大小时,会调用此方法。您可以使用此回调来根据微件的大小范围显示或隐藏内容。您可以通过调用getAppWidgetOptions()来获取大小范围,该方法会返回包含以下各项的Bundle:OPTION_APPWIDGET_MIN_WIDTH: 包含微件实例的当前宽度的下限(以 dp 为单位)。OPTION_APPWIDGET_MIN_HEIGHT: 包含微件实例的当前高度的下限(以 dp 为单位)OPTION_APPWIDGET_MAX_WIDTH: 包含微件实例的当前宽度的上限(以 dp 为单位)OPTION_APPWIDGET_MAX_HEIGHT: 包含微件实例的当前高度的上限(以 dp 为单位)。- 此回调是在 API 级别 16 (Android 4.1) 中引入的。如果您实现此回调,请确保您的应用不依赖于它,因为在旧款设备上不会调用它。
onDeleted(Context, int[])
每次从应用微件托管应用中删除应用微件时,都会调用此方法。onEnabled(Context)
首次创建应用微件的实例时,会调用此方法。例如,如果用户添加应用微件的两个实例,只有首次添加时会调用此方法。如果您需要打开一个新的数据库或执行只需要对所有应用微件实例执行一次的其他设置,则此方法非常合适。onDisabled(Context)
从应用微件托管应用中删除了应用微件的最后一个实例时,会调用此方法。您应使用此方法来清理在onEnabled(Context)中完成的所有工作,如删除临时数据库。- ``
针对每个广播调用此方法,并且是在上述各个回调方法之前调用。您通常不需要实现此方法,因为默认的AppWidgetProvider实现会过滤所有应用微件广播并视情况调用上述方法。
最重要的 AppWidgetProvider 回调是 onUpdate(),因为向托管应用添加每个应用微件时都会调用它(除非您使用配置 Activity)。如果应用微件接受任何用户交互事件,则您需要在此回调中注册事件处理脚本。如果应用微件未创建临时文件或数据库,或者未执行其他需要清理的工作,则 onUpdate() 可能是您需要定义的唯一一个回调方法。例如,如果您希望应用微件具有一个在用户点击时会启动 Activity 的按钮,则可以使用以下 AppWidgetProvider 实现:
public class ExampleAppWidgetProvider extends AppWidgetProvider {


    public void onUpdate(Context context, AppWidgetManager appWidgetManager, int[] appWidgetIds) {


        final int N = appWidgetIds.length;

        // Perform this loop procedure for each App Widget that belongs to this provider
        for (int i=0; i<N; i++) {


            int appWidgetId = appWidgetIds[i];

            // Create an Intent to launch ExampleActivity
            Intent intent = new Intent(context, ExampleActivity.class);
            PendingIntent pendingIntent = PendingIntent.getActivity(context, 0, intent, 0);

            // Get the layout for the App Widget and attach an on-click listener
            // to the button
            RemoteViews views = new RemoteViews(context.getPackageName(), R.layout.appwidget_provider_layout);
            views.setOnClickPendingIntent(R.id.button, pendingIntent);

            // Tell the AppWidgetManager to perform an update on the current app widget
            appWidgetManager.updateAppWidget(appWidgetId, views);
        }
    }
}
接收应用微件广播 Intent
AppWidgetProvider 只是一个辅助类。如果您希望直接接收应用微件广播,您可以实现自己的 BroadcastReceiver 或替换 onReceive(Context, Intent) 回调。您需要关注的 Intent 如下所示:
ACTION_APPWIDGET_UPDATE
ACTION_APPWIDGET_DELETED
ACTION_APPWIDGET_ENABLED
ACTION_APPWIDGET_DISABLED
ACTION_APPWIDGET_OPTIONS_CHANGED
固定应用微件
在搭载 Android 8.0(API 级别 26)及更高版本的设备上,允许您创建固定的快捷方式的启动器也允许您将应用微件固定到启动器上。与固定的快捷方式类似,这些固定的微件也能让用户访问应用中的特定任务。
在您的应用中,您可以创建一个请求,让系统将微件固定到支持的启动器上,只需完成下面一系列步骤即可:

- 在应用的清单文件中创建微件,如以下代码段所示:
    <manifest>
    ...
      <application>
        ...
        <receiver android:name="MyAppWidgetProvider">
            <intent-filter>
                <action android:name="android.appwidget.action.APPWIDGET_UPDATE" />
            </intent-filter>
            <meta-data android:name="android.appwidget.provider"
                       android:resource="@xml/my_appwidget_info" />
        </receiver>
      </application>
    </manifest>
- 调用 requestPinAppWidget() 方法,如以下代码段所示:
    AppWidgetManager appWidgetManager =
            context.getSystemService(AppWidgetManager.class);
    ComponentName myProvider =
            new ComponentName(context, MyAppWidgetProvider.class);

    if (appWidgetManager.isRequestPinAppWidgetSupported()) {
        // Create the PendingIntent object only if your app needs to be notified
        // that the user allowed the widget to be pinned. Note that, if the pinning
        // operation fails, your app isn't notified.
        Intent pinnedWidgetCallbackIntent = new Intent( ... );

        // Configure the intent so that your app's broadcast receiver gets
        // the callback successfully. This callback receives the ID of the
        // newly-pinned widget (EXTRA_APPWIDGET_ID).
        PendingIntent successCallback = PendingIntent.getBroadcast(context, 0,
                pinnedWidgetCallbackIntent, PendingIntent.FLAG_UPDATE_CURRENT);

        appWidgetManager.requestPinAppWidget(myProvider, null, successCallback);
    }
注意:如果无需通知您的应用系统是否已成功地将微件固定到受支持的启动器上,则您可以将 null 作为 requestPinAppWidget() 的第三个参数传入。
设置预览图片
Android 3.0 引入了 previewImage 字段,用于指定预览来描绘应用微件是什么样子的。此预览通过微件选择器显示给用户。如果未提供此字段,则应用微件的图标将用于预览。
在 XML 中指定此设置的方式如下:
<appwidget-provider xmlns:android="http://schemas.android.com/apk/res/android"
      ...
      android:previewImage="@drawable/preview">
    </appwidget-provider>
为了帮助创建应用微件的预览图片(在previewImage字段中指定),Android 模拟器包含一个名为“微件预览”的应用。要创建预览图片,请启动此应用,为您的应用选择应用微件并设置您希望如何显示预览图片,然后将其保存并放在您的应用的可绘制资源中。
完整代码
ExampleAppWidgetProvider.java文件
public class ExampleAppWidgetProvider extends AppWidgetProvider {

    private static final String TAG = "ExampleAppWidgetProvider";

    @Override
    public void onUpdate(Context context, AppWidgetManager appWidgetManager, int[] appWidgetIds) {
        Log.i(TAG, "onUpdate: ");
        for (int appWidgetId : appWidgetIds) {
            updateAppWidget(context, appWidgetManager, appWidgetId);
        }
        time = System.currentTimeMillis();
    }

    private void updateAppWidget(Context context, AppWidgetManager appWidgetManager, int appWidgetId) {
        RemoteViews view = new RemoteViews(context.getPackageName(), R.layout.widget_content);

        // 点击桌面组件中的按钮,跳转到主界面
        Intent i = new Intent(context, MainActivity.class);
        PendingIntent intent = PendingIntent.getActivity(context, 0, i, PendingIntent.FLAG_IMMUTABLE | PendingIntent.FLAG_UPDATE_CURRENT);
        view.setOnClickPendingIntent(R.id.btn_click, intent);
//        view.setTextViewText(R.id.tv_info, "clicked");

        appWidgetManager.updateAppWidget(appWidgetId, view);
    }
}
layout/widget_content.xml布局文件
<?xml version="1.0" encoding="utf-8"?>
<RelativeLayout xmlns:android="http://schemas.android.com/apk/res/android"
    android:layout_width="match_parent"
    android:layout_height="match_parent"
    android:orientation="vertical">

    <Button
        android:id="@+id/btn_click"
        android:layout_width="wrap_content"
        android:layout_height="wrap_content"
        android:layout_centerInParent="true"
        android:text="click me"/>

    <TextView
        android:id="@+id/tv_info"
        android:layout_width="wrap_content"
        android:layout_height="wrap_content"
        android:text="hello, this is appwidget"
        android:layout_centerHorizontal="true"
        android:layout_alignParentBottom="true"/>

</RelativeLayout>
xml/example_appwidget_info.xml文件
<?xml version="1.0" encoding="utf-8"?>
<appwidget-provider
    xmlns:android="http://schemas.android.com/apk/res/android"
    android:initialKeyguardLayout="@layout/widget_content"
    android:initialLayout="@layout/widget_content"
    android:minHeight="110dp"
    android:minWidth="180dp"
    android:previewImage="@drawable/ic_launcher_foreground"
    android:resizeMode="vertical|horizontal"
    android:updatePeriodMillis="600000"
    android:widgetCategory="home_screen">

</appwidget-provider>
AndroidManifest.xml文件
<?xml version="1.0" encoding="utf-8"?>
<manifest xmlns:android="http://schemas.android.com/apk/res/android"
    package="com.csu.mywidget">

    <application
        android:allowBackup="true"
        android:icon="@mipmap/ic_launcher"
        android:label="@string/app_name"
        android:roundIcon="@mipmap/ic_launcher_round"
        android:supportsRtl="true"
        android:theme="@style/Theme.MyExample">
        <receiver
            android:name=".ExampleAppWidgetProvider"
            android:enabled="true"
            android:exported="true">
            <intent-filter>
                <action android:name="android.appwidget.action.APPWIDGET_UPDATE"/>
            </intent-filter>
            <meta-data android:name="android.appwidget.provider"
                android:resource="@xml/example_appwidget_info"/>
        </receiver>

        <activity
            android:name=".MainActivity"
            android:exported="true">
            <intent-filter>
                <action android:name="android.intent.action.MAIN" />

                <category android:name="android.intent.category.LAUNCHER" />
            </intent-filter>
        </activity>
    </application>

</manifest>
参考:
https://developer.android.google.cn/guide/practices/ui_guidelines/widget_design
https://developer.android.google.cn/guide/topics/appwidgets#collection_sample
https://blog.csdn.net/tracydragonlxy/article/details/127231654?csdn_share_tail=%7B%22type%22%3A%22blog%22%2C%22rType%22%3A%22article%22%2C%22rId%22%3A%22127231654%22%2C%22source%22%3A%22tracydragonlxy%22%7D