原文网址:Redis集群--扩容的过程(原理)_IT利刃出鞘的博客-CSDN博客
简介
说明
本文介绍Redis的Cluster集群扩容的过程(原理)。
概述
扩容是分布式存储最常见的需求, Redis集群扩容操作可分为如下步骤:
- 准备新节点。
- 加入集群。
- 迁移槽和数据。
1.准备新节点
需要提前准备好新节点并运行在集群模式下, 新节点建议跟集群内的节点配置保持一致, 便于管理统一。 准备好配置后启动两个节点命令如下:
redis-server conf/redis-6385.conf
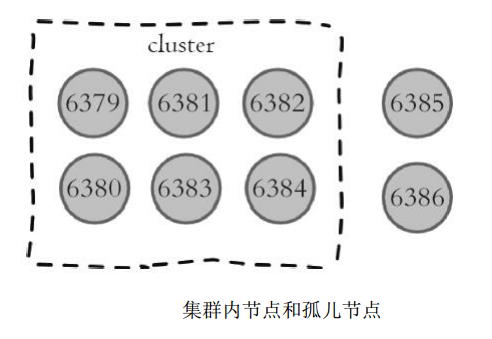
redis-server conf/redis-6386.conf启动后的新节点作为孤儿节点运行, 并没有其他节点与之通信, 集群结构如下图所示。
2.加入集群
新节点依然采用cluster meet命令加入到现有集群中。 在集群内任意节点执行cluster meet命令让6385和6386节点加入进来, 命令如下:
127.0.0.1:6379> cluster meet 127.0.0.1 6385
127.0.0.1:6379> cluster meet 127.0.0.1 6386
新节点加入后集群结构如下图所示:

集群内新旧节点经过一段时间的ping/pong消息通信之后, 所有节点会发现新节点并将它们的状态保存到本地。 例如我们在6380节点上执行clusternodes命令可以看到新节点信息, 如下所示:
127.0.0.1:6380>cluster ndoes
1a205dd8b2819a00dd1e8b6be40a8e2abe77b756 127.0.0.1:6385 master - 0 1469347800759
    7 connected
475528b1bcf8e74d227104a6cf1bf70f00c24aae 127.0.0.1:6386 master - 0 1469347798743
    8 connected
    ...
新节点刚开始都是主节点状态, 但是由于没有负责的槽, 所以不能接受任何读写操作。 对于新节点的后续操作我们一般有两种选择:
- 为它迁移槽和数据实现扩容。
- 作为其他主节点的从节点负责故障转移。
redis-trib.rb工具也实现了为现有集群添加新节点的命令, 还实现了直接添加为从节点的支持, 命令如下:
redis-trib.rb add-node new_host:new_port existing_host:existing_port --slave
--master-id <arg>
内部同样采用cluster meet命令实现加入集群功能。 对于之前的加入集群操作, 我们可以采用如下命令实现新节点加入:
redis-trib.rb add-node 127.0.0.1:6385 127.0.0.1:6379
redis-trib.rb add-node 127.0.0.1:6386 127.0.0.1:6379
运维提示
正式环境建议使用redis-trib.rb add-node命令加入新节点, 该命令内部会执行新节点状态检查, 如果新节点已经加入其他集群或者包含数据, 则放弃集群加入操作并打印如下信息:
[ERR] Node 127.0.0.1:6385 is not empty. Either the node already knows other nodes (check with CLUSTER NODES) or contains some key in database 0.如果我们手动执行cluster meet命令加入已经存在于其他集群的节点, 会601造成被加入节点的集群合并到现有集群的情况,从而造成数据丢失和错乱,后果非常严重, 线上谨慎操作。
3.迁移槽和数据
加入集群后需要为新节点迁移槽和相关数据, 槽在迁移过程中集群可以正常提供读写服务, 迁移过程是集群扩容最核心的环节, 下面详细讲解。
1.槽迁移计划
槽是Redis集群管理数据的基本单位, 首先需要为新节点制定槽的迁移计划, 确定原有节点的哪些槽需要迁移到新节点。 迁移计划需要确保每个节点负责相似数量的槽, 从而保证各节点的数据均匀。 例如, 在集群中加入6385节点, 如下图所示。 加入6385节点后,原有节点负责的槽数量从6380变为4096个。

槽迁移计划确定后开始逐个把槽内数据从源节点迁移到目标节点, 如下图所示。

2.迁移数据
数据迁移过程是逐个槽进行的, 每个槽数据迁移的流程如下图所示。

流程说明:
- 1)对目标节点发送cluster setslot{slot}importing{sourceNodeId}命令, 让目标节点准备导入槽的数据。
- 2)对源节点发送cluster setslot{slot}migrating{targetNodeId}命令, 让源节点准备迁出槽的数据。
- 3)源节点循环执行cluster getkeysinslot{slot}{count}命令, 获取count个属于槽{slot}的键。
- 4)在源节点上执行migrate{targetIp}{targetPort}""0{timeout}keys{keys...}命令, 把获取的键通过流水线(pipeline) 机制批量迁移到目标节点, 批量迁移版本的migrate命令在Redis3.0.6以上版本提供, 之前的migrate命令只能单个键迁移。 对于大量key的场景, 批量键迁移将极大降低节点之间网络IO次数。
- 5)重复执行步骤3) 和步骤4) 直到槽下所有的键值数据迁移到目标节点。
- 6)向集群内所有主节点发送cluster setslot{slot}node{targetNodeId}命令, 通知槽分配给目标节点。 为了保证槽节点映射变更及时传播, 需要遍历发送给所有主节点更新被迁移的槽指向新节点。
使用伪代码模拟迁移过程如下: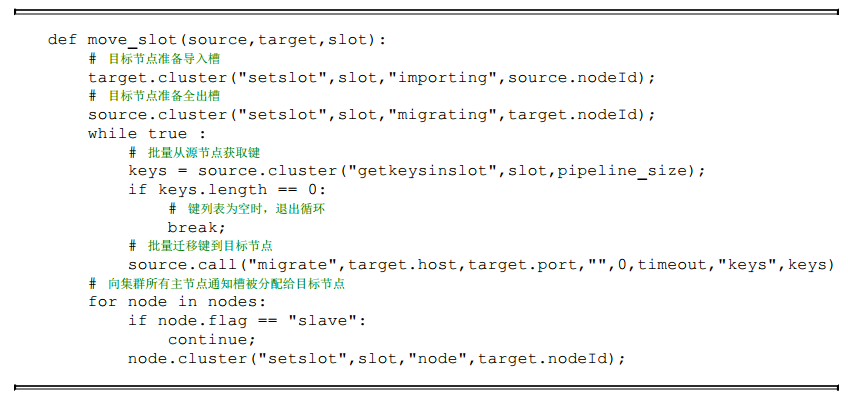
根据以上流程, 我们手动使用命令把源节点6379负责的槽4096迁移到目标节点6385中, 流程如下:
1) 目标节点准备导入槽4096数据:
127.0.0.1:6385>cluster setslot 4096 importing cfb28ef1deee4e0fa78da86abe5d24566744411e
OK
确认槽4096导入状态开启:
127.0.0.1:6385>cluster nodes
1a205dd8b2819a00dd1e8b6be40a8e2abe77b756 127.0.0.1:6385 myself,master - 0 0 7 connected
    [4096-<-cfb28ef1deee4e0fa78da86abe5d24566744411e]
...
2) 源节点准备导出槽4096数据:
127.0.0.1:6379>cluster setslot 4096 migrating 1a205dd8b2819a00dd1e8b6be40a8e2abe77b756
OK
确认槽4096导出状态开启:
605127.0.0.1:6379>cluster nodes
cfb28ef1deee4e0fa78da86abe5d24566744411e 127.0.0.1:6379 myself,master - 0 0 0 connected
    0-5461 [4096->-1a205dd8b2819a00dd1e8b6be40a8e2abe77b756]
...
3) 批量获取槽4096对应的键, 这里我们获取到3个处于该槽的键:
127.0.0.1:6379> cluster getkeysinslot 4096 100
1) "key:test:5028"
2) "key:test:68253"
3) "key:test:79212"
确认这三个键是否存在于源节点:
127.0.0.1:6379>mget key:test:5028 key:test:68253 key:test:79212
1) "value:5028"
2) "value:68253"
3) "value:79212"
批量迁移这3个键, migrate命令保证了每个键迁移过程的原子性:
127.0.0.1:6379>migrate 127.0.0.1 6385 "" 0 5000 keys key:test:5028 key:test:68253
key:test:79212
出于演示目的, 我们继续查询这三个键, 发现已经不在源节点中,Redis返回ASK转向错误, ASK转向负责引导客户端找到数据所在的节点,细节将在后面10.5节“请求路由”中说明。
127.0.0.1:6379> mget key:test:5028 key:test:68253 key:test:79212
(error) ASK 4096 127.0.0.1:6385
通知所有主节点槽4096指派给目标节点6385:
127.0.0.1:6379>cluster setslot 4096 node 1a205dd8b2819a00dd1e8b6be40a8e2abe77b756
127.0.0.1:6380>cluster setslot 4096 node 1a205dd8b2819a00dd1e8b6be40a8e2abe77b756
127.0.0.1:6381>cluster setslot 4096 node 1a205dd8b2819a00dd1e8b6be40a8e2abe77b756
127.0.0.1:6385>cluster setslot 4096 node 1a205dd8b2819a00dd1e8b6be40a8e2abe77b756
606确认源节点6379不再负责槽4096改为目标节点6385负责:
127.0.0.1:6379> cluster nodes
cfb28ef1deee4e0fa78da86abe5d24566744411e 127.0.0.1:6379 myself,master - 0 0 0 connected
    0-4095 4097-5461
1a205dd8b2819a00dd1e8b6be40a8e2abe77b756 127.0.0.1:6385 master - 0 1469718011079 7
    connected 4096
...
手动执行命令演示槽迁移过程, 是为了让读者更好地理解迁移流程, 实际操作时肯定涉及大量槽并且每个槽对应非常多的键。 因此redis-trib提供了槽重分片功能, 命令如下:
redis-trib.rb reshard host:port --from <arg> --to <arg> --slots <arg> --yes --timeout
    <arg> --pipeline <arg>
参数说明:
- host:port: 必传参数, 集群内任意节点地址, 用来获取整个集群信息。
- --from: 制定源节点的id, 如果有多个源节点, 使用逗号分隔, 如果是all源节点变为集群内所有主节点, 在迁移过程中提示用户输入。
- --to: 需要迁移的目标节点的id, 目标节点只能填写一个, 在迁移过程中提示用户输入。
- --slots: 需要迁移槽的总数量, 在迁移过程中提示用户输入。
- --yes: 当打印出reshard执行计划时, 是否需要用户输入yes确认后再执行reshard。
- --timeout: 控制每次migrate操作的超时时间, 默认为60000毫秒。
- --pipeline: 控制每次批量迁移键的数量, 默认为10。
reshard命令简化了数据迁移的工作量, 其内部针对每个槽的数据迁移同样使用之前的流程。 我们已经为新节点6395迁移了一个槽4096, 剩下的槽数据迁移使用redis-trib.rb完成,命令如下:
#redis-trib.rb reshard 127.0.0.1:6379
>>> Performing Cluster Check (using node 127.0.0.1:6379)
M: cfb28ef1deee4e0fa78da86abe5d24566744411e 127.0.0.1:6379
slots:0-4095,4097-5461 (5461 slots) master
1 additional replica(s)
M: 40b8d09d44294d2e23c7c768efc8fcd153446746 127.0.0.1:6381
slots:10923-16383 (5461 slots) master
1 additional replica(s)
M: 8e41673d59c9568aa9d29fb174ce733345b3e8f1 127.0.0.1:6380
slots:5462-10922 (5461 slots) master
1 additional replica(s)
M: 1a205dd8b2819a00dd1e8b6be40a8e2abe77b756 127.0.0.1:6385
slots:4096 (1 slots) master
0 additional replica(s)
// ...
[OK] All nodes agree about slots configuration.
>>> Check for open slots...
>>> Check slots coverage...
[OK] All 16384 slots covered.
打印出集群每个节点信息后, reshard命令需要确认迁移的槽数量,这里我们输入4096个:
How many slots do you want to move (from 1 to 16384)4096输入6385的节点ID作为目标节点, 目标节点只能指定一个:
What is the receiving node ID 1a205dd8b2819a00dd1e8b6be40a8e2abe77b756之后输入源节点的ID, 这里分别输入节点6379、 6380、 6381三个节点ID最后用done表示结束:
Please enter all the source node IDs.
Type 'all' to use all the nodes as source nodes for the hash slots.
608Type 'done' once you entered all the source nodes IDs.
Source node #1:cfb28ef1deee4e0fa78da86abe5d24566744411e
Source node #2:8e41673d59c9568aa9d29fb174ce733345b3e8f1
Source node #3:40b8d09d44294d2e23c7c768efc8fcd153446746
Source node #4:done
数据迁移之前会打印出所有的槽从源节点到目标节点的计划, 确认计划无误后输入yes执行迁移工作:
Moving slot 0 from cfb28ef1deee4e0fa78da86abe5d24566744411e
....
Moving slot 1365 from cfb28ef1deee4e0fa78da86abe5d24566744411e
Moving slot 5462 from 8e41673d59c9568aa9d29fb174ce733345b3e8f1
...
Moving slot 6826 from 8e41673d59c9568aa9d29fb174ce733345b3e8f1
Moving slot 10923 from 40b8d09d44294d2e23c7c768efc8fcd153446746
...
Moving slot 12287 from 40b8d09d44294d2e23c7c768efc8fcd153446746
Do you want to proceed with the proposed reshard plan (yes/no) yes
redis-trib工具会打印出每个槽迁移的进度, 如下:
Moving slot 0 from 127.0.0.1:6379 to 127.0.0.1:6385 ....
....
Moving slot 1365 from 127.0.0.1:6379 to 127.0.0.1:6385 ..
Moving slot 5462 from 127.0.0.1:6380 to 127.0.0.1:6385: ....
....
Moving slot 6826 from 127.0.0.1:6380 to 127.0.0.1:6385 ..
Moving slot 10923 from 127.0.0.1:6381 to 127.0.0.1:6385 ..
...
Moving slot 10923 from 127.0.0.1:6381 to 127.0.0.1:6385 ..
当所有的槽迁移完成后, reshard命令自动退出, 执行cluster nodes命令检查节点和槽映射的变化, 如下所示:
127.0.0.1:6379>cluster nodes
40622f9e7adc8ebd77fca0de9edfe691cb8a74fb 127.0.0.1:6382 slave cfb28ef1deee4e0fa
78da86abe5d24566744411e 0 1469779084518 3 connected
40b8d09d44294d2e23c7c768efc8fcd153446746 127.0.0.1:6381 master - 0
1469779085528 2 connected 12288-16383
4fa7eac4080f0b667ffeab9b87841da49b84a6e4 127.0.0.1:6384 slave 40b8d09d44294d2e2
3c7c768efc8fcd153446746 0 1469779087544 5 connected
be9485a6a729fc98c5151374bc30277e89a461d8 127.0.0.1:6383 slave 8e41673d59c9568aa
9d29fb174ce733345b3e8f1 0 1469779088552 4 connected
cfb28ef1deee4e0fa78da86abe5d24566744411e 127.0.0.1:6379 myself,master - 0 0 0
connected 1366-4095 4097-5461
475528b1bcf8e74d227104a6cf1bf70f00c24aae 127.0.0.1:6386 master - 0
1469779086536 8 connected
6098e41673d59c9568aa9d29fb174ce733345b3e8f1 127.0.0.1:6380 master - 0
1469779085528 1 connected 6827-10922
1a205dd8b2819a00dd1e8b6be40a8e2abe77b756 127.0.0.1:6385 master - 0
1469779083513 9 connected 0-1365 4096 5462-6826 10923-12287
节点6385负责的槽变为: 0-136540965462-682610923-12287。 由于槽用于hash运算本身顺序没有意义, 因此无须强制要求节点负责槽的顺序性。 迁移之后建议使用redis-trib.rb rebalance命令检查节点之间槽的均衡性。 命令如下:
# redis-trib.rb rebalance 127.0.0.1:6380
>>> Performing Cluster Check (using node 127.0.0.1:6380)
[OK] All nodes agree about slots configuration.
>>> Check for open slots...
>>> Check slots coverage...
[OK] All 16384 slots covered.
*** No rebalancing needed! All nodes are within the 2.0% threshold.
可以看出迁移之后所有主节点负责的槽数量差异在2%以内, 因此集群节点数据相对均匀, 无需调整。
3.添加从节点
扩容之初我们把6385、 6386节点加入到集群, 节点6385迁移了部分槽和数据作为主节点, 但相比其他主节点目前还没有从节点, 因此该节点不具备故障转移的能力。
这时需要把节点6386作为6385的从节点, 从而保证整个集群的高可用。使用cluster replicate{masterNodeId}命令为主节点添加对应从节点, 注意在集群模式下slaveof添加从节点操作不再支持。 如下所示:
127.0.0.1:6386>cluster replicate 1a205dd8b2819a00dd1e8b6be40a8e2abe77b756从节点内部除了对主节点发起全量复制之外, 还需要更新本地节点的集群相关状态, 查看节点6386状态确认已经变成6385节点的从节点:
127.0.0.1:6386>cluster nodes
475528b1bcf8e74d227104a6cf1bf70f00c24aae 127.0.0.1:6386 myself,slave 1a205dd8b2
819a00dd1e8b6be40a8e2abe77b756 0 0 8 connected
1a205dd8b2819a00dd1e8b6be40a8e2abe77b756 127.0.0.1:6385 master - 0 1469779083513 9
connected 0-1365 4096 5462-6826 10923-12287
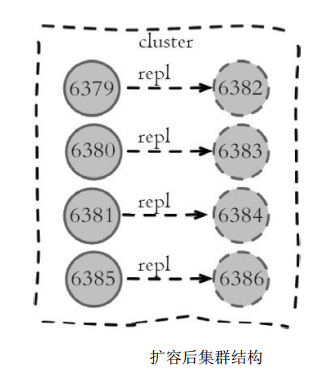
...到此整个集群扩容完成, 集群关系结构如下图所示。