通过父 Widget 初始化时传入的静态配置,StatelessWidget 就能完全控制其静态展示。而 StatefulWidget,还需要借助于 State 对象,在特定的阶段来处理用户的交互或其内部数据的变化,并体现在 UI 上。这些特定的阶段,就涵盖了一个组件从加载到卸载的全过程,即生命周期。与 iOS 的 ViewController、Android 的 Activity 一样,Flutter 中的 Widget 也存在生命周期,并且通过 State 来体现。
而 App 则是一个特殊的 Widget。除了需要处理视图显示的各个阶段(即视图的生命周期)之外,还需要应对应用从启动到退出所经历的各个状态(App 的生命周期)。
对于开发者来说,无论是普通 Widget(的 State)还是 App,框架都给我们提供了生命周期的回调,可以让我们选择恰当的时机,做正确的事儿。所以,在对生命周期有了深入理解之后,我们可以写出更加连贯流畅、体验优良的程序。
从 Widget(的 State)和 App 这两个维度,介绍它们的生命周期。
State<T extends StatefulWidget> class
StatefulWidget 的逻辑和内部状态。https://api.flutter.dev/flutter/widgets/State-class.html
State是以下信息:
(1) 可以在构建小部件时同步读取。
(2) 可能在小部件的生命周期内发生变化。 小部件实施者有责任使用 State.setState 确保在此类状态更改时及时通知状态。
State对象由framework通过在加载 StatefulWidget 以将其插入树中时调用 StatefulWidget.createState 方法来创建。 因为一个给定的 StatefulWidget 实例可以加载多次(例如,该小部件一次在多个位置合并到树中),所以可能有多个 State 对象与给定的 StatefulWidget 实例相关联。 同样,如果一个 StatefulWidget 从树中移除,然后再次插入到树中,framework将再次调用 StatefulWidget.createState 来创建一个新的 State 对象,从而简化 State 对象的生命周期。
State对象具有以下生命周期:
- framework通过调用 StatefulWidget.createState 创建一个 State 对象。
- 新创建的 State 对象与 BuildContext 相关联。 这种关联是永久性的:State 对象永远不会改变它的 BuildContext。 但是,BuildContext 本身可以与其子树一起在树中移动。 此时,State 对象被认为已挂载。
- framework调用 initState。 State 的子类应覆盖 initState 以执行依赖于 BuildContext 或小部件的一次性初始化,当调用 initState 方法时,它们分别可用作上下文和小部件属性。
- framework调用 didChangeDependencies。 State 的子类应该覆盖 didChangeDependencies 以执行涉及 InheritedWidgets 的初始化。 如果调用 BuildContext.dependOnInheritedWidgetOfExactType,如果继承的小部件随后发生更改或者如果小部件在树中移动,将再次调用 didChangeDependencies 方法。
- 此时,State 对象已完全初始化,framework可能会多次调用其构建方法以获得此子树的用户界面描述。 状态对象可以通过调用它们的 setState 方法自发地请求重建它们的子树,这表明它们的某些内部状态已经以可能影响该子树中的用户界面的方式发生变化。
- 在此期间,父小部件可能会重建并请求树中的此位置更新以显示具有相同 runtimeType 和 Widget.key 的新小部件。 发生这种情况时,框架将更新 widget 属性以引用新的 widget,然后调用 didUpdateWidget 方法,将先前的 widget 作为参数。 状态对象应该覆盖 didUpdateWidget 以响应其关联小部件的更改(例如,启动隐式动画)。 框架总是在调用 didUpdateWidget 之后调用 build,这意味着在 didUpdateWidget 中对 setState 的任何调用都是多余的。
- 在开发过程中,如果发生热重载(无论是通过按 r 从命令行 flutter 工具启动,还是从 IDE 启动),都会调用 reassemble 方法。 这提供了重新初始化在 initState 方法中准备的任何数据的机会。
- 如果包含 State 对象的子树从树中移除(例如,因为父级使用不同的 runtimeType 或 Widget.key 构建了一个小部件),框架将调用 deactivate 方法。 子类应该覆盖此方法以清除此对象与树中其他元素之间的任何链接(例如,如果您为祖先提供了指向后代 RenderObject 的指针)。
- 此时,framework可能会将此子树重新插入到树的另一部分。 如果发生这种情况,framework将确保它调用 build 以使 State 对象有机会适应其在树中的新位置。 如果framework确实重新插入此子树,它将在子树从树中移除的动画帧结束之前执行此操作。 因此,State 对象可以推迟释放大部分资源,直到框架调用它们的 dispose 方法。
- 如果framework在当前动画帧结束时没有重新插入此子树,则框架将调用 dispose,这表明此 State 对象将永远不会再次构建。 子类应该覆盖此方法以释放此对象保留的任何资源(例如,停止任何活动动画)。
- framework调用 dispose 后,State 对象被认为已卸载,mounted 属性为 false。 此时调用setState是错误的。 生命周期的这个阶段是终结的:没有办法重新挂载已处置的 State 对象。
State 生命周期
State 的生命周期,指的是在用户参与的情况下,其关联的 Widget 所经历的,从创建到显示再到更新最后到停止,直至销毁等各个过程阶段。
这些不同的阶段涉及到特定的任务处理,因此为了写出一个体验和性能良好的控件,正确理解 State 的生命周期至关重要。
State 的生命周期流程,如图 1 所示:
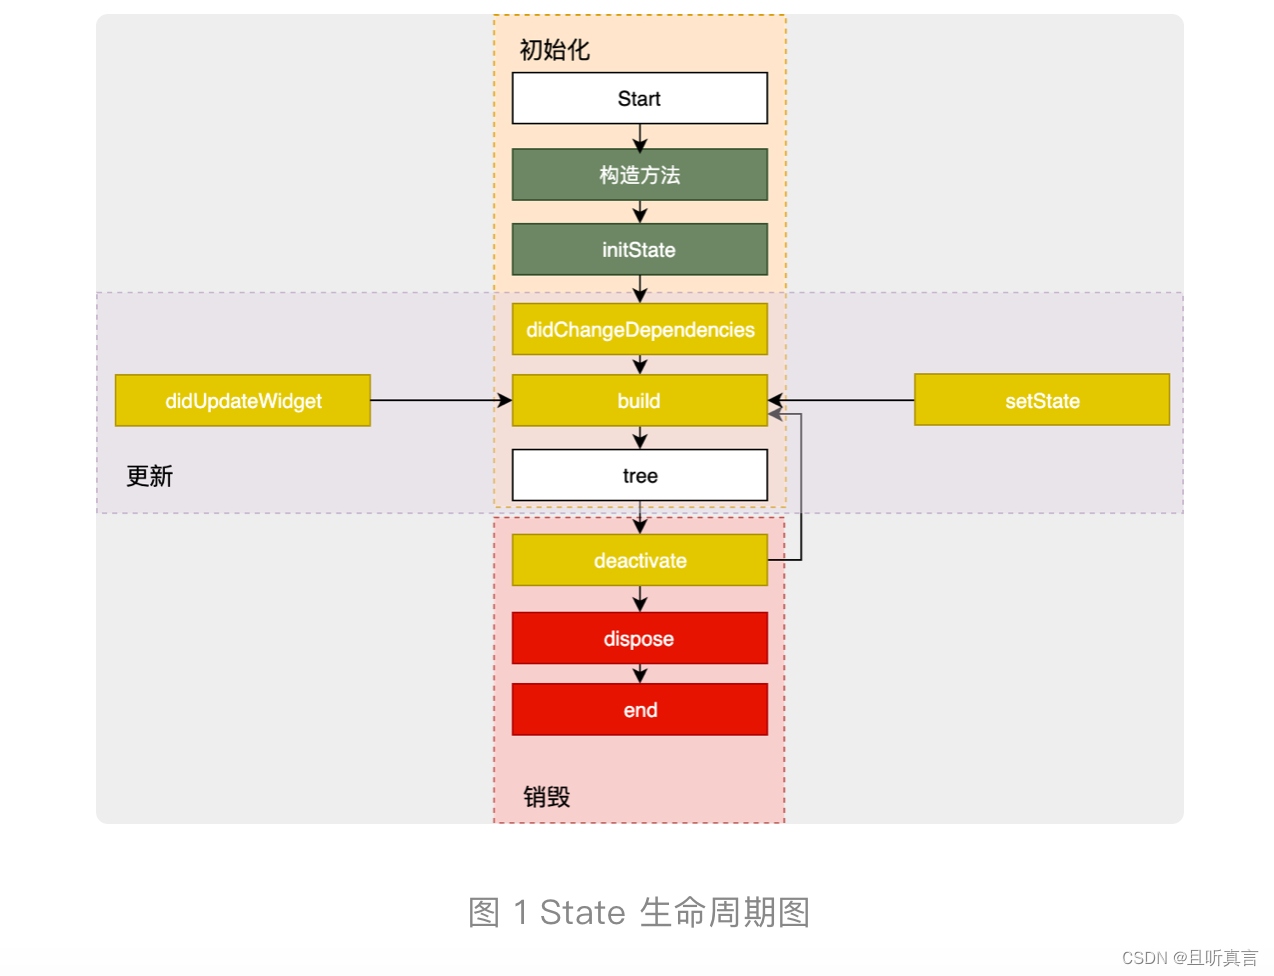
可以看到,State 的生命周期可以分为 3 个阶段:创建(插入视图树)、更新(在视图树中存在)、销毁(从视图树中移除)。接下来,我们一起看看每一个阶段的具体流程。
创建
State 初始化时会依次执行 :构造方法 -> initState -> didChangeDependencies -> build,随后完成页面渲染。
我们来看一下初始化过程中每个方法的意义。
构造方法是 State 生命周期的起点,Flutter 会通过调用 StatefulWidget.createState() 来创建一个 State。我们可以通过构造方法,来接收父 Widget 传递的初始化 UI 配置数据。这些配置数据,决定了 Widget 最初的呈现效果。
initState,会在 State 对象被插入视图树的时候调用。这个函数在 State 的生命周期中只会被调用一次,所以我们可以在这里做一些初始化工作,比如为状态变量设定默认值。
didChangeDependencies 则用来专门处理 State 对象依赖关系变化,会在 initState() 调用结束后,被 Flutter 调用。
build,作用是构建视图。经过以上步骤,Framework 认为 State 已经准备好了,于是调用 build。我们需要在这个函数中,根据父 Widget 传递过来的初始化配置数据,以及 State 的当前状态,创建一个 Widget 然后返回。
import 'package:flutter/material.dart';
import 'dart:developer' as developer;

void main() {
  //runApp(App());
  runApp(const MyApp());
}

class MyApp extends StatelessWidget {
  const MyApp({super.key});

  // This widget is the root of your application.
  @override
  Widget build(BuildContext context) {
    return MaterialApp(
      title: 'Flutter Demo',
      theme: ThemeData(
        // This is the theme of your application.
        //
        // Try running your application with "flutter run". You'll see the
        // application has a blue toolbar. Then, without quitting the app, try
        // changing the primarySwatch below to Colors.green and then invoke
        // "hot reload" (press "r" in the console where you ran "flutter run",
        // or simply save your changes to "hot reload" in a Flutter IDE).
        // Notice that the counter didn't reset back to zero; the application
        // is not restarted.
        primarySwatch: Colors.blue,
      ),
      home: const MyHomePage(title: 'Flutter Demo Home Page'),
    );
  }
}

class MyHomePage extends StatefulWidget {
  const MyHomePage({super.key, required this.title});

  // This widget is the home page of your application. It is stateful, meaning
  // that it has a State object (defined below) that contains fields that affect
  // how it looks.

  // This class is the configuration for the state. It holds the values (in this
  // case the title) provided by the parent (in this case the App widget) and
  // used by the build method of the State. Fields in a Widget subclass are
  // always marked "final".

  final String title;

  @override
  State<MyHomePage> createState() => _MyHomePageState();
}

class _MyHomePageState extends State<MyHomePage> {
  int _counter = 0;

   _MyHomePageState() {
     print("lifecycle _MyHomePageState constructor");
   }

  void _incrementCounter() {
    setState(() {
      print("lifecycle _MyHomePageState setState");
      // This call to setState tells the Flutter framework that something has
      // changed in this State, which causes it to rerun the build method below
      // so that the display can reflect the updated values. If we changed
      // _counter without calling setState(), then the build method would not be
      // called again, and so nothing would appear to happen.
      _counter++;
    });
  }

  @override
  Widget build(BuildContext context) {
    print("lifecycle _MyHomePageState build");
    // This method is rerun every time setState is called, for instance as done
    // by the _incrementCounter method above.
    //
    // The Flutter framework has been optimized to make rerunning build methods
    // fast, so that you can just rebuild anything that needs updating rather
    // than having to individually change instances of widgets.
    return Scaffold(
      appBar: AppBar(
        // Here we take the value from the MyHomePage object that was created by
        // the App.build method, and use it to set our appbar title.
        title: Text(widget.title),
      ),
      body: Center(
        // Center is a layout widget. It takes a single child and positions it
        // in the middle of the parent.
        child: Column(
          // Column is also a layout widget. It takes a list of children and
          // arranges them vertically. By default, it sizes itself to fit its
          // children horizontally, and tries to be as tall as its parent.
          //
          // Invoke "debug painting" (press "p" in the console, choose the
          // "Toggle Debug Paint" action from the Flutter Inspector in Android
          // Studio, or the "Toggle Debug Paint" command in Visual Studio Code)
          // to see the wireframe for each widget.
          //
          // Column has various properties to control how it sizes itself and
          // how it positions its children. Here we use mainAxisAlignment to
          // center the children vertically; the main axis here is the vertical
          // axis because Columns are vertical (the cross axis would be
          // horizontal).
          mainAxisAlignment: MainAxisAlignment.center,
          children: <Widget>[
            const Text(
              'You have pushed the button this many times:',
            ),
            Text(
              '$_counter',
              style: Theme.of(context).textTheme.headlineMedium,
            ),
          ],
        ),
      ),
      floatingActionButton: FloatingActionButton(
        onPressed: _incrementCounter,
        tooltip: 'Increment',
        child: const Icon(Icons.add),
      ), // This trailing comma makes auto-formatting nicer for build methods.
    );
  }

  @override
  void initState() {
    super.initState();
    print("lifecycle _MyHomePageState initState");
  }

  @override
  void dispose() {
    super.dispose();
    print("lifecycle _MyHomePageState dispose");
  }

  @override
  void didUpdateWidget(covariant MyHomePage oldWidget) {
    super.didUpdateWidget(oldWidget);
    print("lifecycle _MyHomePageState didUpdateWidget");
  }

  @override
  void didChangeDependencies() {
    super.didChangeDependencies();
    print("lifecycle _MyHomePageState didChangeDependencies");
  }
}
创建过程中的log:
2023-03-12 14:20:22.220 18242-18271/com.example.flutterporject I/flutter: lifecycle _MyHomePageState constructor
2023-03-12 14:20:22.220 18242-18271/com.example.flutterporject I/flutter: lifecycle _MyHomePageState initState
2023-03-12 14:20:22.221 18242-18271/com.example.flutterporject I/flutter: lifecycle _MyHomePageState didChangeDependencies
2023-03-12 14:20:22.225 18242-18271/com.example.flutterporject I/flutter: lifecycle _MyHomePageState build
更新
Widget 的状态更新,主要由 3 个方法触发:setState、didchangeDependencies 与 didUpdateWidget。
接下来,我和你分析下这三个方法分别会在什么场景下调用。
setState:我们最熟悉的方法之一。当状态数据发生变化时,我们总是通过调用这个方法告诉 Flutter:“我这儿的数据变啦,请使用更新后的数据重建 UI!”
import 'package:flutter/material.dart';
import 'dart:developer' as developer;

void main() {
  //runApp(App());
  runApp(const MyApp());
}

class MyApp extends StatelessWidget {
  const MyApp({super.key});

  // This widget is the root of your application.
  @override
  Widget build(BuildContext context) {
    return MaterialApp(
      title: 'Flutter Demo',
      theme: ThemeData(
        // This is the theme of your application.
        //
        // Try running your application with "flutter run". You'll see the
        // application has a blue toolbar. Then, without quitting the app, try
        // changing the primarySwatch below to Colors.green and then invoke
        // "hot reload" (press "r" in the console where you ran "flutter run",
        // or simply save your changes to "hot reload" in a Flutter IDE).
        // Notice that the counter didn't reset back to zero; the application
        // is not restarted.
        primarySwatch: Colors.blue,
      ),
      home: const MyHomePage(title: 'Flutter Demo Home Page'),
    );
  }
}

class MyHomePage extends StatefulWidget {
  const MyHomePage({super.key, required this.title});

  // This widget is the home page of your application. It is stateful, meaning
  // that it has a State object (defined below) that contains fields that affect
  // how it looks.

  // This class is the configuration for the state. It holds the values (in this
  // case the title) provided by the parent (in this case the App widget) and
  // used by the build method of the State. Fields in a Widget subclass are
  // always marked "final".

  final String title;

  @override
  State<MyHomePage> createState() => _MyHomePageState();
}

class _MyHomePageState extends State<MyHomePage> {
  int _counter = 0;

   _MyHomePageState() {
     print("lifecycle _MyHomePageState constructor");
   }

  void _incrementCounter() {
    setState(() {
      print("lifecycle _MyHomePageState setState");
      // This call to setState tells the Flutter framework that something has
      // changed in this State, which causes it to rerun the build method below
      // so that the display can reflect the updated values. If we changed
      // _counter without calling setState(), then the build method would not be
      // called again, and so nothing would appear to happen.
      _counter++;
    });
  }

  @override
  Widget build(BuildContext context) {
    print("lifecycle _MyHomePageState build");
    // This method is rerun every time setState is called, for instance as done
    // by the _incrementCounter method above.
    //
    // The Flutter framework has been optimized to make rerunning build methods
    // fast, so that you can just rebuild anything that needs updating rather
    // than having to individually change instances of widgets.
    return Scaffold(
      appBar: AppBar(
        // Here we take the value from the MyHomePage object that was created by
        // the App.build method, and use it to set our appbar title.
        title: Text(widget.title),
      ),
      body: Center(
        // Center is a layout widget. It takes a single child and positions it
        // in the middle of the parent.
        child: Column(
          // Column is also a layout widget. It takes a list of children and
          // arranges them vertically. By default, it sizes itself to fit its
          // children horizontally, and tries to be as tall as its parent.
          //
          // Invoke "debug painting" (press "p" in the console, choose the
          // "Toggle Debug Paint" action from the Flutter Inspector in Android
          // Studio, or the "Toggle Debug Paint" command in Visual Studio Code)
          // to see the wireframe for each widget.
          //
          // Column has various properties to control how it sizes itself and
          // how it positions its children. Here we use mainAxisAlignment to
          // center the children vertically; the main axis here is the vertical
          // axis because Columns are vertical (the cross axis would be
          // horizontal).
          mainAxisAlignment: MainAxisAlignment.center,
          children: <Widget>[
            const Text(
              'You have pushed the button this many times:',
            ),
            Text(
              '$_counter',
              style: Theme.of(context).textTheme.headlineMedium,
            ),
          ],
        ),
      ),
      floatingActionButton: FloatingActionButton(
        onPressed: _incrementCounter,
        tooltip: 'Increment',
        child: const Icon(Icons.add),
      ), // This trailing comma makes auto-formatting nicer for build methods.
    );
  }

  @override
  void initState() {
    super.initState();
    print("lifecycle _MyHomePageState initState");
  }

  @override
  void dispose() {
    super.dispose();
    print("lifecycle _MyHomePageState dispose");
  }

  @override
  void didUpdateWidget(covariant MyHomePage oldWidget) {
    super.didUpdateWidget(oldWidget);
    print("lifecycle _MyHomePageState didUpdateWidget");
  }

  @override
  void didChangeDependencies() {
    super.didChangeDependencies();
    print("lifecycle _MyHomePageState didChangeDependencies");
  }
}
调用
  void _incrementCounter() {
    setState(() {
      print("lifecycle _MyHomePageState setState");
      // This call to setState tells the Flutter framework that something has
      // changed in this State, which causes it to rerun the build method below
      // so that the display can reflect the updated values. If we changed
      // _counter without calling setState(), then the build method would not be
      // called again, and so nothing would appear to happen.
      _counter++;
    });
  }
2023-03-12 14:22:34.439 18242-18271/com.example.flutterporject I/flutter: lifecycle _MyHomePageState setState
2023-03-12 14:22:34.441 18242-18271/com.example.flutterporject I/flutter: lifecycle _MyHomePageState builddidChangeDependencies:State 对象的依赖关系发生变化后,Flutter 会回调这个方法,随后触发组件构建。哪些情况下 State 对象的依赖关系会发生变化呢?典型的场景是,系统语言 Locale 或应用主题改变时,系统会通知 State 执行 didChangeDependencies 回调方法。
didUpdateWidget:当 Widget 的配置发生变化时,比如,父 Widget 触发重建(即父 Widget 的状态发生变化时),热重载时,系统会调用这个函数。
一旦这三个方法被调用,Flutter 随后就会销毁老 Widget,并调用 build 方法重建 Widget。
销毁
组件销毁相对比较简单。比如组件被移除,或是页面销毁的时候,系统会调用 deactivate 和 dispose 这两个方法,来移除或销毁组件。
当组件的可见状态发生变化时,deactivate 函数会被调用,这时 State 会被暂时从视图树中移除。值得注意的是,页面切换时,由于 State 对象在视图树中的位置发生了变化,需要先暂时移除后再重新添加,重新触发组件构建,因此这个函数也会被调用。
当 State 被永久地从视图树中移除时,Flutter 会调用 dispose 函数。而一旦到这个阶段,组件就要被销毁了,所以我们可以在这里进行最终的资源释放、移除监听、清理环境,等等。
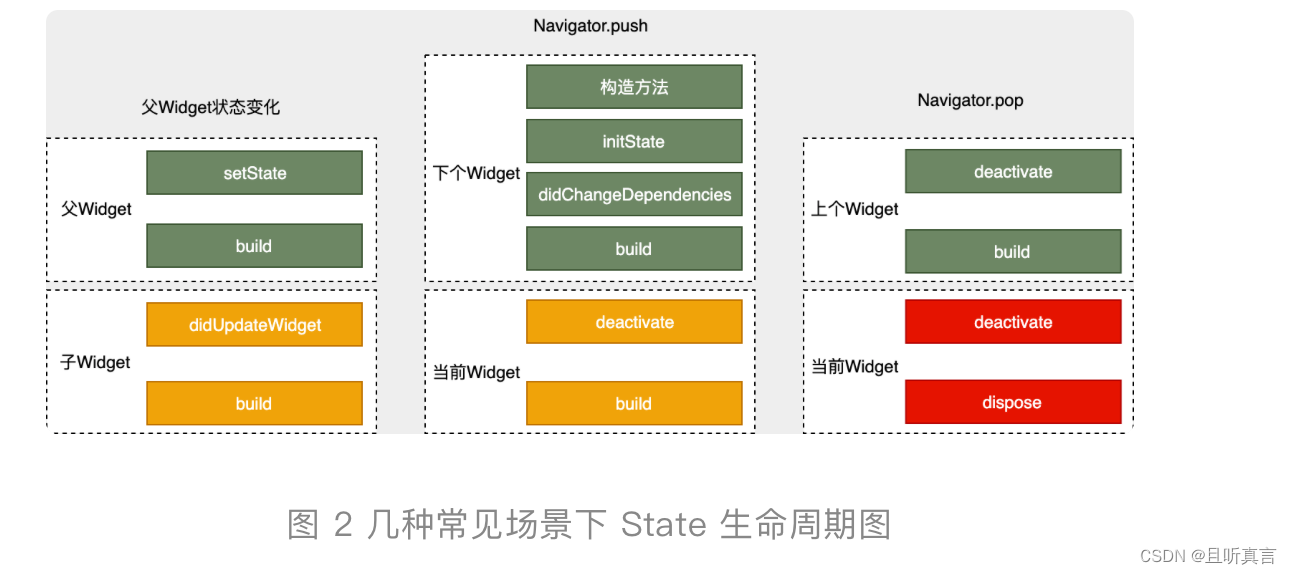
如图 2 所示,左边部分展示了当父 Widget 状态发生变化时,父子双方共同的生命周期;而中间和右边部分则描述了页面切换时,两个关联的 Widget 的生命周期函数是如何响应的。
从功能,调用时机和调用次数的维度总结了这些方法。

App 生命周期
视图的生命周期,定义了视图的加载到构建的全过程,其回调机制能够确保我们可以根据视图的状态选择合适的时机做恰当的事情。而 App 的生命周期,则定义了 App 从启动到退出的全过程。
在原生 Android、iOS 开发中,有时我们需要在对应的 App 生命周期事件中做相应处理,比如 App 从后台进入前台、从前台退到后台,或是在 UI 绘制完成后做一些处理。
这样的需求,在原生开发中,我们可以通过重写 Activity、ViewController 生命周期回调方法,或是注册应用程序的相关通知,来监听 App 的生命周期并做相应的处理。而在 Flutter 中,我们可以利用 WidgetsBindingObserver 类,来实现同样的需求。
接下来,我们就来看看具体如何实现这样的需求。首先,我们来看看 WidgetsBindingObserver 中具体有哪些回调函数:
abstract class WidgetsBindingObserver {
  //页面pop
  Future<bool> didPopRoute() => Future<bool>.value(false);
  //页面push
  Future<bool> didPushRoute(String route) => Future<bool>.value(false);
  //系统窗口相关改变回调,如旋转
  void didChangeMetrics() { }
  //文本缩放系数变化
  void didChangeTextScaleFactor() { }
  //系统亮度变化
  void didChangePlatformBrightness() { }
  //本地化语言变化
  void didChangeLocales(List<Locale> locale) { }
  //App生命周期变化
  void didChangeAppLifecycleState(AppLifecycleState state) { }
  //内存警告回调
  void didHaveMemoryPressure() { }
  //Accessibility相关特性回调
  void didChangeAccessibilityFeatures() {}
}
可以看到,WidgetsBindingObserver 这个类提供的回调函数非常丰富,常见的屏幕旋转、屏幕亮度、语言变化、内存警告都可以通过这个实现进行回调。我们通过给 WidgetsBinding 的单例对象设置监听器,就可以监听对应的回调方法。
考虑到其他的回调相对简单,你可以参考官方文档,对照着进行练习。因此,我今天主要和你分享 App 生命周期的回调 didChangeAppLifecycleState,和帧绘制回调 addPostFrameCallback 与 addPersistentFrameCallback。
生命周期回调
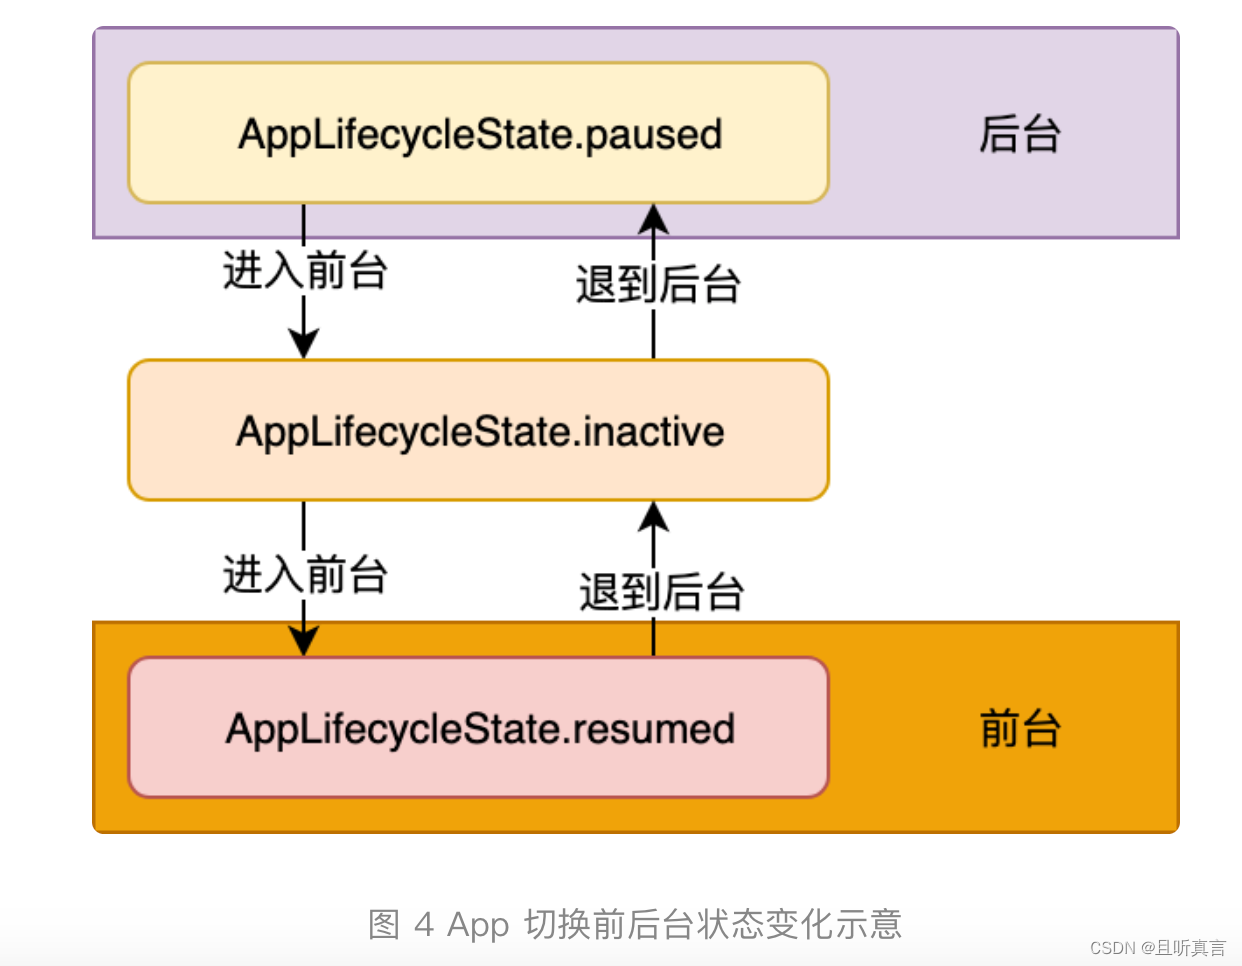
didChangeAppLifecycleState 回调函数中,有一个参数类型为 AppLifecycleState 的枚举类,这个枚举类是 Flutter 对 App 生命周期状态的封装。它的常用状态包括 resumed、inactive、paused 这三个。
resumed:可见的,并能响应用户的输入。
inactive:处在不活动状态,无法处理用户响应。
paused:不可见并不能响应用户的输入,但是在后台继续活动中。
这里,我来和你分享一个实际案例。
在下面的代码中,我们在 initState 时注册了监听器,在 didChangeAppLifecycleState 回调方法中打印了当前的 App 状态,最后在 dispose 时把监听器移除:
class _MyHomePageState extends State<MyHomePage>  with WidgetsBindingObserver{//这里你可以再回顾下,第7篇文章“函数、类与运算符:Dart是如何处理信息的?”中关于Mixin的内容
...
  @override
  @mustCallSuper
  void initState() {
    super.initState();
    WidgetsBinding.instance.addObserver(this);//注册监听器
  }
  @override
  @mustCallSuper
  void dispose(){
    super.dispose();
    WidgetsBinding.instance.removeObserver(this);//移除监听器
  }
  @override
  void didChangeAppLifecycleState(AppLifecycleState state) async {
    print("$state");
    if (state == AppLifecycleState.resumed) {
      //do sth
    }
  }
}
我们试着切换一下前、后台,观察控制台输出的 App 状态,可以发现:
从后台切入前台,控制台打印的 App 生命周期变化如下: AppLifecycleState.paused->AppLifecycleState.inactive->AppLifecycleState.resumed;
import 'package:flutter/material.dart';
import 'dart:developer' as developer;

void main() {
  //runApp(App());
  runApp(const MyApp());
}

class MyApp extends StatelessWidget {
  const MyApp({super.key});

  // This widget is the root of your application.
  @override
  Widget build(BuildContext context) {
    return MaterialApp(
      title: 'Flutter Demo',
      theme: ThemeData(
        // This is the theme of your application.
        //
        // Try running your application with "flutter run". You'll see the
        // application has a blue toolbar. Then, without quitting the app, try
        // changing the primarySwatch below to Colors.green and then invoke
        // "hot reload" (press "r" in the console where you ran "flutter run",
        // or simply save your changes to "hot reload" in a Flutter IDE).
        // Notice that the counter didn't reset back to zero; the application
        // is not restarted.
        primarySwatch: Colors.blue,
      ),
      home: const MyHomePage(title: 'Flutter Demo Home Page'),
    );
  }
}

class MyHomePage extends StatefulWidget {
  const MyHomePage({super.key, required this.title});

  // This widget is the home page of your application. It is stateful, meaning
  // that it has a State object (defined below) that contains fields that affect
  // how it looks.

  // This class is the configuration for the state. It holds the values (in this
  // case the title) provided by the parent (in this case the App widget) and
  // used by the build method of the State. Fields in a Widget subclass are
  // always marked "final".

  final String title;

  @override
  State<MyHomePage> createState() => _MyHomePageState();
}

class _MyHomePageState extends State<MyHomePage> with WidgetsBindingObserver {
  int _counter = 0;

  _MyHomePageState() {
    print("lifecycle _MyHomePageState constructor");
  }

  void _incrementCounter() {
    setState(() {
      print("lifecycle _MyHomePageState setState");
      // This call to setState tells the Flutter framework that something has
      // changed in this State, which causes it to rerun the build method below
      // so that the display can reflect the updated values. If we changed
      // _counter without calling setState(), then the build method would not be
      // called again, and so nothing would appear to happen.
      _counter++;
    });
  }

  @override
  Widget build(BuildContext context) {
    print("lifecycle _MyHomePageState build");
    // This method is rerun every time setState is called, for instance as done
    // by the _incrementCounter method above.
    //
    // The Flutter framework has been optimized to make rerunning build methods
    // fast, so that you can just rebuild anything that needs updating rather
    // than having to individually change instances of widgets.
    return Scaffold(
      appBar: AppBar(
        // Here we take the value from the MyHomePage object that was created by
        // the App.build method, and use it to set our appbar title.
        title: Text(widget.title),
      ),
      body: Center(
        // Center is a layout widget. It takes a single child and positions it
        // in the middle of the parent.
        child: Column(
          // Column is also a layout widget. It takes a list of children and
          // arranges them vertically. By default, it sizes itself to fit its
          // children horizontally, and tries to be as tall as its parent.
          //
          // Invoke "debug painting" (press "p" in the console, choose the
          // "Toggle Debug Paint" action from the Flutter Inspector in Android
          // Studio, or the "Toggle Debug Paint" command in Visual Studio Code)
          // to see the wireframe for each widget.
          //
          // Column has various properties to control how it sizes itself and
          // how it positions its children. Here we use mainAxisAlignment to
          // center the children vertically; the main axis here is the vertical
          // axis because Columns are vertical (the cross axis would be
          // horizontal).
          mainAxisAlignment: MainAxisAlignment.center,
          children: <Widget>[
            const Text(
              'You have pushed the button this many times:',
            ),
            Text(
              '$_counter',
              style: Theme.of(context).textTheme.headlineMedium,
            ),
          ],
        ),
      ),
      floatingActionButton: FloatingActionButton(
        onPressed: _incrementCounter,
        tooltip: 'Increment',
        child: const Icon(Icons.add),
      ), // This trailing comma makes auto-formatting nicer for build methods.
    );
  }

  @override
  void initState() {
    super.initState();
    print("lifecycle _MyHomePageState initState");
    WidgetsBinding.instance.addObserver(this);//注册监听器
  }

  @override
  void dispose() {
    super.dispose();
    print("lifecycle _MyHomePageState dispose");
    WidgetsBinding.instance.removeObserver(this);//移除监听器
  }

  @override
  void didUpdateWidget(covariant MyHomePage oldWidget) {
    super.didUpdateWidget(oldWidget);
    print("lifecycle _MyHomePageState didUpdateWidget");
  }

  @override
  void didChangeDependencies() {
    super.didChangeDependencies();
    print("lifecycle _MyHomePageState didChangeDependencies");
  }

  @override
  void didChangeAppLifecycleState(AppLifecycleState state) {
    // TODO: implement didChangeAppLifecycleState
    super.didChangeAppLifecycleState(state);
    print("lifecycle _MyHomePageState state:${state.name}");
  }
}
APP先进入后台,在回到前台:
2023-03-12 14:46:52.404 22855-23010/com.example.flutterporject I/flutter: lifecycle _MyHomePageState constructor
2023-03-12 14:46:52.404 22855-23010/com.example.flutterporject I/flutter: lifecycle _MyHomePageState initState
2023-03-12 14:46:52.405 22855-23010/com.example.flutterporject I/flutter: lifecycle _MyHomePageState didChangeDependencies
2023-03-12 14:46:52.409 22855-23010/com.example.flutterporject I/flutter: lifecycle _MyHomePageState build
2023-03-12 14:46:55.517 22855-23010/com.example.flutterporject I/flutter: lifecycle _MyHomePageState state:inactive
2023-03-12 14:46:56.133 22855-23010/com.example.flutterporject I/flutter: lifecycle _MyHomePageState state:paused
2023-03-12 14:46:58.650 22855-23010/com.example.flutterporject I/flutter: lifecycle _MyHomePageState state:resumed
从前台退回后台,控制台打印的 App 生命周期变化则变成了:AppLifecycleState.resumed->AppLifecycleState.inactive->AppLifecycleState.paused。
import 'package:flutter/material.dart';
import 'dart:developer' as developer;

void main() {
  //runApp(App());
  runApp(const MyApp());
}

class MyApp extends StatelessWidget {
  const MyApp({super.key});

  // This widget is the root of your application.
  @override
  Widget build(BuildContext context) {
    return MaterialApp(
      title: 'Flutter Demo',
      theme: ThemeData(
        // This is the theme of your application.
        //
        // Try running your application with "flutter run". You'll see the
        // application has a blue toolbar. Then, without quitting the app, try
        // changing the primarySwatch below to Colors.green and then invoke
        // "hot reload" (press "r" in the console where you ran "flutter run",
        // or simply save your changes to "hot reload" in a Flutter IDE).
        // Notice that the counter didn't reset back to zero; the application
        // is not restarted.
        primarySwatch: Colors.blue,
      ),
      home: const MyHomePage(title: 'Flutter Demo Home Page'),
    );
  }
}

class MyHomePage extends StatefulWidget {
  const MyHomePage({super.key, required this.title});

  // This widget is the home page of your application. It is stateful, meaning
  // that it has a State object (defined below) that contains fields that affect
  // how it looks.

  // This class is the configuration for the state. It holds the values (in this
  // case the title) provided by the parent (in this case the App widget) and
  // used by the build method of the State. Fields in a Widget subclass are
  // always marked "final".

  final String title;

  @override
  State<MyHomePage> createState() => _MyHomePageState();
}

class _MyHomePageState extends State<MyHomePage> with WidgetsBindingObserver {
  int _counter = 0;

  _MyHomePageState() {
    print("lifecycle _MyHomePageState constructor");
  }

  void _incrementCounter() {
    setState(() {
      print("lifecycle _MyHomePageState setState");
      // This call to setState tells the Flutter framework that something has
      // changed in this State, which causes it to rerun the build method below
      // so that the display can reflect the updated values. If we changed
      // _counter without calling setState(), then the build method would not be
      // called again, and so nothing would appear to happen.
      _counter++;
    });
  }

  @override
  Widget build(BuildContext context) {
    print("lifecycle _MyHomePageState build");
    // This method is rerun every time setState is called, for instance as done
    // by the _incrementCounter method above.
    //
    // The Flutter framework has been optimized to make rerunning build methods
    // fast, so that you can just rebuild anything that needs updating rather
    // than having to individually change instances of widgets.
    return Scaffold(
      appBar: AppBar(
        // Here we take the value from the MyHomePage object that was created by
        // the App.build method, and use it to set our appbar title.
        title: Text(widget.title),
      ),
      body: Center(
        // Center is a layout widget. It takes a single child and positions it
        // in the middle of the parent.
        child: Column(
          // Column is also a layout widget. It takes a list of children and
          // arranges them vertically. By default, it sizes itself to fit its
          // children horizontally, and tries to be as tall as its parent.
          //
          // Invoke "debug painting" (press "p" in the console, choose the
          // "Toggle Debug Paint" action from the Flutter Inspector in Android
          // Studio, or the "Toggle Debug Paint" command in Visual Studio Code)
          // to see the wireframe for each widget.
          //
          // Column has various properties to control how it sizes itself and
          // how it positions its children. Here we use mainAxisAlignment to
          // center the children vertically; the main axis here is the vertical
          // axis because Columns are vertical (the cross axis would be
          // horizontal).
          mainAxisAlignment: MainAxisAlignment.center,
          children: <Widget>[
            const Text(
              'You have pushed the button this many times:',
            ),
            Text(
              '$_counter',
              style: Theme.of(context).textTheme.headlineMedium,
            ),
          ],
        ),
      ),
      floatingActionButton: FloatingActionButton(
        onPressed: _incrementCounter,
        tooltip: 'Increment',
        child: const Icon(Icons.add),
      ), // This trailing comma makes auto-formatting nicer for build methods.
    );
  }

  @override
  void initState() {
    super.initState();
    print("lifecycle _MyHomePageState initState");
    WidgetsBinding.instance.addObserver(this);//注册监听器
  }

  @override
  void dispose() {
    super.dispose();
    print("lifecycle _MyHomePageState dispose");
    WidgetsBinding.instance.removeObserver(this);//移除监听器
  }

  @override
  void didUpdateWidget(covariant MyHomePage oldWidget) {
    super.didUpdateWidget(oldWidget);
    print("lifecycle _MyHomePageState didUpdateWidget");
  }

  @override
  void didChangeDependencies() {
    super.didChangeDependencies();
    print("lifecycle _MyHomePageState didChangeDependencies");
  }

  @override
  void didChangeAppLifecycleState(AppLifecycleState state) {
    // TODO: implement didChangeAppLifecycleState
    super.didChangeAppLifecycleState(state);
    print("lifecycle _MyHomePageState state:${state.name}");
  }
}
按下返回键退出应用
2023-03-12 14:44:50.729 22855-22884/com.example.flutterporject I/flutter: lifecycle _MyHomePageState constructor
2023-03-12 14:44:50.729 22855-22884/com.example.flutterporject I/flutter: lifecycle _MyHomePageState initState
2023-03-12 14:44:50.729 22855-22884/com.example.flutterporject I/flutter: lifecycle _MyHomePageState didChangeDependencies
2023-03-12 14:44:50.733 22855-22884/com.example.flutterporject I/flutter: lifecycle _MyHomePageState build
2023-03-12 14:44:54.706 22855-22884/com.example.flutterporject I/flutter: lifecycle _MyHomePageState state:inactive
2023-03-12 14:44:55.338 22855-22884/com.example.flutterporject I/flutter: lifecycle _MyHomePageState state:paused
2023-03-12 14:44:55.538 22855-22884/com.example.flutterporject I/flutter: lifecycle _MyHomePageState state:detached
可以看到,App 前后台切换过程中打印出的状态是完全符合预期的。
帧绘制回调
除了需要监听 App 的生命周期回调做相应的处理之外,有时候我们还需要在组件渲染之后做一些与显示安全相关的操作。
在 iOS 开发中,我们可以通过 dispatch_async(dispatch_get_main_queue(),^{…}) 方法,让操作在下一个 RunLoop 执行;而在 Android 开发中,我们可以通过 View.post() 插入消息队列,来保证在组件渲染后进行相关操作。
其实,在 Flutter 中实现同样的需求会更简单:依然使用万能的 WidgetsBinding 来实现。
WidgetsBinding 提供了单次 Frame 绘制回调,以及实时 Frame 绘制回调两种机制,来分别满足不同的需求:
单次 Frame 绘制回调,通过 addPostFrameCallback 实现。它会在当前 Frame 绘制完成后进行进行回调,并且只会回调一次,如果要再次监听则需要再设置一次。
WidgetsBinding.instance.addPostFrameCallback((_){
    print("单次Frame绘制回调");//只回调一次
  });
实时 Frame 绘制回调,则通过 addPersistentFrameCallback 实现。这个函数会在每次绘制 Frame 结束后进行回调,可以用做 FPS 监测。
WidgetsBinding.instance.addPersistentFrameCallback((_){
  print("实时Frame绘制回调");//每帧都回调
});
import 'package:flutter/material.dart';
import 'dart:developer' as developer;
void main() {
//runApp(App());
runApp(const MyApp());
}
class MyApp extends StatelessWidget {
const MyApp({super.key});
// This widget is the root of your application.
@override
Widget build(BuildContext context) {
return MaterialApp(
title: 'Flutter Demo',
theme: ThemeData(
// This is the theme of your application.
//
// Try running your application with "flutter run". You'll see the
// application has a blue toolbar. Then, without quitting the app, try
// changing the primarySwatch below to Colors.green and then invoke
// "hot reload" (press "r" in the console where you ran "flutter run",
// or simply save your changes to "hot reload" in a Flutter IDE).
// Notice that the counter didn't reset back to zero; the application
// is not restarted.
primarySwatch: Colors.blue,
),
home: const MyHomePage(title: 'Flutter Demo Home Page'),
);
}
}
class MyHomePage extends StatefulWidget {
const MyHomePage({super.key, required this.title});
// This widget is the home page of your application. It is stateful, meaning
// that it has a State object (defined below) that contains fields that affect
// how it looks.
// This class is the configuration for the state. It holds the values (in this
// case the title) provided by the parent (in this case the App widget) and
// used by the build method of the State. Fields in a Widget subclass are
// always marked "final".
final String title;
@override
State<MyHomePage> createState() => _MyHomePageState();
}
class _MyHomePageState extends State<MyHomePage> with WidgetsBindingObserver {
int _counter = 0;
_MyHomePageState() {
print("lifecycle _MyHomePageState constructor");
}
void _incrementCounter() {
setState(() {
print("lifecycle _MyHomePageState setState");
// This call to setState tells the Flutter framework that something has
// changed in this State, which causes it to rerun the build method below
// so that the display can reflect the updated values. If we changed
// _counter without calling setState(), then the build method would not be
// called again, and so nothing would appear to happen.
_counter++;
});
}
@override
Widget build(BuildContext context) {
print("lifecycle _MyHomePageState build");
// This method is rerun every time setState is called, for instance as done
// by the _incrementCounter method above.
//
// The Flutter framework has been optimized to make rerunning build methods
// fast, so that you can just rebuild anything that needs updating rather
// than having to individually change instances of widgets.
return Scaffold(
appBar: AppBar(
// Here we take the value from the MyHomePage object that was created by
// the App.build method, and use it to set our appbar title.
title: Text(widget.title),
),
body: Center(
// Center is a layout widget. It takes a single child and positions it
// in the middle of the parent.
child: Column(
// Column is also a layout widget. It takes a list of children and
// arranges them vertically. By default, it sizes itself to fit its
// children horizontally, and tries to be as tall as its parent.
//
// Invoke "debug painting" (press "p" in the console, choose the
// "Toggle Debug Paint" action from the Flutter Inspector in Android
// Studio, or the "Toggle Debug Paint" command in Visual Studio Code)
// to see the wireframe for each widget.
//
// Column has various properties to control how it sizes itself and
// how it positions its children. Here we use mainAxisAlignment to
// center the children vertically; the main axis here is the vertical
// axis because Columns are vertical (the cross axis would be
// horizontal).
mainAxisAlignment: MainAxisAlignment.center,
children: <Widget>[
const Text(
'You have pushed the button this many times:',
),
Text(
'$_counter',
style: Theme.of(context).textTheme.headlineMedium,
),
],
),
),
floatingActionButton: FloatingActionButton(
onPressed: _incrementCounter,
tooltip: 'Increment',
child: const Icon(Icons.add),
), // This trailing comma makes auto-formatting nicer for build methods.
);
}
@override
void initState() {
super.initState();
print("lifecycle _MyHomePageState initState");
WidgetsBinding.instance.addObserver(this); //注册监听器
WidgetsBinding.instance.addPostFrameCallback((timeStamp) {
print("lifecycle _MyHomePageState 单次Frame绘制回调"); //只回调一次
});
WidgetsBinding.instance.addPersistentFrameCallback((timeStamp){
print("lifecycle _MyHomePageState 实时Frame绘制回调");//每帧都回调
});
}
@override
void dispose() {
super.dispose();
print("lifecycle _MyHomePageState dispose");
WidgetsBinding.instance.removeObserver(this); //移除监听器
}
@override
void didUpdateWidget(covariant MyHomePage oldWidget) {
super.didUpdateWidget(oldWidget);
print("lifecycle _MyHomePageState didUpdateWidget");
}
@override
void didChangeDependencies() {
super.didChangeDependencies();
print("lifecycle _MyHomePageState didChangeDependencies");
}
@override
void didChangeAppLifecycleState(AppLifecycleState state) {
// TODO: implement didChangeAppLifecycleState
super.didChangeAppLifecycleState(state);
print("lifecycle _MyHomePageState state:${state.name}");
}
}
应用首次启动log:
2023-03-12 14:53:37.961 23545-23576/com.example.flutterporject I/flutter: lifecycle _MyHomePageState constructor
2023-03-12 14:53:37.961 23545-23576/com.example.flutterporject I/flutter: lifecycle _MyHomePageState initState
2023-03-12 14:53:37.961 23545-23576/com.example.flutterporject I/flutter: lifecycle _MyHomePageState didChangeDependencies
2023-03-12 14:53:37.965 23545-23576/com.example.flutterporject I/flutter: lifecycle _MyHomePageState build
2023-03-12 14:53:38.654 23545-23576/com.example.flutterporject I/flutter: lifecycle _MyHomePageState 实时Frame绘制回调
2023-03-12 14:53:38.655 23545-23576/com.example.flutterporject I/flutter: lifecycle _MyHomePageState 单次Frame绘制回调
2023-03-12 14:53:38.677 23545-23576/com.example.flutterporject I/flutter: lifecycle _MyHomePageState 实时Frame绘制回调
2023-03-12 14:53:38.834 23545-23576/com.example.flutterporject I/flutter: lifecycle _MyHomePageState 实时Frame绘制回调
点击修改后log:
2023-03-12 14:54:38.546 23545-23576/com.example.flutterporject I/flutter: lifecycle _MyHomePageState setState
2023-03-12 14:54:38.564 23545-23576/com.example.flutterporject I/flutter: lifecycle _MyHomePageState build
2023-03-12 14:54:38.651 23545-23576/com.example.flutterporject I/flutter: lifecycle _MyHomePageState 实时Frame绘制回调
2023-03-12 14:54:38.668 23545-23576/com.example.flutterporject I/flutter: lifecycle _MyHomePageState 实时Frame绘制回调
2023-03-12 14:54:38.691 23545-23576/com.example.flutterporject I/flutter: lifecycle _MyHomePageState 实时Frame绘制回调
2023-03-12 14:54:38.736 23545-23576/com.example.flutterporject I/flutter: lifecycle _MyHomePageState 实时Frame绘制回调
2023-03-12 14:54:38.747 23545-23576/com.example.flutterporject I/flutter: lifecycle _MyHomePageState 实时Frame绘制回调
2023-03-12 14:54:38.764 23545-23576/com.example.flutterporject I/flutter: lifecycle _MyHomePageState 实时Frame绘制回调
2023-03-12 14:54:38.782 23545-23576/com.example.flutterporject I/flutter: lifecycle _MyHomePageState 实时Frame绘制回调
退出应用log:
2023-03-12 14:55:32.902 23545-23576/com.example.flutterporject I/flutter: lifecycle _MyHomePageState state:inactive
2023-03-12 14:55:32.907 23545-23576/com.example.flutterporject I/flutter: lifecycle _MyHomePageState 实时Frame绘制回调
2023-03-12 14:55:33.571 23545-23576/com.example.flutterporject I/flutter: lifecycle _MyHomePageState state:paused
2023-03-12 14:55:33.787 23545-23576/com.example.flutterporject I/flutter: lifecycle _MyHomePageState state:detached
首先,Widget 生命周期的实际承载者 State。我将 State 的生命周期划分为了创建(插入视图树)、更新(在视图树中存在)、销毁(从视图树种移除)这 3 个阶段,并为你介绍了每个阶段中涉及的关键方法,希望你能够深刻理解 Flutter 组件从加载到卸载的完整周期。
然后,通过与原生 Android、iOS 平台能力的对比,以及查看 WidgetsBindingObserver 源码的方式,我与你讲述了 Flutter 常用的生命周期状态切换机制。希望你能掌握 Flutter 的 App 生命周期监听方法,并理解 Flutter 常用的生命周期状态切换机制。
Flutter 帧绘制回调机制,理解了单次 Frame 绘制回调与实时 Frame 绘制回调的异同与使用场景。