前言
目录
一、员工信息导入页面
1.1 员工信息导入页面效果图

1.2 新建员工信息导入组件
首先需要注意的是,vue-element-admin已经提供了类似功能,我们在其基础上做二次开发即可
excel导入功能需要使用xlsx,所以需要安装xlsx插件:$ npm i xlsx
将vue-element-admin提供的导入功能新建一个组件,位置: src/components/UploadExcel/index.vue
1.3 注册全局的员工信息导入组件
在src/components/index.vue中添加如下代码:
import PageTools from './PageTools'
import UploadExcel from './UploadExcel'
export default {


  install(Vue) {


    Vue.component('PageTools', PageTools) // 注册工具栏组件
    Vue.component('UploadExcel', UploadExcel) // 注册导入excel组件
  }
}
1.4 员工信息导入组件的基本布局
src/components/UploadExcel/index.vue添加如下代码:
<template>
<div class="upload-excel">
    <div class="btn-upload">
      <el-button :loading="loading" size="mini" type="primary" @click="handleUpload">
        点击上传
      </el-button>
    </div>

    <input ref="excel-upload-input" class="excel-upload-input" type="file" accept=".xlsx, .xls" @change="handleClick">
    <div class="drop" @drop="handleDrop" @dragover="handleDragover" @dragenter="handleDragover">
      <i class="el-icon-upload" />
      <span>将文件拖到此处</span>
    </div>
  </div>
</template>

<style scoped lang="scss">
.upload-excel {


  display: flex;
  justify-content: center;
   margin-top: 100px;
   .excel-upload-input{


       display: none;
        z-index: -9999;
     }
   .btn-upload , .drop{


      border: 1px dashed #bbb;
      width: 350px;
      height: 160px;
      text-align: center;
      line-height: 160px;
   }
   .drop{


       line-height: 80px;
       color: #bbb;
      i {


        font-size: 60px;
        display: block;
      }
   }
}
</style>
1.5 建立员工信息导入的页面路由
在src/router/index.js中挂载路由:
{


    path: '/import',
    component: Layout,
    hidden: true, // 隐藏在左侧菜单中
    children: [{


      path: '', // 二级路由path什么都不写 表示二级默认路由
      component: () => import('@/views/import')
    }]
  },
然后在src/views/import/index.vue创建import路由组件:
<template>
  <!-- 公共导入组件 -->
  <upload-excel :on-success="success" />
</template>
1.6 封装导入员工信息的请求
在src/api/employees.js中添加如下代码:
/** *
*  封装一个导入员工的接口
* ***/
export function importEmployee(data) {


  return request({


    url: '/sys/user/batch',
    method: 'post',
    data
  })
}
1.7 实现员工信息导入功能
在src/views/import/index.vue中添加如下代码:
async  success({

      header, results }) {


      if (this.type === 'user') {


        const userRelations = {


          '入职日期': 'timeOfEntry',
          '手机号': 'mobile',
          '姓名': 'username',
          '转正日期': 'correctionTime',
          '工号': 'workNumber'
        }
        const arr = []
        // 遍历所有的数组
        results.forEach(item => {


        // 需要将每一个条数据里面的中文都换成英文
          const userInfo = {

    }
          Object.keys(item).forEach(key => {


          // key是当前的中文名 找到对应的英文名
            if (userRelations[key] === 'timeOfEntry' || userRelations[key] === 'correctionTime') {


              userInfo[userRelations[key]] = new Date(this.formatDate(item[key], '/')) // 只有这样, 才能入库
              return
            }
            userInfo[userRelations[key]] = item[key]
          })
          // 最终userInfo变成了全是英文
          arr.push(userInfo)
        })
        await importEmployee(arr)
        this.$message.success('导入成功')
      }
      this.$router.back() // 回到上一页
    },
    formatDate(numb, format) {


      const time = new Date((numb - 1) * 24 * 3600000 + 1)
      time.setYear(time.getFullYear() - 70)
      const year = time.getFullYear() + ''
      const month = time.getMonth() + 1 + ''
      const date = time.getDate() - 1 + ''
      if (format && format.length === 1) {


        return year + format + month + format + date
      }
      return year + (month < 10 ? '0' + month : month) + (date < 10 ? '0' + date : date)
    }
1.8 员工页面跳转
<el-button type="warning" size="small" @click="$router.push('/import?type=user')">导入</el-button>
二、员工信息导出功能
2.1 安装依赖
执行一下命令安装依赖:
npm install xlsx file-saver -S
npm install script-loader -S -D

注意:由于js-xlsx体积还是很大的,导出功能也不是一个非常常用的功能,所以使用的时候建议使用懒加载。
2.2 导出功能模块
vue-element-admin已经提供了导出的功能模块,我们将其放置到src/vendor目录下
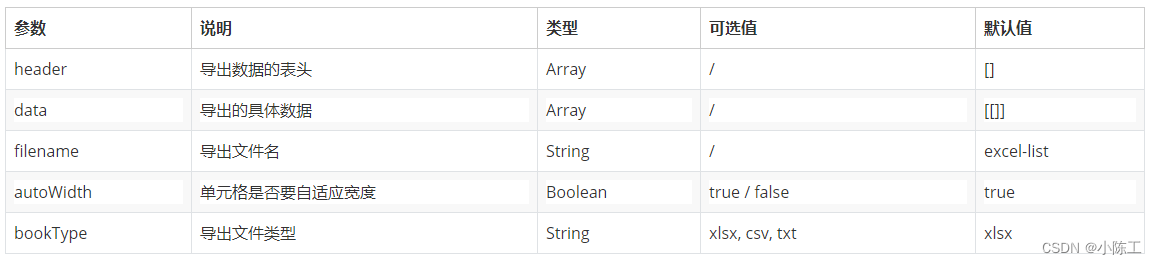
导出功能模块的参数介绍如下所示:
2.3 实现员工信息导出功能
在src/views/employees/index.vue中添加如下代码:
<el-button size="small" type="danger" @click="exportData"> excel导出</el-button>

    exportData() {


      const headers = {


        '姓名': 'username',
        '手机号': 'mobile',
        '入职日期': 'timeOfEntry',
        '聘用形式': 'formOfEmployment',
        '转正日期': 'correctionTime',
        '工号': 'workNumber',
        '部门': 'departmentName'
      }
      // 导出excel
      import('@/vendor/Export2Excel').then(async excel => {


        //  excel是引入文件的导出对象
        // 获取员工的接口,把每页显示条数设置为数据总条数即可获取所有数据
        const {

     rows } = await getEmployeeList({

     page: 1, size: this.page.total })
        const data = this.formatJson(headers, rows) // 返回的data就是 要导出的结构
        excel.export_json_to_excel({


          header: Object.keys(headers),
          data,
          filename: '员工资料表',
        })
      })
    },

    // 将表头数据和数据进行对应
    // [{}]  =>   [[]]
    formatJson(headers, rows) {


      return rows.map(item => {


        // item是一个对象  { mobile: 132111,username: '张三'  }
        // ["手机号", "姓名", "入职日期" 。。]
        return Object.keys(headers).map(key => {


          // 需要判断 字段
          if (headers[key] === 'timeOfEntry' || headers[key] === 'correctionTime') {


            // 格式化日期
            return formatDate(item[headers[key]])
          } else if (headers[key] === 'formOfEmployment') {


            const obj = EmployeeEnum.hireType.find(obj => obj.id === item[headers[key]])
            return obj ? obj.value : '未知'
          }
          return item[headers[key]]
        })
      })
    },