1、缘由
Swagger是一个根据代码注解生成接口文档的工具,减少和前端之间的沟通,前端同学看着文档就可以开发了,提升了效率,之前很少写swagger,这次自己动手写,还是有点麻烦,不怎么懂,记录下,避免下次继续踩坑
2、入门
2.1、加入依赖
新建一个springboo项目,一路next就好,这里使用的maven
pom.xml中加入配置
        <dependency>
            <groupId>io.springfox</groupId>
            <artifactId>springfox-boot-starter</artifactId>
            <version>3.0.0</version>
        </dependency>
注:第一次用,直接选用新版的,不知道好在哪
2.2、配置类
package com.example.webdemo.config;

import org.springframework.context.annotation.Bean;
import org.springframework.context.annotation.Configuration;
import springfox.documentation.builders.RequestHandlerSelectors;
import springfox.documentation.service.ApiInfo;
import springfox.documentation.service.Contact;
import springfox.documentation.spi.DocumentationType;
import springfox.documentation.spring.web.plugins.Docket;
import springfox.documentation.swagger2.annotations.EnableSwagger2WebMvc;

import java.util.Collections;

@Configuration
@EnableSwagger2WebMvc
public class SwaggerConfig {

    @Bean
    public Docket docket() {
        return new Docket(DocumentationType.OAS_30)
                .apiInfo(apiInfo())
                // 是否开启swagger
                .enable(true)
                .select()
                // 过滤条件,扫描指定路径下的文件
                .apis(RequestHandlerSelectors.basePackage("com.example.webdemo.controller"))
                // 指定路径处理,PathSelectors.any()代表不过滤任何路径
                //.paths(PathSelectors.any())
                .build();
    }

    private ApiInfo apiInfo() {
        /*作者信息*/
        Contact contact = new Contact("香菜", "https://blog.csdn.net/perfect2011", "[email protected]");
        return new ApiInfo(
                "Spring Boot 集成 Swagger3 测试",
                "Spring Boot 集成 Swagger3 测试接口文档",
                "v1.0",
                "https://blog.csdn.net/perfect2011",
                contact,
                "Apache 2.0",
                "http://www.apache.org/licenses/LICENSE-2.0",
                Collections.emptyList()
        );
    }
}
2.3、查看接口
地址:http://localhost:16002/swagger-ui/index.html
注:这里的端口换成你本地的
看下界面
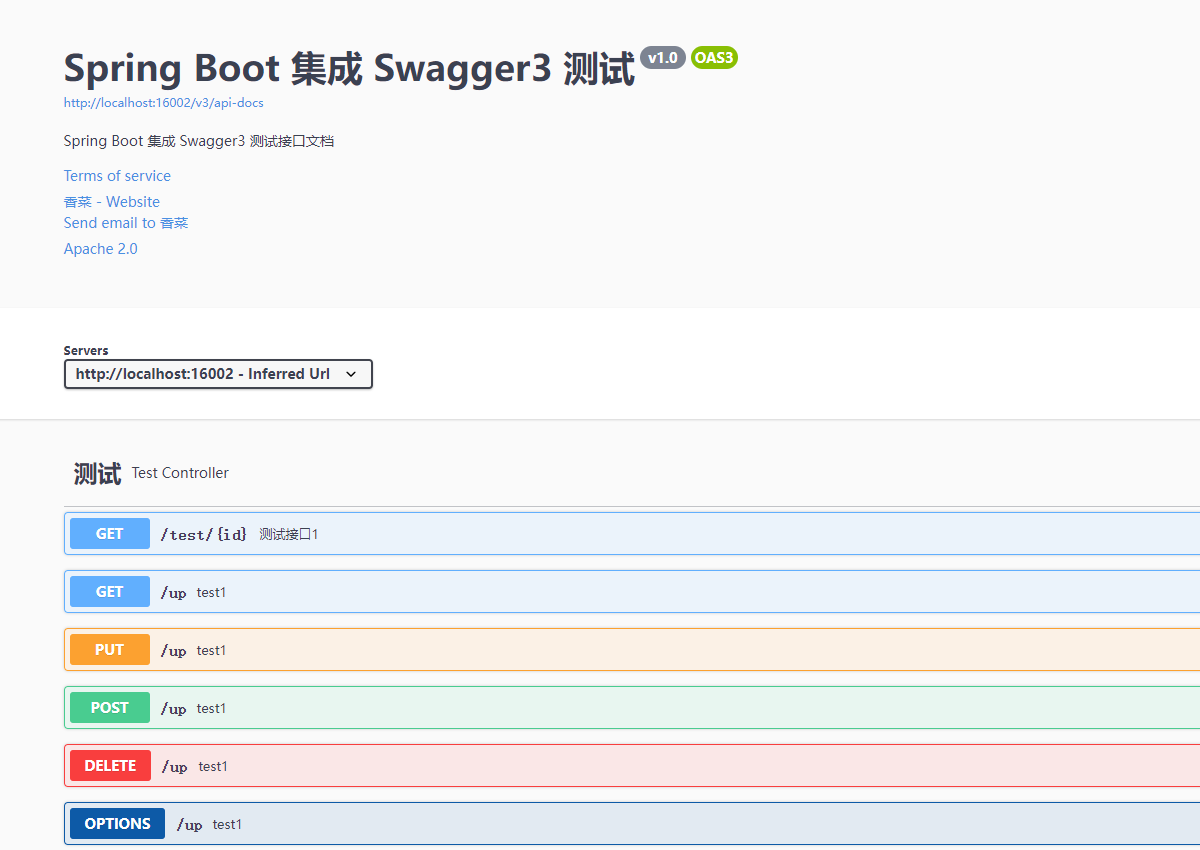
恭喜你成功了,这样就 算是集成了swagger,如果不嫌弃界面难看,可以直接用这个了。
3、Swagger的一些注解
注解概览
| 注解 |
描述 |
| @Api |
标记一个类为 Swagger 资源。 |
| @ApiImplicitParam |
表示 API Operation 中的单个参数。 |
| @ApiImplicitParams |
包装注解,包含多个 @ApiImplicitParam 注解 |
| @ApiModel |
提供 Swagger models 的附加信息 |
| @ApiModelProperty |
添加和操作 model 属性的数据。 |
| @ApiOperation |
描述一个特定路径的 operation(通常是 HTTP 方法) |
| @ApiParam |
为 operation 参数添加额外的 meta-data。 |
| @ApiResponse |
描述 operation 可能的响应。 |
| @ApiResponses |
包装注解,包含多个 @ApiResponse 注解。 |
| @ResponseHeader |
表示响应头。 |
4、实战
swagger自带的UI有点不太舒服,还有一些其他的UI
swagger-bootstrap-ui 和 文档增强工具knife4j
至于其中的区别,暂时也不懂,反正觉得现在的不好看,但是不影响开发
上面的都是入门,是基础的,下面才是在项目中的使用,
在项目中使用的knife4j的增强版,主要是有两个原因,一个是这个提供了搜索功能,另外一个原因就是界面还算好看
4.1 依赖配置
        <dependency>
            <groupId>com.github.xiaoymin</groupId>
            <artifactId>knife4j-spring-boot-starter</artifactId>
            <version>2.0.8</version>
        </dependency>
        <!-- 引入swagger-ui-layer包 /docs.html-->
        <dependency>
            <groupId>com.github.caspar-chen</groupId>
            <artifactId>swagger-ui-layer</artifactId>
            <version>1.1.3</version>
        </dependency>
4.2 配置类
import com.github.xiaoymin.knife4j.spring.extension.OpenApiExtensionResolver;
import org.springframework.beans.factory.annotation.Autowired;
import org.springframework.context.annotation.Bean;
import org.springframework.context.annotation.Configuration;
import springfox.documentation.builders.ApiInfoBuilder;
import springfox.documentation.builders.PathSelectors;
import springfox.documentation.builders.RequestHandlerSelectors;
import springfox.documentation.spi.DocumentationType;
import springfox.documentation.spring.web.plugins.Docket;
import springfox.documentation.swagger2.annotations.EnableSwagger2WebMvc;
@Configuration
@EnableSwagger2WebMvc
public class SwaggerConfig {
/*引入Knife4j提供的扩展类*/
private final OpenApiExtensionResolver openApiExtensionResolver;
@Autowired
public SwaggerConfig(OpenApiExtensionResolver openApiExtensionResolver) {
this.openApiExtensionResolver = openApiExtensionResolver;
}
@Bean(value = "defaultApi2")
public Docket defaultApi2() {
String groupName = "1.0";
return new Docket(DocumentationType.SWAGGER_2)
.pathMapping("/")
.select()
.apis(RequestHandlerSelectors.basePackage("com.demo.ccpparking.controller"))
.paths(PathSelectors.any())
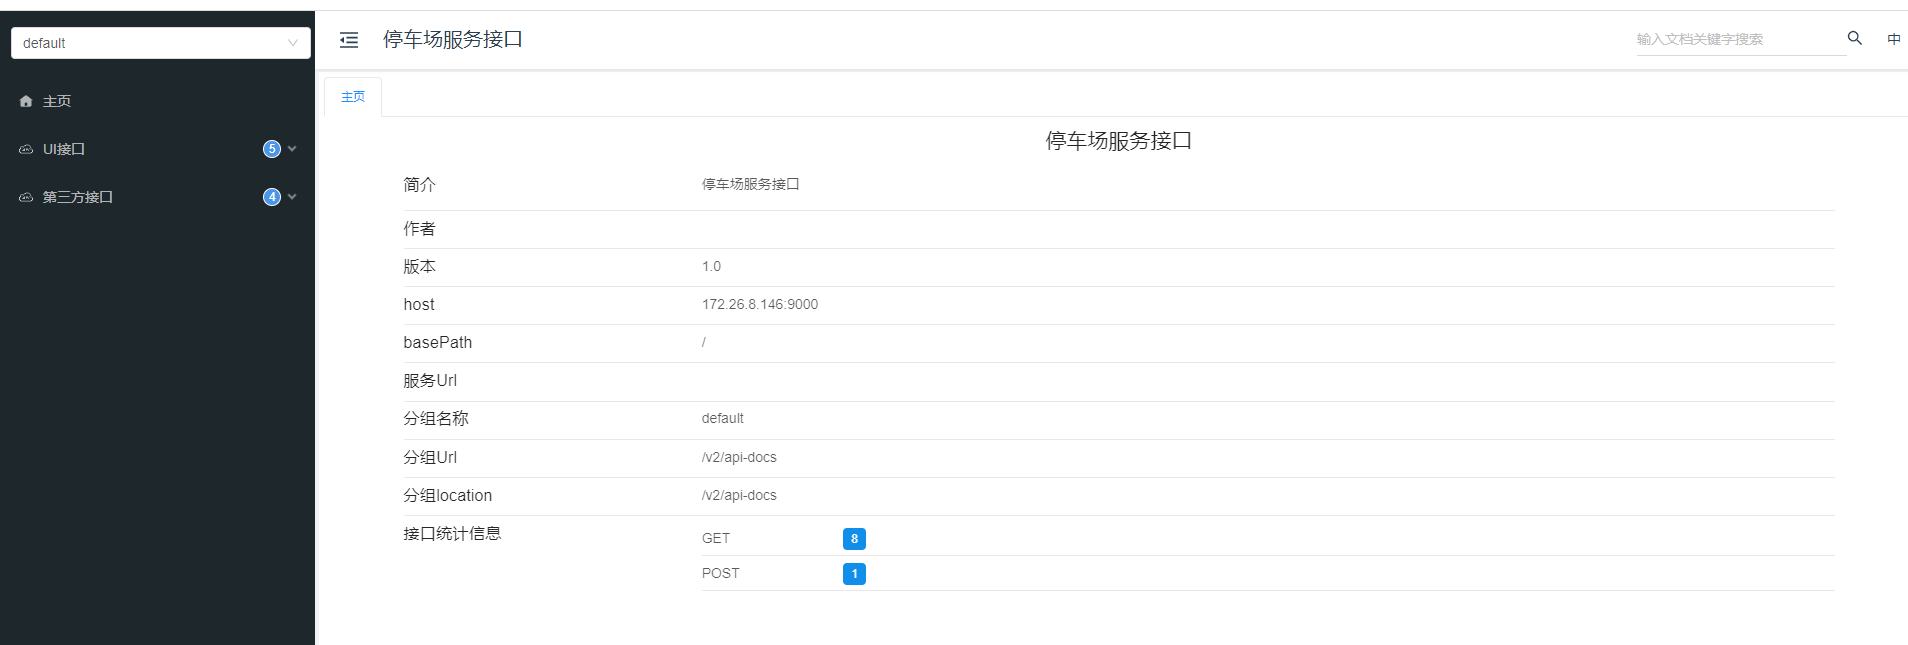
.build().apiInfo(new ApiInfoBuilder()
.title("停车场服务接口")
.description("停车场服务接口")
.version("1.0")
.termsOfServiceUrl("")
.build())
//赋予插件体系
.extensions(openApiExtensionResolver.buildExtensions(groupName));
}
}4.3 application.yml 配置
直接是根配置下
knife4j:
  enable: true
  setting:
    language: zh-CN
    enableSwaggerModels: false
    enableDocumentManage: false
    enableHomeCustom: false
    enableFooter: false
    enableOpenApi: false
    enableAfterScript: false
4.4 配置接口
这里直接选择一个作为实例
@RestController
@Api(tags = "第三方接口")
public class ExposeController {
    @Resource
    ParkingService parkingService;
    @ApiOperation(value = "查询最近的停车场", notes = "参数是经纬度", httpMethod = "GET", tags = {"第三方接口"})
    @ApiImplicitParams({
            @ApiImplicitParam(name = "userId", value = "角色id", dataType = "String", paramType = "header"),
            @ApiImplicitParam(name = "longitude", value = "经度", dataType = "double", paramType = "path"),
            @ApiImplicitParam(name = "latitude", value = "纬度", dataType = "String", paramType = "path")
    })
    @GetMapping("/closestpark")
    public ResponseEntity<ParkingInfoEntity> getClosestPark(@RequestParam(value = "longitude") Double longitude, @RequestParam(value = "latitude") Double latitude) {
        ParkingInfoEntity closestPark = parkingService.getClosestPark(longitude, latitude);
        return ResponseEntity.ok(closestPark);
    }
}
返回值使用ApiModel注解
@Data
@ApiModel(description = "停车场基础信息")
public class ParkingInfoEntity implements Serializable {

    @ApiModelProperty(value = "停车场Id")
    private String parkingId;

    @ApiModelProperty(value = "停车场名字")
    private String parkingName;

}
4.5 看下结果
地址:http://192.168.2.8:9222/doc.html#/home
4.6 总结
例子中简单的使用了swagger,学会了几个知识点
- @ApiModel 标注对象,会把整个对象做解析
- @ApiModelProperty 标注字段,会显示字段的意义
- @Api(tags = "第三方接口") 标注接口的组,可以将接口进行归类,不局限于类
- @ApiOperation 标注接口,相当于接口的注释
- @ApiImplicitParams 对参数进行注释
- @ApiImplicitParam 对单个字段进行注释,这里有两个重要的配置 dataType 是字段的类型,paramType是字段传入的方式,
常用的有三个
header–>请求参数的获取:@RequestHeader(代码中接收注解)
query–>请求参数的获取:@RequestParam(代码中接收注解)
path(用于restful接口)–>请求参数的获取:@PathVariable(代码中接收注解)
5、总结
整个文章主要写了个入门,这样可以快速的理解怎么使用swagger
然后记录了下自己在项目中如何使用swagger的,可以借鉴然后在项目中使用,也是作为后面再使用的一些资料,好记性不如烂笔头。
最后: