简介
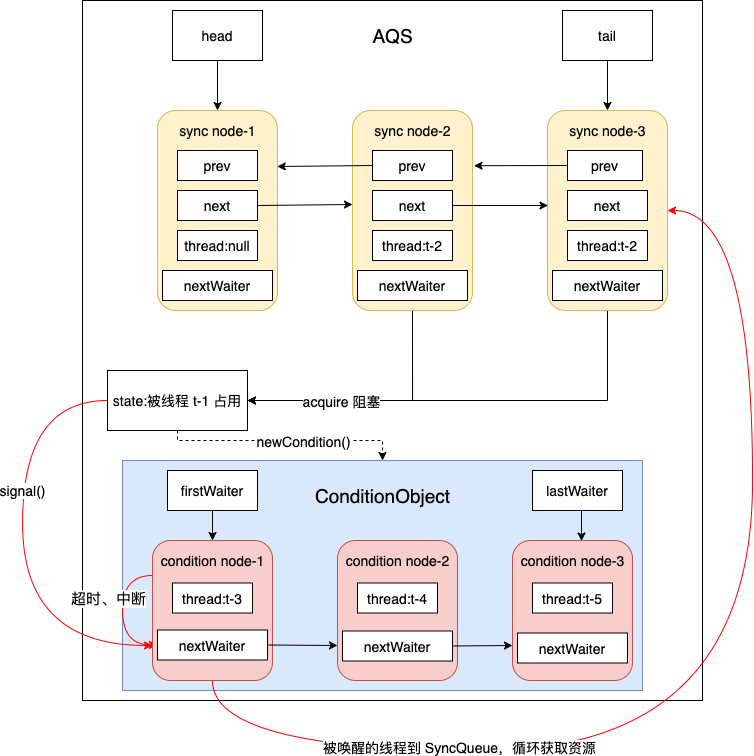
在上一篇《AQS》ConditionQueue 介绍中提到了 ConditionQueue 是借助 AQS 的 SyncQueue 结构来实现条件变量及等待的功能。
ConditionQueue 是 AQS 中相对特殊、复杂的队列。相比较 SyncQueue 只把资源争抢、线程通信全部在 AQS 中处理,那ConditionQueue 就是为了对标 Object#wait、notify、notifyAll 而设计的数据结构,就是为了让开发人员可以手操线程同行。
队列结构
ConditionQueue 是基于 SyncQueue的,或者说都是基于 Node 结构的。而它的操作入口,相信接触过 JUC 的同学应该都知道,那就是 Condition接口。
AQS 中的相关方法都在 ConditionObject,该类正是实现了 Conditon接口。
public interface Condition {


    // 当前线程进入等待状态直到被唤醒或者中断
    void await() throws InterruptedException;
    // 当前线程进入等待状态,不响应中断,阻塞直到被唤醒
    void awaitUninterruptibly();
    // 当前线程进入等待状态直到被唤醒或者中断,阻塞带时间限制
    long awaitNanos(long nanosTimeout) throws InterruptedException;
    // 当前线程进入等待状态直到被唤醒或者中断,阻塞带时间限制
    boolean await(long time, TimeUnit unit) throws InterruptedException;
    // 当前线程进入等待状态直到被唤醒或者中断,阻塞带时间限制
    boolean awaitUntil(Date deadline) throws InterruptedException;
    // 唤醒单个阻塞线程
    void signal();
    // 唤醒所有阻塞线程
    void signalAll();
}
Condition 可以说目前只有唯一的实现类,那就是 AQS 的 ConditionObject,JUC 中的涉及到 Condtion都是直接使用该类。
上一篇提到 AQS-Node 的核心字段中,一直有个字段nextWaiter没有"真正"被使用到,现在终于被排上用场了。
// 在 condition 上等待的下个结点(独占模式),或者为 SHARED,标识为共享模式,不会被使用
// 为null,就是EXCLUSIVE
Node nextWaiter;
因为在一般使用中,我们仅仅是将其作为标记使用,但是当我们创建了 Condition 类(比如 ReentrantLock.newCondition)之后,就是用来组成 Condition 上的等待队列。
注意
方法总览
上文提到,ConditionQueue 是重用 SyncQueue 的结构,并且 ConditionObject 作为 AQS 的父类,所以在 ConditionObject 的源码中,实际有不少使用 AQS 的方法,尤其是 SyncQueue 和 Node 相关。
ConditionObject 自己实现方法则一般是这三类:

- 为了提供给 Condition 接口的重写方法,以便复用;
- 队列相关操作方法,涉及到 ConditionQueue 独有的结构,比如 firstWaiter、lastWaiter;
- 基于 Condition Queue的线程统计与操作方法。
以此,我们画出 ConditionObject 的方法总览图。
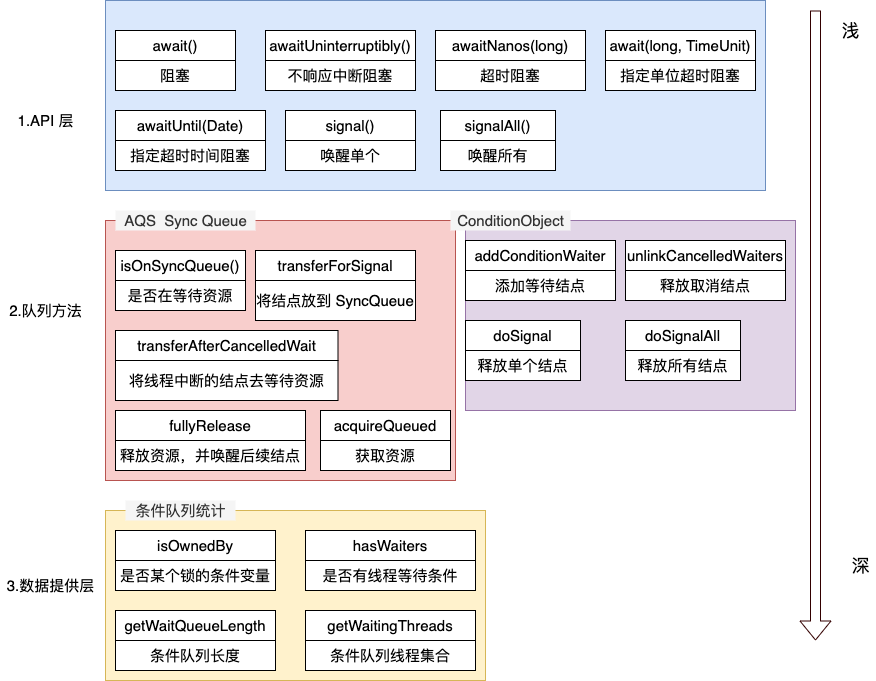
总的来看,核心方法还是比较简单的。注意第2、3层会有使用到 AQS 的方法,主要是涉及到从 ConditionQueue 流转到 SyncQueue,后面会总结什么情况下会出现这样的流转。
阻塞(await)
每个调用 await 阻塞的线程,必然是已经持有锁或者说资源的。我们可以类比 Object.wait() 只能在 synchronized 方法或代码块中调用一样。
因此,基于这个前提,await方法大致主流程如下:
- 1、如果当前线程被中断,则抛出 InterruptedException。
- 2、当前线程包装为结点,加入 ConditionQueue
- 3、保存 getState 返回的锁定状态。
- 3.1、以保存状态作为参数调用 release ,如果失败则抛出 IllegalMonitorStateException。
- 4、阻塞,直到发出信号或被中断为止。
- 5、通过调用以保存状态作为参数的 acquire 专用版本来进行重新 acquire 。
- 6、临走前做一次“无效”结点的清理
- 7、如果在步骤4中被阻止而被中断,则抛出 InterruptedException
可能在不同方法之间,有些许差别。比如响应中断,对于 awaitUninterruptibly 是没有的。
1.API层
对于阻塞,其实无非就是对资源、ConditionQueue 出入、SyncQueue 出入的一个编排,代表了对资源的争抢和放弃的流转。
实际流程都是大同小异的,下面就以 await() 举例。
注意,awaitUninterruptibly() 是特殊的,因为不响应中断,所以必然不会因为中断而进入 Sync Queue。后面会看下源码。

然后看看代码,哪些是操作 ConditionQueue、哪些是SyncQueue,剩下的就是线程操作了。
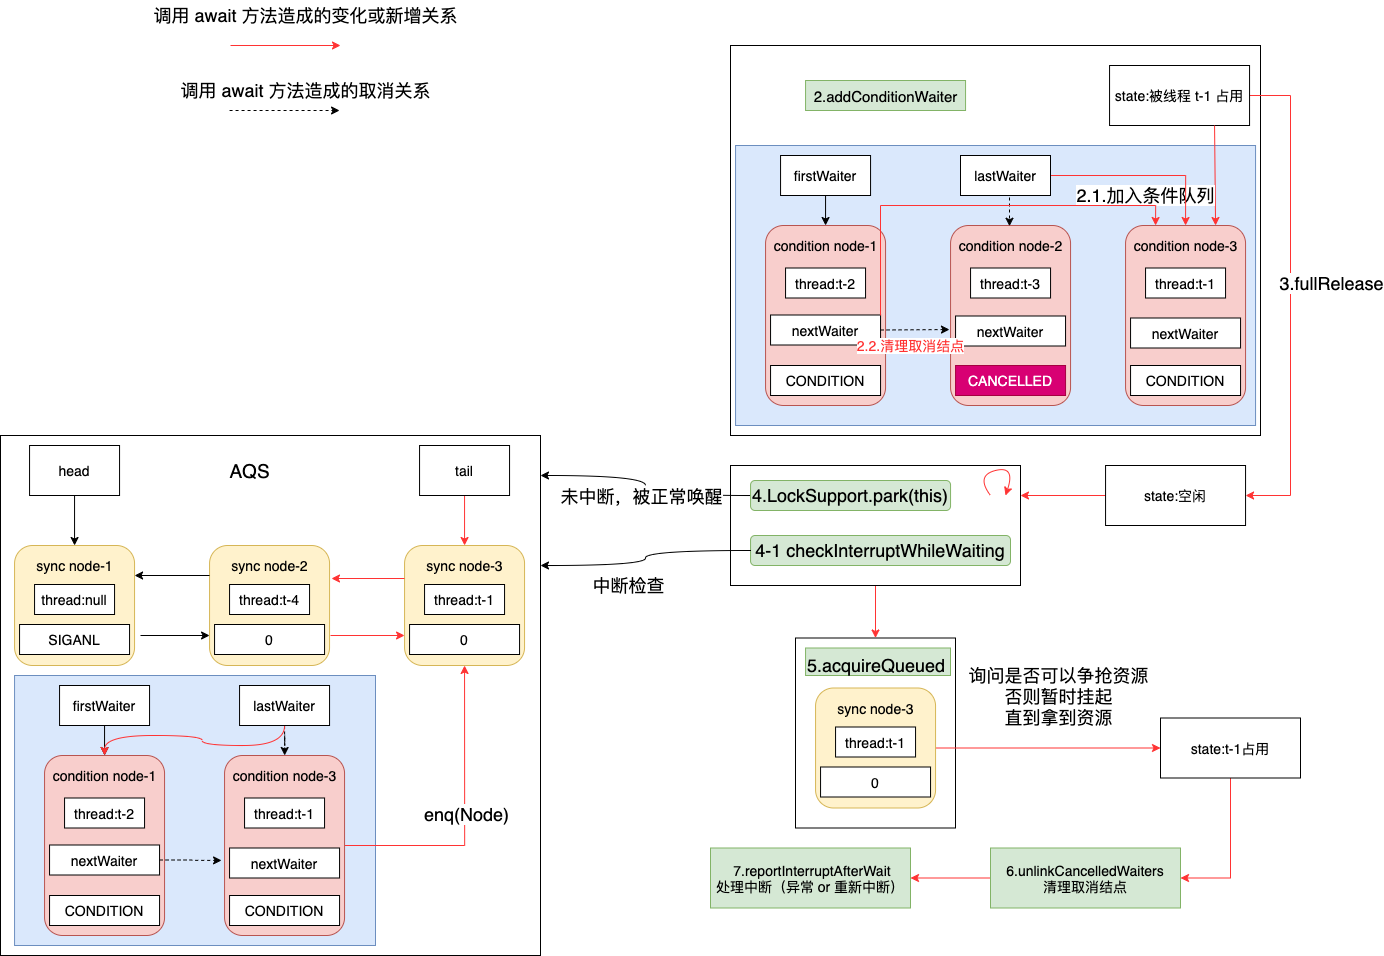
public final void await() throws InterruptedException {


    // 1.首先检查中断
    if (Thread.interrupted())
        throw new InterruptedException();
    // 2.添加到条件队列
    Node node = addConditionWaiter();
    // 3.释放资源, 返回原有锁状态
    int savedState = fullyRelease(node);
    int interruptMode = 0;
    while (!isOnSyncQueue(node)) {


        // 4.如果不在 等待队列 上, 就继续阻塞
        // 因为被唤醒时, 结点会被转移到 等待队列 上
        LockSupport.park(this);
        // 4-1.校验中断:如果是中断了, 会被转到 等待队列 上
        if ((interruptMode = checkInterruptWhileWaiting(node)) != 0)
            break;
    }
    // 5.退出阻塞(中断或者被唤醒), 说明已经在队列, 重新循环获取资源了
    if (acquireQueued(node, savedState) && interruptMode != THROW_IE)
        interruptMode = REINTERRUPT;
    // (因为还在 Lock 代码中, 所以必须拿到锁才能往后执行吧)
    // 6.临走前做一次清理(包括自己),  否则就是等着被人处理
    if (node.nextWaiter != null) // clean up if cancelled
        unlinkCancelledWaiters();
    if (interruptMode != 0)
        // 7.处理中断
        reportInterruptAfterWait(interruptMode);
}

private void reportInterruptAfterWait(int interruptMode) throws InterruptedException {


    if (interruptMode == THROW_IE)
        throw new InterruptedException();
    else if (interruptMode == REINTERRUPT)
        selfInterrupt();
}
看不得不清晰,来个图:
2.ConditionQueue 进出
入队其实很简单,有三个关键的点记住就好:
- 只有独占模式,才有 Condition Queue
- Node 的状态必须是 CONDITION,否则就是无效状态,会被清除
- 会对 lastWaiter 做一次状态检查,来确认是否清理无效结点。
// 每个 await 方法第一步就是调用该方法加入队列
private Node addConditionWaiter() {


    if (!isHeldExclusively())
        // 只有独占模式下,才有 Condition 的作用
        throw new IllegalMonitorStateException();
    Node t = lastWaiter;
    // If lastWaiter is cancelled, clean out.
    // 在 ConditionQueue 中,只要不是 CONDITION 状态, 都看做取消等待了.需要清除出去
    if (t != null && t.waitStatus != Node.CONDITION) {


        // 遍历清除"取消"结点
        unlinkCancelledWaiters();
        t = lastWaiter;
    }

    Node node = new Node(Node.CONDITION);

    if (t == null)
        firstWaiter = node;
    else
        t.nextWaiter = node;
    lastWaiter = node;
    return node;
}
出队,很明确,就是清理 Condition Queue 中状态不是 CONDITION 的结点,但是注意触发的时机其实有两个:
- 结点入队
- 可以认为是出队后,如果有后续等待的结点,则做一次清理。(注意如果没有,那其实自己这个结点,就只能等到下个结点入队被人清理)
// 一般都是在等待期间进行取消
// 1.插入新结点发现 lastWaiter 是取消的
// 2.线程被唤醒时, 如果后面还有等待的结点,就做一次处理
private void unlinkCancelledWaiters() {


    Node t = firstWaiter;
    Node trail = null;
    while (t != null) {


        Node next = t.nextWaiter;
        if (t.waitStatus != Node.CONDITION) {


            t.nextWaiter = null;
            if (trail == null)
                firstWaiter = next;
            else
                trail.nextWaiter = next;
            if (next == null)
                lastWaiter = trail;
        }
        else
            trail = t;
        t = next;
    }
}
3.释放资源
既然已经进入等待队列,那接下来就是释放资源,顺便唤醒后续等待的线程来争夺资源。
final int fullyRelease(Node node) {


    try {


        // 为什么拿到原来的资源状态,并保存下来?
        // 因为针对于可重入锁/或者读写锁来说, 被唤醒时继续执行, 必须拿到原来所有的锁(比如两次重入锁或一个读锁一个写锁), 而不是仅仅一个锁就够了.
        int savedState = getState();
        // 释放所有的锁
        if (release(savedState))
            return savedState;
        throw new IllegalMonitorStateException();
    } catch (Throwable t) {


        node.waitStatus = Node.CANCELLED;
        throw t;
    }
}
Release 则就是 AQS 的方法,可见 AQS-独占释放。
4.从 ConditionQueue 到 SyncQueue
接下来看看 Node 如何在 Condition Queue 到 SyncQueue 的变化。因为,需要明白,其实线程只有三种状态:拿到资源、在 ConditionQueue 等待唤醒、在 SyncQueue 等待资源。
而 在ConditionQueue 等待唤醒,如何在中断或被唤醒时,进入在 SyncQueue 等待资源和拿到资源,就是本小节内容了。
注意:本节只关注线程中断情况下的变化。
int interruptMode = 0;
while (!isOnSyncQueue(node)) {


    // 4.如果不在 等待队列 上, 就继续阻塞
    // 因为被唤醒时, 结点会被转移到 等待队列 上
    LockSupport.park(this);
    // 4-1.校验中断:如果是中断了, 会被转到 等待队列 上
    if ((interruptMode = checkInterruptWhileWaiting(node)) != 0)
        break;
}
// 5.退出阻塞(中断或者被唤醒), 说明已经在队列, 重新循环获取资源了
if (acquireQueued(node, savedState) && interruptMode != THROW_IE)
    interruptMode = REINTERRUPT;
4.1 isOnSyncQueue
如果在 SyncQueue 上,说明被唤醒或中断了,就不再等待。
final boolean isOnSyncQueue(Node node) {


    // 快速判断在不在 SyncQueue 上。
    if (node.waitStatus == Node.CONDITION || node.prev == null)
        return false;
    if (node.next != null) // If has successor, it must be on queue
        return true;
    // 因为设置 prev 和入队(设置 tail) 不是原子性的
    // 存在 prev 不为空,但是由于 CAS 失败还未真正入队的情况。见 enq()
    // 所以从后往前再次确认入队(因为会重试的)
    return findNodeFromTail(node);
}
private boolean findNodeFromTail(Node node) {


    // We check for node first, since it's likely to be at or near tail.
    // tail is known to be non-null, so we could re-order to "save"
    // one null check, but we leave it this way to help the VM.
    for (Node p = tail;;) {


        if (p == node)
            return true;
        if (p == null)
            return false;
        p = p.prev;
    }
}
其实在 AQS 中,经常出现正向查找不到,需要从后往前查找的情况。就是因为设置 prev 和设置 next 的操作不是原子性的,因此来确认状态正确性。
4.2 checkInterruptWhileWaiting
中断检查,跟被唤醒很像的。因为中断是不再等待,在应用代码来看,其实就是抛出了异常。
但是在 ConditionObject 来看,中断其实只是中断检查,抛异常也是框架决定抛出去的。而无论如何都要获取资源才能进行后续操作(毕竟应用代码完全有可能吞掉异常,继续执行。那总不能留一个中断了,没有拿到锁也可以继续执行的 bug 吧)。
反正我一直以为线程中断了,就直接抛异常了。没想到还得拿到锁才能抛异常~。如果别人一直拿着锁,即使这个线程被中断了,也不会抛出异常的,可以看后面示例。
private int checkInterruptWhileWaiting(Node node) {


    return Thread.interrupted() ?
        (transferAfterCancelledWait(node) ? THROW_IE : REINTERRUPT) :
    0;
}

final boolean transferAfterCancelledWait(Node node) {


    // 如果在检查中断之前, 已经被唤醒了, 那状态就是 0了, 这里 CAS 会失败
    if (node.compareAndSetWaitStatus(Node.CONDITION, 0)) {


        enq(node);
        // 要求抛出异常
        return true;
    }
    // 那就等待唤醒流程执行完(也会把下一个等待的结点,放到 SyncQueue 上).
    while (!isOnSyncQueue(node))
        Thread.yield();
    // 要求重新中断
    return false;
}
这个步骤的返回,会决定 reportInterruptAfterWait 的结果,重新中断 or 抛出异常。
而关键在于,当前线程进入 SyncQueue 并尝试获取资源,根本原因是什么。
反正“中断”会被“唤醒”给拦截了,“唤醒”优先级更高了(反之不会,而是被过滤~)。

4.3 acquireQueued
在上篇 AQS-死循环获取资源、排队、阻塞 已经说过这个方法了,就是重新去获取资源(锁)。
关键在于这个过程中,也有可能被中断。而该方法不会检查中断,抛出来上层处理。
之前还在想, 为什么这个方法在 acquire 中会被单独抽出来,是为了在这里复用。
5.awaitUninterruptibly
还记得上面说过,这个方法是特殊的吗?因为不会响应中断,那相应地就不会处理中断,进入 SyncQueue。
那么,进入 SyncQueue 的唯一机会就是被唤醒。
public final void awaitUninterruptibly() {


    Node node = addConditionWaiter();
    int savedState = fullyRelease(node);
    boolean interrupted = false;
    while (!isOnSyncQueue(node)) {


        LockSupport.park(this);
        if (Thread.interrupted())
            interrupted = true;
    }
    if (acquireQueued(node, savedState) || interrupted)
        selfInterrupt();
}
其他几个 await 方法都是大同小异,无非加上了超时处理而已。
以前觉得高大上,现在想想很简单啊,无非就是两个队列进程,CAS,循环获取等。
唤醒(signal)
其实唤醒和中断醒来,区别在于中断是自己处理自己,而唤醒是处理自己后面等待的线程。
而流程都是相似的,设置状态、出 ConditionQueue、进入 SyncQueue、唤醒线程。
private void doSignal(Node first) {


    do {


        if ( (firstWaiter = first.nextWaiter) == null)
            lastWaiter = null;
        first.nextWaiter = null;
    } while (!transferForSignal(first) &&
             (first = firstWaiter) != null);
}

/**
 * Removes and transfers all nodes.
 * @param first (non-null) the first node on condition queue
 */
private void doSignalAll(Node first) {


    lastWaiter = firstWaiter = null;
    do {


        Node next = first.nextWaiter;
        first.nextWaiter = null;
        transferForSignal(first);
        first = next;
    } while (first != null);
}
关键就是 transferForSignal,意在将后继结点放到 SyncQueue 上。然后设置SyncQueue 前驱结点等待唤醒 ,或者直接唤醒。
final boolean transferForSignal(Node node) {


    // 已经被中断处理了
    if (!node.compareAndSetWaitStatus(Node.CONDITION, 0))
        return false;

    Node p = enq(node);
    int ws = p.waitStatus;
    // ws > 0 说明已经取消了, 直接唤醒
    // 要么前面结点的状态刚好在变化, 先直接唤醒. 反正如果失败了, 也会重新阻塞的
    if (ws > 0 || !p.compareAndSetWaitStatus(ws, Node.SIGNAL))
        LockSupport.unpark(node.thread);
    return true;
}
所以,相对于 SyncQueue, ConditionQueue 还是特别简单的,难怪没什么人分析源码。
为什么 await() 会保存 getState() 的状态,并且 fullyRelease 根据 getState() 的值释放资源?
// 3.释放资源, 返回原有锁状态
int savedState = fullyRelease(node);

final int fullyRelease(Node node) {


    .....
    // 为什么拿到原来的资源状态,并保存下来?
    // 因为针对于可重入锁/或者读写锁来说, 被唤醒时继续执行, 必须拿到原来所有的锁(比如两次重入锁或一个读锁一个写锁), 而不是仅仅一个锁就够了.
    int savedState = getState();
    // 释放所有的锁
    if (release(savedState))
        return savedState;
    ......
}
因为子类实现的不同,一个线程在 Condition 上等待时,可能持有不止一个锁。
在 Condition 阻塞时,我们需要释放全部的锁,才能让其他线程拿到锁;
而被唤醒继续执行时,也必须重新拿到全部的锁。
比如可重入锁,线程重入了两次;或者读写锁的情况下,线程即持有读锁,也持有写锁。
所以才叫 fullRelease 。
即使阻塞时被中断了,也没有办法继续执行是为什么?
上文说到了,即使线程在 await 阻塞期间被唤醒,也是要再拿到资源才能继续执行,继而抛出异常或重新中断。
如果哦,一直没有拿到锁,这个线程依旧会被卡死的。看示例:
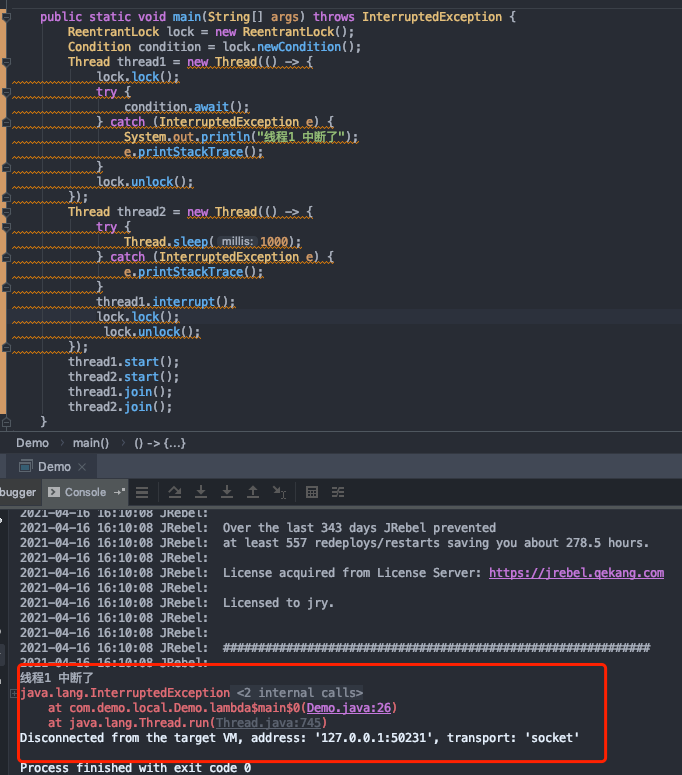
public static void main(String[] args) throws InterruptedException {


    ReentrantLock lock = new ReentrantLock();
    Condition condition = lock.newCondition();
    Thread thread1 = new Thread(() -> {


        lock.lock();
        try {


            condition.await();
        } catch (InterruptedException e) {


            System.out.println("线程1 中断了");
            e.printStackTrace();
        }
        lock.unlock();
    });
    Thread thread2 = new Thread(() -> {


        try {


            Thread.sleep(1000);
        } catch (InterruptedException e) {


            e.printStackTrace();
        }
        thread1.interrupt();
        lock.lock();
        // lock.unlock();
    });
    thread1.start();
    thread2.start();
    thread1.join();
    thread2.join();
}
假定 线程2 不释放锁,那线程 1 自然也拿不到锁。结果就是死锁在这,线程 1 也不会有中断异常日志。
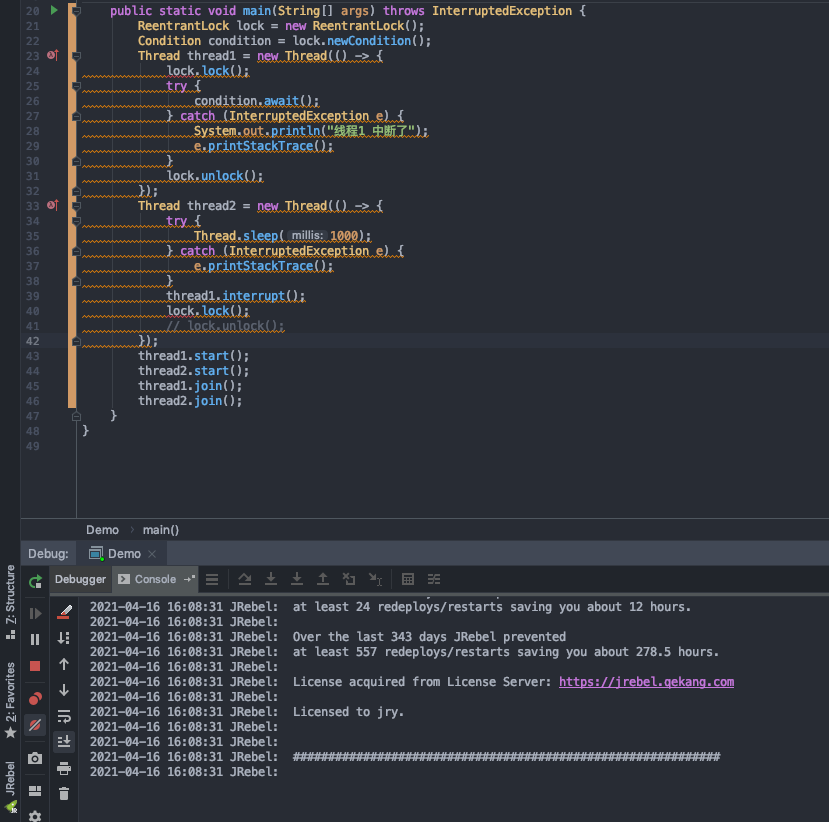
反之,线程 2 释放锁的话,线程 1 才能有我们一般看到的中断表现:
总结
AQS 的源码算是都看完了,后面再看看 AQS 的子类实现。
相对于 SyncQueue,ConditionQueue 就只有 ConditionObject 这个唯一真理,而且简单多了。
毕竟不需要太多结点间的处理,就是转移来转移去,再来个唤醒。