组件的概念
组件时vue的强大的功能之一,它用来扩展HTML元素,封装可重用代码。可以说,组件时自定义HTML标签。组件的本质是可复用的Vue实例,因此它们与new Vue()接收相同的选项,(除了el属性 它是根实例特有的选项)。
组件的注册与使用
在Vue中创建一个新的组件之后,为了能在模板中使用,这些组件必须先进行注册以便Vue能够识别。在Vue中有两种注册类型:全局注册和局部注册。
全局注册
全局注册的组件可以用在其注册之后的任何新创建的Vue实例中
全局组件的注册与使用
1、全局组件的注册方式
- 第一种方式
先使用Vue.extend全局方法构建模板对象,然后通过Vue.component方法来注册组件。因为组件最后会被解析成为自定义的HTML代码,可以直接在HTML中把注册的组件名当作标签来使用。
<!DOCTYPE html>
<html lang="en">

<head>
    <meta charset="UTF-8">
    <meta http-equiv="X-UA-Compatible" content="IE=edge">
    <meta name="viewport" content="width=device-width, initial-scale=1.0">
    <title>Document</title>
    <script src="../js/vue.js"></script>
</head>

<body>
    <div id="app">
        <hello></hello>
    </div>
</body>
<script>
    //创建模板对象,利用Vue的全局方法extend
    var MyComponent = Vue.extend({


        template: `<h3>hello world</h3>`
    })

    //根据模板对象注册组件,利用Vue的comppnent方法
    Vue.component('hello', MyComponent)

    var vm = new Vue({


        el: "#app",
        data: {

    }
    })
</script>

</html>
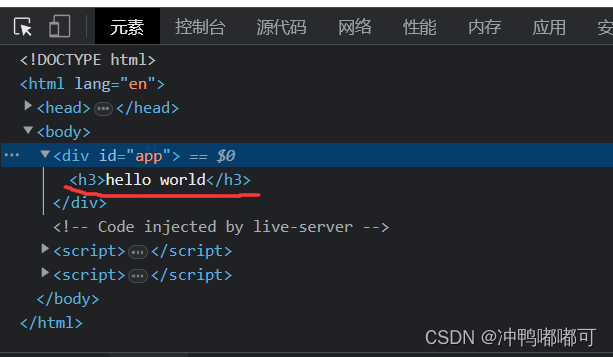
可以看到组件被解析成了HTML元素
- 第二种方式
在Vue.component中以一种类似C#中匿名对象的方式直接注册全局组件
<!DOCTYPE html>
<html lang="en">

<head>
    <meta charset="UTF-8">
    <meta http-equiv="X-UA-Compatible" content="IE=edge">
    <meta name="viewport" content="width=device-width, initial-scale=1.0">
    <title>Document</title>
    <script src="../js/vue.js"></script>
</head>

<body>
    <div id="app">
        <my-hello></my-hello>
        <my-hello2></my-hello2>
    </div>
</body>
<script>

    //根据模板对象注册组件,利用Vue的comppnent方法
    Vue.component('myHello', Vue.extend({


        template: `<h3>hello world</h3>`
    }))

    var vm = new Vue({


        el: "#app",
        data: {

    }
    })
</script>

</html>
Vue.extend可以省略
//这样写更加简略
    Vue.component('myHello', {


        template: `<h3>hello world</h3>`
    })
- 体会全局组件的使用
- 知道了全局注册组件的注册方式之后,下面通过例子来体会全局组件的使用
<!DOCTYPE html>
<html lang="en">

<head>
    <meta charset="UTF-8">
    <meta http-equiv="X-UA-Compatible" content="IE=edge">
    <meta name="viewport" content="width=device-width, initial-scale=1.0">
    <title>Document</title>
    <script src="../js/vue.js"></script>
</head>

<body>
    <div id="app">
        <my-hello></my-hello>
        <my-hello2></my-hello2>
    </div>

    <div id="app2">
        <my-hello></my-hello>
        <my-hello2></my-hello2>
    </div>
</body>
<script>

    //根据模板对象注册组件,利用Vue的comppnent方法
    Vue.component('myHello', {


        template: `<h3>hello world</h3>`
    })

    var vm = new Vue({


        el: "#app",
        data: {

    }
    })

    var vm2 = new Vue({


        el: "#app2",
        data: {

    }
    })
</script>

</html>
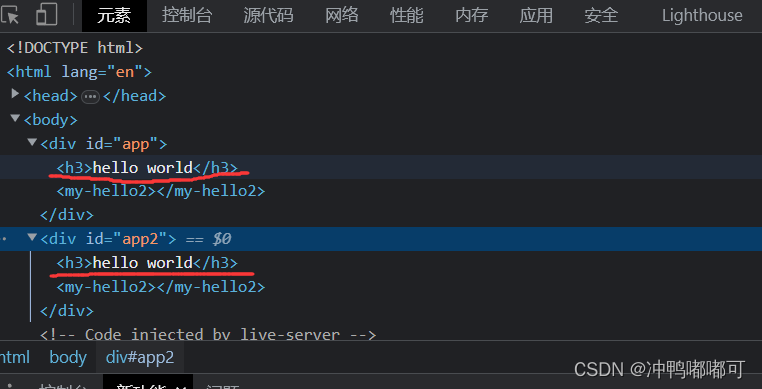
这里创建了两个Vue实例对象 全局注册的组件可以同时作用到两个实例绑定的盒子里
- 用template标签来定义模板
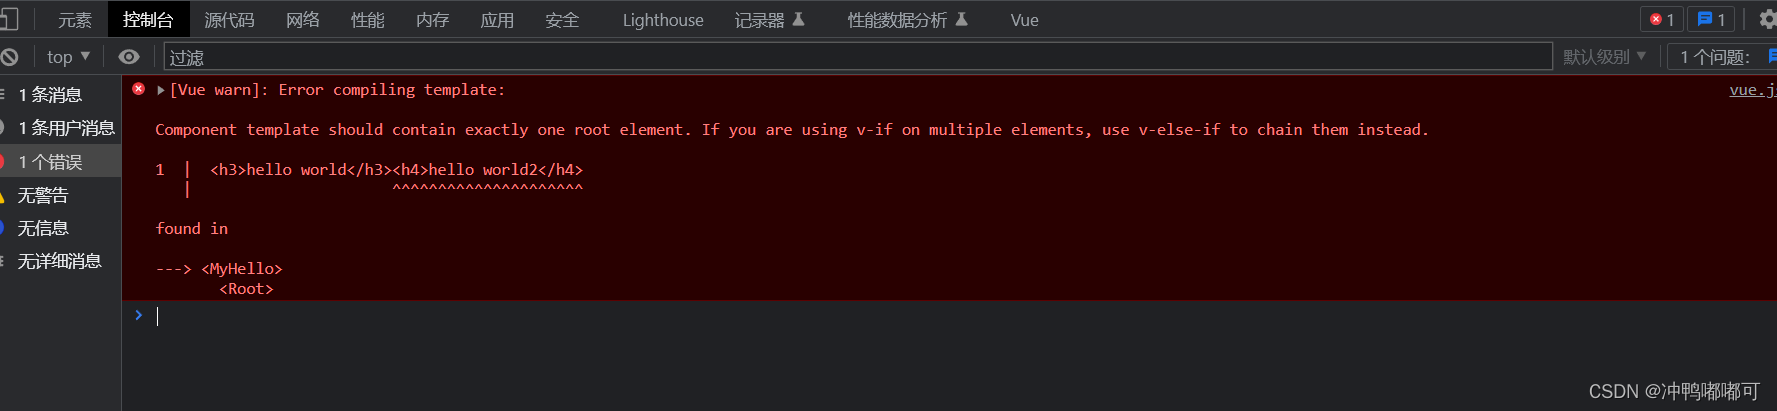
在前面的例子中,只是在template属性中去定义简单的HTML代码,在实际应用中,template属性指向的模板内容可能包含很多元素,而使用Vue.entend 创建的模板必须有且只有一个根元素。因此,当需要创建具有复杂元素的模板时,可以最外层在套一层div
    Vue.component('myHello', {


        template: `<h3>hello world</h3><h4>hello world2</h4>`
    })
就像这样,它会因为缺乏根元素而报错
    Vue.component('myHello', {


        template: `<div><h3>hello world</h3><h4>hello world2</h4></div>`
    })
套层div就可以解决
但是这样子写并不美观也并不方便
为了方便开发,我们使用template标签来在代码部分中定义模板,并为之取一个id,注册组件时通过id来指明模板
<!DOCTYPE html>
<html lang="en">

<head>
    <meta charset="UTF-8">
    <meta http-equiv="X-UA-Compatible" content="IE=edge">
    <meta name="viewport" content="width=device-width, initial-scale=1.0">
    <title>Document</title>
    <script src="../js/vue.js"></script>
</head>

<body>
    <div id="app">
        <my-hello></my-hello>
    </div>
    <template id="tmp1">
        <div>
            <h3>hello world</h3>
            <h4>hello world2</h4>
        </div>
    </template>
</body>

<script>

    //根据模板对象注册组件,利用Vue的comppnent方法
    Vue.component('myHello', {


        template: "#tmp1"
    })

    var vm = new Vue({


        el: "#app",
        data: {

    }
    })

</script>

</html>
- 自定义组件中的data选项
自定义组件时,data选项必须是一个函数,通过函数去返回对象。
<!DOCTYPE html>
<html lang="en">

<head>
    <meta charset="UTF-8">
    <meta http-equiv="X-UA-Compatible" content="IE=edge">
    <meta name="viewport" content="width=device-width, initial-scale=1.0">
    <title>Document</title>
    <script src="../js/vue.js"></script>
</head>

<body>
    <div id="app">
        <my-hello></my-hello>
    </div>
    <template id="tmp1">
        <div>
            <h3>hello world</h3>
            <h4>{

    {

    msg}}</h4>
            <button @click="tanchuang">弹窗</button>
        </div>
    </template>
</body>

<script>

    //根据模板对象注册组件,利用Vue的comppnent方法
    Vue.component('myHello', {


        template: "#tmp1",
        data: () => {

       //此处data必须是个函数,通过函数返回对象
            return {


                msg: "你好!!!"
            }
        },
        methods: {


            tanchuang: function(){


                alert(this.msg)
            }
        }
    })

    var vm = new Vue({


        el: "#app",
        data: {

    }
    })

</script>

</html>
效果如下:
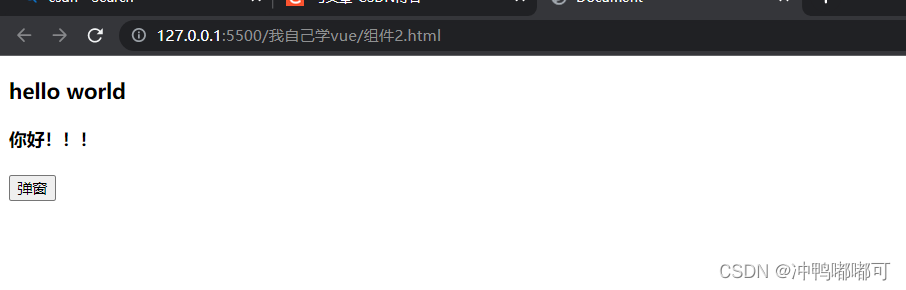
自定义组件就像一个Vue实例一样,不仅有data属性,也可以有methods选项 来定义一个组件内元素的行为方法。
当点击按钮:

局部组件的注册及使用
- 局部组件的基本用法
所谓局部组件,就是只能在某个实例中使用的组件。局部组件是在某个实例中通过components选项来注册的。
<!DOCTYPE html>
<html lang="en">

<head>
    <meta charset="UTF-8">
    <meta http-equiv="X-UA-Compatible" content="IE=edge">
    <meta name="viewport" content="width=device-width, initial-scale=1.0">
    <title>Document</title>
    <script src="../js/vue.js"></script>
</head>

<body>
    <div id="app">
        <my-hello></my-hello>
    </div>
    <template id="tmp1">
        <div>
            <h3>hello world</h3>
            <h4>{

    {

    msg}}</h4>
            <button @click="tanchuang">弹窗</button>
        </div>
    </template>
</body>

<script>

    //根据模板对象注册组件,利用Vue的comppnent方法


    var vm = new Vue({


        el: "#app",
        data: {

    },
        components: {


            myHello: {


                template: "#tmp1",
                data: function () {


                    return {


                        msg: "你好!!!"
                    }
                },
                methods: {


                    tanchuang: function () {


                        alert(this.msg)
                    }
                }
            }
        }
    })

</script>

</html>
注意:使用局部注册的方式来注册组件,只能够在当前实例对象里面作用,别的实例绑定的DOM对象是不能够解析Vue自定义组件的。
- 把组件简化成一个对象的写法:
<!DOCTYPE html>
<html lang="en">

<head>
    <meta charset="UTF-8">
    <meta http-equiv="X-UA-Compatible" content="IE=edge">
    <meta name="viewport" content="width=device-width, initial-scale=1.0">
    <title>Document</title>
    <script src="../js/vue.js"></script>
</head>

<body>
    <div id="app">
        <my-hello></my-hello>
    </div>
    <template id="tmp1">
        <div>
            <h3>hello world</h3>
            <h4>{

    {

    msg}}</h4>
            <button @click="tanchuang">弹窗</button>
        </div>
    </template>
</body>

<script>

    var zujian = {


        myHello: {


            template: "#tmp1",
            data: function () {


                return {


                    msg: "你好!!!"
                }
            },
            methods: {


                tanchuang: function () {


                    alert(this.msg)
                }
            }
        }
    }


    var vm = new Vue({


        el: "#app",
        data: {

    },
        components: zujian  //这里不能用引号引起来
    })

</script>

</html>
动态组件的应用
所谓动态组件,就是多个组件在同一个位置显示,但不是同时显示,比如满足一定条件显示a组件,满足其他条件时显示b组件。也就是说,多个组件使用同一个挂载点,然后动态的在多个组件之间切换,这种效果可以通过v-show来实现,但是比较麻烦,我们一般使用内置的component组件来实现。
内置组件component的应用
需要用到内置的component组件,根据is属性的值来决定哪个组件被渲染。is属性的值是哪个组件名称就显示哪个组件
<component is:"组件名"></component>
<!DOCTYPE html>
<html lang="en">

<head>
    <meta charset="UTF-8">
    <meta http-equiv="X-UA-Compatible" content="IE=edge">
    <meta name="viewport" content="width=device-width, initial-scale=1.0">
    <title>Document</title>
    <script src="../js/vue.js"></script>
</head>

<body>
    <div id="app">
        <button @click="current='my-hello'">显示hello组件</button>
        <button @click="current='my-world'">显示world组件</button>
        <div>
            <!-- <my-hello></my-hello>
            <my-world></my-world> -->
            <component :is="current"></component>
        </div>
    </div>
</body>
<script>
    var vm = new Vue({


        el: "#app",
        data: {


            current: "my-hello"
        },

        //定义局部组件 在某个Vue实例内部定义 通过component属性定义
        components: {


            'my-hello': {


                template: `<h3>我是hello组件</h3>`,
                data() {


                    return {


                        x: Math.random() //产生一个随机数
                    }
                }
            },
            'my-world': {


                template: `<h3>我是world组件</h3>`,
                data() {


                    return {


                        y: Math.random()
                    }
                }
            }
        }
    })
</script>

</html>
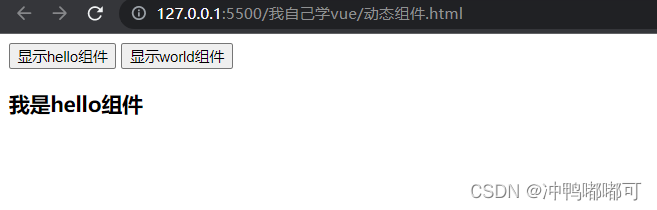
运行效果:
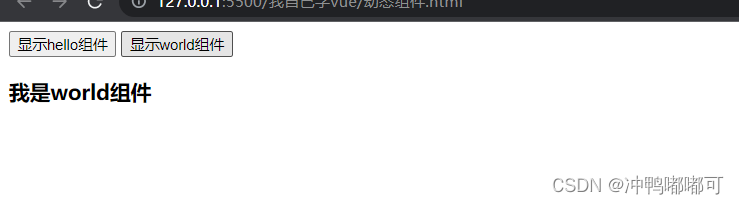
点击第二个按钮:
将两个组件的内容后面加上变量x y
template: `<h3>我是hello组件{

     {x}}</h3>`,
template: `<h3>我是world组件{

     {y}}</h3>`,
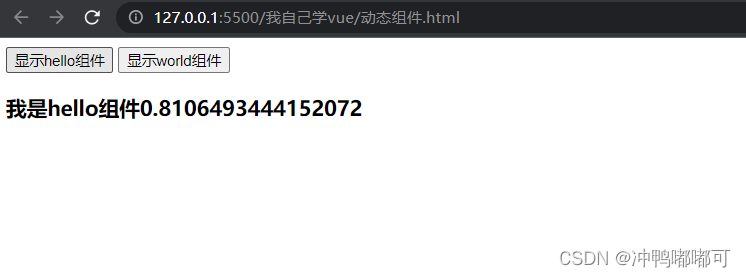
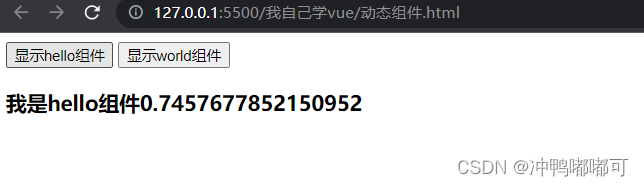
每次从另外一个按钮跳转回来后面的随机数都会改变
这说明每次切换组件时都会销毁非活动组件并重新创建,效率比较低,那么如何缓存非活动组件内容,即保存非活动组件的状态,避免每次切换重新渲染。
我们可以使用内置组件keep-alive
- 内置组件keep-alive的应用
使用keep-alive组件包裹component组件,可以缓存非活动组件内容。
<keep-alive>
     <component :is="current"></component>
</keep-alive>