上一篇文章Vue学习之认识到应用(二)因为字太多页面反应不过来,卡了。重新写了一部分,难受。
目录
14.3.1.在options api中使用mapState
14.5.1.在options api中使用mapGetters
14.7.1.在options api使用mapMutations
14.9.1.在options api使用mapActions
13.Vue-Router前端路由
- 在架构一个网络时,非常重要的两个设备就是路由器和交换机。
- 当然,目前在我们生活中路由器也是越来越被大家所熟知,因为我们生活中都会用到路由器:
- 事实上,路由器主要维护的是一个映射表;
- 映射表会决定数据的流向;
13.1.路由的发展阶段
路由的概念在软件工程中出现,最早是在后端路由中实现的,web的发展主要经历了这样一些阶段:
- 后端路由阶段;
- 前后端分离阶段;
- 单页面富应用(SPA);
13.1.1.后端路由阶段
早期的网站开发整个HTML页面是由服务器来渲染的.
- 服务器直接生产渲染好对应的HTML页面, 返回给客户端进行展示.
- 一个页面有自己对应的网址, 也就是URL;
- URL会发送到服务器, 服务器会通过正则对该URL进行匹配, 并且最后交给一个Controller进行处理;
- Controller进行各种处理, 最终生成HTML或者数据, 返回给前端.
- 当我们页面中需要请求不同的路径内容时, 交给服务器来进行处理, 服务器渲染好整个页面, 并且将页面返回给客户端.
- 这种情况下渲染好的页面, 不需要单独加载任何的js和css, 可以直接交给浏览器展示, 这样也有利于SEO的优化.
- 一种情况是整个页面的模块由后端人员来编写和维护的;
- 另一种情况是前端开发人员如果要开发页面, 需要通过PHP和Java等语言来编写页面代码;
- 而且通常情况下HTML代码和数据以及对应的逻辑会混在一起, 编写和维护都是非常糟糕的事情
13.1.2.前后端分离阶段
前端渲染的理解:
- 每次请求涉及到的静态资源都会从静态资源服务器获取,这些资源包括HTML+CSS+JS,然后在前端对这些请求回来的资源进行渲染;
- 需要注意的是,客户端的每一次请求,都会从静态资源服务器请求文件;
- 同时可以看到,和之前的后端路由不同,这时后端只是负责提供API了;
- 随着Ajax的出现, 有了前后端分离的开发模式;
- 后端只提供API来返回数据,前端通过Ajax获取数据,并且可以通过JavaScript将数据渲染到页面中;
- 这样做最大的优点就是前后端责任的清晰,后端专注于数据上,前端专注于交互和可视化上;
- 并且当移动端(iOS/Android)出现后,后端不需要进行任何处理,依然使用之前的一套API即可;
- 目前比较少的网站采用这种模式开发;
13.1.3. 单页面富应用阶段
其实SPA最主要的特点就是在前后端分离的基础上加了一层前端路由.
也就是前端来维护一套路由规则.
前端路由的核心是什么呢?改变URL,但是页面不进行整体的刷新。
13.2.URL和内容映射
前端路由是如何做到URL和内容进行映射呢?
监听URL的改变。有两种模式来改变url,不刷新页面:
13.2.1. hash
URL的hash也就是锚点(#), 本质上是改变window.location的href属性;
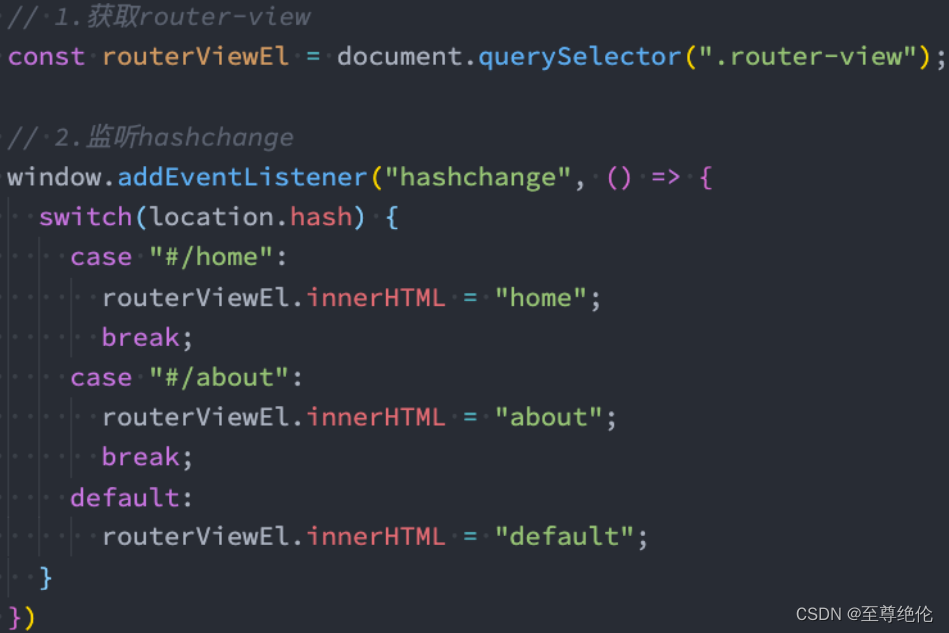
hash的优势就是兼容性更好,在老版IE中都可以运行,但是缺陷是有一个#,显得不像一个真实的路径。
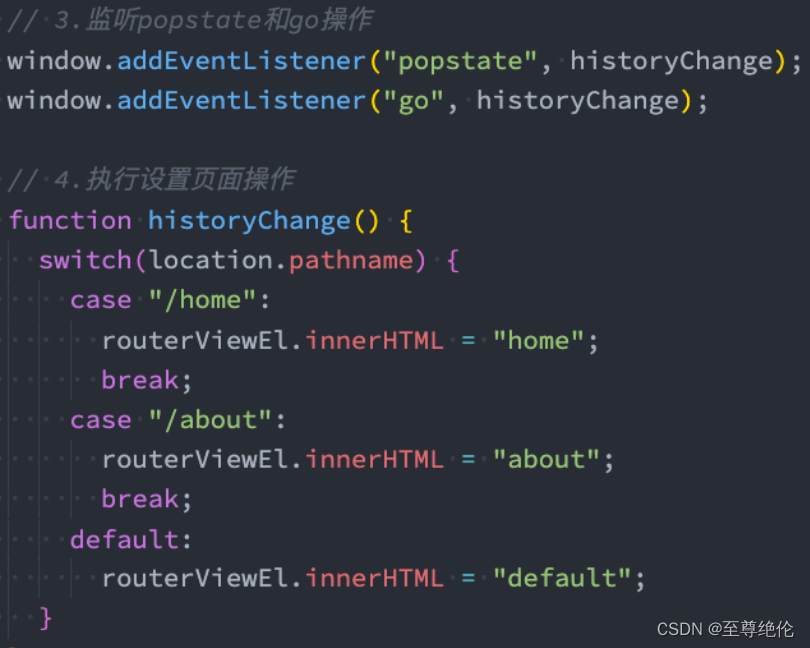
13.2.2.history模式
除了hash模式之外,还可以用history模式实现。
history接口是HTML5新增的, 它有六种模式改变URL而不刷新页面:
- replaceState:替换原来的路径;
- pushState:使用新的路径;
- popState:路径的回退;
- go:向前或向后改变路径;
- forward:向前改变路径;
- back:向后改变路径;

13.3.vue-router的基本使用
目前前端流行的三大框架, 都有自己的路由实现:
- Angular的ngRouter
- React的ReactRouter
- Vue的vue-router
Vue Router是Vue.js的官方路由:它与Vue.js核心深度集成,让用Vue.js构建单页应用(SPA)变得非常容易。
vue-router是基于路由和组件的
- 路由用于设定访问路径, 将路径和组件映射起来;
- 在vue-router的单页面应用中, 页面的路径的改变就是组件的切换;
所以vue-router的作用就是根据编写的映射关系切换组件。
13.3.1.Vue Router的安装
vue-router要安装在项目里面,所以在项目目录里面使用指令。
npm install vue-router
这样就代表安装成功了。
13.3.2.Vue Router的使用
使用vue-router的步骤:
1.创建路由需要映射的组件(打算显示的页面);
2.通过createRouter创建路由对象,并且传入routers和history对象;
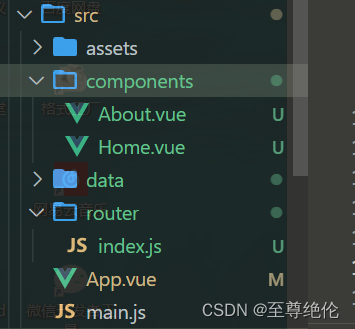
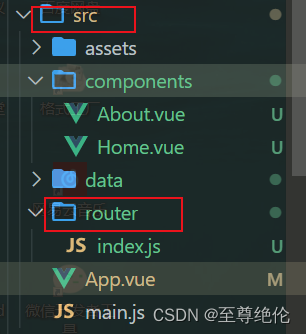
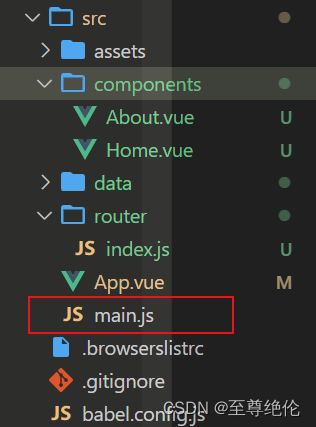
可以在src创建一个router文件夹,创建index.js文件,在index里面编写。
import { createRouter, createWebHashHistory } from 'vue-router'

//导入创建的组件
import Home from '../components/Home.vue'
import About from '../components/About.vue'

//配置路由的映射
const routes = [
  { path: '/home', component: Home },
  { path: '/About', component: About }
]

//创建router对象
const router = createRouter({
  routes,
  history: createWebHashHistory()
})

//将router导出
export default router
3.使用app注册路由对象(use方法);
在main.js导入router,使用use方法使用
import { createApp } from 'vue'
import App from './App.vue'
import router from './router'

const app = createApp(App)
app.use(router)
app.mount('#app')
4.通过<router-link>和<router-view>使用路由
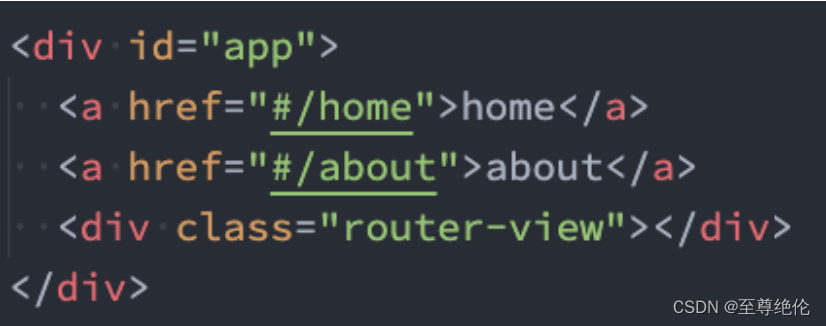
<template>
  <div class="app">
    <p>
      <router-link to="/home">主页</router-link>
      <router-link to="/about">关于</router-link>
    </p>
    <router-view></router-view>
  </div>
</template>
router-link路径切换,to编写要去的路径,router-view显示router-link的内容。
13.3.3.路由的默认路径
怎么让路径默认跳到首页,并且<router-view>渲染首页呢?
- path配置的是根路径: /
- redirect是重定向, 也就是我们将根路径重定向到/home的路径下, 这样就可以得到我们想要的结果了.
const routes = [
  { path:'/', redirect: '/home'},
  { path: '/home', component: Home },
  { path: '/about', component: About }
]
13.3.4.history模式
![]()
前面的hash模式可以看到路径上面有#,有的时候不希望出现这样的符号,可以设置为history模式。
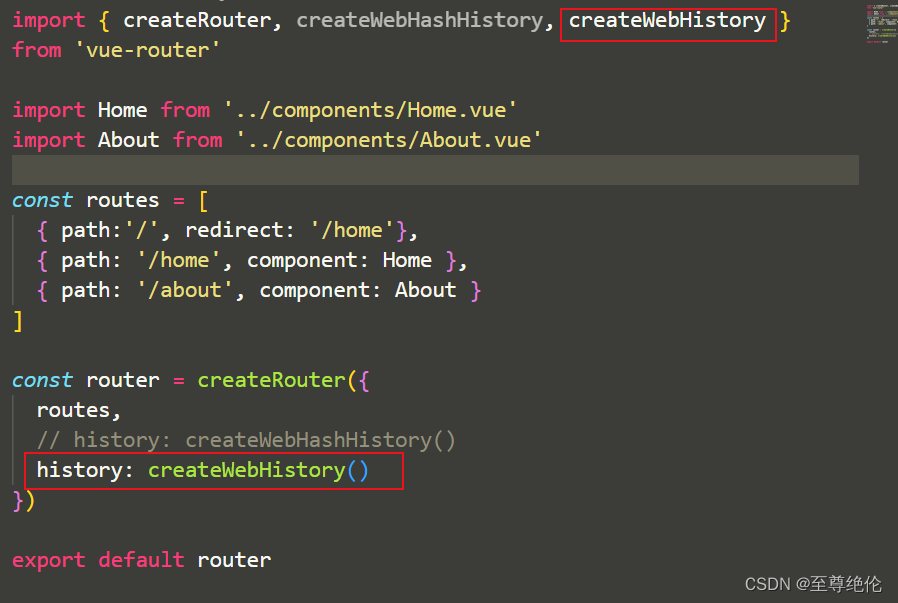
只要从vue-router引入createWebHistory,并且在createRouter函数对象里面的history设置为createWebHistory()即可。
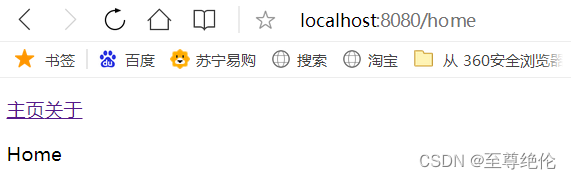
可以看到路径上没有#了。
13.3.5.router-link
router-link也可以设置其他的属性。
to属性:
- 是一个字符串,或者是一个对象;
- 设置 replace 属性的话,当点击时,会调用 router.replace(),而不是 router.push();
使用replace属性, 在点击了有replace属性的路径的时候,新的路径直接替代旧的路径,不能通过返回键回到旧的路径。
- 设置激活a元素后应用的class,默认是router-link-active;
 默认有router-link-active的class名,通过active-class可以设置class名。
<template>
  <div class="app">
    <p>
      <router-link to="/home" active-class="active">主页</router-link>
      <router-link to="/about">关于</router-link>
    </p>
    <router-view></router-view>
  </div>
</template>
把active状态的class名改成active,就可以用css编写样式了。
![]()
- 链接精准激活时,应用于渲染的 <a> 的 class,默认是router-link-exact-active;
和active-class类似的用法。
13.3.6.路由懒加载
当打包构建应用时,JavaScript 包会变得非常大,影响页面加载:
- 如果我们能把不同路由对应的组件分割成不同的代码块,然后当路由被访问的时候才加载对应组件,这样就会更加高效;
- 也可以提高首屏的渲染效率;
在11.5章节中有讲到怎么将代码分包。
Vue Router支持动态导入组件。
- 这是因为component可以传入一个组件,也可以接收一个函数,该函数 需要放回一个Promise;
- 而import函数就是返回一个Promise。
const routes = [
  { path:'/', redirect: '/home'},
  { path: '/home', component: () => import('../components/Home.vue') },
  { path: '/about', component: () => import('../components/About.vue') }
]
在打包后,就会进行分包了。
打包代码 npm run build
13.3.7.路由的其他属性
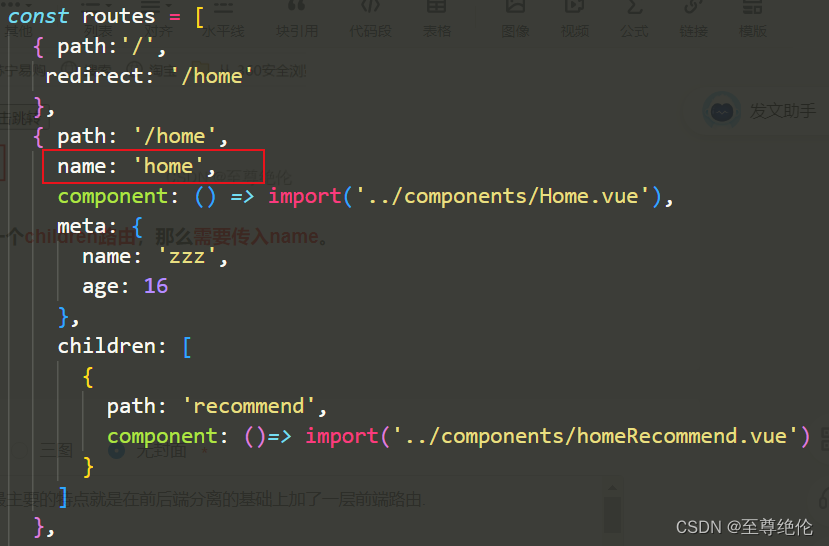
name属性:路由记录独一无二的名称;
const routes = [
  { path:'/',
   redirect: '/home'
  },
  { path: '/home',
    name: 'home',
    component: () => import('../components/Home.vue'),
    meta: {
      name: 'zzz',
      age: 16
    }
  },
  { path: '/about',
    component: () => import('../components/About.vue')
  }
]
13.4.动态路由
很多时候我们需要将给定匹配模式的路由映射到同一个组件:
- 例如,我们可能有一个 User 组件,它应该对所有用户进行渲染,但是用户的ID是不同的;
- 在Vue Router中,我们可以在路径中使用一个动态字段来实现,我们称之为 路径参数;
 {
    path: '/user/:id',
    component: () => import('../components/User.vue')
  }
在router-link中进行如下跳转:

路由后面可以加参数,但是显示的依然是同一个页面。
13.4.1.获取动态路由的值
在User.vue组件中如何获取到对应的值呢?
- 在template中,直接通过$route.params获取值;
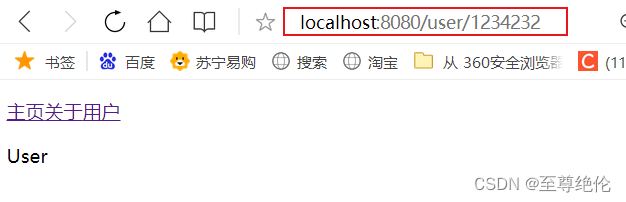
<template>
  <div class="user">
    <h2>user: {

   { $route.params.id }}</h2>
  </div>
</template> 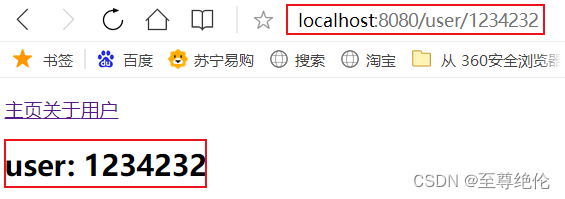
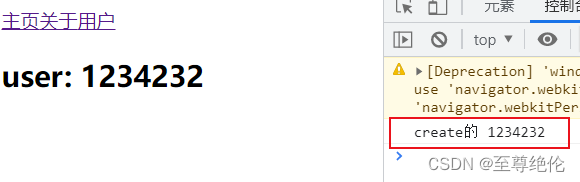
- 在created中,通过this.$route.params获取值;也就是在vue2的options API中这么获取值。
 created() {
    console.log("create的",this.$route.params.id);
  }
- 在setup中,我们要使用vue-router库给我们提供的一个hook userRoute;这是提供给vue3 compositions API的;
- 该Hook会返回一个Router对象,对象中保存着当前路由相关的值。
import { useRoute } from 'vue-router'setup() {
const route = useRoute()
console.log(route);
console.log(route.params.id);
} 
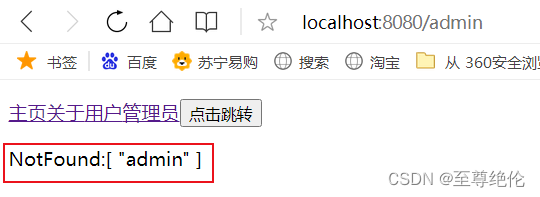
13.5.NotFound
- 比如NotFound的错误页面中,这个时候我们可编写一个动态路由用于匹配所有的页面;
{
path: '/:pathMatch(.*)',
component: () => import('../components/NotFound.vue')
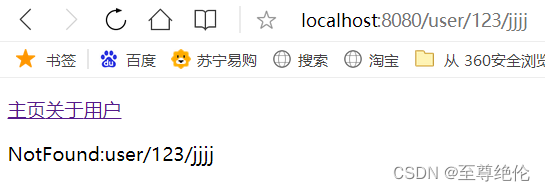
}我们可以通过$route.params.pathMatch获取到传入的参数
<template>
  <div>NotFound:{

   {$route.params.pathMatch}}</div>
</template>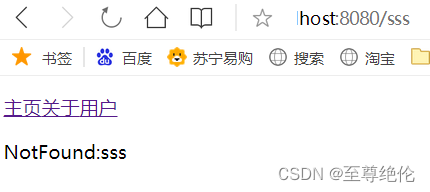
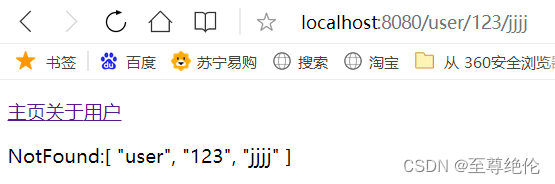
匹配规则加*
也可以在/:pathMatch(.*)后面加一个*;
{
    path: '/:pathMatch(.*)*',
    component: () => import('../components/NotFound.vue')
  }
/:pathMatch(.*)与 /:pathMatch(.*)*的区别在于解析的时候,是否解析/:
/:pathMatch(.*)
/:pathMatch(.*)*
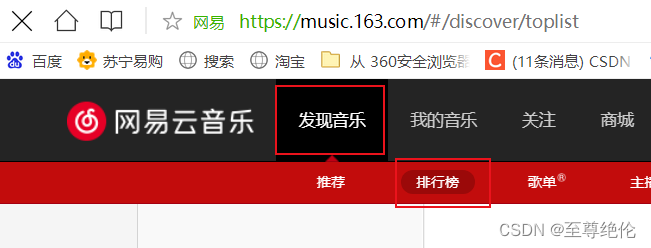
13.6.路由嵌套
什么是路由的嵌套,上面写的Home、About、User等都属于第一层路由,我们在它们之间来回切换。
但是Home页面,也可能会在多个组件之间来回切换:我们可以使用嵌套路由,在Home中也使用router-view来占位之后需要渲染的组件。
比如下面的发现音乐页面还可以切换排行榜。
13.6.1.路由的嵌套配置
想要实现路由嵌套,可以嵌套一个children数组,在里面编写路由信息。
要注意path不需要/
{ path: '/home',
    name: 'home',
    component: () => import('../components/Home.vue'),
    meta: {
      name: 'zzz',
      age: 16
    },
    children: [
      {
        path: 'recommend',
        component: ()=> import('../components/homeRecommend.vue')
      }
    ]
  },
13.7.代码的页面跳转
一些普通元素想要进行页面跳转,不像router-link有to属性,所以我们就需要用代码编写方法来实现页面跳转。
13.7.1.在vue2中实现页面跳转
编写一个触发跳转的元素,给该元素添加上方法。
btnClick() {
    this.$router.push('/about')
}btnClick() {
this.$router.replace('/about')
}也可以传入一个对象。
btnClick() {
    this.$router.push({
        path: '/about'
    })
}
13.7.2.vue2页面跳转的query参数
使用对象写法可以传入更多的参数,可以传入query。
btnClick() {
    this.$router.push({
        path: '/about',
        query: { name: 'zzz',  age: 14 }
    })
}
在界面中可以通过$route.query来获取参数。
<h2>query{

   { $rooute.query.name }}</h2>
13.7.3.vue3中实现页面跳转
在vue3中需要将useRouter函数导入,使用router
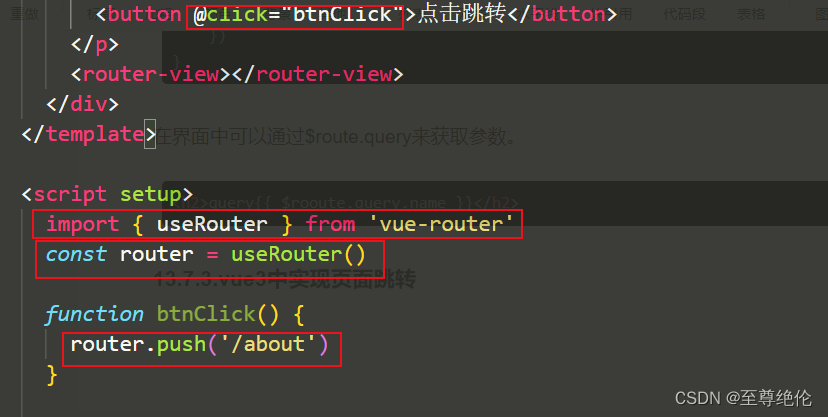
对象参数和query参数与上面的vue2的类似。
13.7.4.页面的前进后退
router的go方法:
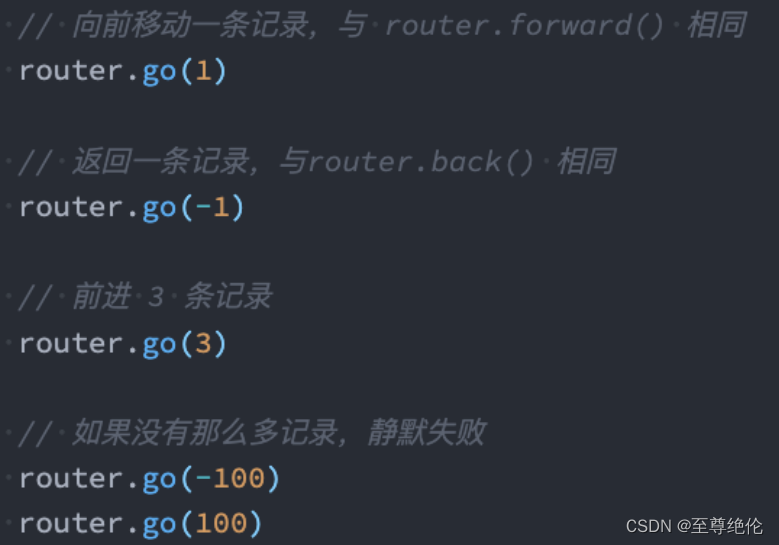
router也有back:
- 通过调用 history.back() 回溯历史。相当于 router.go(-1);
- 通过调用 history.forward() 在历史中前进。相当于 router.go(1)
13.8.动态添加路由
- 比如根据用户不同的权限,注册不同的路由;
- 这个时候我们可以使用一个方法 addRoute;
const adminRoute = {
  path:'/admin',
  component: () => import('../components/admin.vue')
}
router.addRoute(adminRoute)
也可以判断是否拥有权限来动态添加路由。
let isAdmin = false
if(isAdmin){
  const adminRoute = {
    path:'/admin',
    component: () => import('../components/admin.vue')
  }
  router.addRoute(adminRoute)
}
上面的isAdmin的false值可以动态改变,当isAdmin为false的时候,就不添加admin这个路由。
如果想要为route添加一个children路由,那么需要传入name。
给home添加children路由,在addRoute前面的参数添加name。
const adminRoute = {
    path:'/admin',
    component: () => import('../components/admin.vue')
  }
  router.addRoute('home', adminRoute)
13.8.1.动态管理路由
三种删除路由的方式:
1.添加name相同的路由;如果name相同,就会删除之前已经添加的路由,因为它们名字必须是唯一的。
router.addRoute({path:'/about', name:'about', components: About})2.通过removeRoute方法,传入路由名称;
router.removeRoute('about')3.通过addRoute方法的返回值回调;
const removeRoute = router.addRoute(routeRecord)
removeRoute()
除了删除路由,还有其他的方法。
- router.hasRoute():检查路由是否存在。
- router.getRoutes():获取一个包含所有路由记录的数组。
13.9.路由导航守卫
比如要完成一个功能:只有在登录了之后才可以查看用户的订单,就可以用路由导航守卫在要跳转的两个页面中间拦截判断逻辑。
vue-router 提供的导航守卫主要用来通过跳转或取消的方式守卫导航。
全局的前置守卫beforeEach是在导航触发时会被回调的:
- to:即将进入的路由Route对象;
- from:即将离开的路由Route对象;
router.beforeEach((to, from) => {
  console.log(to);
  console.log(from);
  return false
})- 在Vue2中我们是通过next函数来决定如何进行跳转的;
- 但是在Vue3中我们是通过返回值来控制的,不再推荐使用next函数,这是因为开发中很容易调用多次next;
13.9.1.用户登录守卫案例
我们想完成一个需求:点击进入到订单页面,判断用户是否登录。
一般我们在完成登录的时候,服务器会传递一个token保存到localStorage来表示登录成功。
//route.js
router.beforeEach((to, from) => {
  console.log(to);
  console.log(from);
  const token = localStorage.getItem("token")
  if(!token && to.path === "/order"){
    return "/login"
  }
})
Vue-Router还提供了很多的其他守卫函数,目的都是在某一个时刻给予我们回调,让我们可以更好的控制程序的流程或者功能:
14. Vuex状态管理
在开发中,我们的应用程序需要处理各种各样的数据,这些数据需要保存在我们应用程序中的某一个位置,对于这些数据的管理我们就称之为是状态管理。
在Vue开发中,我们使用组件化的开发方式。
- 而在组件中我们定义data或者在setup中返回使用的数据,这些数据我们称之为state;
- 在模块template中我们可以使用这些数据,模块最终会被渲染成 DOM,我们称之为View;
- 在模块中我们会产生一些行为事件,处理这些行为事件时,有可能会修改state,这些行为事件我们称之为actions;

在开发的过程中就是在这三者之间不断循环。
之前不是学过父子组件和非父子组件之间的数据传递吗?这个不能实现状态管理吗?
- 对于一些简单的状态,确实可以通过props的传递或者Provide的方式来共享状态;
- 但是对于复杂的状态管理来说,显然单纯通过传递和共享的方式是不足以解决问题的,比如兄弟组件如何共享数据呢?
管理不断变化的state本身是非常困难的:
- 状态之间相互会存在依赖,一个状态的变化会引起另一个状态的变化,View页面也有可能会引起状态的变化;
- 当应用程序复杂时,state在什么时候,因为什么原因而发生了变化,发生了怎么样的变化,会变得非常难以控制和追踪;
因此,我们是否可以考虑将组件的内部状态抽离出来,以一个全局单例的方式来管理呢?
- 在这种模式下,我们的组件树构成了一个巨大的 “视图View”;
- 不管在树的哪个位置,任何组件都能获取状态或者触发行为;
- 通过定义和隔离状态管理中的各个概念,并通过强制性的规则来维护视图和状态间的独立性,我们的代码边会变得更加结构化和易于维护、跟踪;
- 这就是vuex的基本思想。
14.1. Vuex和全局对象的区别
第一:Vuex的状态存储是响应式的
- 当Vue组件从store中读取状态的时候,若store中的状态发生变化,那么相应的组件也会被更新;
- 改变store中的状态的唯一途径就显示提交 (commit) mutation;
- 这样使得我们可以方便的跟踪每一个状态的变化,从而让我们能够通过一些工具帮助我们更好的管理应用的状态;
14.2.Vuex的基本使用
如果在创建项目的过程中有选择安装vuex就不用再安装了,如果没有选择就需要安装一下。
我们要使用vuex,第一步就是安装。
14.2.1.vuex的安装
npm install vuex
14.2.2. 创建store
- store本质上是一个容器,它包含着你的应用中大部分的状态(state);

开发的时候一般在src文件中创建store文件夹用来储存状态。
//store index.js
import { createStore } from 'vuex'

const store = createStore({
  state: () => ({
    counter: 0
  })
})

export default store
//main.js
import { createApp } from 'vue'
import App from './App.vue'
import store from './store'
createApp(App).use(store).mount('#app')把store的index.js文件导出就能在main.js使用了,use(store)。
在store中定义了一个counter, 怎么在组件中使用?
14.2.3.组件中使用state
1.在组件template中使用state
<template>
  <div class="app">
    <h2>app计数: {

   {$store.state.counter}}</h2>
  </div>
</template>
这样就可以拿到store的counter了。

2.在vue3的setup中使用state
我们来实现点击按钮将counter增加的需求。
<template>
  <div class="app">
    <h2>app计数: {

   {$store.state.counter}}</h2>
    <button @click="increment">+</button>
  </div>
</template>

<script setup>
import { useStore } from 'vuex'
const store = useStore()

function increment() {
  store.commit("increment")
}

</script>
//store index.js
import { createStore } from 'vuex'
const store = createStore({
state: () => ({
counter: 0
}),
mutations: {
increment(state) {
state.counter++
}
}
})
因为不能直接改变store的状态,所以我们需要显示提交mutations。在本案例中的store.commit("increment")需要与mutations的increment相对应,increment传入state就可以使用state修改counter的内容了。
3. 在vue2的options api中使用state
<template>
  <div class="app">
    <h2>app计数: {

   {$store.state.counter}}</h2>
    <h2>app options api计数: {

   { storeCounter }}</h2>
  </div>
</template>

<script>
export default {
  computed: {
    storeCounter(){
      return this.$store.state.counter
    }
  }
}
</script>可以在computed里面使用this.$store.state.来获取store里面的数据。

14.2.4.单一状态树
Vuex 使用单一状态树:
- 用一个对象就包含了全部的应用层级的状态;
- 采用的是SSOT,Single Source of Truth,也可以翻译成单一数据源;
- 单状态树和模块化并不冲突,后面我们会讲到module的概念;
- 如果你的状态信息是保存到多个Store对象中的,那么之后的管理和维护等等都会变得特别困难;
- 所以Vuex也使用了单一状态树来管理应用层级的全部状态;
- 单一状态树能够让我们最直接的方式找到某个状态的片段;
- 而且在之后的维护和调试过程中,也可以非常方便的管理和维护;
14.3.mapState的使用
前面学习了怎么在组件中获取状态,但是只是拿一个状态;
如果我们有很多状态要获取的话,就可以使用mapState的函数。下面state里面有三个变量。
import { createStore } from 'vuex'

const store = createStore({
  state: () => ({
    counter: 0,
    name: "zzz",
    level: 100
  }),
  mutations: {
    increment(state) {
      state.counter++
    }
  }
})

export default store
14.3.1.在options api中使用mapState
可以使用展开运算符和原来有的computed混合在一起;
- mapState的方式一:数组类型;
-
<template>
  <div class="app">
    <h2>name:{

     { name }}</h2>
    <h2>counter:{

     { counter }}</h2>
    <h2>level:{

     { level }}</h2>
  </div>
</template>

<script>
import { mapState } from 'vuex'
export default {
  computed: {
    ...mapState(["name", "counter", "level"])
  }
}
</script>
- mapState的方式二:对象类型;

有的时候data会和state里面的变量相同,mapState里面的名又需要和state里面的相同,使用对象类型就可以给变量重命名了。
...mapState({
      sName: state => state.name,
      sLevel: state => state.level,
      sCounter: state => state.counter,
    })
这样就可以使用sName、sLevel、sCounter了。
14.3.2. 在setup中使用mapState
在setup中如果我们获取单个状态是非常简单的:
- 通过useStore拿到store后去获取某个状态即可;
- 但是如果我们需要使用 mapState 的功能呢?
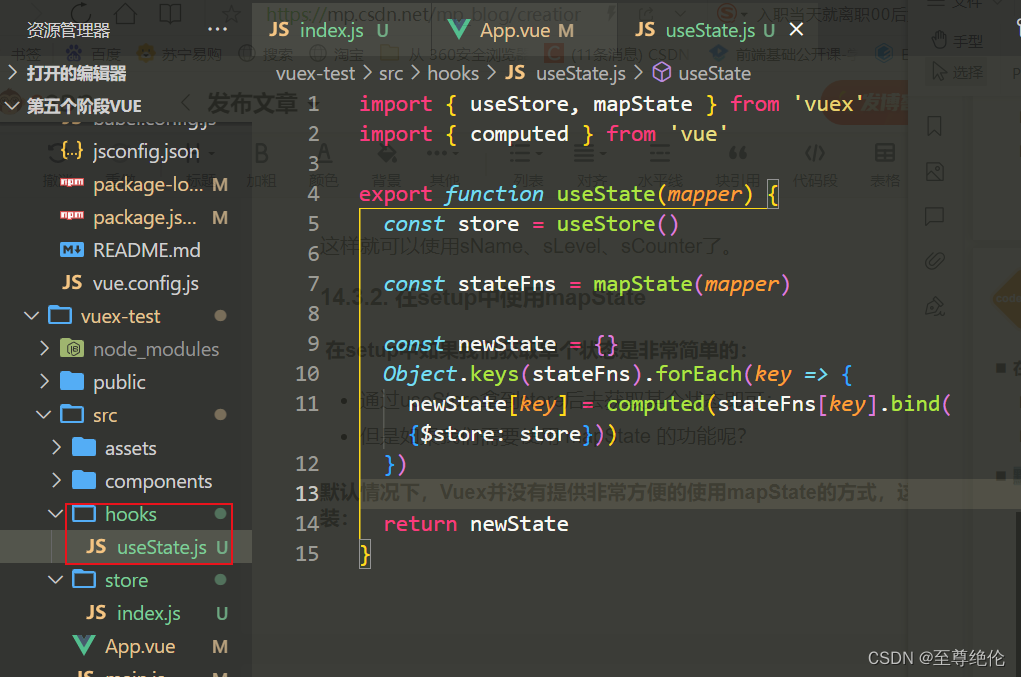
import { useStore, mapState } from 'vuex'
import { computed } from 'vue'

export function useState(mapper) {
  const store = useStore()

  const stateFns = mapState(mapper)

  const newState = {}
  Object.keys(stateFns).forEach(key => {
    newState[key] = computed(stateFns[key].bind({$store: store}))
  })

  return newState
}
<script setup>
import useState from "./hooks/useState"
const { name, level } = useState(["name", "level"])
</script>这样太麻烦了,开发的时候可以直接对store.state进行解构。
import {toRefs} from 'vue'
import { useStore } from 'vuex'

const store = useStore()
const {name, level} = toRefs(store.state)
如果怕命名有冲突还可以起别名。
const { name: cName, level: cLevel } = toRefs(store.state)14.4.getters的使用
getters是将数据处理,有点类似于computed。某些属性可能需要经过变化后来使用,这个时候可以使用getters。
const store = createStore({
  state: () => ({
    counter: 10,
  }),

  getters: {
    doubleCounter(state) {
      return state.counter * 2
    }
  }
<template>
<div class="app">
<h2>doubleCounter:{
{ $store.getters.doubleCounter }}</h2>
</div>
</template>可以用$store.getters.doubleCounter来拿到getters里面的处理过后的数据。

14.4.1.getters的第二个参数
getters也可以传入第二个参数getters,在本案例中是使用了getters里面的bookName。
本案例是创建了一个books数组,在getters的bookName传入state中的name,而getters的totalPrice使用reduce高阶函数将price相加,并且返回bookName。
const store = createStore({
  state: () => ({
    name: "zzz",
    books: [
      { id:11, name:"book1", price:20 },
      { id:22, name:"book2", price:25 },
      { id:33, name:"book3", price:26 },
    ]
  }),
  getters: {
    bookName(state) {
      return state.name
    },
    totalPrice(state, getters) {
      let price = state.books.reduce((preValue, item) => {
        return preValue + item.price
      },0)
      return price + "," + getters.bookName
    }
  }
})
<h2>totalPrice:{
{ $store.getters.totalPrice }}</h2>![]()
14.4.2.getters的返回函数(了解)
getters中的函数本身、可以返回一个函数、在使用的时候相当于可以调用这个函数。
totalPriceFunction(state) {
      return function(price){
        let totalPrice = state.books.reduce((preValue, item)=> {
          if(price > 15){
               return preValue + item.price
            }
        }, 0)
        return totalPrice
      }
    }
也可以使用箭头函数。
totalPriceFunction(state) {
      return (price) => {
        let totalPrice = state.books.reduce((preValue, item)=> {
          if(price > 15){
               return preValue + item.price
            }
        }, 0)
        return totalPrice
      }
    }
在使用的时候可以传入参数。
<h2>totalPriceFunction:{

   { $store.getters.totalPriceFunction(11) }}</h2>
14.5.mapGetters的使用
我们也可以使用mapGetters的辅助函数,当一次想要使用很多个getters的时候。
14.5.1.在options api中使用mapGetters
可以使用展开运算符和原来有的computed混合在一起;
mapGetters方式一:数组类型
<script>
import { mapGetters } from 'vuex'
export default {
  computed: {
    ...mapGetters(["bookName", "totalPrice"])
  }
}
</script>
使用mapGetters辅助函数就可以在template中插值语法使用了
<h2>bookName:{

   { bookName }}</h2>
<h2>totalPrice:{

{ totalPrice }}</h2> 
mapGetters方式二:对象类型
...mapGetters({
      sBookName: getters => getters.bookName,
      sTotalPrice: getters => getters.totalPrice,
    })
14.5.2.在setup中使用mapGetters
如果想要自己封装一个像在options api里面的mapGetters函数太麻烦了,不如直接解构,再用toRefs包裹实现响应式。
<script setup>
import { toRefs } from 'vue'
import { useStore } from 'vuex'

const store = useStore()

const { bookName, totalPrice } = toRefs(store.getters)

</script>
14.6.Mutations的使用
更改vuex的store中的状态唯一方法是提交mutation。虽然直接用state修改也是修改,但是不符合规范,不符合单项数据流的标准。为了vuex对数据更改进行跟踪。
<template>
  <div class="app">
    <h2>counter: {

   {$store.state.counter}}</h2>
    <button @click="increment">+</button>
    <button @click="decrement">-</button>
  </div>
</template>

<script>
export default {
  methods: {
    increment() {
      this.$store.commit("increment")
    },
    decrement() {
      this.$store.commit("decrement")
    }
  }
}
</script>
需要将更改数据的操作使用this.$store.commit发射出去,在mutations可以对数据进行处理。
const store = createStore({
  state: () => ({
    counter: 10
  }),
  mutations: {
    increment(state) {
      state.counter++
    },
    decrement(state) {
      state.counter--
    }
  }
})
14.6.1.Mutations携带参数
很多时候我们在提交mutation的时候,会携带一些数据,这个时候我们可以使用参数。
mutations: {
    increment(state, payload) {
      state.counter++
      console.log(payload);
    }
  },
methods: {
increment() {
this.$store.commit("increment","参数")
}
}
payload可以为对象类型,我们也可以传入对象。
methods: {
    increment() {
      this.$store.commit("increment",{ counter:10, name:"name" })
    }
  }
mutations: {
increment(state, payload) {
state.counter += payload.counter
}
},对象风格的提交方式。
this.$store.commit({
    type: "addNumber",
    counter: 100
})
14.7.mapMutations的使用
如果方法很多,可以用mapMutations辅助函数来拿多个。
14.7.1.在options api使用mapMutations
mapMutations数组类型
<script>
import { mapMutations } from 'vuex'
export default {
  methods: {
    ...mapMutations(["mutation1", "mutation2"])
  }
}
</script>
14.7.2.mutations重要原则
- 这是因为devtool工具会记录mutation的日记;
- 每一条mutation被记录,devtools都需要捕捉到前一状态和后一状态的快照;
- 但是在mutation中执行异步操作,就无法追踪到数据的变化;
想做异步操作可以使用actions。
14.8.actions的使用
Action类似于mutation,不同在于:
- Action提交的是mutation,而不是直接变更状态;
- Action可以包含任意异步操作;
这里有一个非常重要的参数context:
- context是一个和store实例均有相同方法和属性的context对象;
- 所以我们可以从其中获取到commit方法来提交一个mutation,或者通过 context.state 和 context.getters 来获取 state 和 getters;
actions: {
    increment(context) {
      context.commit("increment")
    }
  }
14.8.1.actions的分发操作
如何使用action?可以进行action的分发:分发使用的是store的dispatch函数。
<template>
  <div class="app">
    <h2>counter: {

   {$store.state.counter}}</h2>
    <button @click="actionClick">actions</button>
  </div>
</template>

<script>
export default {
  methods: {
    actionClick() {
      this.$store.dispatch("increment")
    }
  }
}
</script>
在actions里面需要再提交一次mutation,才能修改state里面的值。
14.8.2.actions携带参数
和mutation相同,action也可以传递参数。
btnClick() {
    this.$store.dispatch("increment", {count: 100})
}
也可以以对象的形式进行分发。
btnClick() {
    this.$store.dispatch({
    type: "increment",
    count: 100
    })
}
14.9.mapActions的使用
action也有对应的辅助函数。一次想要取多个action的时候可以使用。
14.9.1.在options api使用mapActions
mapActions方式一:数组类型
<script>
import { mapActions } from 'vuex'
export default {
  methods: {
    ...mapActions(["action1", "action2"])
  }
}
</script>
mapActions方式二:对象类型
...mapActions(
    {
     add: "increment",
     sub: "decrement"
    }
)
14.9.2.在setup使用mapActions
<script setup>
import { useStore, mapActions } from 'vuex'

const store = useStore()

const actions = mapActions(["increment", "decrement"])
const newActions = {}
Object.keys(actions).forEach(key => {
  newActions[key] = actions[key].bind({ $store: store })
})
const { increment, decrement } = newActions

</script>
14.10.module的使用
由于使用单一状态树,应用的所有状态会集中到一个比较大的对象,当应用变得非常复杂时,store 对象就有可能变得相当臃肿;
- 为了解决以上问题,Vuex 允许我们将 store 分割成模块(module);
- 每个模块拥有自己的 state、mutation、action、getter、甚至是嵌套子模块;
const store = createStore({
    modules: {
      a: moduleA,
      b: moduleB
    }
})
const moduleA = {
state: ()=> ({
}),
getters: {},
mutations: {},
actions: {}
}
const moduleB = {
state: ()=> ({
}),
getters: {},
mutations: {},
actions: {}
}<h2>{
{ $store.state.moduleA.xx }}</h2>如果需要拿state里面的内容,需要多加一个模板名。
<h2>{

   { $store.getters.xx }}</h2>
想拿getters里面的内容,是不需要模块名的。 但是可能会冲突,14.10.2.module的命名空间有讲到。
14.10.1. module的局部状态
对于模块内部的 mutation 和 getter,接收的第一个参数是模块的局部状态对象:
mutations: {
    changeName(state) {
        state.name = "zzz"
    }
},
getters: {
    info(state, getters ,rootState) {
        return state.name
    }
}
14.10.2.module的命名空间
默认情况下,模块内部的action和mutation仍然是注册在全局的命名空间中的:
- 这样使得多个模块能够对同一个 action 或 mutation 作出响应;
- Getter 同样也默认注册在全局命名空间;
- 当模块被注册后,它的所有 getter、action 及 mutation 都会自动根据模块注册的路径调整命名;
const moduleA = {
    namespaced: true,
    state: ()=> ({
    }),
    getters: {},
    mutations: {},
    actions: {}
}
添加了namespaced:true之后,要使用getters就需要这样来做。
<h2>{

   { $store.getters["模块名/模块getter"] }}</h2>
提交mutation时,默认也是不跟模块名称的,加了namespaced:true之后,也要加上模块名。
store.commit("模块名/模块mutation")提交action也一样。
14.10.3.module修改或派发根组件
如果想要在模块里面修改根组件的state内容,可以这么做。
changeAction({commit, dispatch, state, rootState, getters, rootGetters}){
    commit("changeName", null, {root: true})
    dispatch("changeRootAction", null, {root: true})
}
null是传递的参数,{root: true}代表传递给根组件。
15.Pinia状态管理
Pinia开始于大概2019年,最初是作为一个实验为Vue重新设计状态管理,让它用起来像组合式API(Composition API)。

在前面学习vuex的时候发现在setup使用辅助函数很不好用,所以给vue3设计一个更符合composition 的状态管理库,Pinia。
15.1.Pinia和Vuex的区别
那么我们不是已经有Vuex了吗?为什么还要用Pinia呢?
- Pinia 最初是为了探索 Vuex 的下一次迭代会是什么样子,结合了 Vuex 5 核心团队讨论中的许多想法;
- 最终,团队意识到Pinia已经实现了Vuex5中大部分内容,所以最终决定用Pinia来替代Vuex;
- 与 Vuex 相比,Pinia 提供了一个更简单的 API,具有更少的仪式,提供了 Composition-API 风格的 API;
- 最重要的是,在与 TypeScript 一起使用时具有可靠的类型推断支持;
和Vuex相比,Pinia有很多的优势:

15.2.Pinia的使用
在使用Pinia之前需要先安装。
npm install pinia
创建一个stores文件夹来放pinia

// stores index.js
import { createPinia } from 'pinia'

const pinia = createPinia()

export default pinia
在main.js中引用。
import { createApp } from 'vue'
import App from './App.vue'
import pinia from '../stores'

createApp(App).use(pinia).mount('#app')
15.3.认识Store
一个 Store (如 Pinia)是一个实体,它会持有为绑定到你组件树的状态和业务逻辑,也就是保存了全局的状态;
它有点像始终存在,并且每个人都可以读取和写入的组件;
- state、getters、actions;
- 等同于组件的data、computed、methods;
- 一旦 store 被实例化,你就可以直接在 store 上访问 state、getters 和 actions 中定义的任何属性;
15.3.1.定义Store
Store是使用defineStore()定义的,它需要有一个唯一名称,作为第一个参数传递。
在stores的index.js创建完之后,不用将内容写在这个文件里面,可以在其他文件编写。

import { defineStore } from 'pinia'

const useCounter = defineStore("counter", {
  state: ()=> ({
    count: 90
  })
})

export default useCounterdefineStore里面的第一个参数,这个 name,也称为 id,是必要的,Pinia 使用它来将 store 连接到 devtools。
15.3.2.Store的使用
Store在它被使用之前是不会创建的,我们可以通过调用use函数来使用Store:
<template>
  <div class="app">
    <h2>counter: {

   { counterStore.count }} </h2>
  </div>
</template>

<script setup>
  import useCounter from '../stores/counter'
  const counterStore = useCounter()

</script>
在template里面使用,都不需要使用$store.state拿count。

注意Store获取到后不能被解构,那么会失去响应式:
const { count } = counterStore //不是响应式的
const { count: count1 } = toRefs(counterStore) //响应式的
const { count: count2 } = storeToRefs(counterStore) //响应式的
15.4.State的使用
state是Pinia的核心部分,在 Pinia 中,状态被定义为返回初始状态的函数;
const useCounter = defineStore("counter", {
  state: ()=> ({
    count: 90,
    name: "zzz",
    age: 16
  })
})
15.4.1.读取和写入state
默认情况下,可以通过store实例访问状态来直接读取和写入状态;在vuex中是不能直接写入状态的,而是要通过mutation。
<script setup>
  import useCounter from '../stores/counter'
  const counterStore = useCounter()
  counterStore.count++
  counterStore.name = "aaa"
</script>
15.4.2.重置state
可以通过调用store上的$reset()方法将状态重置到其初始值。
const counterStore = useCounter()
counterStore.$reset()
15.4.3.改变state
除了直接用store.count++修改store,还可以调用$patch方法;
允许使用部分state对象同时应用多个更改。
const counterStore = useCounter()
counterStore.$patch({
    count: 100,
    name: "ccc"
})
15.4.4.替换state
可以通过将其 $state 属性设置为新对象来替换 Store 的整个状态:
const counterStore = useCounter()
counterStore.$state = {
    count: 100,
    name: "ccc"
}
15.5.Getters的使用
Getters相当于Store的计算属性:
- 它们可以用 defineStore() 中的 getters 属性定义;
- getters中可以定义接受一个state作为参数的函数;
import { defineStore } from 'pinia'

const useCounter = defineStore("counter", {
  state: ()=> ({
    count: 90,
    name: "zzz",
    age: 16
  }),
  getters: {
    doubleCount(state){
      return state.count * 2
    }
  }
})

export default useCounter
15.5.1. 访问当前store的getters
访问当前store的getters和使用state用法一致。
<template>
  <div class="app">
    <h2>counter: {

   { counterStore.count }} </h2>
    <h2>doubleCount: {

   { counterStore.doubleCount }} </h2>
  </div>
</template>

<script setup>
  import useCounter from '../stores/counter'
  const counterStore = useCounter()
  console.log(counterStore.doubleCount);
</script>
15.5.2.getters访问其他getters
我们可以通过this来访问到当前store实例的所有其他属性;
getters: {
    doubleCount(state){
      return state.count * 2
    },
    doublePlusOne(state) {
      return this.doubleCount + 1
    }
  }
15.5.3.访问其他store的getters
getters: {
    message: function(state) {
        const userStore = useUser()
        return userStore.name
    }
}
15.5.4.getters返回函数
getters返回函数就可以在使用的时候写入参数了。
import { defineStore } from 'pinia'

const useCounter = defineStore("counter", {
  state: ()=> ({
    users:[
      {id: 111, name: "zzz", age: 18},
      {id: 222, name: "xxx", age: 24},
      {id: 333, name: "ccc", age: 28},
    ]
  }),
  getters: {
    getUserById(state) {
      return userId => {
        return state.users.find(item => item.id === userId)
      }
    }
  }
})

export default useCounter
<template>
<div class="app">
<h2>User: {
{ getUserById(111) }} </h2>
</div>
</template>
<script setup>
import useCounter from '../stores/counter'
const counterStore = useCounter()
const getUserById = counterStore.getUserById
</script> 
15.6.Actions的使用
Actions相当于组件中的methods。可以使用this.变量来修改变量的值。
和getters一样,在action中可以通过this访问整个store实例的所有操作。
actions: {
    increment() {
      this.count ++
    }
  }
<template>
<div class="app">
<h2>counter: {
{ counterStore.count }} </h2>
<button @click="changeCount">+</button>
</div>
</template>
<script setup>
import useCounter from '../stores/counter'
const counterStore = useCounter()
function changeCount() {
counterStore.increment()
}
</script>counterStore.actions方法名()就可以使用actions里面的方法了,非常方便。
15.6.1.Actions执行异步操作
Actions中是支持异步操作的,我们可以编写异步函数,在函数中使用await。
actions: {
    async fetchAction() {
      const res = await fetch("http://xxx.xxx.xx.xx/xxx")
      const data = await res.json()
      return data
    }
  }
<script setup>
import useCounter from '../stores/counter'
const counterStore = useCounter()
counterStore.fetchAction().then(res => {
console.log(res)
})
</script>16.网络请求库 - axios
在以前vue是有维护过一个网络请求库的,但在2016年11月份后推荐使用axios了。
axios有很多功能特点。
- 在浏览器中发送 XMLHttpRequests 请求
- 在 node.js 中发送 http请求
- 支持 Promise API
- 拦截请求和响应
- 转换请求和响应数据
16.1. axios请求方式
import axios from 'axios'支持多种请求方式:
- axios(config)
- axios.request(config)
- axios.get(url[, config])
-
//axios.get("http://xxx.xx.xx.xx:8080/home?id=111") axios.get("http://xxx.xx.xx.xx:8080/home",{ params: { id:111 } }).then(res => { console.log("res", res.data) }) - axios.delete(url[, config])
- axios.head(url[, config])
- axios.post(url[, data[, config]])
-
axios.post("http://xxx.xx.xx.xx:8080/home", { //如果有参数可以放到这里 name: 1111, password: 200 }).then(res => { console.log("res": res.data) }) //也可以这样写 axios.post("http://xxx.xx.xx.xx:8080/home", { //如果有参数可以放到这里 data:{ name: 1111, password: 200 } }).then(res => { console.log("res": res.data) }) - axios.put(url[, data[, config]])
- axios.patch(url[, data[, config]])
有时候, 我们可能需求同时发送两个请求
- 使用axios.all, 可以放入多个请求的数组,只有等两个请求都有结果的时候才返回;
- axios.all([]) 返回的结果是一个数组,使用 axios.spread 可将数组 [res1,res2] 展开为 res1, res2
16.2.常见的配置选项
- 请求地址 url: '/user',
- 请求类型 method: 'get',
- 请求根路径 baseURL: 'http://www.xxx.com/api',
-
const baseURL = "http://xxx.xx.xx.xx/8080" axios.defaults.baseURL = baseURL axios.get("/home/aa").then(res => { console.log("res": res.data) }) - 请求前的数据处理 transformRequest:[function(data){}],
- 请求后的数据处理 transformResponse: [function(data){}],
- 自定义的请求头 headers:{'x-Requested-With':'XMLHttpRequest'},
- URL查询对象 params:{ id: 12 },
- 查询对象序列化函数 paramsSerializer: function(params){ }
- request body data: { key: 'aa'},
- 超时设置 timeout: 1000.
16.3. axios的创建实例
为什么要创建axios的实例呢?
当我们从axios模块中导入对象时, 使用的实例是默认的实例; 当给该实例设置一些默认配置时, 这些配置就被固定下来了. 但是后续开发中, 某些配置可能会不太一样;
- 比如某些请求需要使用特定的baseURL或者timeout等.
- 这个时候, 我们就可以创建新的实例, 并且传入属于该实例的配置信息.
在开发中可能会有多个实例。
const instance1 = axios.create({
  baseURL: "http://xxx.xx.xx.xx:8080",
  timeout: 8000,
  headers:{}
})

instance1.get("/home",{
  params:{
    id: 100
  }
}).then(res=> {
  console.log(res.data);
})
16.4.请求和响应拦截器
axios可以设置拦截器:拦截每次请求和响应
拦截请求
axios.interceptors.request.use((config)=> {
  console.log("请求拦截成功");
  //开始loading的动画
  //对原来的配置进行修改 1.header 2.认证登录 token/cookie 3.请求参数进行某些转化
  return config
}, err =>{
  console.log("请求拦截失败")
  return err
})
拦截结果
axios.interceptors.response.use((res)=> {
  console.log("响应拦截成功");
  //结束loading的动画
  //对数据进行转化
  return res.data
}, err =>{
  console.log("响应拦截失败")
  return err
})
res.data可以拿到data结果。
16.5.axios请求库封装

import axios from "axios";
class MyRequest {
  constructor(baseURL, timeout = 10000) {
    this.instance = axios.create({
      baseURL,
      timeout
    })
  }
  request(config) {
    return new Promise ((resolve, reject)=> {
      this.instance.request(config).then(res => {
        resolve(res.data)
      }).catch(err => {
        reject(err)
      })
    })
  }
  get(config) {
    return this.request({ ...config, method: "get"})
  }
  post(config) {
    return this.request({ ...config, method: "post"})
  }
}

const myRequest1 = new MyRequest("http://xxx.xx.xx.xx:8080")
const myRequest2 = new MyRequest("http://xxx.xx.xx.xx:8888")
//也可以把myRequest1导出
export default new MyRequest("http://xxx.xx.xx.xx:8080")