目录
1.6.5、命令行管理(rabbitmq安装目录的sbin目录下)
4.1.2、原生提供RabbitTemplate,方便收发消息。
4.1.3、原生提供RabbitAdmin,方便队列、交换机声明。
4.1.4、Spring Boot Config 原生支持RabbitMQ。
4.3.4、RabbitTemplate实现发送端确认、消息返回
4.3.5、SimpleMessageListenerContainer接收消息
4.3.6、利用MessageListenerAdapter自定义消息监听
4.3.7、利用MessageConverter高效处理消息
4.3.8、利用RabbitListener快速实现消息处理器
一、RabbitMQ简介
1.1、RabbitMQ主流的原因
RabbitMQ是由erlang语言开发,基于AMQP(Advanced Message Queue 高级消息队列协议)协议实现的消息队列,它是一种应用程序之间的通信方法,消息队列在分布式系统开发中应用非常广泛。
1.2、RabbitMQ特点
RabbitMQ是使用Erlang语言开发的开源消息队列系统,基于AMQP协议来实现。AMQP的主要特征是面向消息、队列、路由(包括点对点和发布/订阅)、可靠性、安全。AMQP协议更多用在企业系统内,对数据一致性、稳定性和可靠性要求很高的场景,对性能和吞吐量的要求还在其次。RabbitMQ的可靠性是非常好的,数据能够保证百分之百的不丢失。可以使用镜像队列,它的稳定性非常好。所以说在我们互联网的金融行业。对数据的稳定性和可靠性要求都非常高的情况下,我们都会选择RabbitMQ。当然没有kafka性能好,但是要比AvtiveMQ性能要好很多。也可以自己做一些性能的优化。
RabbitMQ可以构建异地双活架构,包括每一个节点存储方式可以采用磁盘或者内存的方式。
1.3、常见MQ对比
1.3.1、ActiveMQ
它的单机吞吐量是万级,一些小的项目已经够用了,但对于高并发的互联网项目完全不够看。在高可用上,使用的主从架构的实现。在消息可靠性上,有较低的概率会丢失数据。社区活跃度低,迭代慢。
1.3.2、RabbitMQ
它的单机吞吐量也是万级,对于需要支持特别高的并发的情况,它是无法担当重任的。在高可用上,它使用的是镜像集群模式,可以保证高可用。在消息可靠性上,它是可以保证数据不丢失的,这也是它的一大优点。同时它也支持一些消息中间件的高级功能,如:消息重试、死信队列等。社区活跃度高,应用广泛。
1.3.3、RocketMQ
教程地址:Rocket详细教程_爱学习的zhangzhang的博客-CSDN博客_rocket使用
它是阿里开源的消息中间件,久经沙场,非常靠谱。它支持高吞吐量,能达到10万级,能承受互联网项目高并发的挑战。在高可用上,它使用的是分布式架构,可以搭建大规模集群,性能很高。在消息可靠性上,通过配置,可以保证数据的绝对不丢失。同时它支持大量的高级功能,如:延迟消息、事务消息、消息回溯、死信队列等等。它非常适合应用于java系统架构中,因为它使用java语言开发的,我们可以去阅读源码了解更深的底层原理。目前来看,它没有什么特别的缺点,可以支持高并发下的技术挑战,可以基于它实现分布式事务,大型互联网公司和中小型公司都可以选择使用它来作为消息中间件使用,如果我来做技术选型,我首选的中间件就是它。社区活跃度高,更新快。
1.3.4、Kafka
kafka的吞吐量被公认为中间件中的翘楚,单机可以支持十几万的并发,相当强悍。在高可用上同样支持分布式集群部署。在消息可靠性上,如果保证异步的性能,可能会出现消息丢失的情况,因为它保存消息时是先存到磁盘缓冲区的,如果机器出现故障,缓冲区的数据是可能丢失的。它的功能非常的单一,就是消息的接收与发送,因此不适合应用于许多场景。它在行业内主要应用于大数据领域,使用它进行用户行为日志的采集和计算,来实现比如“猜你喜欢”的功能。所以,如果没有大数据的需求,一般不会选择它。
1.4、AMQP协议
1.4.1、AMQP协议介绍
AMQP,即Advanced Message Queuing Protocol,一个提供统一消息服务的应用层标准高级消息队列协议,是应用层协议的一个开放标准,为面向消息的中间件设计。基于此协议的客户端与消息中间件可传递消息,并不受客户端/中间件不同产品,不同的开发语言等条件的限制。Erlang中的实现有RabbitMQ
1.4.2、AMQP协议图解
Broker: 接受和分发消息的应用,RabbitMQ就是MessageBroker。
Virtual Host:虚拟Broker,将多个单元隔离开。
Connection:publisher/consumer和broker之间的TCP连接。
Channel:connection内部建立的逻辑连接,通常每个线程创建单独的channel。
RoutingKey:路由键,用来指示消息的路由转发,相当于快递的地址。
Exchange:交换机,相当于快递的分拨中心。
Queue:消息队列,消息最终被送到这里等待consumer取走。
Binding:exchange和queue之间的虚拟连接,用于message的分发依据。
1.4.3、AMQP协议的核心概念- Exchange
在AMQP协议或者是RabbitMQ实现中,最核心的组件是Exchange,Exchange承担RabbitMQ的核心功能-路由转发,Exchange有多个种类,配置多变。
1.5、Exchange详细解析
1.5.1、Exchange的作用
- Exchange是AMQP协议和RabbitMQ的核心组件。
- Exchange的功能是根据绑定关系和路由键为消息提供路由,将消息转发至相应的队列 。
- Exchange有四种类型:Direct/Topic/Fanout/Headers,其中Headers使用很少,以前三种为主。
1.5.2、Exchange四种类型详解
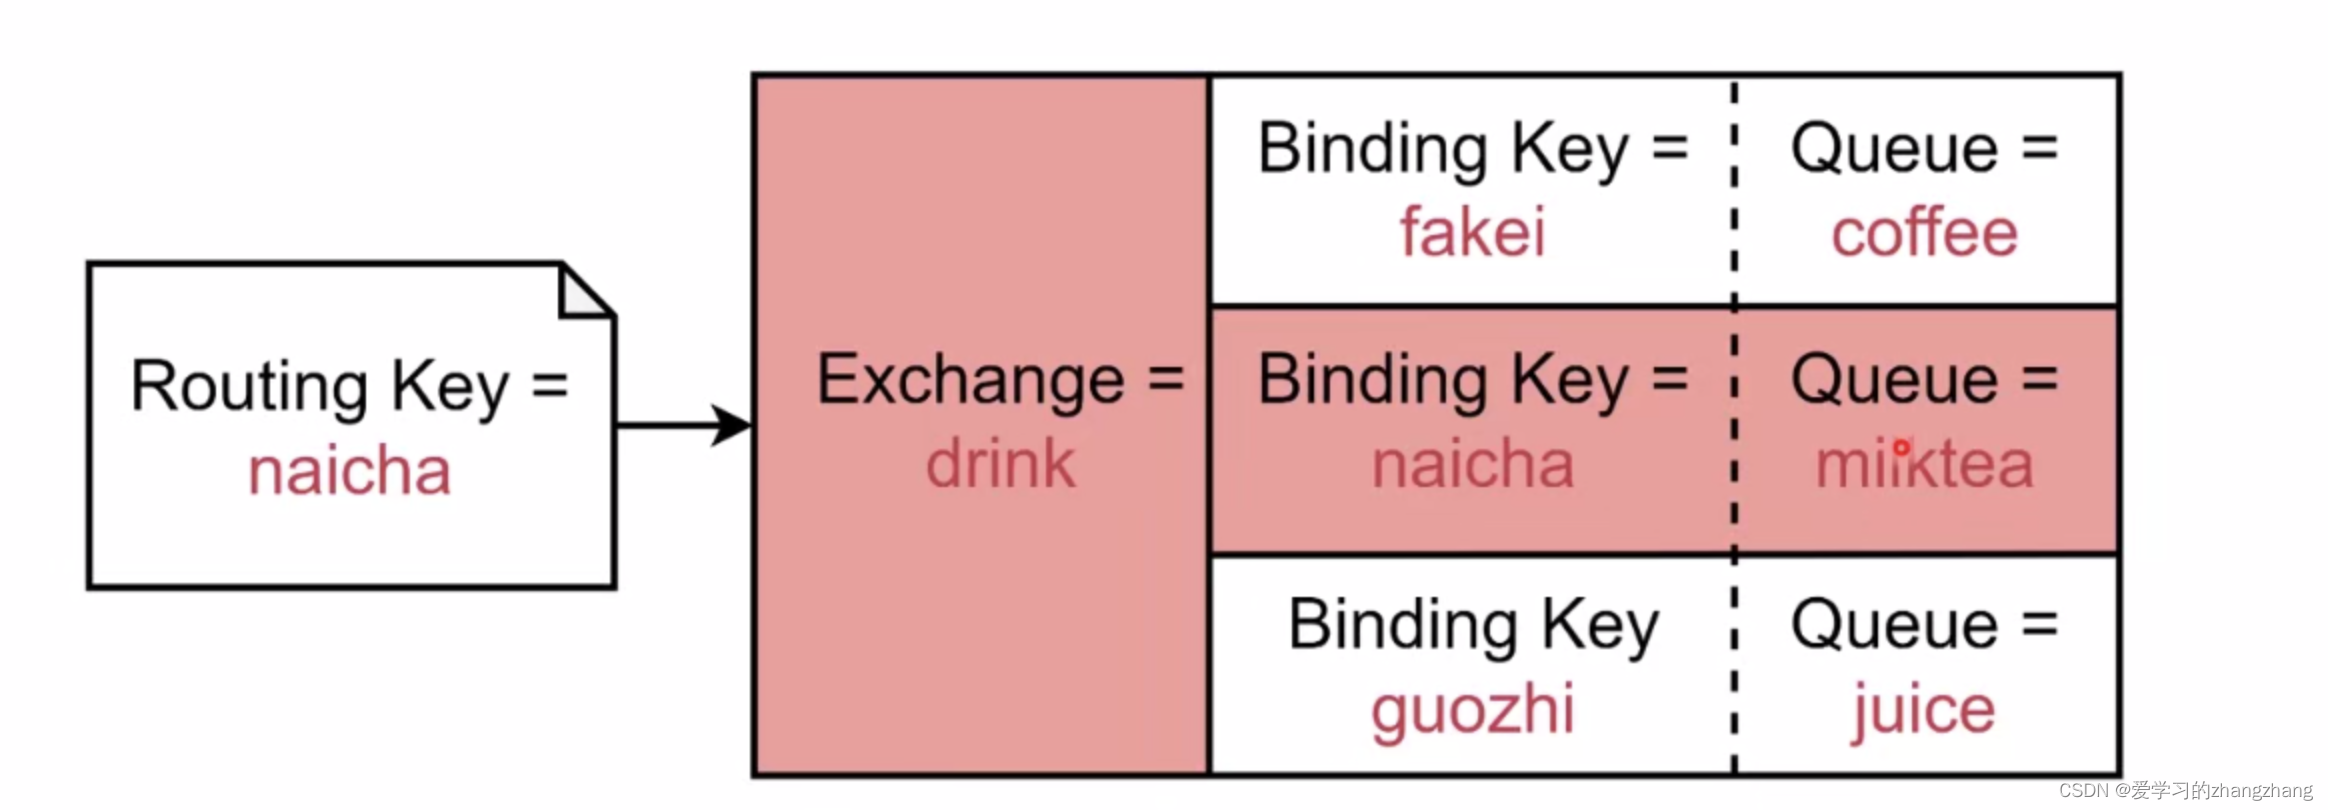
Direct Exchange:Message中的Routing Key如果和Binding Key一致,Direct Exchange则将message发到对应的queue中。

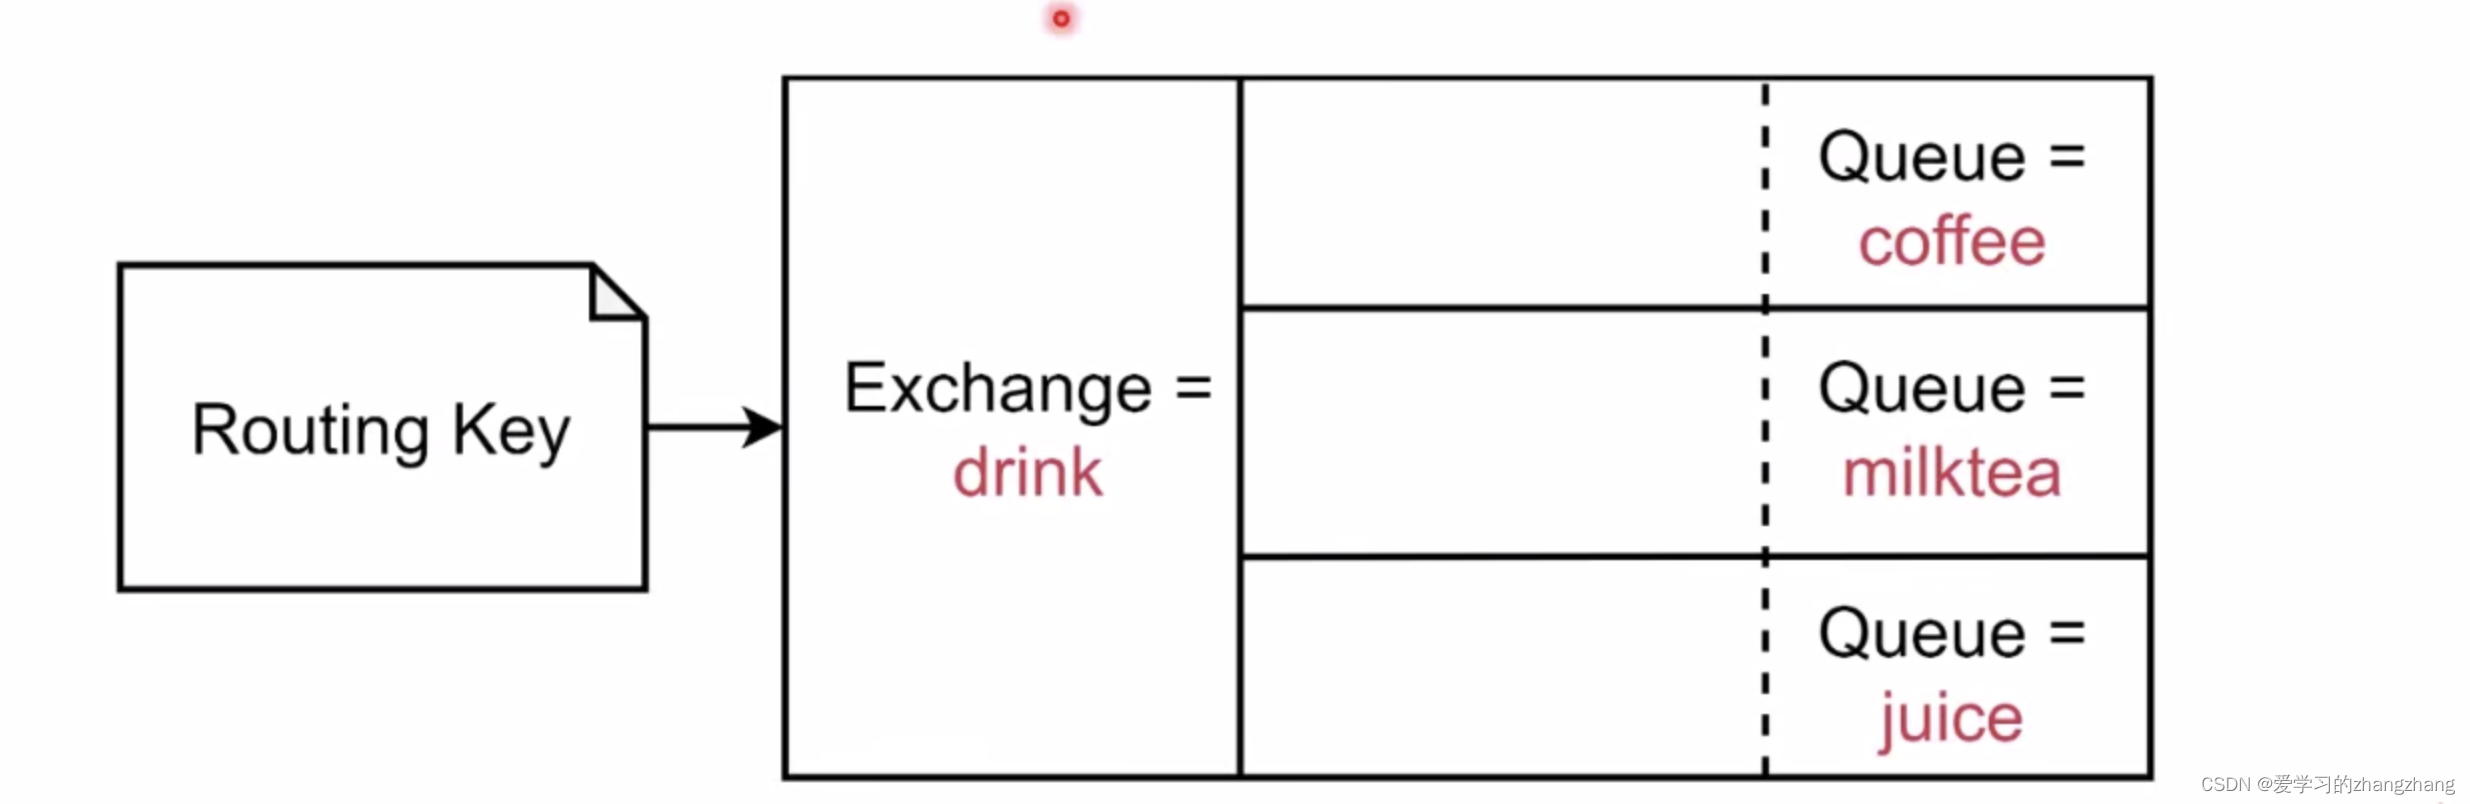
Fanout Exchange:每个发到Fanout Exchange的message都会分发到所有绑定的queue上去。

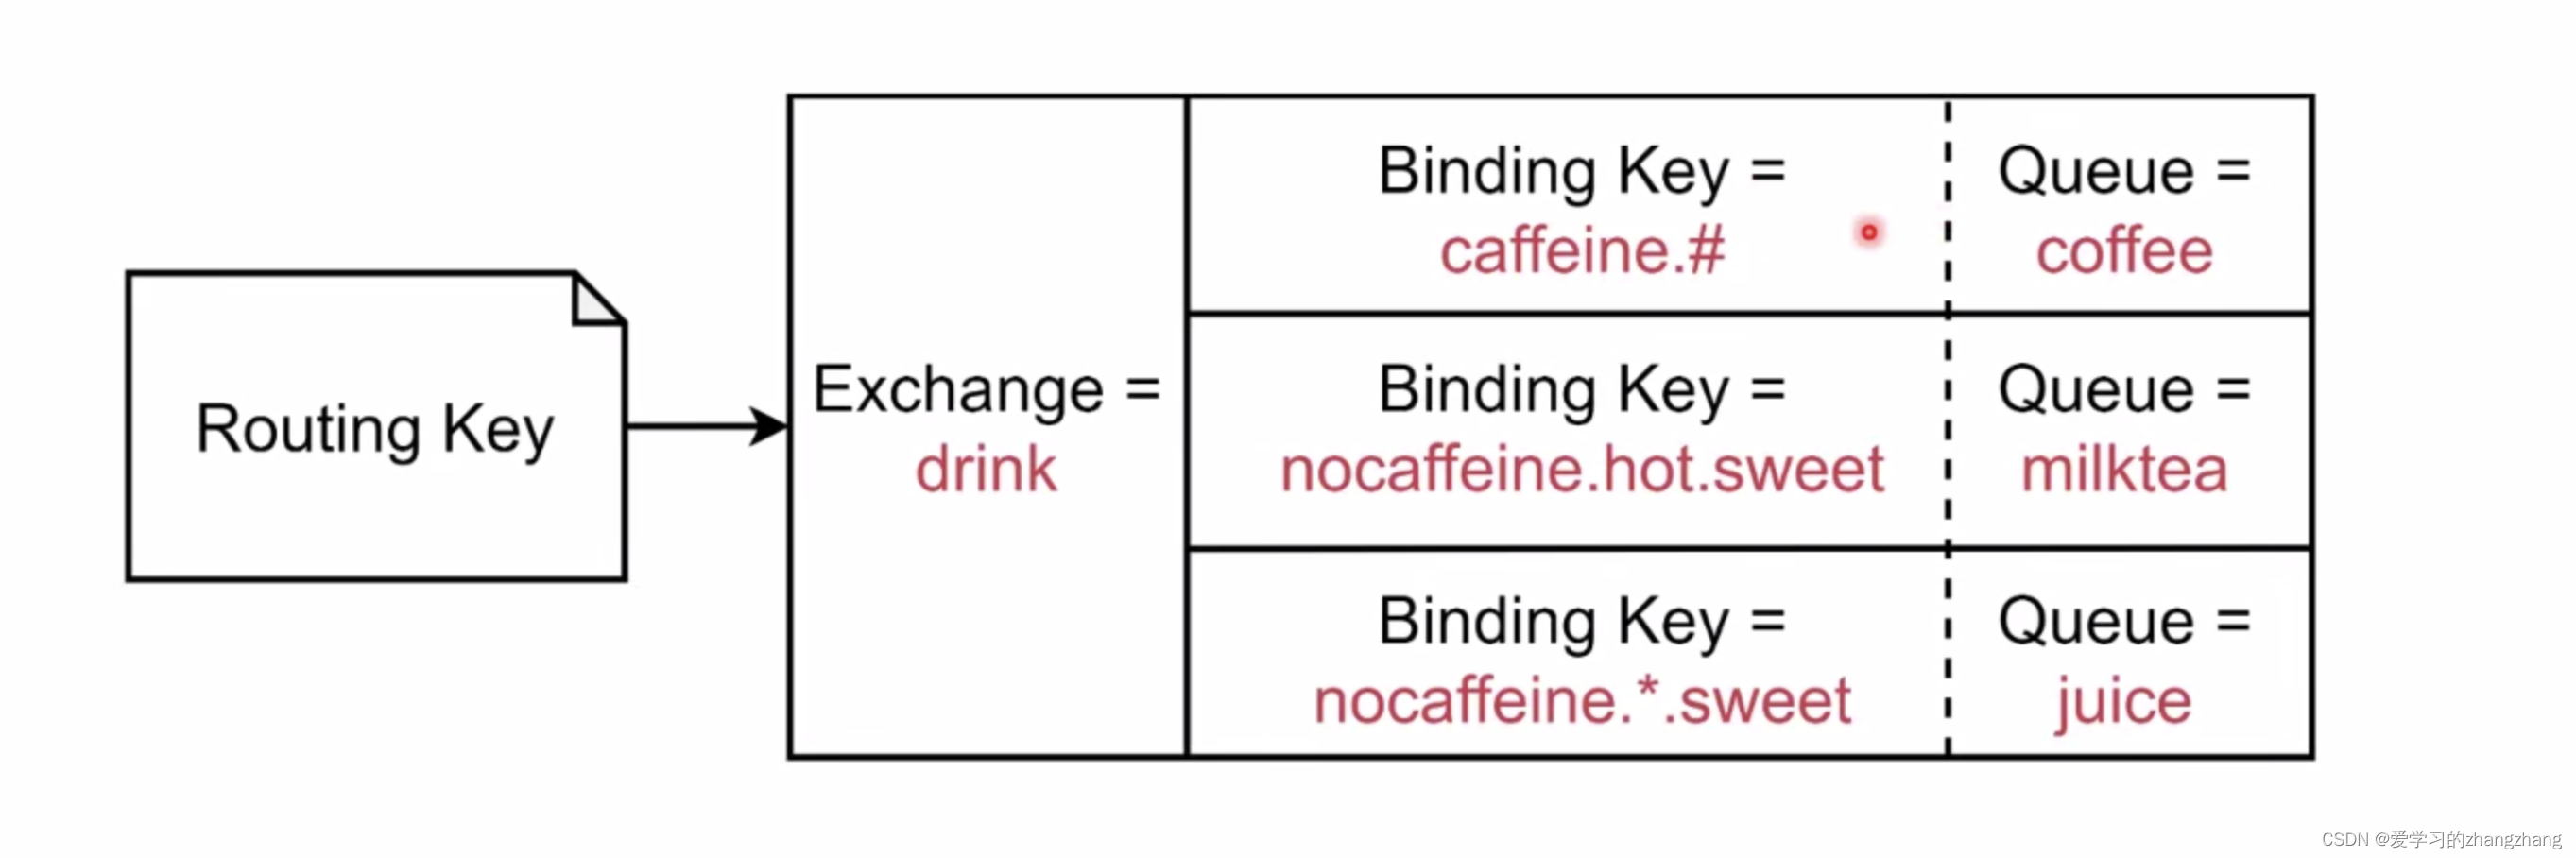
- Topit Exchange:根据Routing Key及通配规则,Topic Exchange将消息分发到目标Queue中。
- 全匹配:与Direct类似。
- Binding Key中的 #:匹配任意个数的word。
- Binding Key中的 *:匹配任意一个word。
举例子:


1.5.3、总结
- AMQP协议直接决定了RabbitMQ的内部结构和外部行为。
- 对于发送者来说,将消息发送给特定的Exchange。
- 消息经过Exchange路由后,到达具体队列。
- 消费者将消息从监听的队列中取走。
- Exchange主要有三种类型:Direct/Topic/Fanout。
- Direct(直接路由):Routing Key = Binding Key,容易配置和使用。
- Fanout(广播路由):群发绑定的所有队列,适用于消息广播。
- Topic(话题路由):功能较为复杂,但能降级为Direct,建议优先使用,为以后拓展留余地。
1.6、RabbitMQ快速安装
1.6.1、windows安装
1、下载安装Erlang OTP(Open Telecom Platform):Downloads - Erlang/OTPThe official home of the Erlang Programming Language![]() https://www.erlang.org/downloads
https://www.erlang.org/downloads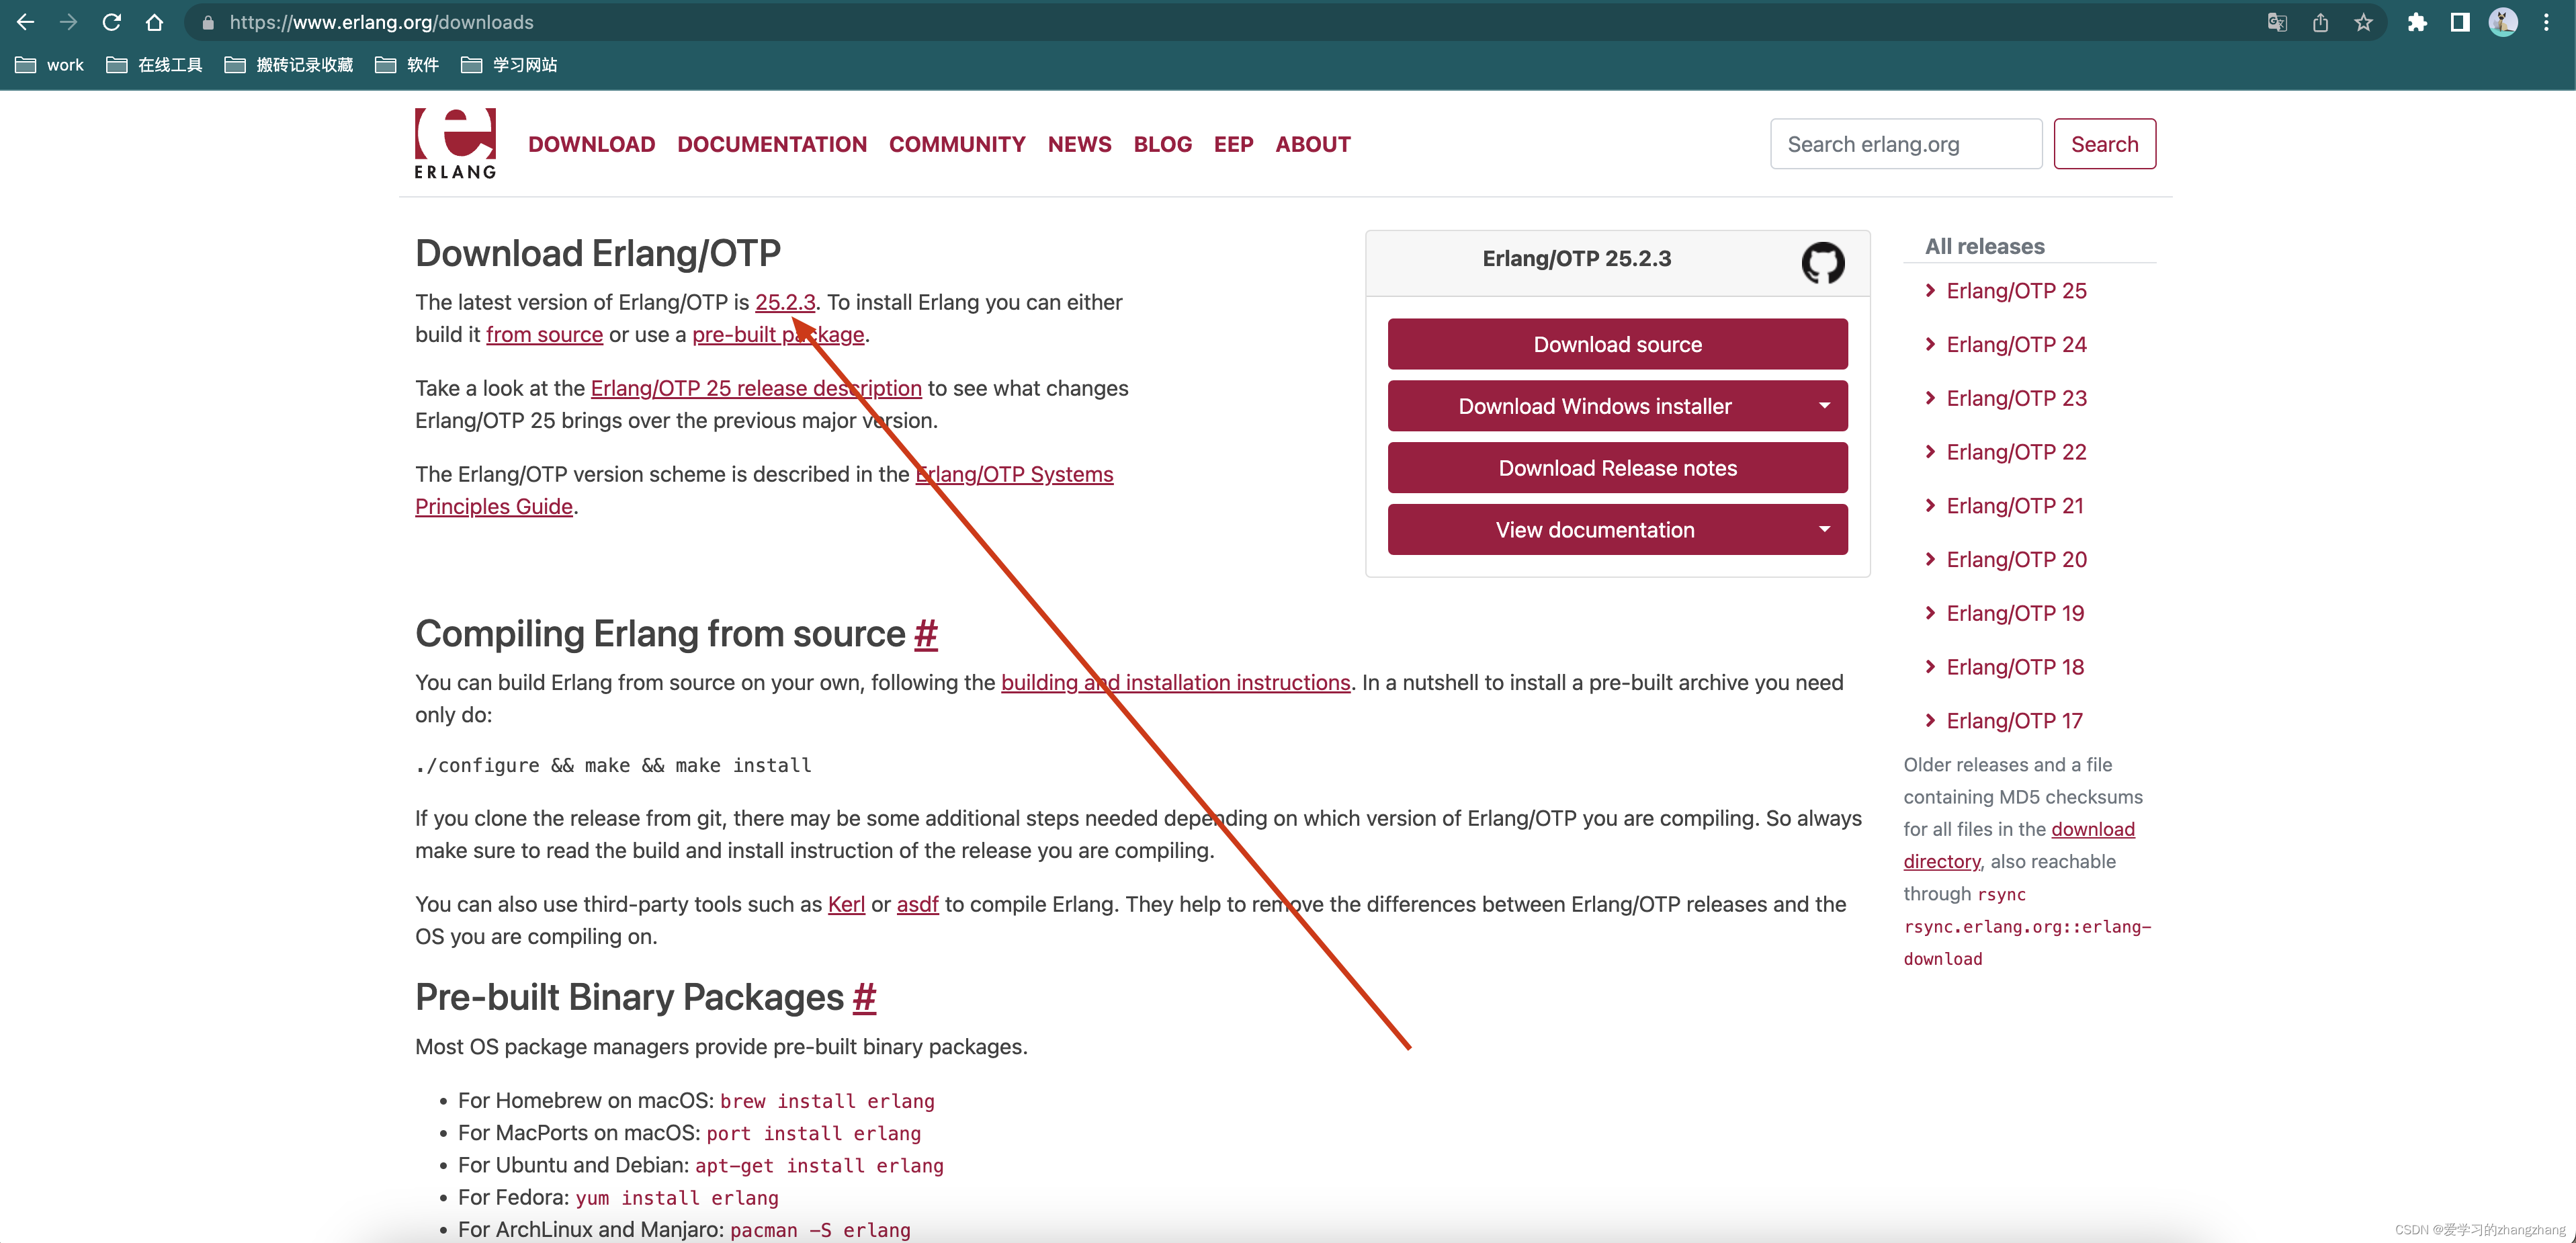
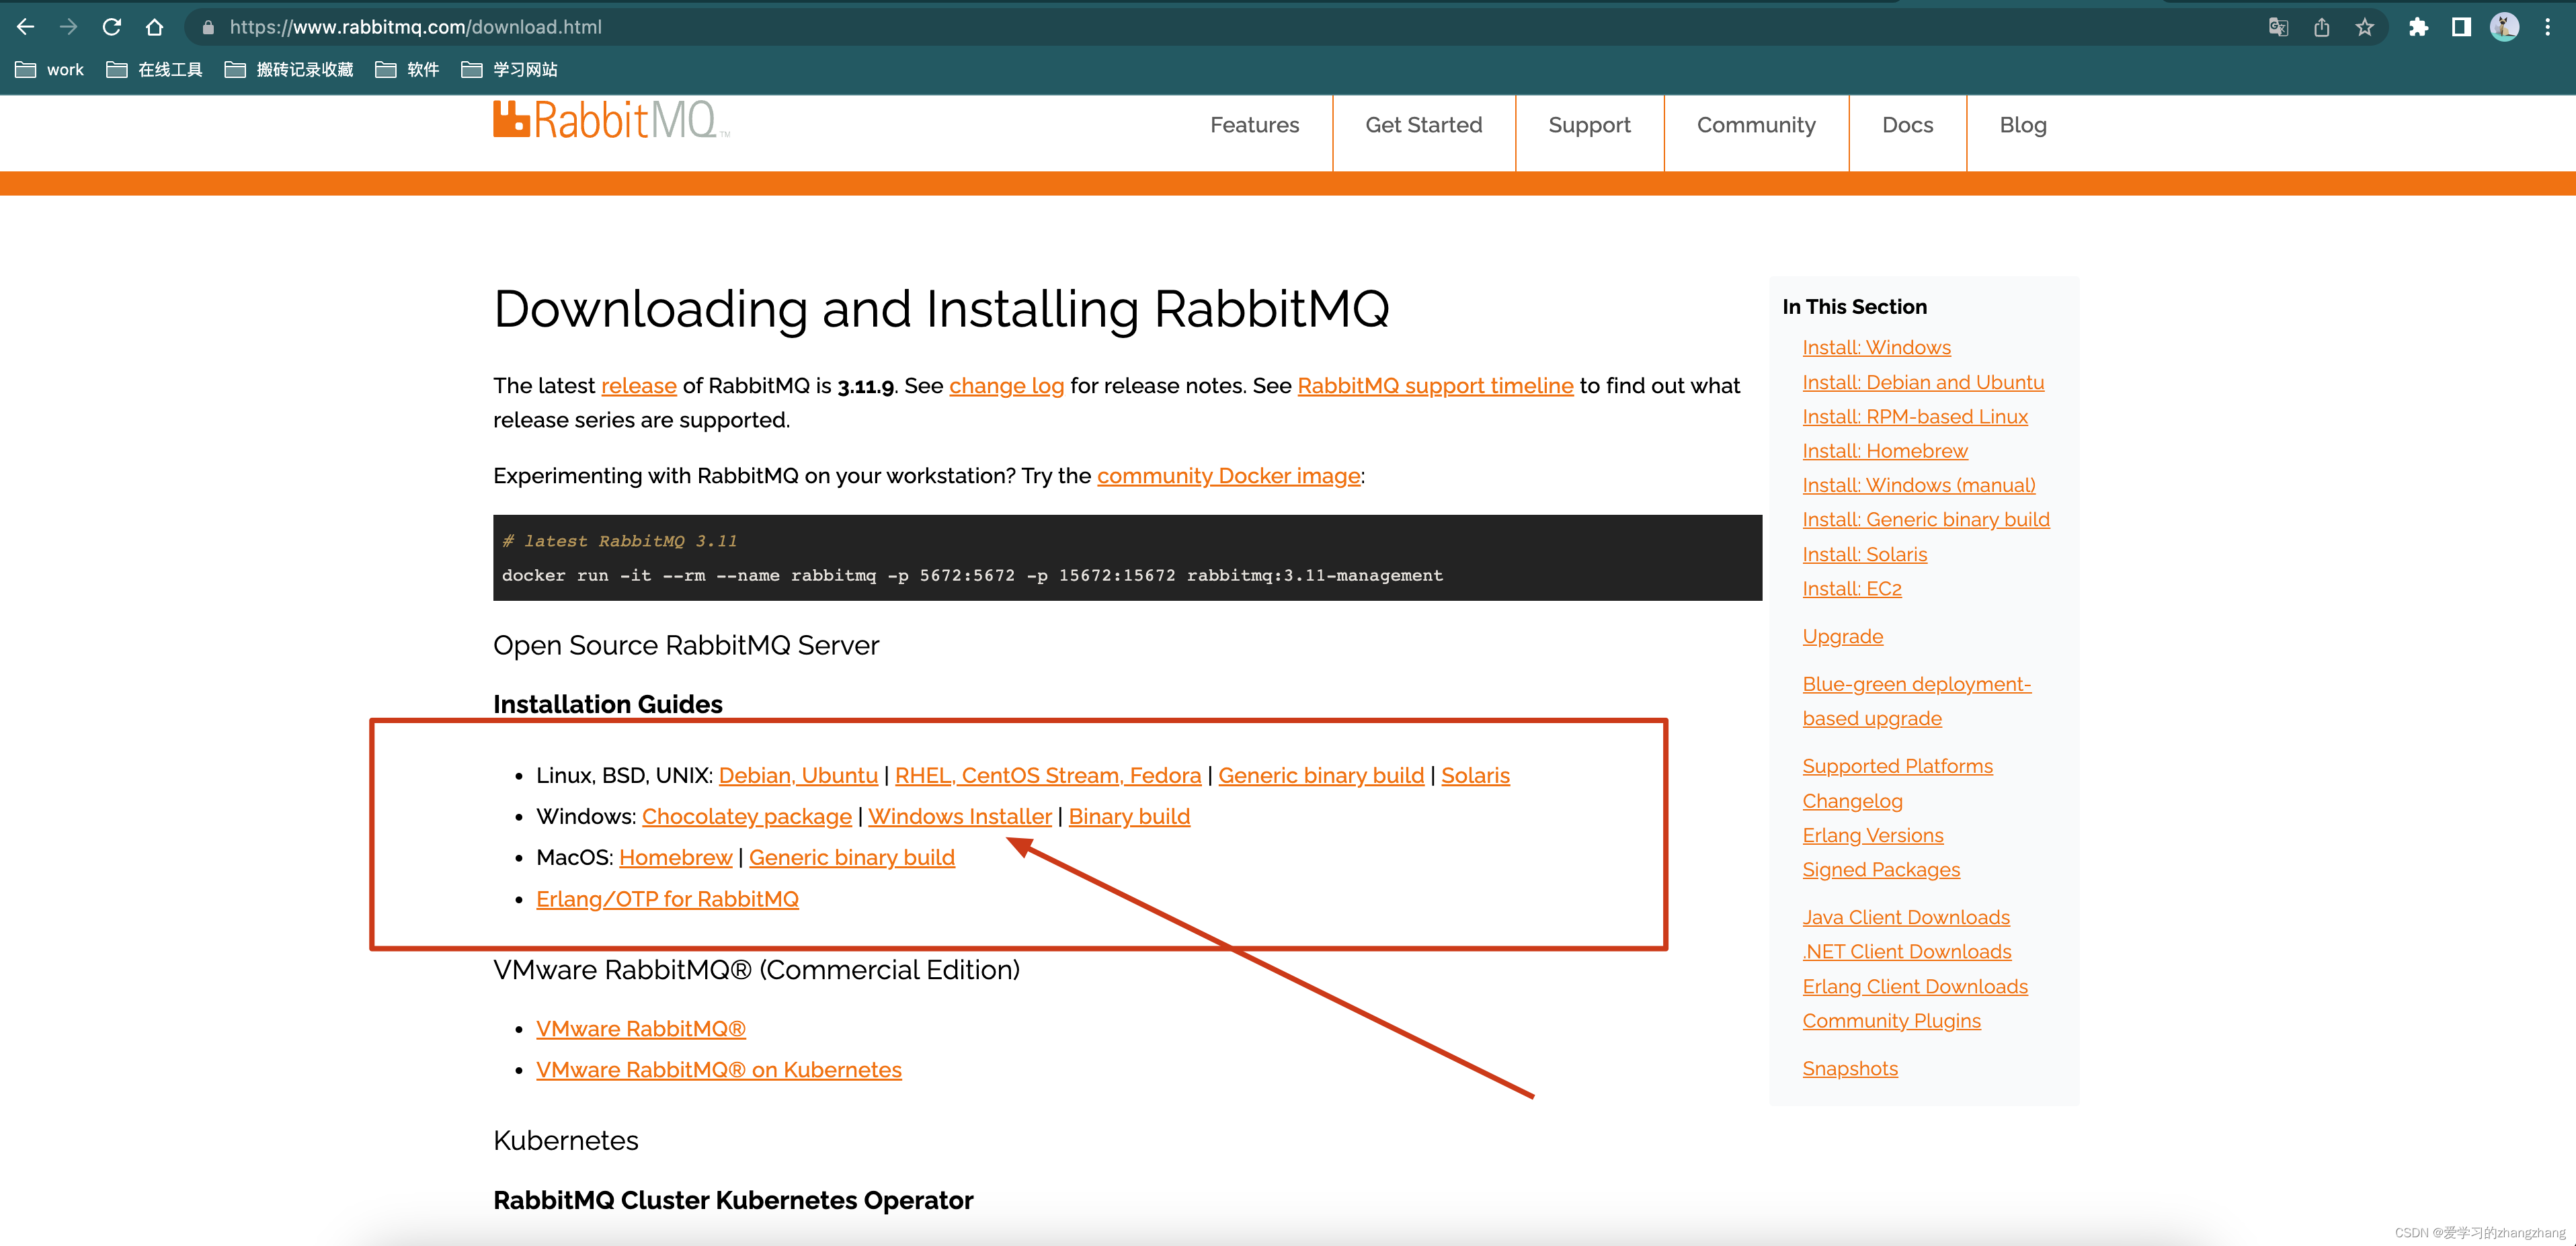
2、下载并安装RabbitMQ:Messaging that just works — RabbitMQhttps://www.rabbitmq.com/Get Started ->DownLoad+Installation ->Windows Installer ->Using the official installer
3、安装完成后,查看系统服务中会出现RabbitMQ。 
1.6.2、Mac安装RabbitMQ
1、使用brew工具安装,会自动安装OTP依赖。
brew install rabbitmq2、启动/关闭rabbitmq
## 启动rabbitmq
brew services start rabbitmq

## 关闭rabbitmq
brew services stop rabbitmq
3、浏览器访问地址,账号/密码默认guest
4、开启消息追踪(查看历史消息)
# 查看所有安装插件列表
rabbitmq-plugins list
# 开启插件
rabbitmq-plugins enable rabbitmq_tracing
# 开启插件
rabbitmqctl trace_on
# 添加trace给我们的虚拟主机地址 myhost
rabbitmqctl trace_on -p myhost
添加完成后我们的网页控制台下面将多出一个trace交换机,后续所有该虚拟地址下的消息都会在该交换机上进行记录。 
登录rabbitmq控制台,在Admin>Tracing 目录下添加trace追踪文件信息。添加完成后右侧出现相应的追踪信息文件。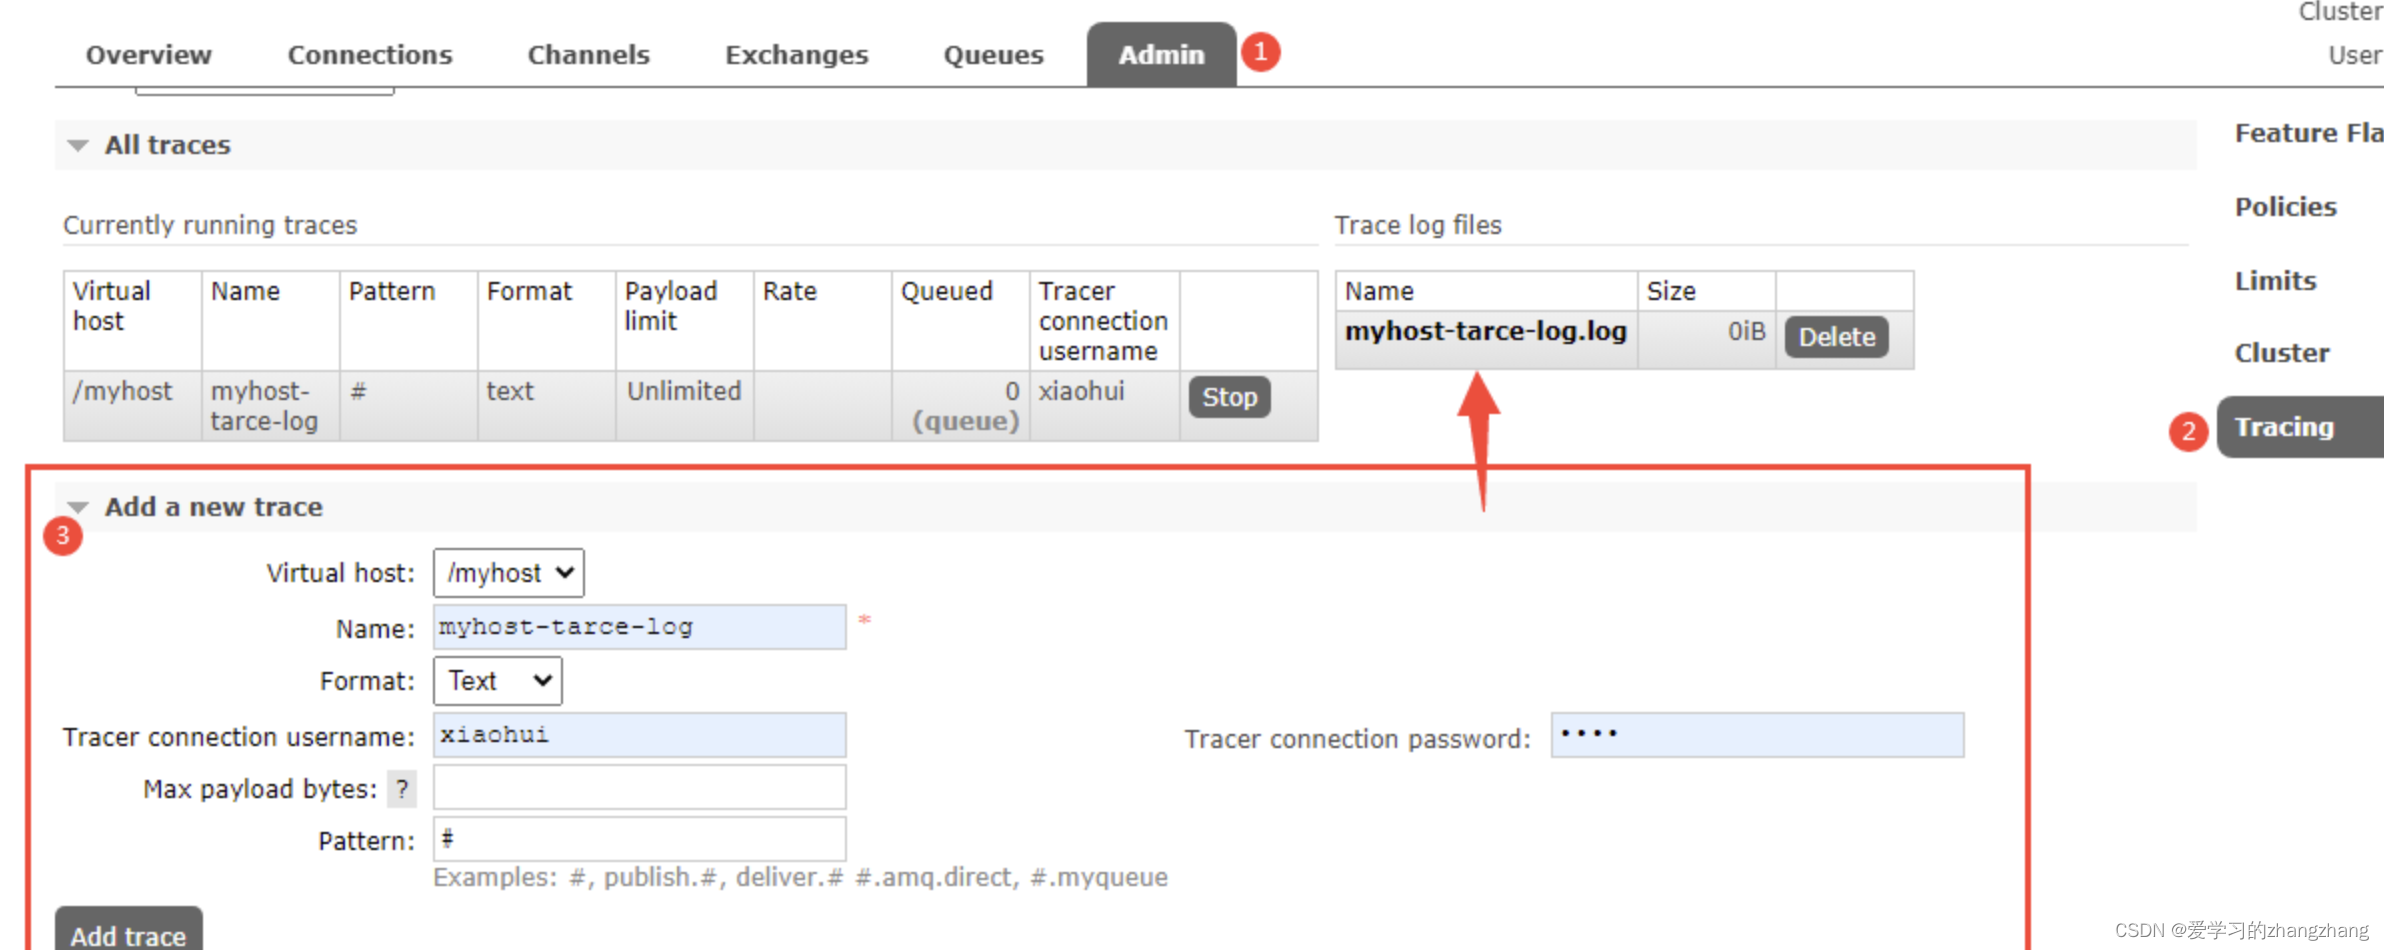
1.6.3、linux安装RabbitMQ
1、使用docker安装(开发环境使用docker简单安装配置)
docker run -it --rm --name rabbitmq -p 5672:5672 -p 15672:15672 rabbitmq:3-management2、生产环境安装RabbitMQ
1.6.4、网页端管理工具介绍
1、启动(在rabbitmq的sbin目录)
rabbitmq-plugins enable rabbitmq_management2、浏览器访问:127.0.0.1:15672,账号/密码默认guest
1.6.5、命令行管理(rabbitmq安装目录的sbin目录下)
口诀:
想看什么就List什么。
想清空什么就purge什么。
想删除什么就Delete什么。
一切问题记得使用 --help什么。
1、查看相关的命令
查看状态:
rabbitmqctl status
查看绑定:
rabbitmqctl list_bindings
查看channel:
rabbitmqctl list_channels
查看connection:
rabbitmqctl list_connections
查看消费者:
rabbitmqctl list_consumers
查看交换机:
rabbitmqctl list_exchanges
2、队列相关的命令
查看队列:
rabbitmqctl list_queues
删除队列:
rabbitmqctl list_queues
清空队列:
rabbitmqctl list_queues
3、用户相关的命令
新建用户:
rabbitmqctl add_user
修改用户密码:
rabbitmqctl change_password
删除用户:
rabbitmqctl delete_user
查看用户:
rabbitmqctl list_users
设置用户角色:
rabbitmqctl set_user_tags
4、应用启停相关的命令
启动应用:
rabbitmqctl start_app
关闭应用:
rabbitmqctl stop_app ,保留Erlang虚拟机(暂停)
关闭应用:
rabbitmqctl stop_app ,并关闭Erlang虚拟机
5、集群相关的命令
加入集群
rabbitmqctl join_cluster
离开集群
rabbitmqctl reset
6、镜像队列相关的命令
设置镜像队列:
rabbitmqctl sync_queue
取消镜像队列:
rabbitmqctl cancel_sync_queue
二、RabbitMQ基本用法
2.1、队列和交换机绑定
@Slf4j
@Service
public class OrderMessageService {


    /**
     * 设置 交换机、队列、交换机和队列绑定
     * 在那个服务处理那个队列,配置别的服务的交换机和绑定关系。
     *
     * @throws IOException
     * @throws TimeoutException
     * @throws InterruptedException
     */
    @Async
    public void handleMessage() throws IOException, TimeoutException, InterruptedException {
        log.info("start linstening message");
        ConnectionFactory connectionFactory = new ConnectionFactory();

        connectionFactory.setHost("localhost");

        try (Connection connection = connectionFactory.newConnection();
             Channel channel = connection.createChannel()) {

            /*---------------------交换机 初始化----------------------*/
            channel.exchangeDeclare(
                    "exchange.order.restaurant",  //exchange名称。
                    BuiltinExchangeType.DIRECT, //exchange类型。 DIRECT("direct"), FANOUT("fanout"), TOPIC("topic"), HEADERS("headers");
                    true,   //是否持久化。
                    false,  //空闲了,是否删除交换机。
                    null);  //特殊的属性,没有传递null。


            /*---------------------队列初始化---------------------*/
            channel.queueDeclare(
                    "queue.order",  //queue的名称。
                    true,   //是否持久化。
                    false,  //是否是connection独占。
                    false,  //空闲了,是否删除队列。
                    null);  //特殊的属性,没有传递null。


            /*---------------------队列、交换机绑定 queue  exchange Bind restaurant---------------------*/
            channel.queueBind(
                    "queue.order", //队列名称
                    "exchange.order.restaurant",    //exchange名称
                    "key.order"); //Routing key名称。


        }
    }
}
2.1.1、Java代码测试配置队列和交换机绑定
    /**
     * 调用设置 交换机、队列、交换机和队列绑定方法
     * @param args
     * @throws IOException
     * @throws InterruptedException
     * @throws TimeoutException
     */
    public static void main(String[] args) throws IOException, InterruptedException, TimeoutException {
        handleMessage();
    }

2.2、生产者发送消息
三种模式不清楚可参考:1.5.2、Exchange四种类型详解
2.2.1、direct模式
public class OrderService {

    /**
     * 测试生产消息
     * @throws IOException
     * @throws InterruptedException
     * @throws TimeoutException
     */
    public static void testSendMessage() throws IOException, TimeoutException {
        //log.info("发送消息");
        ConnectionFactory connectionFactory = new ConnectionFactory();
        connectionFactory.setHost("localhost");

        try (Connection connection = connectionFactory.newConnection();
             Channel channel = connection.createChannel()) {
            String messageToSend = "test two";
            //direct模式,routing key必须一致才可以被消费
            channel.basicPublish("exchange.order.test.two", "key.order", null, messageToSend.getBytes());
        }
    }

    public static void main(String[] args) throws IOException, TimeoutException {
        testSendMessage();
    }
}
2.2.2、fanout模式
public class OrderService {

    /**
     * 测试生产消息
     * @throws IOException
     * @throws InterruptedException
     * @throws TimeoutException
     */
    public static void testSendMessage() throws IOException, TimeoutException {
        //log.info("发送消息");
        ConnectionFactory connectionFactory = new ConnectionFactory();
        connectionFactory.setHost("localhost");

        try (Connection connection = connectionFactory.newConnection();
             Channel channel = connection.createChannel()) {
            String messageToSend = "test two";
            //fanout模式,routing key不一致也可以被消费
            channel.basicPublish("exchange.order.test.two", "key.order1", null, messageToSend.getBytes());
        }
    }

    public static void main(String[] args) throws IOException, TimeoutException {
        testSendMessage();
    }
}
2.2.3、topic模式
public class OrderService {

    /**
     * 测试生产消息
     * @throws IOException
     * @throws InterruptedException
     * @throws TimeoutException
     */
    public static void testSendMessage() throws IOException, TimeoutException {
        //log.info("发送消息");
        ConnectionFactory connectionFactory = new ConnectionFactory();
        connectionFactory.setHost("localhost");

        try (Connection connection = connectionFactory.newConnection();
             Channel channel = connection.createChannel()) {
            String messageToSend = "test two";
            channel.basicPublish("exchange.order.test.four", "key.order.test", null, messageToSend.getBytes());
        }
    }

    public static void main(String[] args) throws IOException, TimeoutException {
        testSendMessage();
    }
}
2.3、消费者消费消息
三种模式不清楚可参考:1.5.2、Exchange四种类型详解
2.3.1、direct模式
public class OrderMessageService {


    /**
     * 设置 交换机、队列、交换机和队列绑定
     * 在那个服务处理那个队列,配置别的服务的交换机和绑定关系。
     *
     * @throws IOException
     * @throws TimeoutException
     * @throws InterruptedException
     */
    public static void handleMessage() throws IOException, TimeoutException {
        log.info("start linstening message");
        ConnectionFactory connectionFactory = new ConnectionFactory();

        connectionFactory.setHost("localhost");

        try (Connection connection = connectionFactory.newConnection();
             Channel channel = connection.createChannel()) {

            /*---------------------交换机 初始化----------------------*/
            channel.exchangeDeclare(
                    "exchange.order.test.two",  //exchange名称。
                    BuiltinExchangeType.DIRECT, //exchange类型。 DIRECT("direct"), FANOUT("fanout"), TOPIC("topic"), HEADERS("headers");
                    true,   //是否持久化。
                    false,  //空闲了,是否删除交换机。
                    null);  //特殊的属性,没有传递null。


            /*---------------------队列初始化---------------------*/
            channel.queueDeclare(
                    "queue.order",  //queue的名称。
                    true,   //是否持久化。
                    false,  //是否是connection独占。
                    false,  //空闲了,是否删除队列。
                    null);  //特殊的属性,没有传递null。


            /*---------------------队列、交换机绑定 queue  exchange Bind restaurant---------------------*/
            channel.queueBind(
                    "queue.order", //队列名称
                    "exchange.order.test.two",    //exchange名称
                    "key.order"); //Routing key名称。


            channel.basicConsume("queue.order",true, new DefaultConsumer(channel){
                @Override
                public void handleDelivery(String consumerTag,Envelope envelope,AMQP.BasicProperties properties, byte[] body) throws IOException{
                    //5.处理消息
                    String message = new String(body);
                    log.info("deliverCallback:messageBody:{}", message);
                }
            });
            while (true){
                Thread.sleep(100000);
            }
        }
    }


    /**
     * 调用设置 交换机、队列、交换机和队列绑定方法
     * @param args
     * @throws IOException
     * @throws InterruptedException
     * @throws TimeoutException
     */
    public static void main(String[] args) throws IOException, InterruptedException, TimeoutException {
        handleMessage();
    }


}
2.3.2、fanout模式
public class OrderMessageService {


    /**
     * 设置 交换机、队列、交换机和队列绑定
     * 在那个服务处理那个队列,配置别的服务的交换机和绑定关系。
     *
     * @throws IOException
     * @throws TimeoutException
     * @throws InterruptedException
     */
    public static void handleMessage() throws IOException, TimeoutException {
        log.info("start linstening message");
        ConnectionFactory connectionFactory = new ConnectionFactory();

        connectionFactory.setHost("localhost");

        try (Connection connection = connectionFactory.newConnection();
             Channel channel = connection.createChannel()) {

            /*---------------------交换机 初始化----------------------*/
            channel.exchangeDeclare(
                    "exchange.order.test.two",  //exchange名称。
                    BuiltinExchangeType.DIRECT, //exchange类型。 DIRECT("direct"), FANOUT("fanout"), TOPIC("topic"), HEADERS("headers");
                    true,   //是否持久化。
                    false,  //空闲了,是否删除交换机。
                    null);  //特殊的属性,没有传递null。


            /*---------------------队列初始化---------------------*/
            channel.queueDeclare(
                    "queue.order",  //queue的名称。
                    true,   //是否持久化。
                    false,  //是否是connection独占。
                    false,  //空闲了,是否删除队列。
                    null);  //特殊的属性,没有传递null。


            /*---------------------队列、交换机绑定 queue  exchange Bind restaurant---------------------*/
            channel.queueBind(
                    "queue.order", //队列名称
                    "exchange.order.test.two",    //exchange名称
                    "key.order"); //Routing key名称。


            channel.basicConsume("queue.order",true, new DefaultConsumer(channel){
                @Override
                public void handleDelivery(String consumerTag,Envelope envelope,AMQP.BasicProperties properties, byte[] body) throws IOException{
                    //5.处理消息
                    String message = new String(body);
                    log.info("deliverCallback:messageBody:{}", message);
                }
            });
            while (true){
                Thread.sleep(100000);
            }
        }
    }


    /**
     * 调用设置 交换机、队列、交换机和队列绑定方法
     * @param args
     * @throws IOException
     * @throws InterruptedException
     * @throws TimeoutException
     */
    public static void main(String[] args) throws IOException, InterruptedException, TimeoutException {
        handleMessage();
    }


}
2.3.3、topic模式
public class OrderMessageService {


    /**
     * 设置 交换机、队列、交换机和队列绑定
     * 在那个服务处理那个队列,配置别的服务的交换机和绑定关系。
     *
     * @throws IOException
     * @throws TimeoutException
     * @throws InterruptedException
     */
    public static void handleMessage() throws IOException, TimeoutException, InterruptedException {
        log.info("start linstening message");
        ConnectionFactory connectionFactory = new ConnectionFactory();

        connectionFactory.setHost("localhost");

        try (Connection connection = connectionFactory.newConnection();
             Channel channel = connection.createChannel()) {

            /*---------------------交换机 初始化----------------------*/
            channel.exchangeDeclare(
                    "exchange.order.test.four",  //exchange名称。
                    BuiltinExchangeType.TOPIC, //exchange类型。 DIRECT("direct"), FANOUT("fanout"), TOPIC("topic"), HEADERS("headers");
                    true,   //是否持久化。
                    false,  //空闲了,是否删除交换机。
                    null);  //特殊的属性,没有传递null。


            /*---------------------队列初始化---------------------*/
            channel.queueDeclare(
                    "queue.order",  //queue的名称。
                    true,   //是否持久化。
                    false,  //是否是connection独占。
                    false,  //空闲了,是否删除队列。
                    null);  //特殊的属性,没有传递null。


            /*---------------------队列、交换机绑定 queue  exchange Bind restaurant---------------------*/
            channel.queueBind(
                    "queue.order", //队列名称
                    "exchange.order.test.four",    //exchange名称
                    "key.order.test"); //Routing key名称。key.# ,key.order.*,key.order.test 都可消费


            channel.basicConsume("queue.order",true, new DefaultConsumer(channel){
                @Override
                public void handleDelivery(String consumerTag,Envelope envelope,AMQP.BasicProperties properties, byte[] body) throws IOException{
                    //5.处理消息
                    String message = new String(body);
                    log.info("deliverCallback:messageBody:{}", message);
                }
            });
            while (true){
                Thread.sleep(100000);
            }
        }
    }


    /**
     * 调用设置 交换机、队列、交换机和队列绑定方法
     * @param args
     * @throws IOException
     * @throws InterruptedException
     * @throws TimeoutException
     */
    public static void main(String[] args) throws IOException, InterruptedException, TimeoutException {
        handleMessage();
    }


}
三、RabbitMQ高级特性
3.1、RabbitMQ如何保证消息的可靠性
- 发送端确认机制。
- 消息返回机制。
- 消费端限流机制。
- 消费端确认机制。
- 消息过期机制。
- 死信队列。
3.2、 发送端确认机制
3.2.1、三种确认机制及其实现方式
单条同步确认:
- 配置channel,开启确认模式:channel.confirmSelect()。
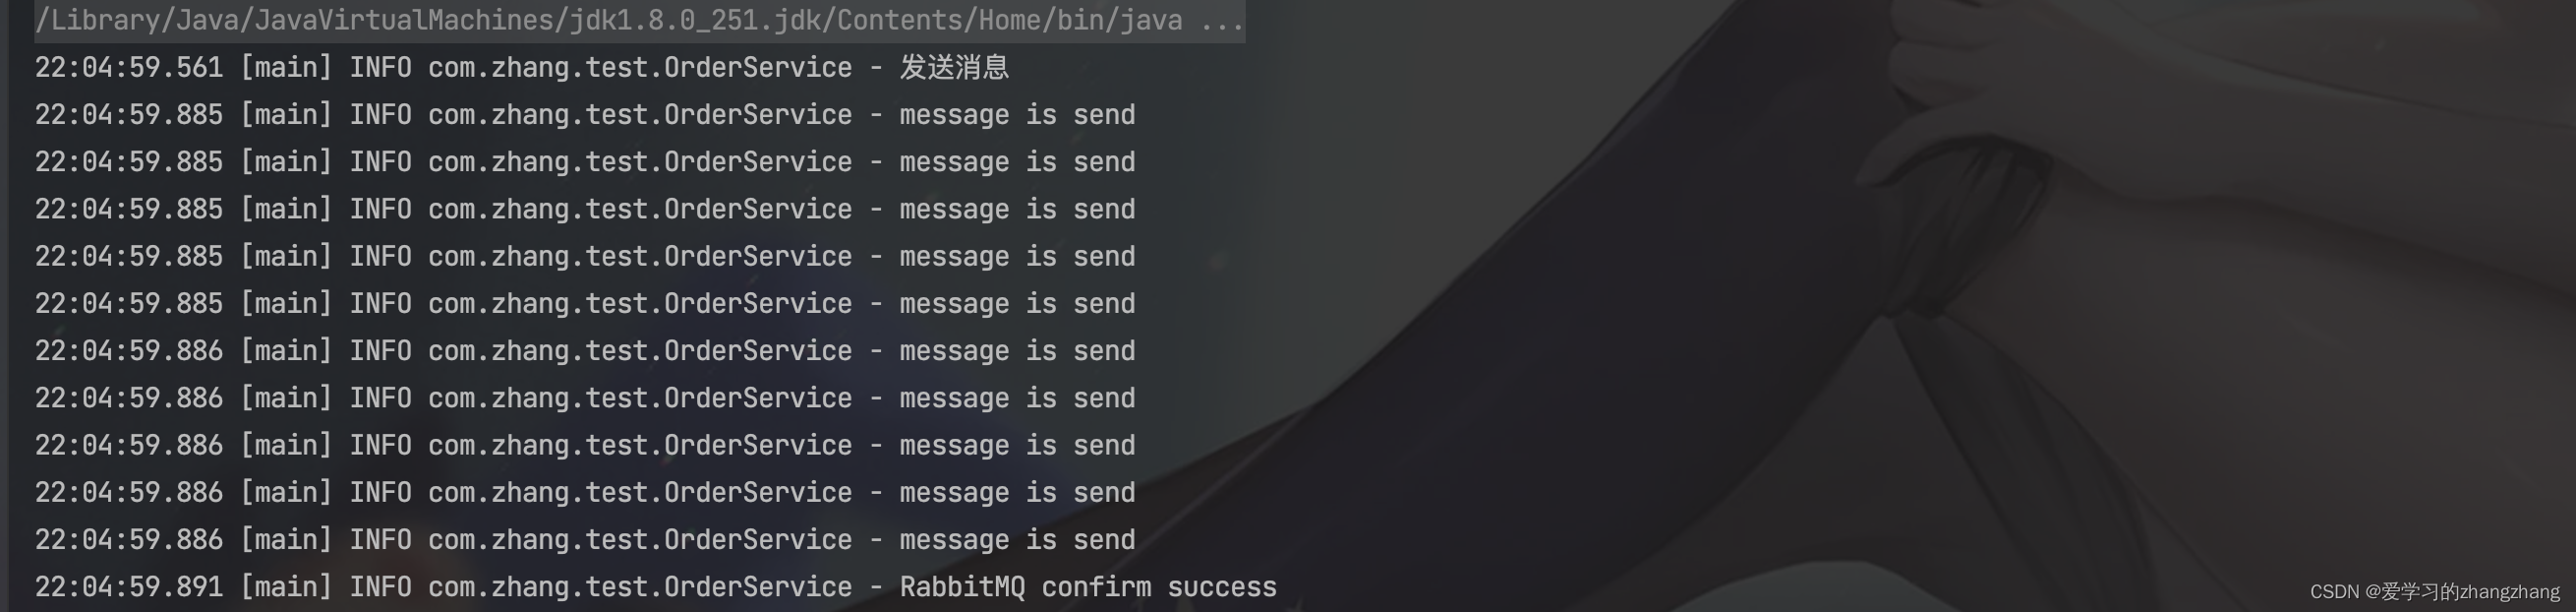
- 每发送一条消息,调用channel.waitForConfirms()方法,等待确认。返回true/false(ure表示成功,false表示失败)
生产者代码示例
    /**
     * 测试生产消息
     * @throws IOException
     * @throws InterruptedException
     * @throws TimeoutException
     */
    public static void testSendMessage() throws IOException, TimeoutException, InterruptedException {
        log.info("发送消息");
        ConnectionFactory connectionFactory = new ConnectionFactory();
        connectionFactory.setHost("localhost");

        try (Connection connection = connectionFactory.newConnection();
             Channel channel = connection.createChannel()) {
            channel.confirmSelect(); //开启发送端确认机制
            String messageToSend = "test";
            channel.basicPublish("exchange.order.test", "key.order", null, messageToSend.getBytes());
            log.info("message is send");
            if (channel.waitForConfirms()) { //调用channel.waitForConfirms()方法,等待确认。返回true/false(ure表示成功,false表示失败)
                log.info("RabbitMQ confirm success");
            }else {
                log.info("RabbitMQ confirm error");

            }
        }
    }

    public static void main(String[] args) throws IOException, InterruptedException, TimeoutException {
        testSendMessage();
    }

多条同步确认:
- 配置channel,开启确认模式:channel.confirmSelect()。
- 发送多条消息后,调用channel.waitForConfirms()方法,等待确认。返回true/false(ture表示成功,false不是所有消息都失败,只是表示发送的多条消息其中有失败的)
生产者代码示例
    /**
     * 测试生产消息
     * @throws IOException
     * @throws InterruptedException
     * @throws TimeoutException
     */
    public static void testSendMessage() throws IOException, TimeoutException, InterruptedException {
        log.info("发送消息");
        ConnectionFactory connectionFactory = new ConnectionFactory();
        connectionFactory.setHost("localhost");

        try (Connection connection = connectionFactory.newConnection();
             Channel channel = connection.createChannel()) {
            channel.confirmSelect(); //开启发送端确认机制
            String messageToSend = "test";
            for (int i = 0; i < 10; i++) {
                channel.basicPublish("exchange.order.test", "key.order", null, messageToSend.getBytes());
                log.info("message is send");
            }
            if (channel.waitForConfirms()) { //调用channel.waitForConfirms()方法,等待确认。返回true/false(ure表示成功,false表示失败)
                log.info("RabbitMQ confirm success");
            }else {
                log.info("RabbitMQ confirm error");

            }
        }
    }

    public static void main(String[] args) throws IOException, InterruptedException, TimeoutException {
        testSendMessage();
    }
异步确认:
- 配置channel,开启确认模式:channel.confirmSelect()。
- 在channel上添加监听:addConfirmListener,发送消息后,会回调此方法,通知是否发送成功。
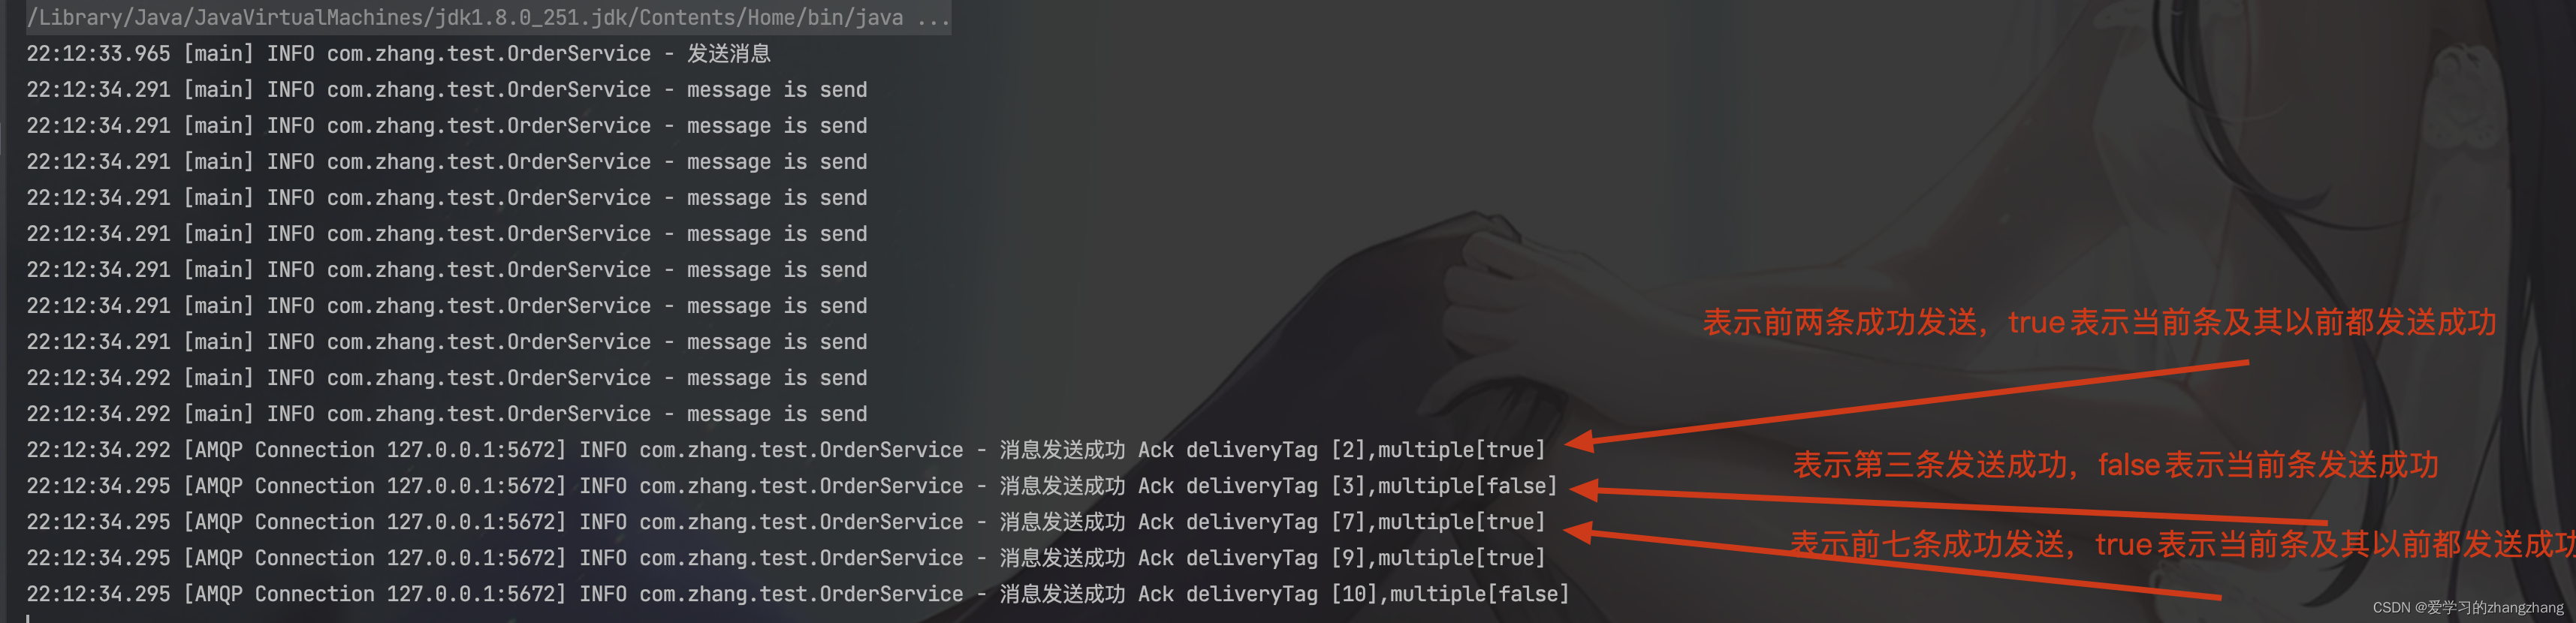
- 异步确认有可能是单条,也有可能是多条,取决于MQ。
生产者代码示例:
/**
     * 测试生产消息
     * @throws IOException
     * @throws InterruptedException
     * @throws TimeoutException
     */
    public static void testSendMessage() throws IOException, TimeoutException, InterruptedException {
        log.info("发送消息");
        ConnectionFactory connectionFactory = new ConnectionFactory();
        connectionFactory.setHost("localhost");

        try (Connection connection = connectionFactory.newConnection();
             Channel channel = connection.createChannel()) {
            channel.confirmSelect(); //开启发送端确认机制
            ConfirmListener confirmListener = new ConfirmListener() {
                //消息发送成功了调用
                @Override
                public void handleAck(long l, boolean b) throws IOException {

                    log.info("消息发送成功 Ack deliveryTag [{}],multiple[{}]",l,b);
                }

                //消息发送失败了调用
                @Override
                public void handleNack(long l, boolean b) throws IOException {
                    log.info("Nack deliveryTag [{}],multiple[{}]",l,b);

                }
            };
            channel.addConfirmListener(confirmListener);
            String messageToSend = "test";
            for (int i = 0; i < 10; i++) {
                channel.basicPublish("exchange.order.test", "key.order", null, messageToSend.getBytes());
                log.info("message is send");
            }
            Thread.sleep(1000000);
        }
    }

    public static void main(String[] args) throws IOException, InterruptedException, TimeoutException {
        testSendMessage();
    }
3.3、消息返回机制。
3.3.1、开启消息返回

- 在RabbitMQ基础配置中有一个关键配置项:Mandatory。
- Mandatory若为false,RabbitMQ将直接丢弃无法路由消息。
- Mandatory若为true,RabbitMQ才会处理无法路由消息。
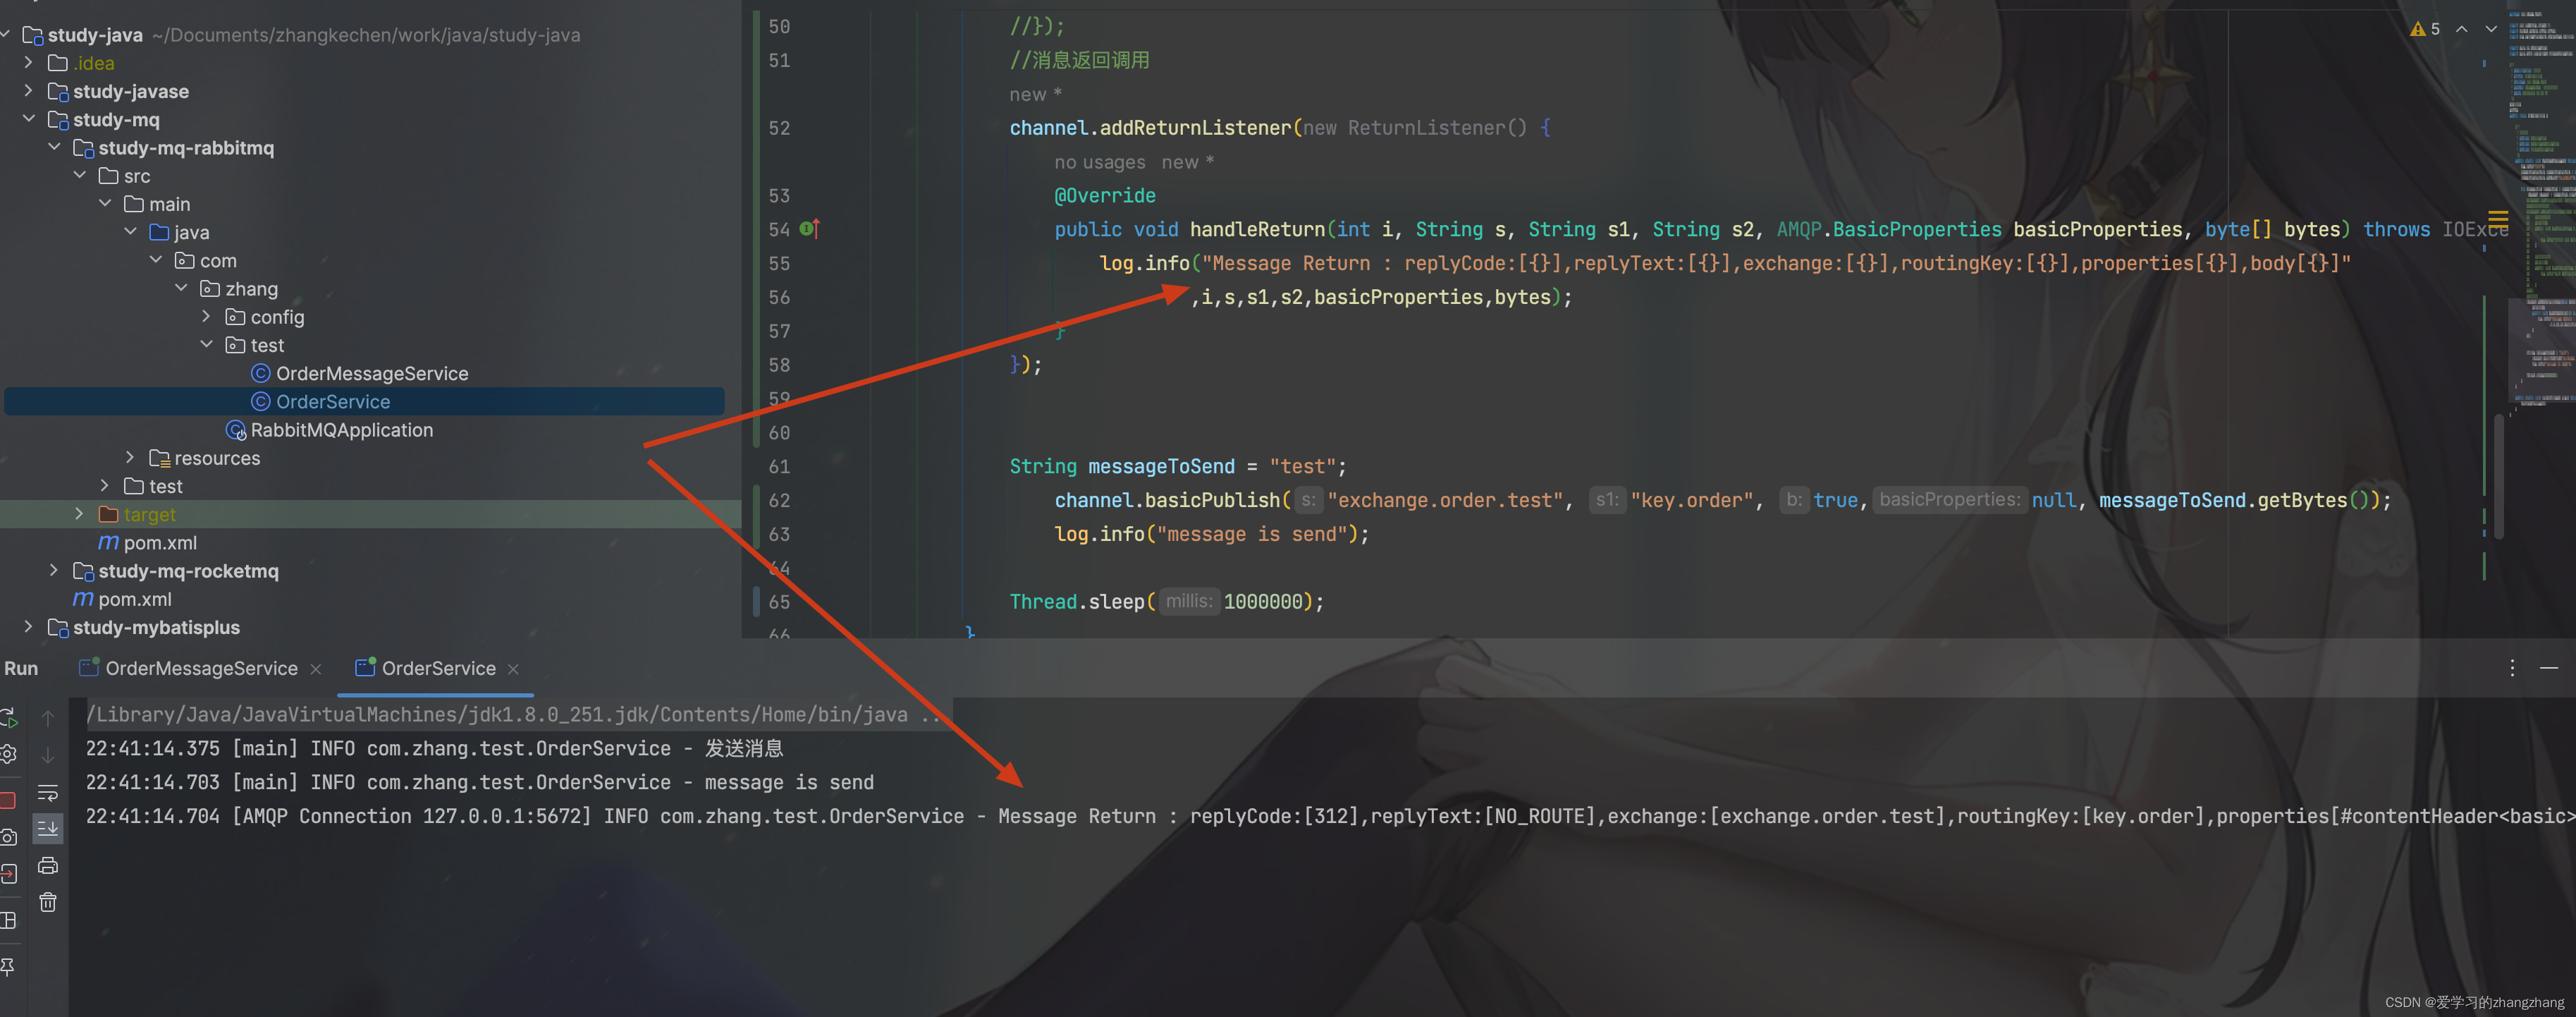
- 消息发送后,中间件会对消息进行路由,若队列中没有发现目标队列,中间件会通知发送方,channel.addReturnListener()方法 ,传递的ReturnListener对象或者ReturnCallback对象 会被调用(ReturnListener是消息返回对象的属性当作参数传递,ReturnCallback是传递得是消息返回对象,可以自行get/set)。
示例代码(在网页控制台 中unbind exchange bindings 对应的队列后执行):
  /**
     * 测试生产消息
     * @throws IOException
     * @throws InterruptedException
     * @throws TimeoutException
     */
    public static void testSendMessage() throws IOException, TimeoutException, InterruptedException {
        log.info("发送消息");
        ConnectionFactory connectionFactory = new ConnectionFactory();
        connectionFactory.setHost("localhost");

        try (Connection connection = connectionFactory.newConnection();
             Channel channel = connection.createChannel()) {
            //消息发送失败 返回告知发送方调用的方法
            channel.addReturnListener(new ReturnListener() {
                @Override
                public void handleReturn(int i, String s, String s1, String s2, AMQP.BasicProperties basicProperties, byte[] bytes) throws IOException {
                    log.info("Message Return : replyCode:[{}],replyText:[{}],exchange:[{}],routingKey:[{}],properties[{}],body[{}]"
                            ,i,s,s1,s2,basicProperties,bytes);
                }
            });
            消息发送失败 返回告知发送方调用的方法(传递的对象)
            //channel.addReturnListener(new ReturnCallback() {
            //    @Override
            //    public void handle(Return aReturn) {
            //        log.info("Message Return : aReturn");
            //
            //    }
            //});

            String messageToSend = "test";
                channel.basicPublish("exchange.order.test", "key.order", true,null, messageToSend.getBytes());
                log.info("message is send");

            Thread.sleep(1000000);
        }
    }

    public static void main(String[] args) throws IOException, InterruptedException, TimeoutException {
        testSendMessage();
    }
3.4、消费端限流机制(RabbitMQ-QoS)。
使用场景:
业务高峰期,可能出现发送端与接口端性能不一致,大量的消息被同时推送给接收端,造成接收端服务崩溃。需要使用RabbitMQ消费端限流机制,限制消息推送速度,保障接收端服务稳定。
QoS介绍:
QoS功能保证了在一定数目的消息未被确认前,不消费新的消息。
QoS功能的前提是不使用自动确认。
QoS原理:
QoS原理是当消费端有一定数量的消息未被ACK确定时,RabbitMQ不给消费端推送新的消息。
RabbitMQ使用QoS机制实现了消费端限流。
消费端限流机制参数设置
- prefetchCount:针对一个消费端最多推送多少未确认消息。
- global:true:针对整个消费端限流;false:针对当前channel;。
- prefetchSize:0(单个消息大小限制,一般为0)。
- prefetchSize与global两项,RabbitMQ暂时未实现。
代码示例:
生产者:
public class OrderService {

    /**
     * 测试生产消息
     * @throws IOException
     * @throws InterruptedException
     * @throws TimeoutException
     */
    public  void testSendMessage() throws IOException, TimeoutException {
        log.info("发送消息");
        ConnectionFactory connectionFactory = new ConnectionFactory();
        connectionFactory.setHost("localhost");

        try (Connection connection = connectionFactory.newConnection();
             Channel channel = connection.createChannel()) {
            String messageToSend = "test";
            for (int i = 0; i < 10; i++) {
                channel.basicPublish("exchange.order.test", "key.order", null, messageToSend.getBytes());

            }
        }
    }

    public static void main(String[] args) throws IOException, TimeoutException {
        new OrderService().testSendMessage();
    }
}
消费者:
public class OrderMessageService {
    Channel channel;


    /**
     * 设置 交换机、队列、交换机和队列绑定
     * 在那个服务处理那个队列,配置别的服务的交换机和绑定关系。
     *
     * @throws IOException
     * @throws TimeoutException
     * @throws InterruptedException
     */
    public void handleMessage() throws IOException, TimeoutException, InterruptedException {
        log.info("start linstening message");
        ConnectionFactory connectionFactory = new ConnectionFactory();

        connectionFactory.setHost("localhost");

        try (Connection connection = connectionFactory.newConnection();
             Channel channel = connection.createChannel()) {
            this.channel=channel;
            /*---------------------交换机 初始化----------------------*/
            channel.exchangeDeclare(
                    "exchange.order.test",  //exchange名称。
                    BuiltinExchangeType.DIRECT, //exchange类型。
                    true,   //是否持久化。
                    false,  //空闲了,是否删除交换机。
                    null);  //特殊的属性,没有传递null。


            /*---------------------队列初始化---------------------*/
            channel.queueDeclare(
                    "queue.order",  //queue的名称。
                    true,   //是否持久化。
                    false,  //是否是connection独占。
                    false,  //空闲了,是否删除队列。
                    null);  //特殊的属性,没有传递null。


            /*---------------------队列、交换机绑定 queue  exchange Bind restaurant---------------------*/
            channel.queueBind(
                    "queue.order", //队列名称
                    "exchange.order.test",    //exchange名称
                    "key.order"); //Routing key名称。

            //设置消费端限流
            channel.basicQos(2);//表示同时可以有两条消息在处理中,没有被消费者确认消息。
            channel.basicConsume("queue.order", false, deliverCallback,consumerTag->{});
            while (true) {
                Thread.sleep(10000);
            }
        }
    }
    DeliverCallback deliverCallback = ((consumerTag, message) -> {
        String messageBody = new String(message.getBody());
        log.info("接收到的信息:[{}]", messageBody);
        try {
            Thread.sleep(3000);
        } catch (InterruptedException e) {
            throw new RuntimeException(e);
        }
        //手动确认消息 multiple参数 false 单条接收  true 多条接收
        channel.basicAck(message.getEnvelope().getDeliveryTag(),false);

    });


    /**
     * 调用设置 交换机、队列、交换机和队列绑定方法
     *
     * @param args
     * @throws IOException
     * @throws InterruptedException
     * @throws TimeoutException
     */
    public static void main(String[] args) throws IOException, InterruptedException, TimeoutException {
        new OrderMessageService().handleMessage();
    }


}
运行截图

3.5、消费端确认机制。
3.5.1、消费端自动ACK(默认情况)
解释:消费端收到消息后,会自动签收消息。
3.5.2、消费端手动ACK
解释:消费端收到消息后,不会自动签收消息,需要我们在业务代码中显式签收消息。
手动ACK类型
- 单条手动ACK(推荐):multiple=false
多条手动ACK:multiple=true
代码示例
生产者:
public class OrderService {

    /**
     * 测试生产消息
     * @throws IOException
     * @throws InterruptedException
     * @throws TimeoutException
     */
    public  void testSendMessage() throws IOException, TimeoutException {
        log.info("发送消息");
        ConnectionFactory connectionFactory = new ConnectionFactory();
        connectionFactory.setHost("localhost");

        try (Connection connection = connectionFactory.newConnection();
             Channel channel = connection.createChannel()) {
            String messageToSend = "test";

            channel.basicPublish("exchange.order.test", "key.order", null, messageToSend.getBytes());
        }
    }

    public static void main(String[] args) throws IOException, TimeoutException {
        new OrderService().testSendMessage();
    }
}
消费者:
public class OrderMessageService {
    Channel channel;


    /**
     * 设置 交换机、队列、交换机和队列绑定
     * 在那个服务处理那个队列,配置别的服务的交换机和绑定关系。
     *
     * @throws IOException
     * @throws TimeoutException
     * @throws InterruptedException
     */
    public void handleMessage() throws IOException, TimeoutException, InterruptedException {
        log.info("start linstening message");
        ConnectionFactory connectionFactory = new ConnectionFactory();

        connectionFactory.setHost("localhost");

        try (Connection connection = connectionFactory.newConnection();
             Channel channel = connection.createChannel()) {
            this.channel=channel;
            /*---------------------交换机 初始化----------------------*/
            channel.exchangeDeclare(
                    "exchange.order.test",  //exchange名称。
                    BuiltinExchangeType.DIRECT, //exchange类型。
                    true,   //是否持久化。
                    false,  //空闲了,是否删除交换机。
                    null);  //特殊的属性,没有传递null。


            /*---------------------队列初始化---------------------*/
            channel.queueDeclare(
                    "queue.order",  //queue的名称。
                    true,   //是否持久化。
                    false,  //是否是connection独占。
                    false,  //空闲了,是否删除队列。
                    null);  //特殊的属性,没有传递null。


            /*---------------------队列、交换机绑定 queue  exchange Bind restaurant---------------------*/
            channel.queueBind(
                    "queue.order", //队列名称
                    "exchange.order.test",    //exchange名称
                    "key.order"); //Routing key名称。


            channel.basicConsume("queue.order", false, deliverCallback,consumerTag->{});
            while (true) {
                Thread.sleep(10000);
            }
        }
    }
    DeliverCallback deliverCallback = ((consumerTag, message) -> {
        String messageBody = new String(message.getBody());
        log.info("接收到的信息:[{}]", messageBody);
        //手动确认消息
        channel.basicAck(message.getEnvelope().getDeliveryTag(),false);

    });


    /**
     * 调用设置 交换机、队列、交换机和队列绑定方法
     *
     * @param args
     * @throws IOException
     * @throws InterruptedException
     * @throws TimeoutException
     */
    public static void main(String[] args) throws IOException, InterruptedException, TimeoutException {
        new OrderMessageService().handleMessage();
    }


}
运行截图

3.5.3、重回队列
若设置了重回队列,消息被NACK之后,会返回队列末尾,等待进一步被处理。一般不建议开启重回队列,因为第一次处理异常的消息,再次处理,基本上也是异常。
生产者:
public class OrderService {

    /**
     * 测试生产消息
     * @throws IOException
     * @throws InterruptedException
     * @throws TimeoutException
     */
    public  void testSendMessage() throws IOException, TimeoutException {
        log.info("发送消息");
        ConnectionFactory connectionFactory = new ConnectionFactory();
        connectionFactory.setHost("localhost");

        try (Connection connection = connectionFactory.newConnection();
             Channel channel = connection.createChannel()) {
            String messageToSend = "test";

            channel.basicPublish("exchange.order.test", "key.order", null, messageToSend.getBytes());
        }
    }

    public static void main(String[] args) throws IOException, TimeoutException {
        new OrderService().testSendMessage();
    }
}
消费者:
public class OrderMessageService {
    Channel channel;


    /**
     * 设置 交换机、队列、交换机和队列绑定
     * 在那个服务处理那个队列,配置别的服务的交换机和绑定关系。
     *
     * @throws IOException
     * @throws TimeoutException
     * @throws InterruptedException
     */
    public void handleMessage() throws IOException, TimeoutException, InterruptedException {
        log.info("start linstening message");
        ConnectionFactory connectionFactory = new ConnectionFactory();

        connectionFactory.setHost("localhost");

        try (Connection connection = connectionFactory.newConnection();
             Channel channel = connection.createChannel()) {
            this.channel=channel;
            /*---------------------交换机 初始化----------------------*/
            channel.exchangeDeclare(
                    "exchange.order.test",  //exchange名称。
                    BuiltinExchangeType.DIRECT, //exchange类型。
                    true,   //是否持久化。
                    false,  //空闲了,是否删除交换机。
                    null);  //特殊的属性,没有传递null。


            /*---------------------队列初始化---------------------*/
            channel.queueDeclare(
                    "queue.order",  //queue的名称。
                    true,   //是否持久化。
                    false,  //是否是connection独占。
                    false,  //空闲了,是否删除队列。
                    null);  //特殊的属性,没有传递null。


            /*---------------------队列、交换机绑定 queue  exchange Bind restaurant---------------------*/
            channel.queueBind(
                    "queue.order", //队列名称
                    "exchange.order.test",    //exchange名称
                    "key.order"); //Routing key名称。


            channel.basicConsume("queue.order", false, deliverCallback,consumerTag->{});
            while (true) {
                Thread.sleep(10000);
            }
        }
    }
    DeliverCallback deliverCallback = ((consumerTag, message) -> {
        String messageBody = new String(message.getBody());
        log.info("接收到的信息:[{}]", messageBody);
        //重回队列
        channel.basicNack(message.getEnvelope().getDeliveryTag(),false,true);

    });


    /**
     * 调用设置 交换机、队列、交换机和队列绑定方法
     *
     * @param args
     * @throws IOException
     * @throws InterruptedException
     * @throws TimeoutException
     */
    public static void main(String[] args) throws IOException, InterruptedException, TimeoutException {
        new OrderMessageService().handleMessage();
    }


}
运行截图:

3.6、消息过期机制。
3.6.1、TTL介绍
- RabbitMQ的过期时间称为TTL(Time to Live),生存时间。
- RabbitMQ的过期时间分为消息TTL和队列TTL。
- 消息TTL设置了单条消息的过期时间。
队列TTL设置队列中所有消息的过期时间。
3.6.2、如何找到适合自己的TTL
TTL的设置主要考虑技术架构与业务,TTL应该明显长于服务的平均重启时间。建议TTL长于业务高峰期时间。
3.6.3、设置单条消息的过期时间
生产者:public class OrderService { /** * 测试生产消息 * @throws IOException * @throws InterruptedException * @throws TimeoutException */ public void testSendMessage() throws IOException, TimeoutException { log.info("发送消息"); ConnectionFactory connectionFactory = new ConnectionFactory(); connectionFactory.setHost("localhost"); try (Connection connection = connectionFactory.newConnection(); Channel channel = connection.createChannel()) { String messageToSend = "test"; //设置消息过期时间 AMQP.BasicProperties properties=new AMQP.BasicProperties().builder().expiration("15000").build(); channel.basicPublish("exchange.order.test", "key.order", properties, messageToSend.getBytes()); } } public static void main(String[] args) throws IOException, TimeoutException { new OrderService().testSendMessage(); } }消费者:
public class OrderMessageService {
    Channel channel;


    /**
     * 设置 交换机、队列、交换机和队列绑定
     * 在那个服务处理那个队列,配置别的服务的交换机和绑定关系。
     *
     * @throws IOException
     * @throws TimeoutException
     * @throws InterruptedException
     */
    public void handleMessage() throws IOException, TimeoutException, InterruptedException {
        log.info("start linstening message");
        ConnectionFactory connectionFactory = new ConnectionFactory();

        connectionFactory.setHost("localhost");

        try (Connection connection = connectionFactory.newConnection();
             Channel channel = connection.createChannel()) {
            this.channel=channel;
            /*---------------------交换机 初始化----------------------*/
            channel.exchangeDeclare(
                    "exchange.order.test",  //exchange名称。
                    BuiltinExchangeType.DIRECT, //exchange类型。
                    true,   //是否持久化。
                    false,  //空闲了,是否删除交换机。
                    null);  //特殊的属性,没有传递null。


            /*---------------------队列初始化---------------------*/
            channel.queueDeclare(
                    "queue.order",  //queue的名称。
                    true,   //是否持久化。
                    false,  //是否是connection独占。
                    false,  //空闲了,是否删除队列。
                    null);  //特殊的属性,没有传递null。


            /*---------------------队列、交换机绑定 queue  exchange Bind restaurant---------------------*/
            channel.queueBind(
                    "queue.order", //队列名称
                    "exchange.order.test",    //exchange名称
                    "key.order"); //Routing key名称。

            //设置消费端限流
            channel.basicQos(2);//表示同时可以有两条消息在处理中,没有被消费者确认消息。
            channel.basicConsume("queue.order", false, deliverCallback,consumerTag->{});
            while (true) {
                Thread.sleep(10000);
            }
        }
    }
    DeliverCallback deliverCallback = ((consumerTag, message) -> {
        String messageBody = new String(message.getBody());
        log.info("接收到的信息:[{}]", messageBody);
        try {
            Thread.sleep(3000);
        } catch (InterruptedException e) {
            throw new RuntimeException(e);
        }
        //手动确认消息 multiple参数 false 单条接收  true 多条接收
        channel.basicAck(message.getEnvelope().getDeliveryTag(),false);

    });


    /**
     * 调用设置 交换机、队列、交换机和队列绑定方法
     *
     * @param args
     * @throws IOException
     * @throws InterruptedException
     * @throws TimeoutException
     */
    public static void main(String[] args) throws IOException, InterruptedException, TimeoutException {
        new OrderMessageService().handleMessage();
    }


}
运行截图

3.6.4、设置队列中所有消息的过期时间
生产者:
public class OrderService {

    /**
     * 测试生产消息
     * @throws IOException
     * @throws InterruptedException
     * @throws TimeoutException
     */
    public  void testSendMessage() throws IOException, TimeoutException {
        log.info("发送消息");
        ConnectionFactory connectionFactory = new ConnectionFactory();
        connectionFactory.setHost("localhost");

        try (Connection connection = connectionFactory.newConnection();
             Channel channel = connection.createChannel()) {
            String messageToSend = "test";
            //设置消息过期时间
            //AMQP.BasicProperties properties=new AMQP.BasicProperties().builder().expiration("15000").build();
            channel.basicPublish("exchange.order.test", "key.order", null, messageToSend.getBytes());
        }
    }

    public static void main(String[] args) throws IOException, TimeoutException {
        new OrderService().testSendMessage();
    }
}
消费者:
public class OrderMessageService {
    Channel channel;


    /**
     * 设置 交换机、队列、交换机和队列绑定
     * 在那个服务处理那个队列,配置别的服务的交换机和绑定关系。
     *
     * @throws IOException
     * @throws TimeoutException
     * @throws InterruptedException
     */
    public void handleMessage() throws IOException, TimeoutException, InterruptedException {
        log.info("start linstening message");
        ConnectionFactory connectionFactory = new ConnectionFactory();

        connectionFactory.setHost("localhost");

        try (Connection connection = connectionFactory.newConnection();
             Channel channel = connection.createChannel()) {
            this.channel=channel;
            /*---------------------交换机 初始化----------------------*/
            channel.exchangeDeclare(
                    "exchange.order.test",  //exchange名称。
                    BuiltinExchangeType.DIRECT, //exchange类型。
                    true,   //是否持久化。
                    false,  //空闲了,是否删除交换机。
                    null);  //特殊的属性,没有传递null。
            //设置队列中消息的过期时间
            Map<String, Object>  args=new HashMap<>(16);
            args.put("x-message-ttl",15000);
            /*---------------------队列初始化---------------------*/
            channel.queueDeclare(
                    "queue.order",  //queue的名称。
                    true,   //是否持久化。
                    false,  //是否是connection独占。
                    false,  //空闲了,是否删除队列。
                    args);  //特殊的属性,没有传递null。


            /*---------------------队列、交换机绑定 queue  exchange Bind restaurant---------------------*/
            channel.queueBind(
                    "queue.order", //队列名称
                    "exchange.order.test",    //exchange名称
                    "key.order"); //Routing key名称。

            //设置消费端限流
            channel.basicQos(2);//表示同时可以有两条消息在处理中,没有被消费者确认消息。
            channel.basicConsume("queue.order", false, deliverCallback,consumerTag->{});
            while (true) {
                Thread.sleep(10000);
            }
        }
    }
    DeliverCallback deliverCallback = ((consumerTag, message) -> {
        String messageBody = new String(message.getBody());
        log.info("接收到的信息:[{}]", messageBody);
        try {
            Thread.sleep(3000);
        } catch (InterruptedException e) {
            throw new RuntimeException(e);
        }
        //手动确认消息 multiple参数 false 单条接收  true 多条接收
        channel.basicAck(message.getEnvelope().getDeliveryTag(),false);

    });


    /**
     * 调用设置 交换机、队列、交换机和队列绑定方法
     *
     * @param args
     * @throws IOException
     * @throws InterruptedException
     * @throws TimeoutException
     */
    public static void main(String[] args) throws IOException, InterruptedException, TimeoutException {
        new OrderMessageService().handleMessage();
    }


}
3.7、死信队列。
3.7.1、死信队列应用场景
消息被设置了过期时间,过期后会直接被丢弃。直接被丢弃的消息,无法对系统运行异常发出警报,需要使用RabbitMQ死信队列,收集过期消息,以供分析。
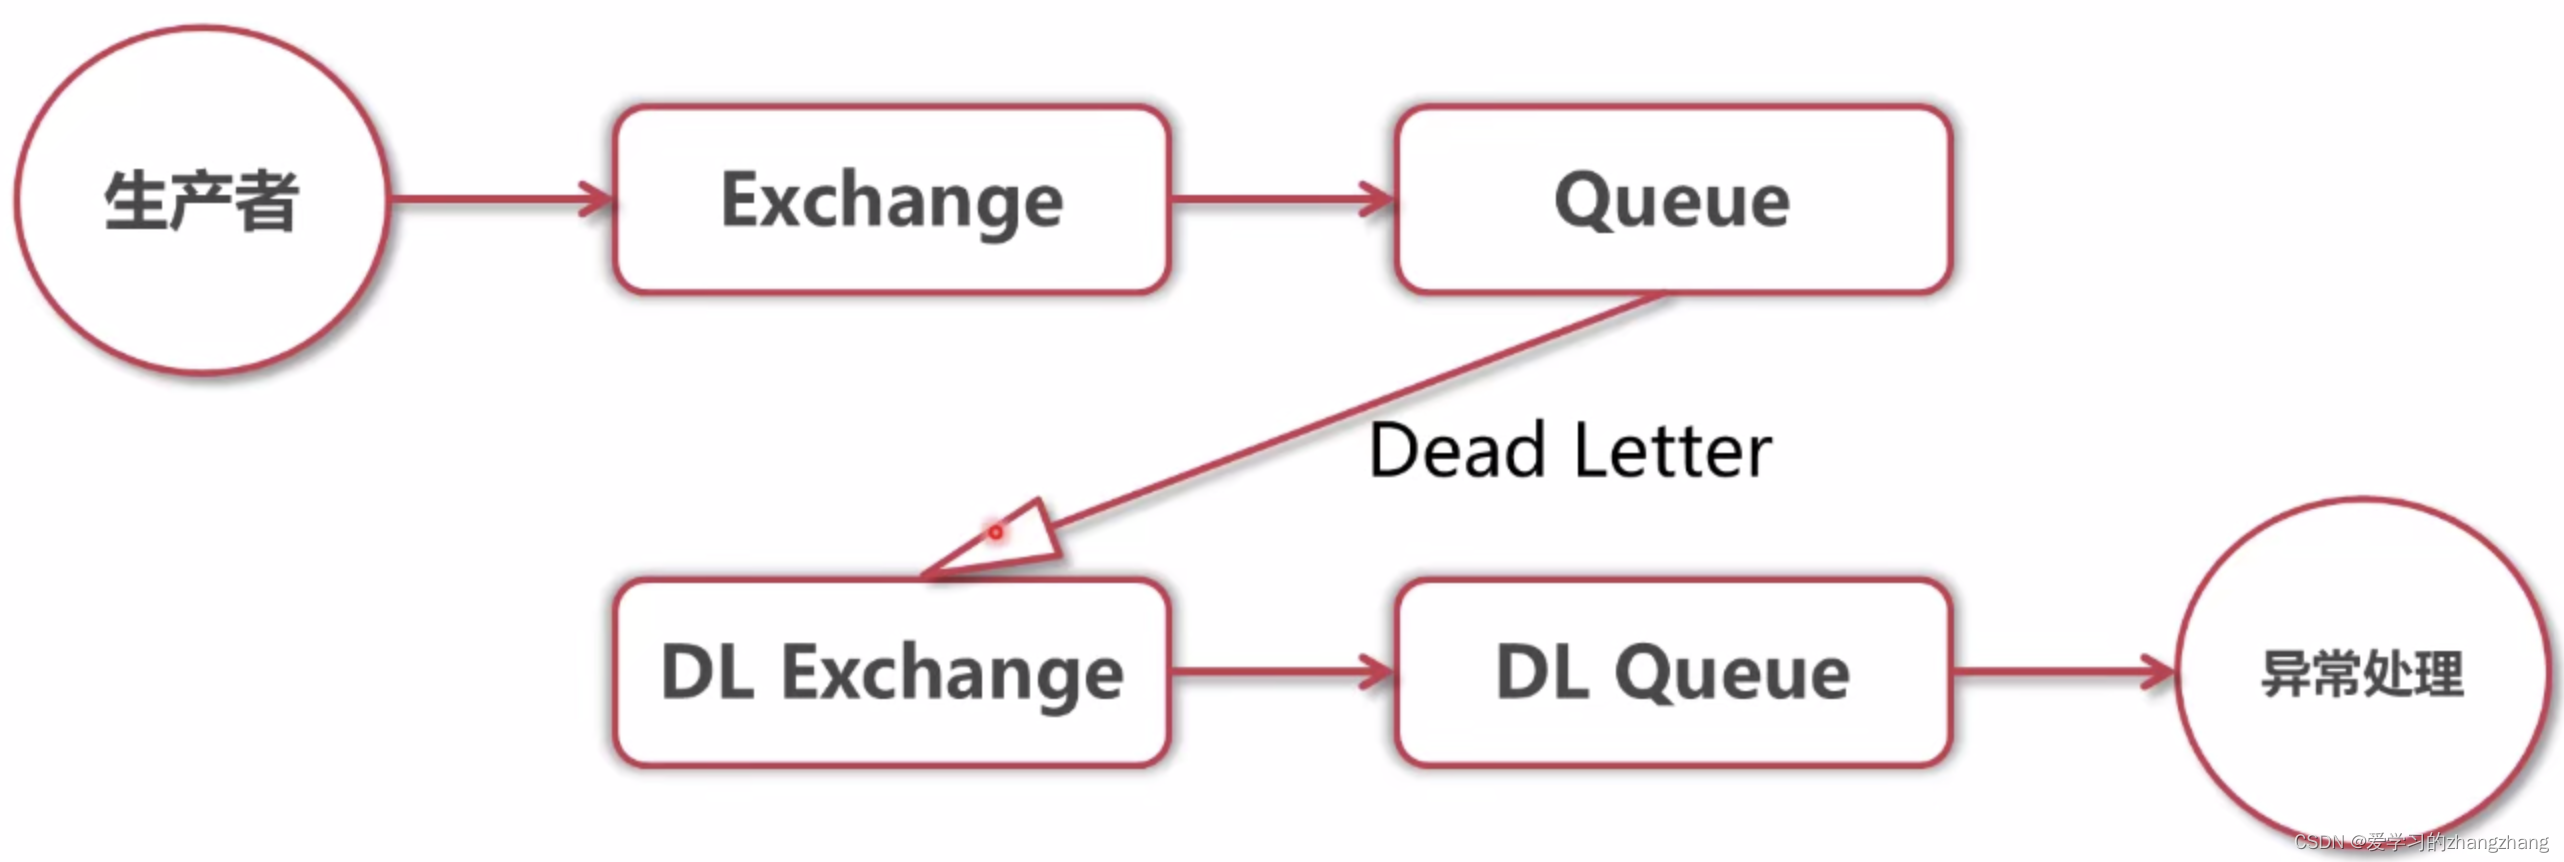
3.7.2、什么是死信队列
- 死信队列:队列被配置了DLX属性(Dead-Letter-Exchange)
- 当一个消息变成死信后,能重新被发布到另一个Exchange,这个Exchange也是一个普通交换机。
- 死信被死信交换机路由后,一般进入一个估计队列。
3.7.3 、消息怎么变成死信
- 消息被拒绝(reject/nack)并且requeue=false。rejected
- 消息过期(TTL到期)。expired
- 队列达到最大长度。maxlen
3.7.4、死信队列设置方法
设置转发、接收死信的交换机和队列:
- Exchange:dlx.exchange。
- Queue:dlx.queue
- RoutingKey:#
在需要设置死信的队列加入参数:
- x-dead-letter-exchange=dlx.exchange
3.7.5、死信队列示例代码
消息过期示例:发送消息,不启动死信队列消费者,启动处理死信队列路由的消息的消费者
生产者:
public class OrderService {

    /**
     * 测试生产消息
     * @throws IOException
     * @throws InterruptedException
     * @throws TimeoutException
     */
    public  void testSendMessage() throws IOException, TimeoutException {
        log.info("发送消息");
        ConnectionFactory connectionFactory = new ConnectionFactory();
        connectionFactory.setHost("localhost");

        try (Connection connection = connectionFactory.newConnection();
             Channel channel = connection.createChannel()) {
            String messageToSend = "test";
            //设置消息过期时间
            //AMQP.BasicProperties properties=new AMQP.BasicProperties().builder().expiration("15000").build();
            channel.basicPublish("exchange.order.test", "key.order", null, messageToSend.getBytes());
        }
    }

    public static void main(String[] args) throws IOException, TimeoutException {
        new OrderService().testSendMessage();
    }
}
消费者(死信队列):
public class OrderMessageService {
    Channel channel;


    /**
     * 设置 交换机、队列、交换机和队列绑定
     * 在那个服务处理那个队列,配置别的服务的交换机和绑定关系。
     *
     * @throws IOException
     * @throws TimeoutException
     * @throws InterruptedException
     */
    public void handleMessage() throws IOException, TimeoutException, InterruptedException {
        log.info("start linstening message");
        ConnectionFactory connectionFactory = new ConnectionFactory();

        connectionFactory.setHost("localhost");

        try (Connection connection = connectionFactory.newConnection();
             Channel channel = connection.createChannel()) {
            this.channel=channel;
            /*---------------------交换机 初始化----------------------*/
            channel.exchangeDeclare(
                    "exchange.order.test",  //exchange名称。
                    BuiltinExchangeType.DIRECT, //exchange类型。
                    true,   //是否持久化。
                    false,  //空闲了,是否删除交换机。
                    null);  //特殊的属性,没有传递null。
            Map<String, Object>  args=new HashMap<>(16);
            //设置队列中所有消息的过期时间
            args.put("x-message-ttl",15000);
            //设置队列为死信队列
            args.put("x-dead-letter-exchange","exchange.dlx");
            设置队列最大长度
            //args.put("x-max-length",5);
            /*---------------------队列初始化---------------------*/
            channel.queueDeclare(
                    "queue.order",  //queue的名称。
                    true,   //是否持久化。
                    false,  //是否是connection独占。
                    false,  //空闲了,是否删除队列。
                    args);  //特殊的属性,没有传递null。


            /*---------------------队列、交换机绑定 queue  exchange Bind restaurant---------------------*/
            channel.queueBind(
                    "queue.order", //队列名称
                    "exchange.order.test",    //exchange名称
                    "key.order"); //Routing key名称。

            //设置消费端限流
            //channel.basicQos(2);//表示同时可以有两条消息在处理中,没有被消费者确认消息。
            channel.basicConsume("queue.order", false, deliverCallback,consumerTag->{});
            while (true) {
                Thread.sleep(10000);
            }
        }
    }
    DeliverCallback deliverCallback = ((consumerTag, message) -> {
        String messageBody = new String(message.getBody());
        log.info("接收到的信息:[{}]", messageBody);
        try {
            Thread.sleep(3000);
        } catch (InterruptedException e) {
            throw new RuntimeException(e);
        }
        重回队列
        //channel.basicNack(message.getEnvelope().getDeliveryTag(),false,true);
        //手动确认消息 multiple参数 false 单条接收  true 多条接收
        channel.basicAck(message.getEnvelope().getDeliveryTag(),false);

    });


    /**
     * 调用设置 交换机、队列、交换机和队列绑定方法
     *
     * @param args
     * @throws IOException
     * @throws InterruptedException
     * @throws TimeoutException
     */
    public static void main(String[] args) throws IOException, InterruptedException, TimeoutException {
        new OrderMessageService().handleMessage();
    }


}
处理死信队列路由的消息的消费者:
public class OrderDlxMessageService {
    Channel channel;


    /**
     * 设置 交换机、队列、交换机和队列绑定
     * 在那个服务处理那个队列,配置别的服务的交换机和绑定关系。
     *
     * @throws IOException
     * @throws TimeoutException
     * @throws InterruptedException
     */
    public void handleMessage() throws IOException, TimeoutException, InterruptedException {
        log.info("start linstening message");
        ConnectionFactory connectionFactory = new ConnectionFactory();

        connectionFactory.setHost("localhost");

        try (Connection connection = connectionFactory.newConnection();
             Channel channel = connection.createChannel()) {
            this.channel=channel;
            /*---------------------交换机 初始化----------------------*/
            channel.exchangeDeclare(
                    "exchange.dlx",  //exchange名称。
                    BuiltinExchangeType.TOPIC, //exchange类型。
                    true,   //是否持久化。
                    false,  //空闲了,是否删除交换机。
                    null);  //特殊的属性,没有传递null。

            /*---------------------队列初始化---------------------*/
            channel.queueDeclare(
                    "exchange.dlx.queue.order",  //queue的名称。
                    true,   //是否持久化。
                    false,  //是否是connection独占。
                    false,  //空闲了,是否删除队列。
                    null);  //特殊的属性,没有传递null。


            /*---------------------队列、交换机绑定 queue  exchange Bind restaurant---------------------*/
            channel.queueBind(
                    "exchange.dlx.queue.order", //队列名称
                    "exchange.dlx",    //exchange名称
                    "#"); //Routing key名称。

            设置消费端限流
            //channel.basicQos(2);//表示同时可以有两条消息在处理中,没有被消费者确认消息。
            channel.basicConsume("exchange.dlx.queue.order", false, deliverCallback,consumerTag->{});
            while (true) {
                Thread.sleep(10000);
            }
        }
    }
    DeliverCallback deliverCallback = ((consumerTag, message) -> {
        String messageBody = new String(message.getBody());
        log.info("死信接收到的信息:[{}]", messageBody);
        try {
            Thread.sleep(3000);
        } catch (InterruptedException e) {
            throw new RuntimeException(e);
        }
        //手动确认消息 multiple参数 false 单条接收  true 多条接收
        channel.basicAck(message.getEnvelope().getDeliveryTag(),false);

    });


    /**
     * 调用设置 交换机、队列、交换机和队列绑定方法
     *
     * @param args
     * @throws IOException
     * @throws InterruptedException
     * @throws TimeoutException
     */
    public static void main(String[] args) throws IOException, InterruptedException, TimeoutException {
        new OrderDlxMessageService().handleMessage();
    }


}
运行截图


3.8、总结
3.8.1、善用RabbitMQ高级特性
- 对于RabbitMQ的高级特性,要善加利用。
- 接收端消息确认,死信队列是非常常用的特性。
3.8.2、慎用RabbitMQ高级特性
- 不要无限追求高级,用上所有RabbitMQ的高级特性。
- 重回队列、发送端确认是不常用的特性,谨慎使用。
3.8.3、善用RabbitMQ管控台
- 管控台时RabbitMQ调试的利器。
- RabbitMQ高级特性多数都涉及交换机,队列的属性配置,可以在管控台确认配置是否生效。
- RabbitMQ高级特性很多都可以在控制台进行试验。
四、SpringBoot集成RabbitMQ
4.1、Spring AMQP四大特性
- 异步消息监听容器。
- 原生提供RabbitTemplate,方便收发消息。
- 原生提供RabbitAdmin,方便队列、交换机声明。
- Spring Boot Config 原生支持RabbitMQ。
4.1.1、异步消息监听容器。
- 原始实现:自己实现线程池,会调方法,并注册回调方法。
- SpringBoot:自动实现可配置的线程池,并自动注册回调方法,只需要实现回调方法。
4.1.2、原生提供RabbitTemplate,方便收发消息。
- 相比basicPublish,功能更加强大,能自动实现消息转换等功能。
4.1.3、原生提供RabbitAdmin,方便队列、交换机声明。
- 声明时提供队列、交换机、绑定关系的注册方法。
- 甚至不需要显式的注册代码。
4.1.4、Spring Boot Config 原生支持RabbitMQ。
- 充分发挥SpringBoot约定大于配置的特性。
- 可以隐式建立Connection、Channel。
4.2、利用RabbitAdmin快速配置Rabbit服务
4.2.1、RabbitAdmin
- RabbitAdmin类用来管理RabbitMQ
4.2.2、RabbitAdmin功能
- declareExchange:创建交换机。
- deleteExchange:删除交换机。
- declareQueue:创建队列。
- deleteQueue:删除队列。
- purgeQueue:清空队列。
- declareBinding:新建绑定关系。
- removeBinding:删除绑定关系。
- getQueueProperties:查询队列属性。
4.2.3、代码实现
导入pom.xml
<!-- springboot整合rabbitmq依赖 -->
<dependency>
    <groupId>org.springframework.boot</groupId>
    <artifactId>spring-boot-starter-amqp</artifactId>
</dependency>
使用RabbitAdmin创建队列、交换机、交换机绑定对垒(spring amqp封装了之前的声明写法)
@Configuration
public class RabbitConfig {

    /**
     * 初始化rabbitmq
     */
    @Autowired
    public void initRabbitmq() {
        CachingConnectionFactory connectionFactory = new CachingConnectionFactory();
        connectionFactory.setHost("127.0.0.1");
        connectionFactory.setPort(5672);
        RabbitAdmin rabbitAdmin = new RabbitAdmin(connectionFactory);
        Exchange exchange = new DirectExchange("springboot.rabbitmq-exchange");
        rabbitAdmin.declareExchange(exchange);
        Queue queue = new Queue("springboot.rabbitmq-queue");
        rabbitAdmin.declareQueue(queue);
        Binding binding = new Binding("springboot.rabbitmq-queue",
                Binding.DestinationType.QUEUE, "springboot.rabbitmq-exchange",
                "key.springboot.order", null);
        rabbitAdmin.declareBinding(binding);
    }
}
利用RabbitAdmin简化配置Rabbit服务流程 (RabbitAdmin声明式配置)
- 将Exchange、Queue、Binding声明为Bean。
- 再将RabbitAdmin声明为Bean。
- Exchange、Queue、Binding即可自动创建。
RabbitAdmin声明式配置的优点
- 将声明和创建工作分开,解耦多人工作。
- 不需显示声明,减少代码量,减少Bug。
代码示例:
@Configuration
public class RabbitConfig {


    @Bean
    public Exchange exchange1() {
        return new DirectExchange("springboot.rabbitmq-exchange");
    }

    @Bean
    public Queue queue1() {
        return new Queue("springboot.rabbitmq-queue");
    }

    @Bean
    public Binding binding1() {
        return new Binding("springboot.rabbitmq-queue",
                Binding.DestinationType.QUEUE, "springboot.rabbitmq-exchange",
                "key.springboot.order", null);
    }

    @Bean
    public ConnectionFactory connectionFactory() {
        CachingConnectionFactory connectionFactory = new CachingConnectionFactory();
        connectionFactory.setHost("127.0.0.1");
        connectionFactory.setPort(5672);
        connectionFactory.setPassword("guest");
        connectionFactory.setUsername("guest");
        connectionFactory.createConnection();
        return connectionFactory;
    }

    @Bean
    public RabbitAdmin rabbitAdmin(ConnectionFactory connectionFactory) {
        RabbitAdmin rabbitAdmin = new RabbitAdmin(connectionFactory);
        rabbitAdmin.setAutoStartup(true);
        return rabbitAdmin;
    }
}
运行截图


4.3、利用RabbitTemplate快速消息发送
4.3.1、RabbitTemplate简介
- RabbitTemplate与RestTemplate类似,使用了模版方法设计模式。
- RabbitTemplate提供了丰富的功能,方便消息收发。
- RabbitTemplate可以显式传入配置也可以隐式声明配置。
4.3.2、配置RabbitTemplate
@Slf4j
@Configuration
public class RabbitConfig {


    @Bean
    public Exchange exchange1() {
        return new DirectExchange("springboot.rabbitmq-exchange");
    }

    @Bean
    public Queue queue1() {
        return new Queue("springboot.rabbitmq-queue");
    }

    @Bean
    public Binding binding1() {
        return new Binding("springboot.rabbitmq-queue",
                Binding.DestinationType.QUEUE, "springboot.rabbitmq-exchange",
                "key.springboot.order", null);
    }

    @Bean
    public ConnectionFactory connectionFactory() {
        CachingConnectionFactory connectionFactory = new CachingConnectionFactory();
        connectionFactory.setHost("127.0.0.1");
        connectionFactory.setPort(5672);
        connectionFactory.setPassword("guest");
        connectionFactory.setUsername("guest");
        connectionFactory.createConnection();
        return connectionFactory;
    }

    @Bean
    public RabbitAdmin rabbitAdmin(ConnectionFactory connectionFactory) {
        RabbitAdmin rabbitAdmin = new RabbitAdmin(connectionFactory);
        rabbitAdmin.setAutoStartup(true);
        return rabbitAdmin;
    }
    @Bean
    public RabbitTemplate rabbitTemplate(ConnectionFactory connectionFactory) {
        return new RabbitTemplate(connectionFactory);
    }
}
4.3.3、RabbitTemplate发送消息
@Service
@Slf4j
public class OrderTemplateService {
    @Autowired
    private RabbitTemplate rabbitTemplate;

    /**
     * 测试生产消息
     * @throws IOException
     * @throws InterruptedException
     * @throws TimeoutException
     */
    public  void testSendMessage()  {
        log.info("发送消息");
        //新方式发送消息
        String messageToSend = "test";
        //MessageProperties messageProperties=new MessageProperties();
        //messageProperties.setExpiration("1500");
        //Message message=new Message(messageToSend.getBytes(),messageProperties);
        //消息体需要是Message对象
        //rabbitTemplate.send("exchange.order.test", "key.order", message);
        //消息体需要是Object类型(自动转换后发送)
        rabbitTemplate.convertAndSend("exchange.order.test", "key.order", messageToSend);
    }

}
4.3.4、RabbitTemplate实现发送端确认、消息返回
修改配置RabbitConfig中的connectionFactory配置(开启发送端确认、消息返回),配置rabbitTemplate设置发送端确认、消息返回)
@Slf4j
@Configuration
public class RabbitConfig {


    @Bean
    public Exchange exchange1() {
        return new DirectExchange("springboot.rabbitmq-exchange");
    }

    @Bean
    public Queue queue1() {
        return new Queue("springboot.rabbitmq-queue");
    }

    @Bean
    public Binding binding1() {
        return new Binding("springboot.rabbitmq-queue",
                Binding.DestinationType.QUEUE, "springboot.rabbitmq-exchange",
                "key.springboot.order", null);
    }

    @Bean
    public ConnectionFactory connectionFactory() {
        CachingConnectionFactory connectionFactory = new CachingConnectionFactory();
        connectionFactory.setHost("127.0.0.1");
        connectionFactory.setPort(5672);
        connectionFactory.setPassword("guest");
        connectionFactory.setUsername("guest");
        //开启发送端确认
        connectionFactory.setPublisherConfirmType(CachingConnectionFactory.ConfirmType.CORRELATED);//SIMPLE=简单的;CORRELATED=相关的;NONE=关闭b;
        //开启消息返回
        connectionFactory.setPublisherReturns(true);
        connectionFactory.createConnection();
        return connectionFactory;
    }

    @Bean
    public RabbitAdmin rabbitAdmin(ConnectionFactory connectionFactory) {
        RabbitAdmin rabbitAdmin = new RabbitAdmin(connectionFactory);
        rabbitAdmin.setAutoStartup(true);
        return rabbitAdmin;
    }
    @Bean
    public RabbitTemplate rabbitTemplate(ConnectionFactory connectionFactory) {
        RabbitTemplate rabbitTemplate = new RabbitTemplate(connectionFactory);

        rabbitTemplate.setMandatory(true);
        //消息返回
        rabbitTemplate.setReturnCallback((message, i, s, s1, s2) -> {
            log.info("消息返回实现,message:{},replyCode:{},replyText:{},exchange:{},routingKey:{}", message, i, s, s1, s2);
        });
        //发送端确认
        rabbitTemplate.setConfirmCallback((correlationData, b, s) -> {
            log.info("发送端确认,correlationData:{},ack:{},cause:{}", correlationData, b, s);

        });
        return rabbitTemplate;
    }
}
发送消息(设置消息id,可以追溯哪一条确认了)
@Service
@Slf4j
public class OrderTemplateService {
    @Autowired
    private RabbitTemplate rabbitTemplate;

    /**
     * 测试生产消息
     * @throws IOException
     * @throws InterruptedException
     * @throws TimeoutException
     */
    public  void testSendMessage()  {
        log.info("发送消息");
        //新方式发送消息
        String messageToSend = "test";
        //MessageProperties messageProperties=new MessageProperties();
        //messageProperties.setExpiration("1500");
        //Message message=new Message(messageToSend.getBytes(),messageProperties);
        //消息体需要是Message对象
        //rabbitTemplate.send("exchange.order.test", "key.order", message);
        //消息体需要是Object类型(自动转换后发送)
        //发送消息时,指定消息id;消息确认时,接收指定消息id
        CorrelationData correlationData=new CorrelationData();
        correlationData.setId("12388891231239192");
        rabbitTemplate.convertAndSend("exchange.order.test", "key.order", messageToSend,correlationData);
    }

}
运行结果(消息返回测试,可以设置个没有的RoutingKey)


4.3.5、SimpleMessageListenerContainer接收消息
RabbitConfig
@Slf4j
@Configuration
public class RabbitConfig {


    @Bean
    public Exchange exchange1() {
        return new DirectExchange("springboot.rabbitmq-exchange");
    }

    @Bean
    public Queue queue1() {
        return new Queue("springboot.rabbitmq-queue");
    }

    @Bean
    public Binding binding1() {
        return new Binding("springboot.rabbitmq-queue",
                Binding.DestinationType.QUEUE, "springboot.rabbitmq-exchange",
                "key.springboot.order", null);
    }

    @Bean
    public ConnectionFactory connectionFactory() {
        CachingConnectionFactory connectionFactory = new CachingConnectionFactory();
        connectionFactory.setHost("127.0.0.1");
        connectionFactory.setPort(5672);
        connectionFactory.setPassword("guest");
        connectionFactory.setUsername("guest");
        //开启发送端确认
        connectionFactory.setPublisherConfirmType(CachingConnectionFactory.ConfirmType.CORRELATED);//SIMPLE=简单的;CORRELATED=相关的;NONE=关闭b;
        //开启消息返回
        connectionFactory.setPublisherReturns(true);
        connectionFactory.createConnection();
        return connectionFactory;
    }

    @Bean
    public RabbitAdmin rabbitAdmin(ConnectionFactory connectionFactory) {
        RabbitAdmin rabbitAdmin = new RabbitAdmin(connectionFactory);
        rabbitAdmin.setAutoStartup(true);
        return rabbitAdmin;
    }

    @Bean
    public RabbitTemplate rabbitTemplate(ConnectionFactory connectionFactory) {
        RabbitTemplate rabbitTemplate = new RabbitTemplate(connectionFactory);

        rabbitTemplate.setMandatory(true);
        //消息返回
        rabbitTemplate.setReturnCallback((message, i, s, s1, s2) -> {
            log.info("消息返回实现,message:{},replyCode:{},replyText:{},exchange:{},routingKey:{}", message, i, s, s1, s2);
        });
        //发送端确认
        rabbitTemplate.setConfirmCallback((correlationData, b, s) -> {
            log.info("发送端确认,correlationData:{},ack:{},cause:{}", correlationData, b, s);

        });
        return rabbitTemplate;
    }

    @Bean
    public SimpleMessageListenerContainer messageListenerContainer(ConnectionFactory connectionFactory) {
        SimpleMessageListenerContainer simpleMessageListenerContainer = new SimpleMessageListenerContainer(connectionFactory);
        //针对哪些队列(参数为可变参数)
        simpleMessageListenerContainer.setQueueNames("springboot.rabbitmq-queue");
        //同时有多少个消费者线程在消费这个队列,相当于线程池的线程数字。
        simpleMessageListenerContainer.setConcurrentConsumers(3);
        //最大的消费者线程数
        simpleMessageListenerContainer.setMaxConcurrentConsumers(5);
        //设置消息确认方式    NONE=不确认,MANUAL=手动确认,AUTO=自动确认;
        //自动确认
        //simpleMessageListenerContainer.setAcknowledgeMode(AcknowledgeMode.AUTO);
        //simpleMessageListenerContainer.setMessageListener(message -> log.info("springboot.rabbitmq-queue接收到的消息:[{}]", message));
        //手动确认(单条确认)
        simpleMessageListenerContainer.setAcknowledgeMode(AcknowledgeMode.MANUAL);
        simpleMessageListenerContainer.setMessageListener((ChannelAwareMessageListener) (message, channel) -> {
            log.info("springboot.rabbitmq-queue接收到的消息:[{}]", message);
            channel.basicAck(message.getMessageProperties().getDeliveryTag(), false);
        });
        //消费端限流
        simpleMessageListenerContainer.setPrefetchCount(1);
        return simpleMessageListenerContainer;
    }
}
消息发送
@Service
@Slf4j
public class OrderTemplateService {
    @Autowired
    private RabbitTemplate rabbitTemplate;

    /**
     * 测试生产消息
     * @throws IOException
     * @throws InterruptedException
     * @throws TimeoutException
     */
    public  void testSendMessage()  {
        log.info("发送消息");
        //新方式发送消息
        String messageToSend = "test";
        //MessageProperties messageProperties=new MessageProperties();
        //messageProperties.setExpiration("1500");
        //Message message=new Message(messageToSend.getBytes(),messageProperties);
        //消息体需要是Message对象
        //rabbitTemplate.send("exchange.order.test", "key.order", message);
        //消息体需要是Object类型(自动转换后发送)
        //发送消息时,指定消息id;消息确认时,接收指定消息id
        CorrelationData correlationData=new CorrelationData();
        correlationData.setId("12388891231239192");
        rabbitTemplate.convertAndSend("springboot.rabbitmq-exchange",
                "key.springboot.order", messageToSend,correlationData);
    }

}
运行截图


4.3.6、利用MessageListenerAdapter自定义消息监听
生产者
@Service
@Slf4j
public class OrderTemplateService {
    @Autowired
    private RabbitTemplate rabbitTemplate;

    /**
     * 测试生产消息
     * @throws IOException
     * @throws InterruptedException
     * @throws TimeoutException
     */
    public  void testSendMessage()  {
        log.info("发送消息");
        //新方式发送消息
        String messageToSend = "test";
        //MessageProperties messageProperties=new MessageProperties();
        //messageProperties.setExpiration("1500");
        //Message message=new Message(messageToSend.getBytes(),messageProperties);
        //消息体需要是Message对象
        //rabbitTemplate.send("exchange.order.test", "key.order", message);
        //消息体需要是Object类型(自动转换后发送)
        //发送消息时,指定消息id;消息确认时,接收指定消息id
        CorrelationData correlationData=new CorrelationData();
        correlationData.setId("12388891231239192");
        rabbitTemplate.convertAndSend("springboot.rabbitmq-exchange",
                "key.springboot.order", messageToSend,correlationData);
    }

}
配置类RabbitConfig
@Slf4j
@Configuration
public class RabbitConfig {


    @Resource
    public OrderTemplateMessageService orderTemplateMessageService;
    @Bean
    public Exchange exchange1() {
        return new DirectExchange("springboot.rabbitmq-exchange");
    }

    @Bean
    public Queue queue1() {
        return new Queue("springboot.rabbitmq-queue");
    }

    @Bean
    public Binding binding1() {
        return new Binding("springboot.rabbitmq-queue",
                Binding.DestinationType.QUEUE, "springboot.rabbitmq-exchange",
                "key.springboot.order", null);
    }

    @Bean
    public ConnectionFactory connectionFactory() {
        CachingConnectionFactory connectionFactory = new CachingConnectionFactory();
        connectionFactory.setHost("127.0.0.1");
        connectionFactory.setPort(5672);
        connectionFactory.setPassword("guest");
        connectionFactory.setUsername("guest");
        //开启发送端确认
        connectionFactory.setPublisherConfirmType(CachingConnectionFactory.ConfirmType.CORRELATED);//SIMPLE=简单的;CORRELATED=相关的;NONE=关闭b;
        //开启消息返回
        connectionFactory.setPublisherReturns(true);
        connectionFactory.createConnection();
        return connectionFactory;
    }

    @Bean
    public RabbitAdmin rabbitAdmin(ConnectionFactory connectionFactory) {
        RabbitAdmin rabbitAdmin = new RabbitAdmin(connectionFactory);
        rabbitAdmin.setAutoStartup(true);
        return rabbitAdmin;
    }

    @Bean
    public RabbitTemplate rabbitTemplate(ConnectionFactory connectionFactory) {
        RabbitTemplate rabbitTemplate = new RabbitTemplate(connectionFactory);

        rabbitTemplate.setMandatory(true);
        //消息返回
        rabbitTemplate.setReturnCallback((message, i, s, s1, s2) -> {
            log.info("消息返回实现,message:{},replyCode:{},replyText:{},exchange:{},routingKey:{}", message, i, s, s1, s2);
        });
        //发送端确认
        rabbitTemplate.setConfirmCallback((correlationData, b, s) -> {
            log.info("发送端确认,correlationData:{},ack:{},cause:{}", correlationData, b, s);

        });
        return rabbitTemplate;
    }

    @Bean
    public SimpleMessageListenerContainer messageListenerContainer(ConnectionFactory connectionFactory) {
        SimpleMessageListenerContainer simpleMessageListenerContainer = new SimpleMessageListenerContainer(connectionFactory);
        //针对哪些队列(参数为可变参数)
        simpleMessageListenerContainer.setQueueNames("springboot.rabbitmq-queue");
        //同时有多少个消费者线程在消费这个队列,相当于线程池的线程数字。
        simpleMessageListenerContainer.setConcurrentConsumers(3);
        //最大的消费者线程数
        simpleMessageListenerContainer.setMaxConcurrentConsumers(5);
        //设置消息确认方式    NONE=不确认,MANUAL=手动确认,AUTO=自动确认;
        //自动确认
        //simpleMessageListenerContainer.setAcknowledgeMode(AcknowledgeMode.AUTO);
        //simpleMessageListenerContainer.setMessageListener(message -> log.info("springboot.rabbitmq-queue接收到的消息:[{}]", message));
        //手动确认(单条确认)
        //simpleMessageListenerContainer.setAcknowledgeMode(AcknowledgeMode.MANUAL);
        //simpleMessageListenerContainer.setMessageListener((ChannelAwareMessageListener) (message, channel) -> {
        //    log.info("springboot.rabbitmq-queue接收到的消息:[{}]", message);
        //    //orderTemplateMessageService.handleMessage(message.getBody());
        //    channel.basicAck(message.getMessageProperties().getDeliveryTag(), false);
        //});
        //监听
        MessageListenerAdapter messageListenerAdapter = new MessageListenerAdapter(orderTemplateMessageService);
        //解决接收到消息处理业务类方法名称不为handleMessage且需要调用,因为MessageListenerAdapter会调用参数类中的handleMessage方法名称的方法。
        Map<String,String> methodMap=new HashMap<>(16);
        methodMap.put("springboot.rabbitmq-queue","handleMessage");
        messageListenerAdapter.setQueueOrTagToMethodName(methodMap);
        simpleMessageListenerContainer.setMessageListener(messageListenerAdapter);

        //消费端限流
        simpleMessageListenerContainer.setPrefetchCount(1);
        return simpleMessageListenerContainer;
    }
}
实现业务类
@Slf4j
@Service
public class OrderTemplateMessageService {
    public void handleMessage(String messageBody) {
        log.info("messageBody:[{}]",messageBody);
    }

}
运行截图

4.3.7、利用MessageConverter高效处理消息
配置类RabbitConfig
package com.zhang.config;

import com.zhang.dto.MessageVO;
import com.zhang.rabbittemplate.OrderTemplateMessageService;
import lombok.extern.slf4j.Slf4j;
import org.springframework.amqp.core.*;
import org.springframework.amqp.rabbit.connection.CachingConnectionFactory;
import org.springframework.amqp.rabbit.connection.ConnectionFactory;
import org.springframework.amqp.rabbit.core.RabbitAdmin;
import org.springframework.amqp.rabbit.core.RabbitTemplate;
import org.springframework.amqp.rabbit.listener.SimpleMessageListenerContainer;
import org.springframework.amqp.rabbit.listener.adapter.MessageListenerAdapter;
import org.springframework.amqp.support.converter.ClassMapper;
import org.springframework.amqp.support.converter.Jackson2JsonMessageConverter;
import org.springframework.context.annotation.Bean;
import org.springframework.context.annotation.Configuration;

import javax.annotation.Resource;
import java.util.HashMap;
import java.util.Map;


@Slf4j
@Configuration
public class RabbitConfig {


    @Resource
    public OrderTemplateMessageService orderTemplateMessageService;
    @Bean
    public Exchange exchange1() {
        return new DirectExchange("springboot.rabbitmq-exchange");
    }

    @Bean
    public Queue queue1() {
        return new Queue("springboot.rabbitmq-queue");
    }

    @Bean
    public Binding binding1() {
        return new Binding("springboot.rabbitmq-queue",
                Binding.DestinationType.QUEUE, "springboot.rabbitmq-exchange",
                "key.springboot.order", null);
    }

    @Bean
    public ConnectionFactory connectionFactory() {
        CachingConnectionFactory connectionFactory = new CachingConnectionFactory();
        connectionFactory.setHost("127.0.0.1");
        connectionFactory.setPort(5672);
        connectionFactory.setPassword("guest");
        connectionFactory.setUsername("guest");
        //开启发送端确认
        connectionFactory.setPublisherConfirmType(CachingConnectionFactory.ConfirmType.CORRELATED);//SIMPLE=简单的;CORRELATED=相关的;NONE=关闭b;
        //开启消息返回
        connectionFactory.setPublisherReturns(true);
        connectionFactory.createConnection();
        return connectionFactory;
    }

    @Bean
    public RabbitAdmin rabbitAdmin(ConnectionFactory connectionFactory) {
        RabbitAdmin rabbitAdmin = new RabbitAdmin(connectionFactory);
        rabbitAdmin.setAutoStartup(true);
        return rabbitAdmin;
    }

    @Bean
    public RabbitTemplate rabbitTemplate(ConnectionFactory connectionFactory) {
        RabbitTemplate rabbitTemplate = new RabbitTemplate(connectionFactory);

        rabbitTemplate.setMandatory(true);
        //消息返回
        rabbitTemplate.setReturnCallback((message, i, s, s1, s2) -> {
            log.info("消息返回实现,message:{},replyCode:{},replyText:{},exchange:{},routingKey:{}", message, i, s, s1, s2);
        });
        //发送端确认
        rabbitTemplate.setConfirmCallback((correlationData, b, s) -> {
            log.info("发送端确认,correlationData:{},ack:{},cause:{}", correlationData, b, s);

        });
        return rabbitTemplate;
    }

    @Bean
    public SimpleMessageListenerContainer messageListenerContainer(ConnectionFactory connectionFactory) {
        SimpleMessageListenerContainer simpleMessageListenerContainer = new SimpleMessageListenerContainer(connectionFactory);
        //针对哪些队列(参数为可变参数)
        simpleMessageListenerContainer.setQueueNames("springboot.rabbitmq-queue");
        //同时有多少个消费者线程在消费这个队列,相当于线程池的线程数字。
        simpleMessageListenerContainer.setConcurrentConsumers(3);
        //最大的消费者线程数
        simpleMessageListenerContainer.setMaxConcurrentConsumers(5);
        //设置消息确认方式    NONE=不确认,MANUAL=手动确认,AUTO=自动确认;
        //自动确认
        //simpleMessageListenerContainer.setAcknowledgeMode(AcknowledgeMode.AUTO);
        //simpleMessageListenerContainer.setMessageListener(message -> log.info("springboot.rabbitmq-queue接收到的消息:[{}]", message));
        //手动确认(单条确认)
        //simpleMessageListenerContainer.setAcknowledgeMode(AcknowledgeMode.MANUAL);
        //simpleMessageListenerContainer.setMessageListener((ChannelAwareMessageListener) (message, channel) -> {
        //    log.info("springboot.rabbitmq-queue接收到的消息:[{}]", message);
        //    //orderTemplateMessageService.handleMessage(message.getBody());
        //    channel.basicAck(message.getMessageProperties().getDeliveryTag(), false);
        //});
        //监听
        MessageListenerAdapter messageListenerAdapter = new MessageListenerAdapter(orderTemplateMessageService);
        //解决接收到消息处理业务类方法名称不为handleMessage且需要调用,因为MessageListenerAdapter会调用参数类中的handleMessage方法名称的方法。
        //Map<String,String> methodMap=new HashMap<>(16);
        //methodMap.put("springboot.rabbitmq-queue","handleMessage");
        //messageListenerAdapter.setQueueOrTagToMethodName(methodMap);
        // MessageConverter用来在收发消息时自动转换消息
        Jackson2JsonMessageConverter messageConverter = new Jackson2JsonMessageConverter();
        messageConverter.setClassMapper(new ClassMapper() {
            @Override
            public void fromClass(Class<?> aClass, MessageProperties messageProperties) {

            }

            @Override
            public Class<?> toClass(MessageProperties messageProperties) {
                // OrderMessageDTO为接收消息的类型
                return MessageVO.class;
            }
        });


        // 根据消息里面的属性判断属于哪个java类(不推荐:因为各个微服务之间可能不都是java,也可能是go语言)
        /*Jackson2JavaTypeMapper javaTypeMapper = new DefaultJackson2JavaTypeMapper();
        messageConverter.setJavaTypeMapper(javaTypeMapper);*/
        messageListenerAdapter.setMessageConverter(messageConverter);
        simpleMessageListenerContainer.setMessageListener(messageListenerAdapter);

        //消费端限流
        simpleMessageListenerContainer.setPrefetchCount(1);
        return simpleMessageListenerContainer;
    }
}
消费者
@Slf4j
@Service
public class OrderTemplateMessageService {
    public void handleMessage(MessageVO messageVO) {
        log.info("messageBody:[{}]",messageVO);
    }

}
生产者
@Service
@Slf4j
public class OrderTemplateService {
    @Autowired
    private RabbitTemplate rabbitTemplate;
    private ObjectMapper objectMapper = new ObjectMapper();
    /**
     * 测试生产消息
     * @throws IOException
     * @throws InterruptedException
     * @throws TimeoutException
     */
    public  void testSendMessage() throws JsonProcessingException {
        log.info("发送消息");
        //新方式发送消息
        MessageVO messageVO=new MessageVO();
        messageVO.setMessageBody("test");
        String messageToSend = objectMapper.writeValueAsString(messageVO);
        log.info("messageToSend:{}",messageVO);
        //MessageProperties messageProperties=new MessageProperties();
        //messageProperties.setExpiration("1500");
        //Message message=new Message(messageToSend.getBytes(),messageProperties);
        //消息体需要是Message对象
        //rabbitTemplate.send("exchange.order.test", "key.order", message);
        //消息体需要是Object类型(自动转换后发送)
        //发送消息时,指定消息id;消息确认时,接收指定消息id
        CorrelationData correlationData=new CorrelationData();
        correlationData.setId("12388891231239192");
        rabbitTemplate.convertAndSend("springboot.rabbitmq-exchange",
                "key.springboot.order", messageToSend,correlationData);
    }

}
4.3.8、利用RabbitListener快速实现消息处理器
RabbitListener是什么
- RabbitListener是 SpringBoot架构中监听消息的"终极方案”
- RabbitListener使用注解声明,对业务代码无侵入
- RabbitListener可以在SpringBoot配置文件中进行配置
@RabbitListener注解
- @RabbitListener是一个组合注解,可以嵌套以下注解:
- @Exchange:自动声明Exchange
- @Queue:自动声明队列
- @QueueBinding:自动声明绑定关系
代码演示:
配置类RabbitConfig
@Slf4j
@Configuration
public class RabbitConfig {


    @Resource
    public OrderTemplateMessageService orderTemplateMessageService;
    @Bean
    public Exchange exchange1() {
        return new DirectExchange("springboot.rabbitmq-exchange");
    }

    @Bean
    public Queue queue1() {
        return new Queue("springboot.rabbitmq-queue");
    }

    @Bean
    public Binding binding1() {
        return new Binding("springboot.rabbitmq-queue",
                Binding.DestinationType.QUEUE, "springboot.rabbitmq-exchange",
                "key.springboot.order", null);
    }

    @Bean
    public ConnectionFactory connectionFactory() {
        CachingConnectionFactory connectionFactory = new CachingConnectionFactory();
        connectionFactory.setHost("127.0.0.1");
        connectionFactory.setPort(5672);
        connectionFactory.setPassword("guest");
        connectionFactory.setUsername("guest");
        //开启发送端确认
        connectionFactory.setPublisherConfirmType(CachingConnectionFactory.ConfirmType.CORRELATED);//SIMPLE=简单的;CORRELATED=相关的;NONE=关闭b;
        //开启消息返回
        connectionFactory.setPublisherReturns(true);
        connectionFactory.createConnection();
        return connectionFactory;
    }

    @Bean
    public RabbitAdmin rabbitAdmin(ConnectionFactory connectionFactory) {
        RabbitAdmin rabbitAdmin = new RabbitAdmin(connectionFactory);
        rabbitAdmin.setAutoStartup(true);
        return rabbitAdmin;
    }

    @Bean
    public RabbitTemplate rabbitTemplate(ConnectionFactory connectionFactory) {
        RabbitTemplate rabbitTemplate = new RabbitTemplate(connectionFactory);

        rabbitTemplate.setMandatory(true);
        //消息返回
        rabbitTemplate.setReturnCallback((message, i, s, s1, s2) -> {
            log.info("消息返回实现,message:{},replyCode:{},replyText:{},exchange:{},routingKey:{}", message, i, s, s1, s2);
        });
        //发送端确认
        rabbitTemplate.setConfirmCallback((correlationData, b, s) -> {
            log.info("发送端确认,correlationData:{},ack:{},cause:{}", correlationData, b, s);

        });
        return rabbitTemplate;
    }


    @Bean
    public RabbitListenerContainerFactory rabbitListenerContainerFactory(ConnectionFactory connectionFactory){
        SimpleRabbitListenerContainerFactory factory=new SimpleRabbitListenerContainerFactory();
        factory.setConnectionFactory(connectionFactory);
        return factory;
    }
}
生产者:
@Service
@Slf4j
public class OrderTemplateService {
    @Autowired
    private RabbitTemplate rabbitTemplate;

    /**
     * 测试生产消息
     * @throws IOException
     * @throws InterruptedException
     * @throws TimeoutException
     */
    public  void testSendMessage()  {
        log.info("发送消息");
        //新方式发送消息
        MessageVO messageVO=new MessageVO();
        messageVO.setMessageBody("test");
        String messageToSend = JSON.toJSONString(messageVO);
        log.info("messageToSend:{}",messageVO);
        //MessageProperties messageProperties=new MessageProperties();
        //messageProperties.setExpiration("1500");
        //Message message=new Message(messageToSend.getBytes(),messageProperties);
        //消息体需要是Message对象
        //rabbitTemplate.send("exchange.order.test", "key.order", message);
        //消息体需要是Object类型(自动转换后发送)
        //发送消息时,指定消息id;消息确认时,接收指定消息id
        CorrelationData correlationData=new CorrelationData();
        correlationData.setId("12388891231239192");
        rabbitTemplate.convertAndSend("springboot.rabbitmq-exchange",
                "key.springboot.order", messageToSend,correlationData);
    }

}
消费者第一种方式(在类上设置@RabbitListener,在方法上设置@RabbitHandler):
@Slf4j
@Service
// 设置该类为消息监听器
@RabbitListener(containerFactory = "rabbitListenerContainerFactory",
        queues = "springboot.rabbitmq-queue"
)
public class OrderTemplateMessageServiceTWO {

    // 设置该方法为默认调用方法(注意无法使用MessageConverter接收消息)
    @RabbitHandler(isDefault = true)
    public void handMessage(@Payload Message message) throws IOException {
        String messageBody = new String(message.getBody());
        log.info("handMessage:message:{}", messageBody);
    }
}
消费者第二种方式(直接在方法上设置@RabbitListener(对整体代码入侵小)):
@Slf4j
@Service
public class OrderTemplateMessageServiceTWO {

    // 设置该方法为默认调用方法(注意无法使用MessageConverter接收消息)
    @RabbitListener(containerFactory = "rabbitListenerContainerFactory",
            queues = "springboot.rabbitmq-queue"
    )
    public void handMessage(@Payload Message message) throws IOException {
        String messageBody = new String(message.getBody());
        log.info("handMessage:message:{}", messageBody);
    }
}
运行截图:

@RabbitListener注解交换机队列绑定
@Slf4j
@Service
public class OrderTemplateMessageServiceTWO {

    // 设置该方法为默认调用方法(注意无法使用MessageConverter接收消息)
    @RabbitListener(containerFactory = "rabbitListenerContainerFactory",
            admin = "rabbitAdmin",
            bindings = {
                    @QueueBinding(
                            value = @Queue(
                                    name = "springboot.rabbitmq-queue"
                                    /*arguments = {
                                            //设置队列中所有消息的过期时间
                                            @Argument(
                                                    name = "x-message-ttl",
                                                    value = "1000",
                                                    type = "java.lang.Integer"
                                            ),
                                            //设置队列为死信队列
                                            @Argument(
                                                    name = "x-dead-letter-exchange",
                                                    value = "exchange.dlx"
                                            )
                                    }*/
                            ),
                            exchange = @Exchange(name = "springboot.rabbitmq-exchange", type = ExchangeTypes.DIRECT),
                            key = "key.springboot.order"
                    )
            }
    )
    public void handMessage(@Payload Message message) throws IOException {
        String messageBody = new String(message.getBody());
        log.info("handMessage:message:{}", messageBody);
    }
}
4.3.9、SpringBoot配置rabbitmq
SpringBoot配置Rabbitmq
spring:
  rabbitmq:
    addresses: 127.0.0.1
    host: 5672
    username: guest
    password: guest
    listener:
      direct:
        acknowledge-mode: auto
amqp配置文件配置详解
# base
spring.rabbitmq.host: 服务Host
spring.rabbitmq.port: 服务端口
spring.rabbitmq.username: 登陆用户名
spring.rabbitmq.password: 登陆密码
spring.rabbitmq.virtual-host: 连接到rabbitMQ的vhost
spring.rabbitmq.addresses: 指定client连接到的server的地址,多个以逗号分隔(优先取addresses,然后再取host)
spring.rabbitmq.requested-heartbeat: 指定心跳超时,单位秒,0为不指定;默认60s
spring.rabbitmq.publisher-confirms: 是否启用【发布确认】
spring.rabbitmq.publisher-returns: 是否启用【发布返回】
spring.rabbitmq.connection-timeout: 连接超时,单位毫秒,0表示无穷大,不超时
spring.rabbitmq.parsed-addresses:

# ssl
spring.rabbitmq.ssl.enabled: 是否支持ssl
spring.rabbitmq.ssl.key-store: 指定持有SSL certificate的key store的路径
spring.rabbitmq.ssl.key-store-password: 指定访问key store的密码
spring.rabbitmq.ssl.trust-store: 指定持有SSL certificates的Trust store
spring.rabbitmq.ssl.trust-store-password: 指定访问trust store的密码
spring.rabbitmq.ssl.algorithm: ssl使用的算法,例如,TLSv1.1

# cache
spring.rabbitmq.cache.channel.size: 缓存中保持的channel数量
spring.rabbitmq.cache.channel.checkout-timeout: 当缓存数量被设置时,从缓存中获取一个channel的超时时间,单位毫秒;如果为0,则总是创建一个新channel
spring.rabbitmq.cache.connection.size: 缓存的连接数,只有是CONNECTION模式时生效
spring.rabbitmq.cache.connection.mode: 连接工厂缓存模式:CHANNEL 和 CONNECTION

# listener
spring.rabbitmq.listener.simple.auto-startup: 是否启动时自动启动容器
spring.rabbitmq.listener.simple.acknowledge-mode: 表示消息确认方式,其有三种配置方式,分别是none、manual和auto;默认auto
spring.rabbitmq.listener.simple.concurrency: 最小的消费者数量
spring.rabbitmq.listener.simple.max-concurrency: 最大的消费者数量
spring.rabbitmq.listener.simple.prefetch: 指定一个请求能处理多少个消息,如果有事务的话,必须大于等于transaction数量.
spring.rabbitmq.listener.simple.transaction-size: 指定一个事务处理的消息数量,最好是小于等于prefetch的数量.
spring.rabbitmq.listener.simple.default-requeue-rejected: 决定被拒绝的消息是否重新入队;默认是true(与参数acknowledge-mode有关系)
spring.rabbitmq.listener.simple.idle-event-interval: 多少长时间发布空闲容器时间,单位毫秒

spring.rabbitmq.listener.simple.retry.enabled: 监听重试是否可用
spring.rabbitmq.listener.simple.retry.max-attempts: 最大重试次数
spring.rabbitmq.listener.simple.retry.initial-interval: 第一次和第二次尝试发布或传递消息之间的间隔
spring.rabbitmq.listener.simple.retry.multiplier: 应用于上一重试间隔的乘数
spring.rabbitmq.listener.simple.retry.max-interval: 最大重试时间间隔
spring.rabbitmq.listener.simple.retry.stateless: 重试是有状态or无状态

# template
spring.rabbitmq.template.mandatory: 启用强制信息;默认false
spring.rabbitmq.template.receive-timeout: receive() 操作的超时时间
spring.rabbitmq.template.reply-timeout: sendAndReceive() 操作的超时时间
spring.rabbitmq.template.retry.enabled: 发送重试是否可用
spring.rabbitmq.template.retry.max-attempts: 最大重试次数
spring.rabbitmq.template.retry.initial-interval: 第一次和第二次尝试发布或传递消息之间的间隔
spring.rabbitmq.template.retry.multiplier: 应用于上一重试间隔的乘数
spring.rabbitmq.template.retry.max-interval: 最大重试时间间隔
生产者:
@Service
@Slf4j
public class OrderTemplateService {
    @Autowired
    private RabbitTemplate rabbitTemplate;

    /**
     * 测试生产消息
     * @throws IOException
     * @throws InterruptedException
     * @throws TimeoutException
     */
    public  void testSendMessage()  {
        log.info("发送消息");
        //新方式发送消息
        MessageVO messageVO=new MessageVO();
        messageVO.setMessageBody("test");
        String messageToSend = JSON.toJSONString(messageVO);
        log.info("messageToSend:{}",messageVO);
        //MessageProperties messageProperties=new MessageProperties();
        //messageProperties.setExpiration("1500");
        //Message message=new Message(messageToSend.getBytes(),messageProperties);
        //消息体需要是Message对象
        //rabbitTemplate.send("exchange.order.test", "key.order", message);
        //消息体需要是Object类型(自动转换后发送)
        //发送消息时,指定消息id;消息确认时,接收指定消息id
        CorrelationData correlationData=new CorrelationData();
        correlationData.setId("12388891231239192");
        rabbitTemplate.convertAndSend("springboot.rabbitmq-exchange",
                "key.springboot.order", messageToSend,correlationData);
    }

}
消费者:
@Slf4j
@Service
public class OrderTemplateMessageServiceTWO {

    // 设置该方法为默认调用方法(注意无法使用MessageConverter接收消息)
    @RabbitListener(containerFactory = "rabbitListenerContainerFactory",
            bindings = {
                    @QueueBinding(
                            value = @Queue(
                                    name = "springboot.rabbitmq-queue"
                                    /*arguments = {
                                            //设置队列中所有消息的过期时间
                                            @Argument(
                                                    name = "x-message-ttl",
                                                    value = "1000",
                                                    type = "java.lang.Integer"
                                            ),
                                            //设置队列为死信队列
                                            @Argument(
                                                    name = "x-dead-letter-exchange",
                                                    value = "exchange.dlx"
                                            )
                                    }*/
                            ),
                            exchange = @Exchange(name = "springboot.rabbitmq-exchange", type = ExchangeTypes.DIRECT),
                            key = "key.springboot.order"
                    )
            }
    )
    public void handMessage(@Payload Message message) throws IOException {
        String messageBody = new String(message.getBody());
        log.info("handMessage:message:{}", messageBody);
    }
}
五、RabbitMQ集群高可用
5.1、RabbitMQ集群高可用好处
- 扩展规模
- 数据冗余
- 高可用
5.2、RabbitMQ集群搭建
5.2.1、RabbitMQ集群搭建概述
- 多个RabbitMQ单节点,经过配置组成RabbitMQ集群。
- 集群节点之间共享数据,不共享队列数据(默认)。
- RabbitMQ节点数据互相转发,客户端通过单一节点访问所有数据。
5.2.2、集群架构拓扑 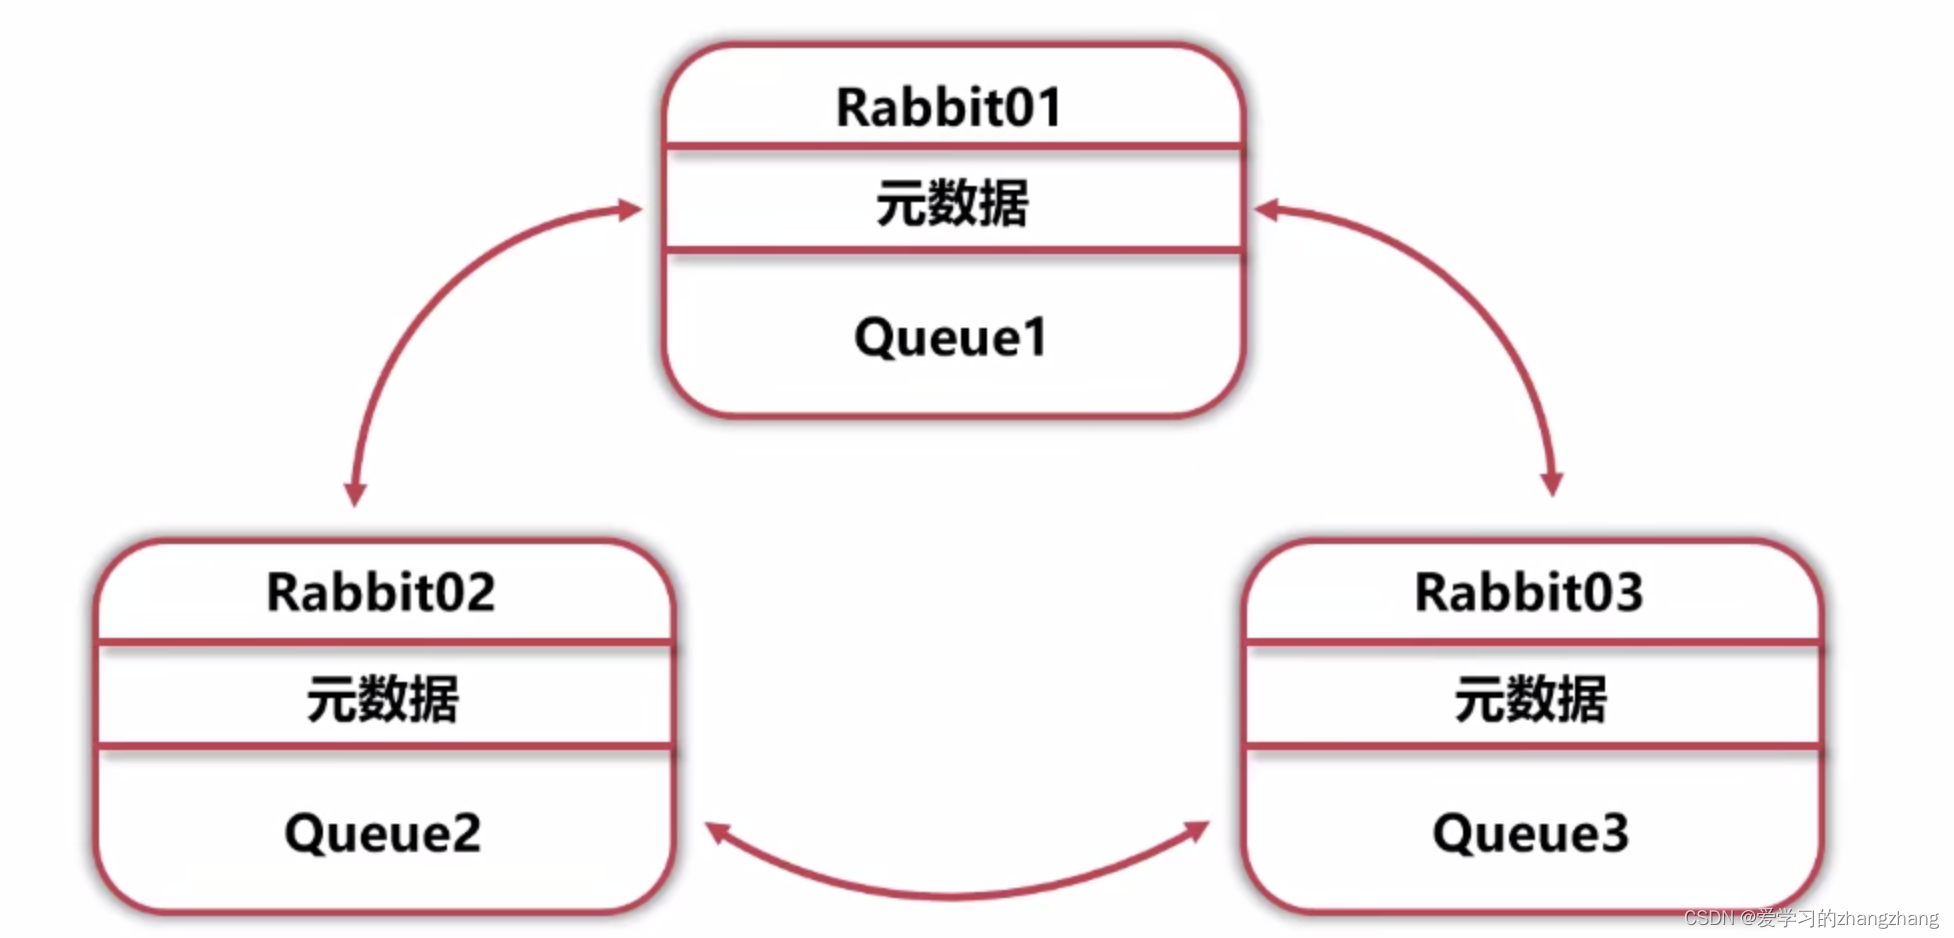
5.2.3、RabbitMQ集群搭建步骤
链接: https://pan.baidu.com/s/1ifVV_LgGLfaOAO5COY1gdw?pwd=gx2q 提取码: gx2q
--来自百度网盘超级会员v4的分享