ASP.NET MVC入门教程(二)
本部分主要实现文章控制器的创建与列表页、内容页的设计与实现
一、布局页介绍
1.布局页介绍
在所有的网页中,有很多内容在所有的页面中都是相同的,比如Logo、导航、版权信息等部分,在ASP.NET Form时,采用母版页的方法实现,在MVC中,采用了布局页的方法。
布局页在Views下的Shared下,其项目默认的布局页是_Layout.cshtml,布局模板允许你在页面的某个地方指定HTML容器,然后在网站中多个页面中应用。
@RenderBody()。是一个占位符,即所有使用了该布局页的内容页,其内容会被显示在这个地方。
@RenderSection("scripts", required: false),这个是为了在子页面中引用JS,相当于在布局页中定义了一个占位符,在子页面中去填充这个占位。在子页面中使用以下方式来引用js
@section scripts{}
在本教程中,不对布局页进行修改,只修改其超链接部分,修改部分如下
<ul class="nav navbar-nav">
                    <li>@Html.ActionLink("主页", "Index", "Home")</li>
                    <li>@Html.ActionLink("关于", "About", "Home")</li>
                    <li>@Html.ActionLink("联系方式", "Contact", "Home")</li>
                    <li>@Html.ActionLink("文章列表","Index","Article")</li>
                    <li>@Html.ActionLink("发表文章","Create","Article")</li>
                </ul>
二、创建Article控制器
1.创建Article控制器
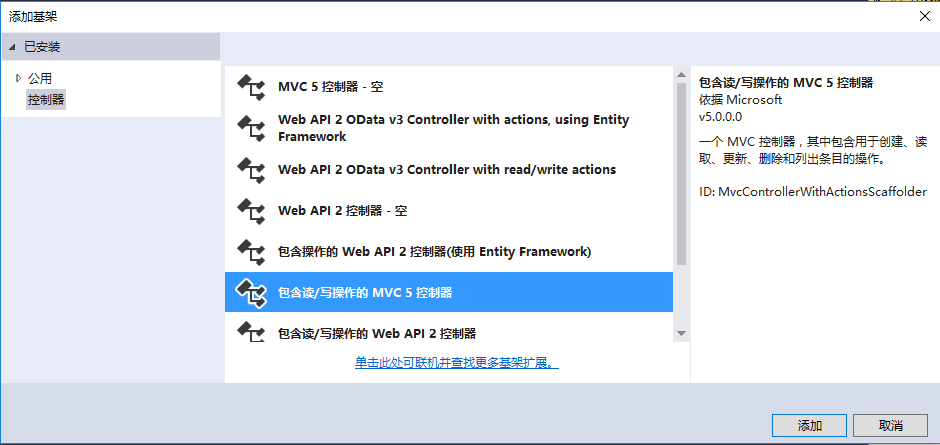
在Controllers文件夹上右键单击,选择“添加"、“控制器”,选中“包含读/写操作的MVC5控制器”,点击添加,
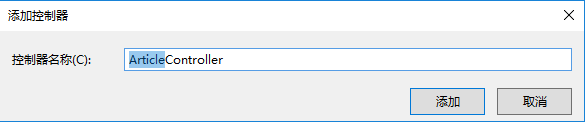
控制器名称修改为Article
点击“添加”后,生成的代码如下:
public class ArticleController : Controller
    {
        // GET: Article
        public ActionResult Index()
        {
            return View();
        }

        // GET: Article/Details/5
        public ActionResult Details(int id)
        {
            return View();
        }

        // GET: Article/Create
        public ActionResult Create()
        {
            return View();
        }

        // POST: Article/Create
        [HttpPost]
        public ActionResult Create(FormCollection collection)
        {
            try
            {
                // TODO: Add insert logic here

                return RedirectToAction("Index");
            }
            catch
            {
                return View();
            }
        }

        // GET: Article/Edit/5
        public ActionResult Edit(int id)
        {
            return View();
        }

        // POST: Article/Edit/5
        [HttpPost]
        public ActionResult Edit(int id, FormCollection collection)
        {
            try
            {
                // TODO: Add update logic here

                return RedirectToAction("Index");
            }
            catch
            {
                return View();
            }
        }

        // GET: Article/Delete/5
        public ActionResult Delete(int id)
        {
            return View();
        }

        // POST: Article/Delete/5
        [HttpPost]
        public ActionResult Delete(int id, FormCollection collection)
        {
            try
            {
                // TODO: Add delete logic here

                return RedirectToAction("Index");
            }
            catch
            {
                return View();
            }
        }
    }
其中的方法,后面将会逐一介绍,此处不做解释
三、列表页的实现
1.Index方法
Index方法主要用来实现文章的列表页,在该方法下,将访问数据库并将得到的结果传递给视图进行显示。
1)引入命名空间
using MyStudy.Models;2)在Articlecontroller类内部创建数据上下文,即EF容器对象
 public class ArticleController : Controller
    {
        //创建数据上下文
        private MyEFContainer db = new MyEFContainer();
3)创建视图模型
在Models文件夹上右键单击,选择“添加”、“类”

其代码如下
using System;

namespace MyStudy.Models
{
    public class ArticleListViewModel
    {
        public int id { get; set; }
        public string title { get; set; }
        public DateTime publishDate { get; set; }
    }
}
4)在Article控制器的Index方法中,输入以下代码
public ActionResult Index()
        {
            //1.执行数据库查询,取得所有文章信息
            List<tb_article> tArticles = db.tb_article
                .OrderByDescending(m => m.PublishDate)
                .ToList();
            //2.转换为视图模型
            List<ArticleListViewModel> articles = new List<ArticleListViewModel>();
            foreach(var item in tArticles)
            {
                ArticleListViewModel article = new ArticleListViewModel();
                article.id = item.Id;
                article.title = item.Name;
                article.publishDate =(DateTime) item.PublishDate;
                articles.Add(article);
            }
            //通过模型绑定将数据传递给视图
            return View(articles);
        }
5)创建视图层
在Index方法内,右键单击选择”添加视图“,设置如下
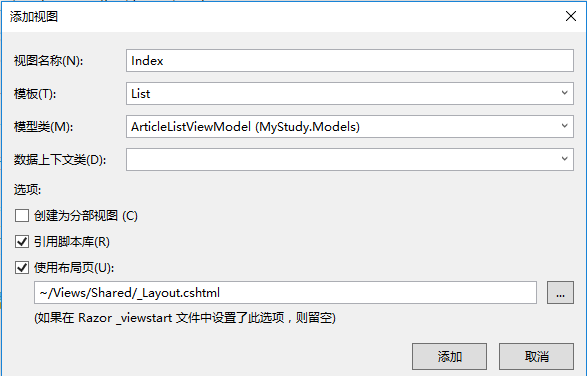
点击”添加“后,系统将会根据你所选择的模型类、与模板,自动创建视图
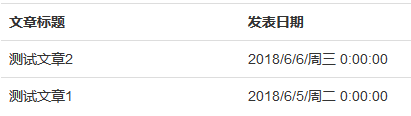
6)运行,查看列表页,
![]() ,在浏览器中显示如下结果
,在浏览器中显示如下结果
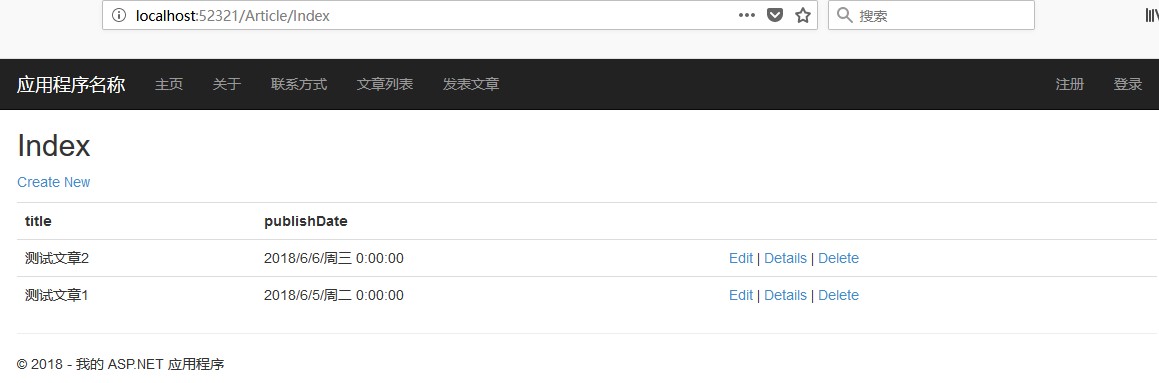
该页面中,文章的标题与发表日期上方的表头显示,title和publishDate,并不是中文的,现在我们通过修改视图模型让其显示为相应的中文
7)修改视图模型
首先引入命名空间 using System.ComponentModel.DataAnnotations;
然后修改如下:
using System;
using System.ComponentModel.DataAnnotations;

namespace MyStudy.Models
{
    public class ArticleListViewModel
    {
        [Display(Name ="编号")]
        public int id { get; set; }
        [Display(Name ="文章标题")]
        public string title { get; set; }
        [Display(Name ="发表日期")]
        public DateTime publishDate { get; set; }
    }
}
再次运行,页面显示如下:
8)修改列表页
将以下代码删除
<h2>Index</h2>

<p>
    @Html.ActionLink("Create New", "Create")
</p>
将其后的Edit、Details、Delete修改如下
@Html.ActionLink("编辑文章", "Edit", new { id=item.id }) |
            @Html.ActionLink("文章内容", "Details", new { id=item.id }) |
            @Html.ActionLink("删除文章", "Delete", new { id=item.id })
四、内容页的实现
1.Article控制器下的Details方法,为文章内容页,其代码如下
public ActionResult Details(int? id)
        {
            if (id == null)
            {
                return new HttpStatusCodeResult(HttpStatusCode.BadRequest);
            }
            tb_article article = db.tb_article.Find(id);
            if (article == null)
            {
                return new HttpStatusCodeResult(HttpStatusCode.NotFound);
            }
            return View(article);
        }
首先判断从上一个视图传递过来的id值是否为空,如果为空,则返回一个错误的请求,否则,根据id查找数据库中的记录,再判断查找到的结果是否为null,如果为空则表示没有该记录,返回一个404错误。否则通过模型绑定,将数据传递给视图显示。
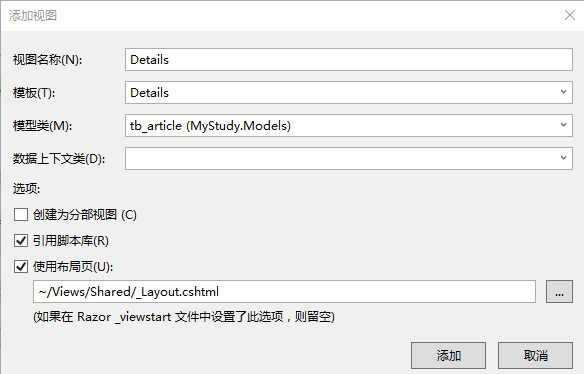
2.利用模板创建视图
在Details方法内右键单击,选择“添加视图”,设置如下
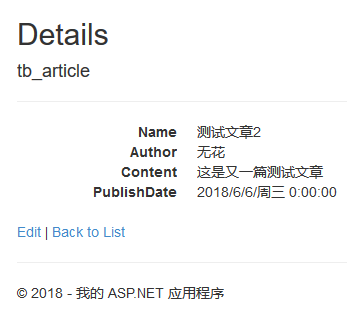
3.运行、在列表页中,点击文章内容、浏览器中显示如下结果
4.对内容页进行简单修改,如下
@model MyStudy.Models.tb_article

@{
    ViewBag.Title = "Details";
    Layout = "~/Views/Shared/_Layout.cshtml";
}

<div class="row">
    <h3 class="text-center">@Model.Name</h3>
    <h5 class="text-center">@Model.Author</h5>
    <p>
        @Model.Content
    </p>
    <h5 class="text-right">@Model.PublishDate</h5>
</div>
<p>
    @Html.ActionLink("返回列表", "Index")
</p>