centos7部署k8s Cluster
我们将部署三个节点的 Kubernetes Cluster
k8s-m1 是 Master,k8s-n1 和 k8s-n2 是 Node。
所有节点的操作系统均为centos1708 minimal ,2G内存,2颗CPU。当然其他 Linux 也是可以的。
1、环境初始化
1.1 给各主机设置主机名称
hostnamectl set-hostname k8s-m1
hostnamectl set-hostname k8s-n1
hostnamectl set-hostname k8s-n2
1.2 给各主机设置静态域名解释:
cat <<EOF > /etc/hosts
127.0.0.1 localhost localhost.localdomain localhost4 localhost4.localdomain4
::1 localhost localhost.localdomain localhost6 localhost6.localdomain6
192.168.92.159 k8s-m1
192.168.92.160 k8s-n1
192.168.92.161 k8s-n2
EOF
1.3 k8s-m1上执行ssh免密码登陆配置
ssh-keygen #一路回车即可
ssh-copy-id k8s-n1
ssh-copy-id k8s-n2
1.4 各主机还需配置:停防火墙、关闭Selinux、关闭Swap、设置内核、K8S的yum源、安装依赖包、配置ntp
systemctl stop firewalld
systemctl disable firewalld
sed -i "s/^SELINUX=enforcing/SELINUX=disabled/g" /etc/sysconfig/selinux
swapoff -a && sysctl -w vm.swappiness=0
sed -i 's/.swap./#&/' /etc/fstab
设定/etc/sysctl.conf的系统参数。
cat <<EOF > /etc/sysctl.conf
net.ipv4.ip_forward = 1
net.bridge.bridge-nf-call-ip6tables = 1
net.bridge.bridge-nf-call-iptables = 1
EOF
sysctl -p
cat <<EOF > /etc/yum.repos.d/kubernetes.repo
[kubernetes]
name=Kubernetes
baseurl=https://mirrors.aliyun.com/kubernetes/yum/repos/kubernetes-el7-x86_64/
enabled=1
gpgcheck=1
repo_gpgcheck=1
gpgkey=https://mirrors.aliyun.com/kubernetes/yum/doc/yum-key.gpg https://mirrors.aliyun.com/kubernetes/yum/doc/rpm-package-key.gpg
EOF
yum install -y epel-release
yum install -y yum-utils device-mapper-persistent-data lvm2 net-tools conntrack-tools wget vim ntpdate libseccomp libtool-ltdl
systemctl enable ntpdate.service
echo '/30 * /usr/sbin/ntpdate time7.aliyun.com >/dev/null 2>&1' > /tmp/crontab2.tmp
crontab /tmp/crontab2.tmp
systemctl start ntpdate.service

(/etc/security/limits.conf 是 Linux 资源使用配置文件,用来限制用户对系统资源的使用)
echo " soft nofile 65536" >> /etc/security/limits.conf
echo " hard nofile 65536" >> /etc/security/limits.conf
echo " soft nproc 65536" >> /etc/security/limits.conf
echo " hard nproc 65536" >> /etc/security/limits.conf
echo " soft memlock unlimited" >> /etc/security/limits.conf
echo " hard memlock unlimited" >> /etc/security/limits.conf
1.5 配置完后重启一次
2、所有节点安装配置docker
2.1 安装docker(kubeadm目前支持docker最高版本是17.03.x)
wget https://download.docker.com/linux/centos/7/x86_64/stable/Packages/docker-ce-17.09.0.ce-1.el7.centos.x86_64.rpm
yum localinstall -y docker-ce-17.09.0.ce-1.el7.centos.x86_64.rpm
2.2 修改配置文件 vim /usr/lib/systemd/system/docker.service
ExecStart=/usr/bin/dockerd -H tcp://0.0.0.0:2375 -H unix:///var/run/docker.sock --registry-mirror=https://ms3cfraz.mirror.aliyuncs.com
2.3 启动docker
systemctl daemon-reload
systemctl enable docker && systemctl start docker
3、安装 kubelet、kubeadm 和 kubectl
3.1 所有节点安装kubelet kubeadm kubectl
yum install -y kubelet kubeadm kubectl
systemctl enable kubelet
3.2 所有节点修改kubelet配置文件
/etc/systemd/system/kubelet.service.d/10-kubeadm.conf
#修改这一行
Environment="KUBELET_CGROUP_ARGS=--cgroup-driver=cgroupfs"
#添加这一行
Environment="KUBELET_EXTRA_ARGS=--v=2 --fail-swap-on=false --pod-infra-container-image=registry.cn-hangzhou.aliyuncs.com/k8sth/pause-amd64:3.0"
3.3 所有节点修改完配置文件一定要重新加载配置
systemctl daemon-reload
systemctl enable kubelet
3.4 命令补全
yum install -y bash-completion
source /usr/share/bash-completion/bash_completion
source <(kubectl completion bash)
echo "source <(kubectl completion bash)" >> ~/.bashrc
4、下载K8S相关镜像
安装时候最常见的就是time out,因为K8S镜像在国外,所以我们在前面就说到了提前把他下载下来。
#!/bin/bash
images=(kube-proxy-amd64:v1.10.0 kube-scheduler-amd64:v1.10.0 kube-controller-manager-amd64:v1.10.0 kube-apiserver-amd64:v1.10.0
etcd-amd64:3.1.12 pause-amd64:3.1 kubernetes-dashboard-amd64:v1.8.3 k8s-dns-sidecar-amd64:1.14.8 k8s-dns-kube-dns-amd64:1.14.8
k8s-dns-dnsmasq-nanny-amd64:1.14.8)
for imageName in ${images[@]} ; do
docker pull keveon/$imageName
docker tag keveon/$imageName k8s.gcr.io/$imageName
docker rmi keveon/$imageName
done
上面的shell脚本主要做了3件事,下载各种需要用到的容器镜像、重新打标记为符合k8s命令规范的版本名称、清除旧的容器镜像。
提示:镜像版本一定要和kubeadm安装的版本一致,否则会出现time out问题。
5、初始化 Master
5.1 执行上述shell脚本,等待下载完成后,执行kubeadm init
kubeadm init --kubernetes-version=v1.10.0 --pod-network-cidr=10.244.0.0/16
提示:选项–kubernetes-version=v1.10.0是必须的,否则会因为访问google网站被墙而无法执行命令。这里使用v1.10.0版本,刚才前面也说到了下载的容器镜像版本必须与K8S版本一致否则会出现time out。
--pod-network-cidr 指定 Pod 网络的范围。Kubernetes 支持多种网络方案,而且不同网络方案对 --pod-network-cidr 有自己的要求,这里设置为 10.244.0.0/16 是因为我们将使用 flannel 网络方案,必须设置成这个 CIDR。在后面的实践中我们会切换到其他网络方案,比如 Canal。
上面的命令大约需要1分钟的过程,期间可以观察下tail -f /var/log/message日志文件的输出,掌握该配置过程和进度。上面最后一段的输出信息保存一份,后续添加工作节点还要用到。
[root@k8s-m1 ~]# kubeadm init --kubernetes-version=v1.10.0 --pod-network-cidr=10.244.0.0/16
[init] Using Kubernetes version: v1.10.0
[init] Using Authorization modes: [Node RBAC]
[preflight] Running pre-flight checks.
[WARNING SystemVerification]: docker version is greater than the most recently validated version. Docker version: 17.09.0-ce. Max validated version: 17.03
[WARNING FileExisting-crictl]: crictl not found in system path
Suggestion: go get github.com/kubernetes-incubator/cri-tools/cmd/crictl
[preflight] Starting the kubelet service
[certificates] Using the existing ca certificate and key.
[certificates] Using the existing apiserver certificate and key.
[certificates] Using the existing apiserver-kubelet-client certificate and key.
[certificates] Using the existing etcd/ca certificate and key.
[certificates] Using the existing etcd/server certificate and key.
[certificates] Using the existing etcd/peer certificate and key.
[certificates] Using the existing etcd/healthcheck-client certificate and key.
[certificates] Using the existing apiserver-etcd-client certificate and key.
[certificates] Using the existing sa key.
[certificates] Using the existing front-proxy-ca certificate and key.
[certificates] Using the existing front-proxy-client certificate and key.
[certificates] Valid certificates and keys now exist in "/etc/kubernetes/pki"
[kubeconfig] Wrote KubeConfig file to disk: "/etc/kubernetes/admin.conf"
[kubeconfig] Wrote KubeConfig file to disk: "/etc/kubernetes/kubelet.conf"
[kubeconfig] Wrote KubeConfig file to disk: "/etc/kubernetes/controller-manager.conf"
[kubeconfig] Wrote KubeConfig file to disk: "/etc/kubernetes/scheduler.conf"
[controlplane] Wrote Static Pod manifest for component kube-apiserver to "/etc/kubernetes/manifests/kube-apiserver.yaml"
[controlplane] Wrote Static Pod manifest for component kube-controller-manager to "/etc/kubernetes/manifests/kube-controller-manager.yaml"
[controlplane] Wrote Static Pod manifest for component kube-scheduler to "/etc/kubernetes/manifests/kube-scheduler.yaml"
[etcd] Wrote Static Pod manifest for a local etcd instance to "/etc/kubernetes/manifests/etcd.yaml"
[init] Waiting for the kubelet to boot up the control plane as Static Pods from directory "/etc/kubernetes/manifests".
[init] This might take a minute or longer if the control plane images have to be pulled.
[apiclient] All control plane components are healthy after 23.503191 seconds
[uploadconfig]?Storing the configuration used in ConfigMap "kubeadm-config" in the "kube-system" Namespace
[markmaster] Will mark node k8s-m1 as master by adding a label and a taint
[markmaster] Master k8s-m1 tainted and labelled with key/value: node-role.kubernetes.io/master=""
[bootstraptoken] Using token: 0ivtjg.t670zkbmni8b8qsw
[bootstraptoken] Configured RBAC rules to allow Node Bootstrap tokens to post CSRs in order for nodes to get long term certificate credentials
[bootstraptoken] Configured RBAC rules to allow the csrapprover controller automatically approve CSRs from a Node Bootstrap Token
[bootstraptoken] Configured RBAC rules to allow certificate rotation for all node client certificates in the cluster
[bootstraptoken] Creating the "cluster-info" ConfigMap in the "kube-public" namespace
[addons] Applied essential addon: kube-dns
[addons] Applied essential addon: kube-proxy
Your Kubernetes master has initialized successfully!
To start using your cluster, you need to run the following as a regular user:
mkdir -p $HOME/.kube
sudo cp -i /etc/kubernetes/admin.conf $HOME/.kube/config
sudo chown $(id -u):$(id -g) $HOME/.kube/config
You should now deploy a pod network to the cluster.
Run "kubectl apply -f [podnetwork].yaml" with one of the options listed at:
https://kubernetes.io/docs/concepts/cluster-administration/addons/
You can now join any number of machines by running the following on each node
as root:
kubeadm join 192.168.92.159:6443 --token 0ivtjg.t670zkbmni8b8qsw --discovery-token-ca-cert-hash sha256:2b7fd25ced027017b8be24c77dd0472d36c5cdf9dc95ca5fc85f63d7ac4d00c5
初始化过程如下:
① kubeadm 执行初始化前的检查。
② 生成 token 和证书。
③ 生成 KubeConfig 文件,kubelet 需要这个文件与 Master 通信。
④ 安装 Master 组件,会从 goolge 的 Registry 下载组件的 Docker 镜像,这一步可能会花一些时间,主要取决于网络质量。
⑤ 安装附加组件 kube-proxy 和 kube-dns。
⑥ Kubernetes Master 初始化成功。
⑦ 提示如何配置 kubectl,后面会实践。
⑧ 提示如何安装 Pod 网络,后面会实践。
⑨ 提示如何注册其他节点到 Cluster,后面会实践。
5.2 初始化失败后处理办法
kubeadm reset
#或
rm -rf /etc/kubernetes/.conf
rm -rf /etc/kubernetes/manifests/.yaml
docker ps -a |awk '{print $1}' |xargs docker rm -f
systemctl stop kubelet
6、配置kubectl认证信息
对于非root用户
mkdir -p $HOME/.kube
sudo cp -i /etc/kubernetes/admin.conf $HOME/.kube/config
sudo chown $(id -u):$(id -g) $HOME/.kube/config
对于root用户
export KUBECONFIG=/etc/kubernetes/admin.conf
也可以直接放到~/.bash_profile
echo "export KUBECONFIG=/etc/kubernetes/admin.conf" >> ~/.bash_profile
7、安装flannel网络
mkdir -p /etc/cni/net.d/
cat <<EOF> /etc/cni/net.d/10-flannel.conf
{
“name”: “cbr0”,
“type”: “flannel”,
“delegate”: {
“isDefaultGateway”: true
}
}
EOF
mkdir /usr/share/oci-umount/oci-umount.d -p
mkdir /run/flannel/
cat <<EOF> /run/flannel/subnet.env
FLANNEL_NETWORK=10.244.0.0/16
FLANNEL_SUBNET=10.244.1.0/24
FLANNEL_MTU=1450
FLANNEL_IPMASQ=true
EOF
kubectl apply -f https://raw.githubusercontent.com/coreos/flannel/v0.9.1/Documentation/kube-flannel.yml
8、让k8s-n1、k8s-n2加入集群
在k8s-n1和k8s-n2节点上分别执行kubeadm join命令,加入集群:
kubeadm join 192.168.92.159:6443 --token 0ivtjg.t670zkbmni8b8qsw --discovery-token-ca-cert-hash sha256:2b7fd25ced027017b8be24c77dd0472d36c5cdf9dc95ca5fc85f63d7ac4d00c5
提示:细心的童鞋应该会发现,这段命令其实就是前面K8S Matser安装成功后我让你们保存的那段命令。
默认情况下,Master节点不参与工作负载,但如果希望安装出一个All-In-One的k8s环境,则可以执行以下命令,让Master节点也成为一个Node节点:
kubectl taint nodes --all node-role.kubernetes.io/master-
9、验证K8S Master是否搭建成功
查看节点状态
kubectl get nodes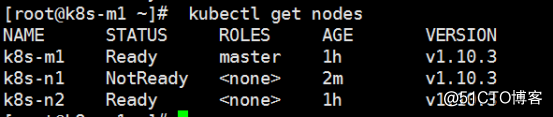
查看pods状态
kubectl get pods --all-namespaces
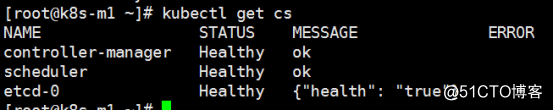
查看K8S集群状态
kubectl get cs