前言
由于在app中没有document,window等对象,所以使用在pc端传统方法引入的方式,将会发现无法引用成功,会出现白屏现象。
目前有两种解决方式:
使用uniapp的web-view方式(百度地图)
使用renderjs来调用document等js对象(高德地图)
一、使用uniapp的web-view方式(百度地图)
首先新建一个uniapp的页面,并在里面使用webview组件
map.vue:
<template>
    <view>
          <view class="page-body">
            <web-view  :src='remoteUrl'></web-view>
          </view>
     </view>
</template>
<script >
export default {
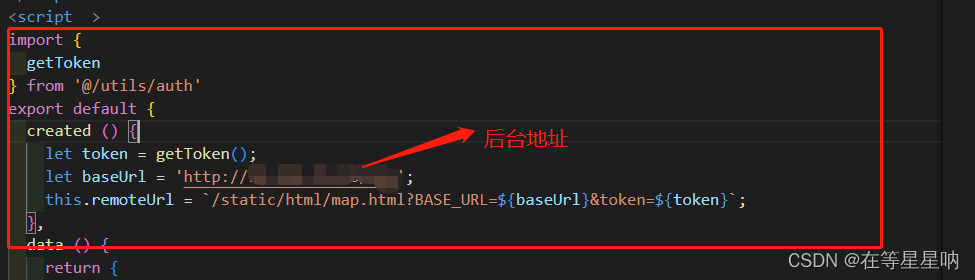
created () {
this.remoteUrl = `/static/html/map.html`;
},
data () {
return {
remoteUrl: '',
}
},
}
</script><style>
.page-body {
width: 100vw;
height: 100vh;
}
</style>2.然后我们在static/html下新建基本的map.html页面
<!DOCTYPE html>
<html lang="zh">
<head>
<meta charset="UTF-8">
<meta name="viewport" content="width=device-width, initial-scale=1.0">
<meta http-equiv="X-UA-Compatible" content="ie=edge">
<title>webview百度地图</title>
<style type="text/css">
html {
height: 100%
}
body {
height: 100%;
margin: 0px;
padding: 0px;
}
#mapPage {
width: 100vw;
height: 100vh;
position: relative;
}
#container {
width: 100vw;
height: 100vh;
}
</style>
</head>
<body>
<div id='mapPage
<div id='container'></div>
</div>
</body>
<!-- 微信 JS-SDK 如果不需要兼容小程序,则无需引用此 JS 文件 -->
<!-- <script type="text/javascript" src="https://res.wx.qq.com/open/js/jweixin-1.4.0.js"></script> -->
<!-- uni 的 SDK -->
<script type="text/javascript" src="https://js.cdn.aliyun.dcloud.net.cn/dev/uni-app/uni.webview.1.5.2.js">
</script>
<!-- 百度地图 -->
<script type="text/javascript"
src="https://api.map.baidu.com/api?v=3.0&&type=webgl&ak=你的ak"></script>
<!-- vue -->
<script src="https://cdn.jsdelivr.net/npm/[email protected]"></script>
<script type="text/javascript">
document.addEventListener('UniAppJSBridgeReady', function() {
const vm=new Vue({
el:'#mapPage',
data:{
map: null,
},
methods:{
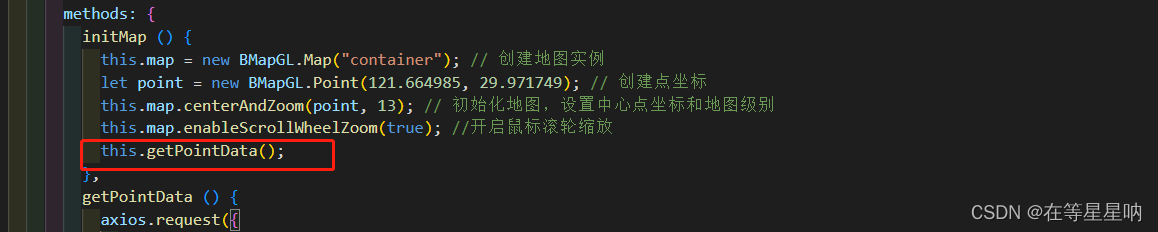
initMap(){
this.map = new BMapGL.Map("container"); // 创建地图实例
let point = new BMapGL.Point(121.664985,29.971749); // 创建点坐标
this.map.centerAndZoom(point, 13); // 初始化地图,设置中心点坐标和地图级别
this.map.enableScrollWheelZoom(true); //开启鼠标滚轮缩放
},
},
mounted(){
this.initMap();
}
})
});
</script>
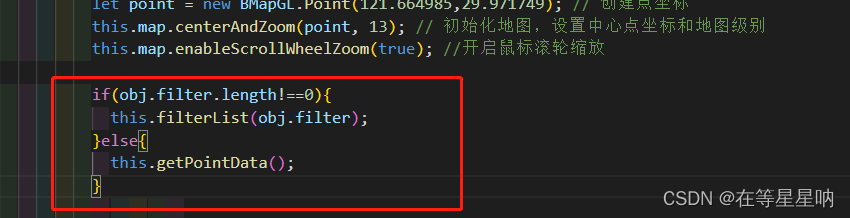
</html>3.设置顶部栏
中间实时显示地图上图标的个数,以及一个筛选按钮(可以跳转其他页面之后,对地图上图标进行筛选,筛选后进入地图页面)

4.从后台接口中获取到图标信息,在地图上放置自定义图标
①引入axios

②创建方法getPointData,获取图标数据
(1)uniapp页面传递token以及ip地址
map.vue
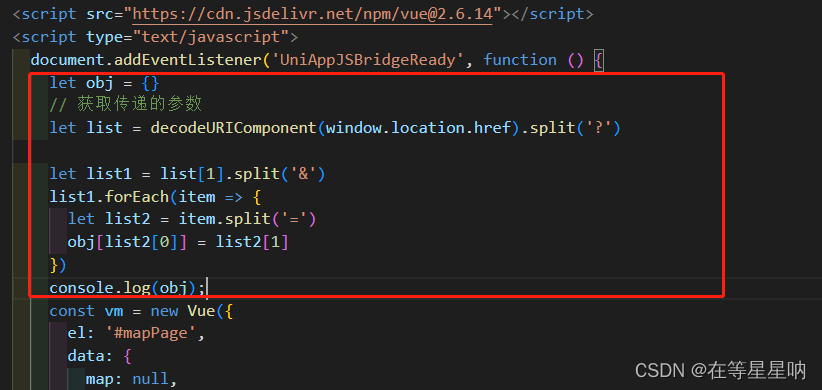
(2)html页面获取uniapp传递的数据
(3)调用接口
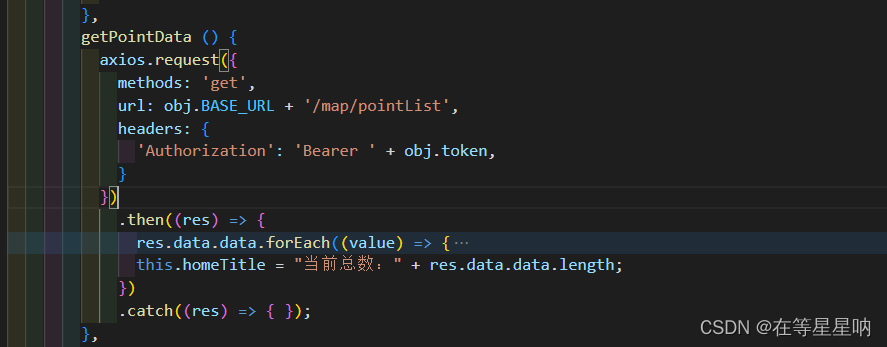
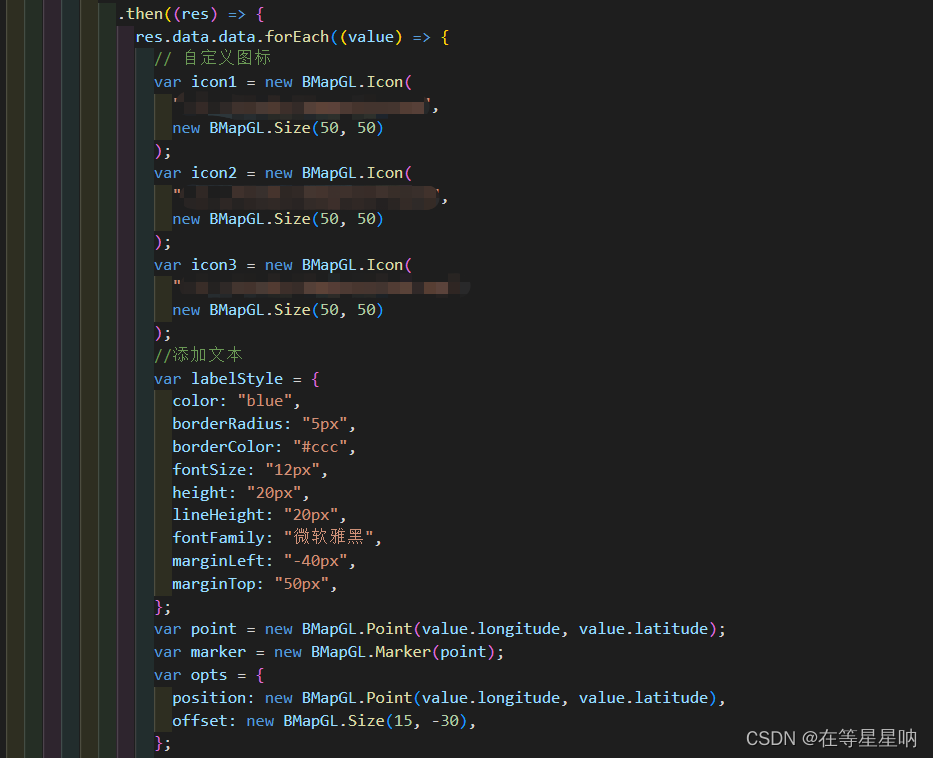
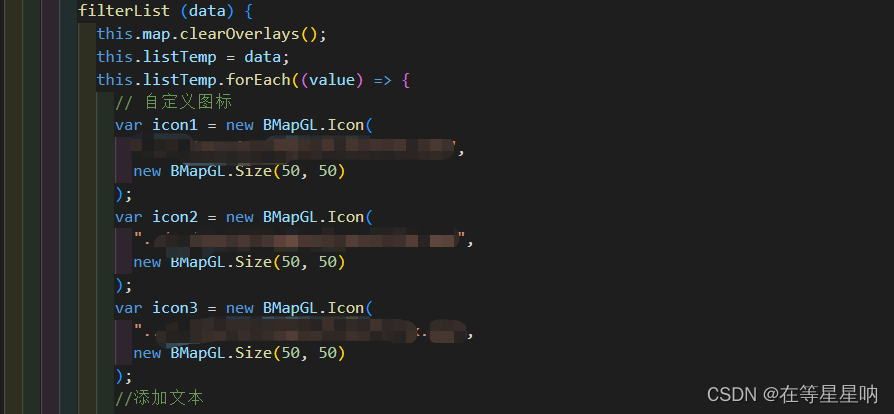
(4)根据接口返回的数据添加不同图标并添加标注
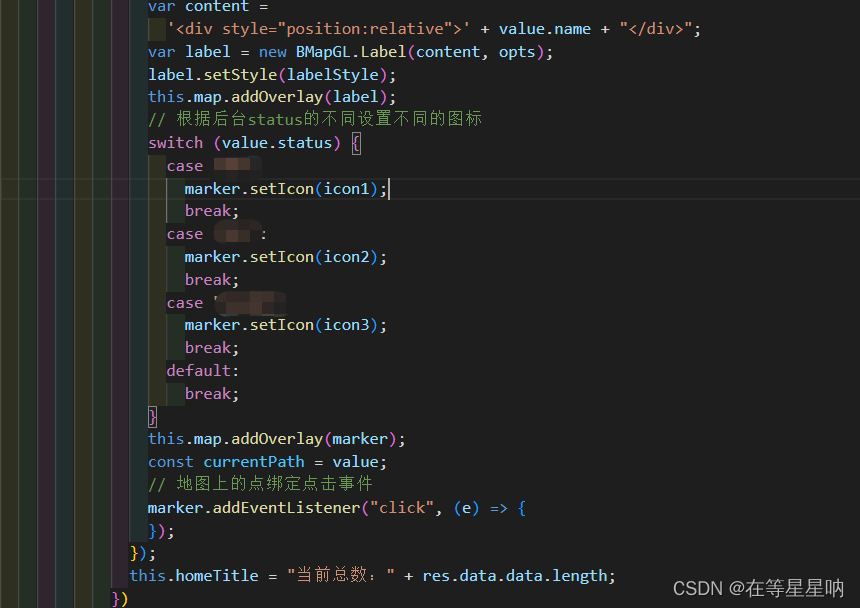
(5)调用方法
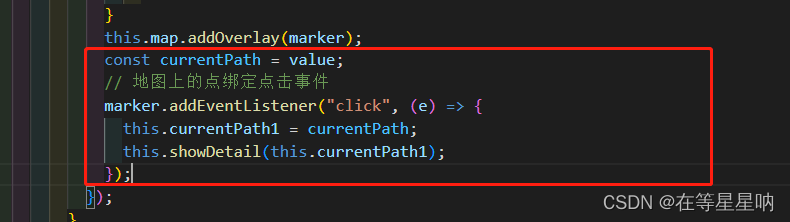
5.为marker添加点击事件,弹出该marker的详细信息
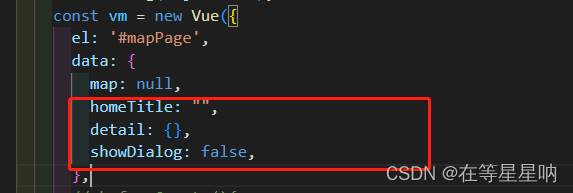
①添加div容器和data数据
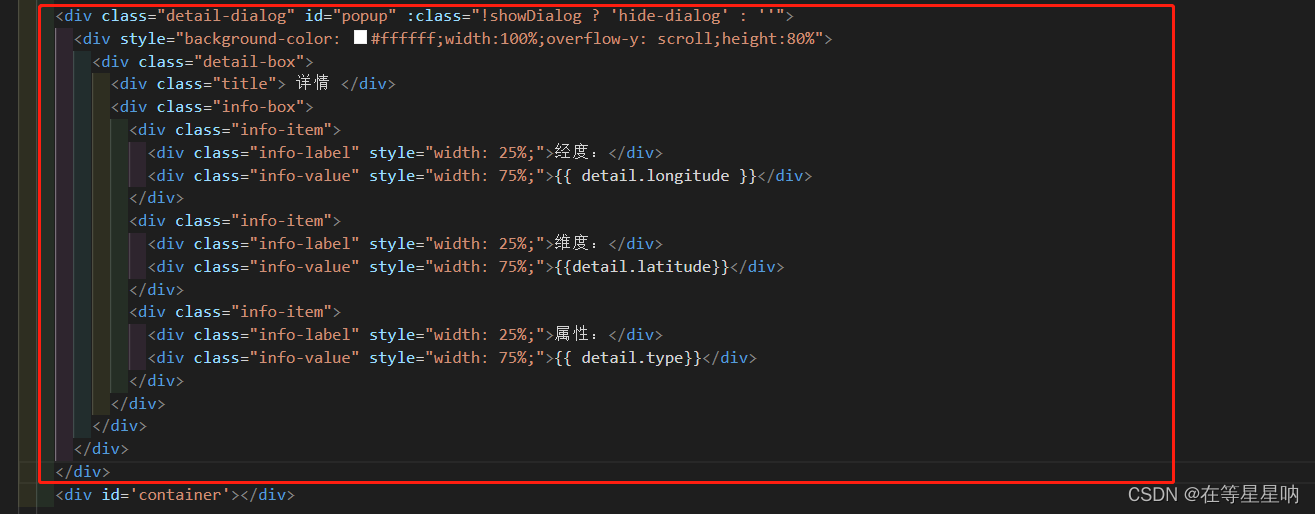
②为div添加内容
        showDetail (value) {
          this.detail = {};
          this.showDialog = true;
          axios.request({
            methods: 'get',
            url: obj.BASE_URL + '/app/info',
            headers: {
              'Authorization': 'Bearer ' + obj.token,
            },
            params: {
              Id: value,
            }
          })
            .then((res) => {
              this.detail = res.data.data;
            })
            .catch((res) => { });
        },
        closeDetail () {
          this.showDialog = false;
        },
③点击事件触发showDetail方法
至此,该地图基本功能完成。后续将介绍顶部栏的筛选
点击筛选图标,触发事件,跳转到筛选页面
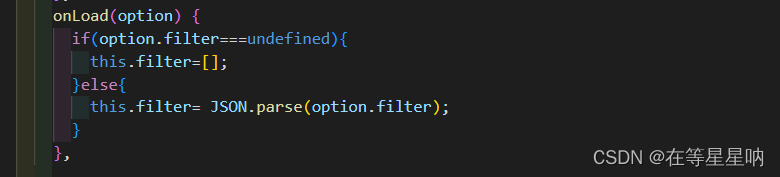
2.筛选页面

3.在uniapp的页面接收filter
pages/map/index
4.将filter发送给html页面
pages/map/index

5.在html页面接收
map.html
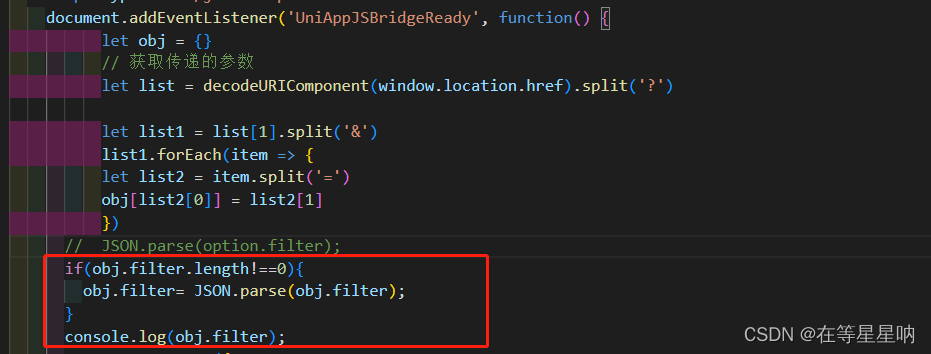
6.调用筛选方法
7.定义筛选方法
注意:使用此方法有延迟问题,建议使用方法二
二、使用renderjs来调用document等js对象(高德地图)
定义基本结构
html:
<template>
  <view>
      <view class="page-body">
        <view :msg="msg"
              :change:msg="amap.receiveMsg"
              :currentIndex="currentIndex"
              :change:currentIndex="amap.currentIndexChange"
              id="amap">
        </view>
      </view>
  </view>
</template>
render.js
<!-- render.js -->
<script module="amap" lang="renderjs">
export default{
data(){
return{
map:null,
myData:[],
}
},
methods:{
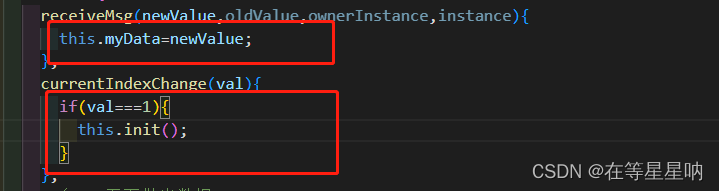
receiveMsg(newValue,oldValue,ownerInstance,instance){
console.log(newValue);
},
currentIndexChange(val){
console.log(val);
},
// 引入高德地图SDK
init(){
if(typeof window.AMap=='function'){
this.initAmap();
}else{
// 动态引入较大类库避免影响页面展示
const script =document.createElement('script');
script.src='https://webapi.amap.com/maps?v=1.4.15&key=你的key';
script.onload=this.initAmap.bind(this);
document.head.appendChild(script);
}
},
//初始化地图
initAmap(){
this.map=new AMap.Map('amap',{
resizeEnable:true,
center:[121.664985,29.971749],
zooms:[14,20],//设置地图级别范围
zoom:15,
})
this.map.on('complete',()=>{
console.log('加载完成')
})
},
}
}
</script>自己的script
<script>
export default {
data () {
return {
pointData: [],
current: 0,
}
},
computed: {
msg () {
return this.pointData
},
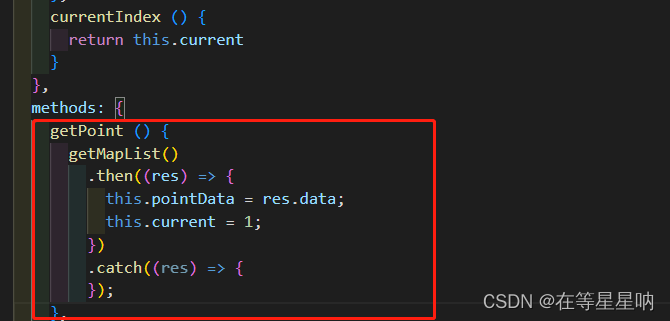
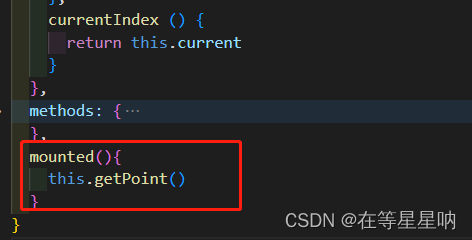
currentIndex () {
return this.current
}
},
methods: {
},
}
</script>2.为地图添加坐标
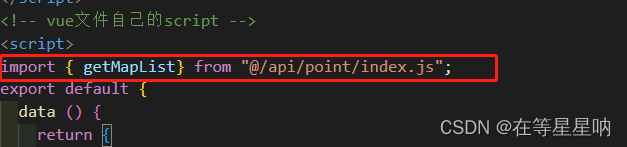
①在自己的script里面调用后台接口,获取图标信息
Ⅰ.引用后台接口方法
Ⅱ.定义获取图标方法
Ⅲ.调用方法
②将坐标信息传递给renderjs(renderjs)
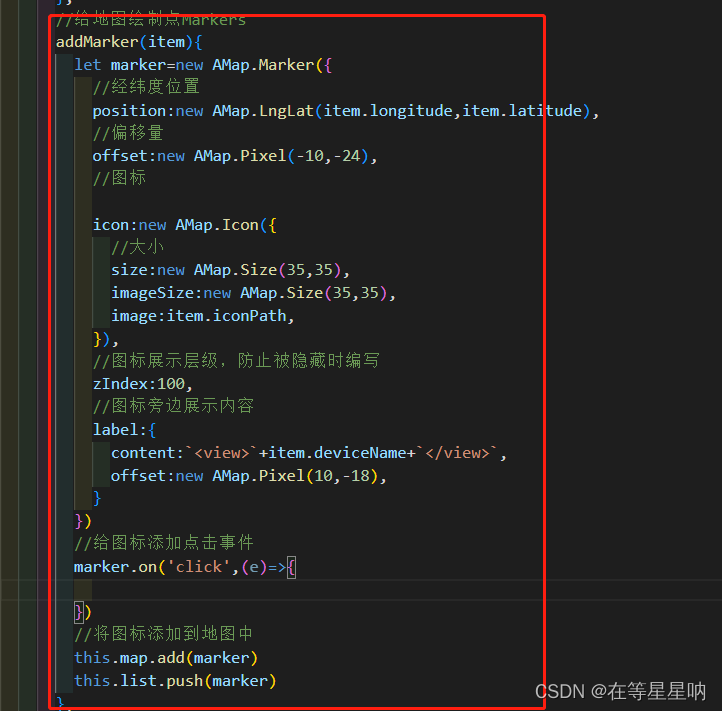
③在地图上添加图标(renderjs)
注意:如果图标路径采用相对路径,自定义图标可能加载不出来,建议将图标转换为base64格式
Ⅰ.定义base64图标
Ⅱ.清除地图上原有图标,初始化图标数据

Ⅲ.地图上添加图标
3.为图标添加点击事件,显示弹出框
①弹出框html结构
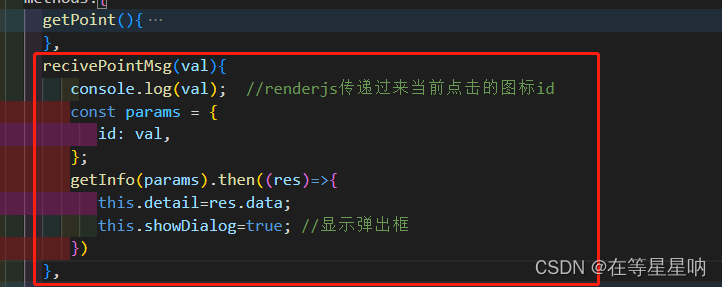
②定义点击事件,将当前图标上的唯一标识传递给自己的script(renderjs)
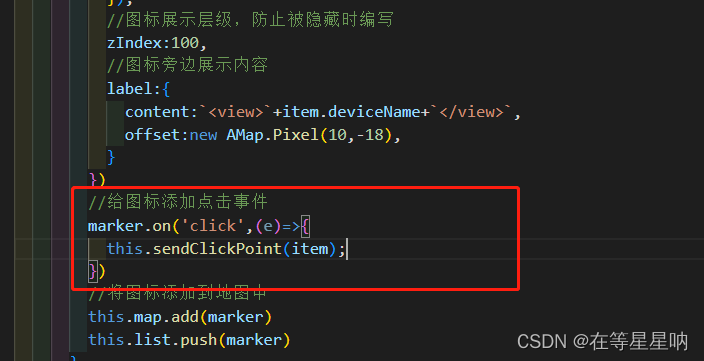

③接收id,并调用接口,获取弹出框信息(自己的script)
至此,两种方法实现地图已经完成。