目录
相关导读
大家如果对于本期内容有什么不了解的话也可以去看看往期的内容,下面列出了博主往期精心制作的Maven,Mybatis等专栏系列文章,走过路过不要错过哎!如果对您有所帮助的话就点点赞,收藏一下啪。其中Spring专栏有些正在更,所以无法查看,但是当博主全部更完之后就可以看啦。
1. Maven专栏系列文章
| Maven系列专栏 | Maven工程开发 |
| Maven聚合开发【实例详解---5555字】 |
2. Mybatis专栏系列文章
3. Spring系列专栏文章
前言
Spring简介
Spring是一个开源框架,为简化企业级开发而生。它以IOC(控制反转)和AOP(面向切面)为思想内核,提供了控制层SpringMVC、数据层SpringData、服务层事务管理等众多技术,并可以整合众多第三方框架。Spring将很多复杂的代码变得优雅简洁,有效的降低代码的耦合度,极大的方便项目的后期维护、升级和扩展。
Spring官网地址:https://spring.io/Spring官方网站:
Spring体系结构
Spring框架根据不同的功能被划分成了多个模块,这些模块可以满足一切企业级应用开发的需求,在开发过程中可以根据需求有选择性地使用所需要的模块。
- Core Container:Spring核心模块,任何功能的使用都离不开该模块,是其他模块建立的基础。
- Data Access/Integration:该模块提供了数据持久化的相应功能。
- Web:该模块提供了web开发的相应功能。
- AOP:提供了面向切面编程实现
- Aspects:提供与AspectJ框架的集成,该框架是一个面向切面编程框架。
- Instrumentation:提供了类工具的支持和类加载器的实现,可以在特定的应用服务器中使用。
- Messaging:为Spring框架集成一些基础的报文传送应用
- Test:提供与测试框架的集成
一、IOC控制反转思想
控制反转就是让框架创建对象
IOC(Inversion of Control) :程序将创建对象的权利交给框架。之前在开发过程中,对象实例的创建是由调用者管理的,代码如下:
public interface StudentDao {
  // 根据id查询学生
  Student findById(int id);
}

public class StudentDaoImpl implements StudentDao{
  @Override
  public Student findById(int id) {
    // 模拟从数据库查找出学生
    return new Student(1,"程序员","北京");
 }
}

public class StudentService {
  public Student findStudentById(int id){
    // 此处就是调用者在创建对象
    StudentDao studentDao = newStudentDaoImpl();
    return studentDao.findById(1);
 }
}
这种写法有两个缺点:
- 浪费资源:StudentService调用方法时即会创建一个对象,如果不断调用方法则会创建大量StudentDao对象。
- 代码耦合度高:假设随着开发,我们创建了StudentDao另一个更加完善的实现类StudentDaoImpl2,如果在StudentService中想使用StudentDaoImpl2,则必须修改源码。
而IOC思想是将创建对象的权利交给框架,框架会帮助我们创建对象,分配对象的使用,控制权由程序代码转移到了框架中,控制权发生了反转,这就是Spring的IOC思想。而IOC思想可以完美的解决以上两个问题。
二、IOC自定义对象容器

接下来我们通过一段代码模拟IOC思想。创建一个集合容器,先将对象创建出来放到容器中,需要使用对象时,只需要从容器中获取对象即可,而不需要重新创建,此时容器就是对象的管理者。
1. 创建实体类,Dao接口,实现类
Student实体类
package com.example.pojo;

public class Student {
    private int id;
    private String name;
    private String address;

    public Student(int id, String name, String address) {
        this.id = id;
        this.name = name;
        this.address = address;
    }

    public Student(){}

    public int getId() {
        return id;
    }

    public void setId(int id) {
        this.id = id;
    }

    public String getName() {
        return name;
    }

    public void setName(String name) {
        this.name = name;
    }

    public String getAddress() {
        return address;
    }

    public void setAddress(String address) {
        this.address = address;
    }

    @Override
    public String toString() {
        return "Student[ " +
                "id=" + id +
                ", name='" + name + '\'' +
                ", address='" + address + '\'' +
                " ]";
    }
}
StudentDao接口
package com.example.dao;

import com.example.pojo.Student;

public interface StudentDao {
    // 根据id查询学生
    Student findById(int id);
}
StudentDao接口实现类1:StudentDaoImpl1
package com.example.dao;

import com.example.pojo.Student;

public class StudentDaoImpl1 implements StudentDao{

    public StudentDaoImpl1() {
    }

    public StudentDaoImpl1(int a){};
    @Override
    public Student findById(int id){
        return new Student(id,"程序员","北京");
    }
}
StudentDao接口实现类1:StudentDaoImpl2
package com.example.dao;

import com.example.pojo.Student;

public class StudentDaoImpl2 implements StudentDao{

    @Override
    public Student findById(int id) {
        // 模拟根据ID查询学生
        System.out.println("新方法!!!");
        return new Student(id,"程序员","上海");
    }
}
2. 创建配置文件bean.properties
该文件中定义管理的对象
studentDao=com.example.dao.StudentDaoImpl23. 创建容器管理类
package com.example;

import java.io.InputStream;
import java.util.Enumeration;
import java.util.HashMap;
import java.util.Map;
import java.util.Properties;

public class Container {
    static Map<String,Object> map = new HashMap<>();

    static {
        // 读取配置文件
        InputStream is = Container.class.getClassLoader().getResourceAsStream("bean.properties");
        Properties properties = new Properties();
        try{
            properties.load(is);
        }catch (Exception e){
            e.printStackTrace();
        }

        // 遍历配置文件的所有配置
        Enumeration<Object> keys = properties.keys();
        while(keys.hasMoreElements()){
            String key = keys.nextElement().toString();
            String value = properties.getProperty(key);
            try{
                Object o = Class.forName(value).newInstance();
                map.put(key,o);
            }catch (Exception e){
                e.printStackTrace();
            }
        }
    }

    // 从容器中获取对象
    public static Object getBean(String key){
        return map.get(key);
    }
}
4. 创建StudentService类
package com.example.service;

import com.example.Container;
import com.example.dao.StudentDao;
import com.example.domain.Student;

public class StudentService {
    public Student findStudentById(int id){
        // 从容器中获取对象
        StudentDao studentDao = (StudentDao) Container.getBean("studentDao");
        System.out.println(studentDao.hashCode());
        return studentDao.findById(id);
    }
}
5. 测试方法
package com.example.test;

import com.example.Container;
import com.example.service.StudentService;

public class Test {
    public static void main(String[] args) {
        StudentService studentService = new StudentService();

        System.out.println(studentService.findStudentById(1));
        System.out.println(studentService.findStudentById(1));
    }
}
6. 测试结果
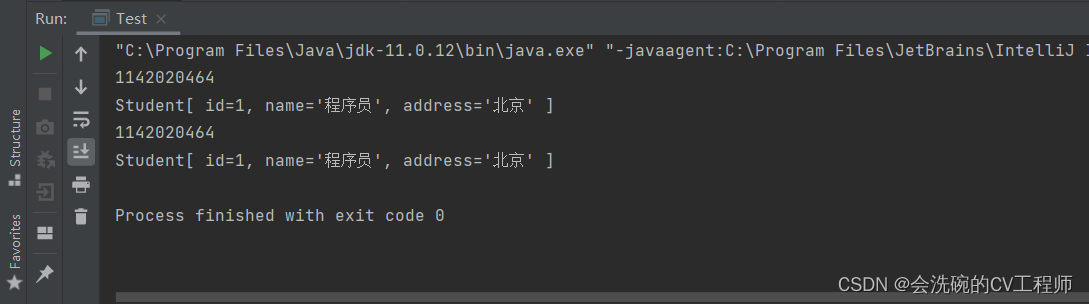
StudentService从容器中每次拿到的都是同一个StudentDao对象,节约了资源。
如果想使用StudentDaoImpl2对象,只需要修改bean.properties的内容为:studentDao=com.itbaizhan.dao.StudentDaoImpl2即可,无需修改Java源码。
或者如果不想new StudentService,也可以在bean.properties加上一行:
studentService = com.example.service.StudentService