在这篇文章中:
做过很多遍了,却总是记不住,这回从头来描述一下。
介绍
所谓多个git账号,可能有两种情况:
- 我有多个github的账号,不同的账号对应不同的repo,需要push的时候自动区分账号
- 我有多个git的账号,有的是github的,有的是bitbucket的,有的是单位的gitlab的,不同账号对应不同的repo,需要push的时候自动区分账号
这两种情况的处理方法是一样的,分下面几步走:
处理
- 先假设我有两个账号,一个是github上的,一个是公司gitlab上面的。先为不同的账号生成不同的ssh-key
ssh-keygen -t rsa -f ~/.ssh/id_rsa_work -c [email protected]然后根据提示连续回车即可在~/.ssh目录下得到id_rsa_work和id_rsa_work.pub两个文件,id_rsa_work.pub文件里存放的就是我们要使用的keyssh-keygen -t rsa -f ~/.ssh/id_rsa_github -c [email protected]然后根据提示连续回车即可在~/.ssh目录下得到id_rsa_github和id_rsa_github.pub两个文件,id_rsa_gthub.pub文件里存放的就是我们要使用的key - 把id_rsa_xxx.pub中的key添加到github或gitlab上,这一步在github或gitlab上都有帮助,不再赘述
- 编辑
~/.ssh/config,设定不同的git 服务器对应不同的key
|
1 2 3 4 5 6 7 8 9 10 11 12 |
# Default github user([email protected]),注意User项直接填git,不用填在github的用户名 Host github.com HostName github.com User git IdentityFile ~/.ssh/id_rsa_github # second user([email protected]) # 建一个gitlab别名,新建的帐号使用这个别名做克隆和更新 Host 172.16.11.11 HostName 172.16.11.11 User work IdentityFile ~/.ssh/id_rsa_work |
|---|
编辑完成后可以使用命令 ssh -vT [email protected] 看看是不是采用了正确的id_rsa_github.pub文件
这样每次push的时候系统就会根据不同的仓库地址使用不同的账号提交了
- 从上面一步可以看到,ssh区分账号,其实靠的是HostName这个字段,因此如果在github上有多个账号,很容易的可以把不同的账号映射到不同的HostName上就可以了。比如我有A和B两个账号, 先按照步骤一生成不同的key文件,再修改
~/.ssh/config内容应该是这样的。
|
1 2 3 4 5 6 7 8 9 10 11 12 |
# Default github user([email protected]),注意User项直接填git,不用填在github的用户名 Host A.github.com HostName github.com User git IdentityFile ~/.ssh/id_rsa_github_A # second user([email protected]) # 建一个gitlab别名,新建的帐号使用这个别名做克隆和更新 Host A.github.com HostName github.com User git IdentityFile ~/.ssh/id_rsa_github_B |
|---|
同时你的github的repo ssh url就要做相应的修改了,比如根据上面的配置,原连接地址是:
git@github.com:testA/gopkg.git
那么根据上面的配置,就要把github.com换成A.github.com, 那么ssh解析的时候就会自动把testA.github.com 转换为 github.com,修改后就是
git@A.github.com:testA/gopkg.git
直接更改 repo/.git/config 里面的url即可
这样每次push的时候系统就会根据不同的仓库地址使用不同的账号提交了
一些题外话
我有一个repo,想要同时push到不同的仓库该如何设置?
很简单, 直接更改 repo/.git/config 里面的url即可,把里面对应tag下的url增加一个就可以了。例:
|
1 2 3 4 5 6 7 8 9 10 11 12 13 14 15 |
[remote "GitHub"] url = [email protected]:elliottcable/Paws.o.git fetch = +refs/heads/*:refs/remotes/GitHub/* [branch "Master"] remote = GitHub merge = refs/heads/Master [remote "Codaset"] url = [email protected]:elliottcable/paws-o.git fetch = +refs/heads/*:refs/remotes/Codaset/* [remote "Paws"] url = [email protected]:Paws/Paws.o.git fetch = +refs/heads/*:refs/remotes/Paws/* [remote "Origin"] url = [email protected]:Paws/Paws.o.git url = [email protected]:elliottcable/paws-o.git |
|---|
上面这个立即就是有4个远端仓库,不同的tag表示不同的远端仓库,最后的Origin标签写法表示默认push到github和codaset这两个远端仓库去。当然,你可以自己随意定制tag和url
我有一个github的repo,clone没有问题,push的时候总是报错:error: The requested URL returned error: 403 while accessing xxx
这个问题也困扰了我一段时间,后来发现修改 repo/.git/config 里面的url,把https地址替换为ssh就好了。
例如
url=https://MichaelDrogalis@github.com/derekerdmann/lunch_call.git
替换为
url=ssh://git@github.com/derekerdmann/lunch_call.git
本机添加多个git仓库账号
我们可能会需要在一台电脑上以不同的github账户去使用git,这时就需要去解决如何管理本机上的多个ssh key的问题了。
生成新ssh key
如果我们电脑上已经存在了一个ssh key,那么我们需要在我们电脑上生成第二个你想在本电脑上使用的id_rsa,使用命令:ssh-keygen -t rsa -C "你的github注册邮箱"。
下图红色标注部分会提示你把新生成的id_rsa存放到哪里,此处默认会存放在c盘的用户名下的.ssh文件夹下(即你第一个github用户ssh key存放的目录),因此我们需要输入路径/c/Users/DodoMonster/.ssh(注意此路径是你的系统盘下用户目录安放ssh密钥的目录,请使用自己电脑上相对应的目录),最后我以“id_rsa_me”重新命名了ssh key防止默认与已有的ssh key重复。
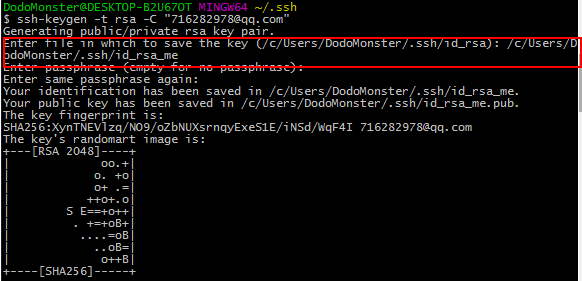
在输入了路径后,会提示你输入提交项目时输入的验证密码,不输则表示不用密码,这是为了防止别人随便在你的项目上push东西,所以最好还是输入以下你的密码。回车,再重复输入确认回车即可。
添加新ssh key
默认SSH只会读取id_rsa,所以为了让SSH识别新的私钥,需要将其添加到SSH agent
使用命令:ssh-add ~/.ssh/id_rsa_me

如果报错:Could not open a connection to your authentication agent.无法连接到ssh agent
可执行ssh-agent bash命令后再执行ssh-add命
然后将公钥添加到git账号中 https://github.com/settings/keys
配置config文件
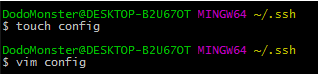
查看.ssh文件中是否存在config文件
如果已存在则直接编辑config文件,命令:vim config #这是linux的命令,进入了vim界面后按a或i或A或I进入编辑模式,编辑完成后按esc键输入:wq 保存文件退出
如果不存在则需要创建config文件,命令:touch config,再对config文件进行编辑
对config文件进行配置填写:
#Default 第一个账号(123456@xxxx.com)

Host default
    HostName github.com
    PreferredAuthentications publickey
    IdentityFile ~/.ssh/id_rsa_me


#second 第二个账号(38894403@xxxx.com) Host zc HostName github.com PreferredAuthentications publickey IdentityFile ~/.ssh/id_rsa
其中Host 后的名字可以随意方便自己记忆,但HostName必须为github.com(或者其它git地址)。
测试是否配置成功
使用命令:
ssh -T git@zc
出现如图的欢迎语则为配置成功。
注意:配置完成后,在连接Host不是github.com的github仓库时,远程库的地址要对应地做一些修改:
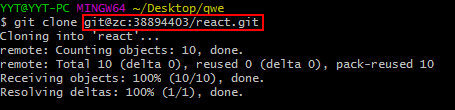
而并非原来的[email protected]:38894403/react.git
这样每次连接都会使用id_rsa_me与服务器进行连接。
配置至此,大功告成!
添加SSH密钥到GitHub
$ clip < ~/.ssh/id_rsa.pub
bash: /c/Users/UsersName/.ssh/id_rsa.pub: No such file or directory
【转】Generating SSH keys 生成 SSH 密钥
Step 1、检查本机现有的SSH密钥
检查~/.ssh看看是否有名为d_rsa.pub 和id_dsa.pub的2个文件。如果你什么都没得到这些文件,转到 步骤2 ;否则,请跳到 第3步。
打开你的Git Bash,输入:
$ ls -al ~/.ssh
Step 2、创建一个新的SSH密钥
注意期间“输入密码(空没有密码):再次输入密码]:[键入密码]#再次输入相同的密码”,如下:
“Enter passphrase (empty for no passphrase): [Type a passphrase] # Enter same passphrase again:”
可不管,直接一路ENTER。
$ ssh-keygen -t rsa -C "注册Github用的邮箱"
$ ssh-keygen -t rsa -C "注册Github用的邮箱"
Generating public/private rsa key pair.
Enter file in which to save the key (/c/Users/UsersName/.ssh/id_rsa):
Enter passphrase (empty for no passphrase):
Enter same passphrase again:
Your identification has been saved in /c/Users/UsersName/.ssh/id_rsa.
Your public key has been saved in /c/Users/UsersName/.ssh/id_rsa.pub.
The key fingerprint is:
SHA256:rwuerTS5wjzt86GtvvVt0jwm5nquIJWpdXt+kw2exYU 注册Github用的邮箱
The key's randomart image is:
+---[RSA 2048]----+
| |
| |
| . |
| o E .|
| = S . . |
| + o o . o |
| oo.* + o+ * |
| =+o@ *=.% . |
| =@*OO=*.o |
+----[SHA256]-----+
现在你的公钥已经保存在/c/Users/you/.ssh/id_rsa.pub中。
如果以上“ssh-keygen 生成一个公钥私钥”的过程中选择设置了密码,及可通过“ssh-add”来实现ssh免密码登陆。(详情可参照“ssh-agent用法”)
添加新的SSh密钥到ssh-keyen中:
$ eval "$ (ssh-agent -s)" #ssh-agent启动之后,如果通过公钥做身份验证,只需第一次输入密码,以后ssh-agent会帮你自动输入。
Step 3、将你的SSH key添加到GitHub
运行以下代码复制id_rsa.pub到剪切板:
$ clip < ~/.ssh/id_rsa.pub
或
手动复制 ~/.ssh文件夹下的id_rsa.pub。
现在将其添加到GitHub上(参考GitHub官网教程“Adding a new SSH key to your GitHub account”):
- 在页面的用户栏的右上角,单击 Settings ;
- 在左侧边栏点击 SSH and GPG keys.;
- 点击 New SSH key ;
- 在Title标题区域中,为新的SSH密钥添加一个描述性标签。例如,如果您使用的是个人的PC,您可以调用这个关键的“Personal MacBook Air”;
- 粘贴您的钥匙插入 Key 区域中;
- 点击 Add SSH key ;
- 确认通过输入操作GitHub的密码。
Step 4、测试SSH key是否成功的添加到GitHub
$ ssh -T [email protected] # 用 ssh 连接 github
$ ssh -T [email protected]
中途会有如下提示,选择yes即可:
Are you sure you want to continue connecting (yes/no)? yes
我们可能会需要在一台电脑上以不同的github账户去使用git,这时就需要去解决如何管理本机上的多个ssh key的问题了。
生成新ssh key
如果我们电脑上已经存在了一个ssh key,那么我们需要在我们电脑上生成第二个你想在本电脑上使用的id_rsa,使用命令:ssh-keygen -t rsa -C "你的github注册邮箱"。
下图红色标注部分会提示你把新生成的id_rsa存放到哪里,此处默认会存放在c盘的用户名下的.ssh文件夹下(即你第一个github用户ssh key存放的目录),因此我们需要输入路径/c/Users/DodoMonster/.ssh(注意此路径是你的系统盘下用户目录安放ssh密钥的目录,请使用自己电脑上相对应的目录),最后我以“id_rsa_me”重新命名了ssh key防止默认与已有的ssh key重复。
在输入了路径后,会提示你输入提交项目时输入的验证密码,不输则表示不用密码,这是为了防止别人随便在你的项目上push东西,所以最好还是输入以下你的密码。回车,再重复输入确认回车即可。
添加新ssh key
默认SSH只会读取id_rsa,所以为了让SSH识别新的私钥,需要将其添加到SSH agent
使用命令:ssh-add ~/.ssh/id_rsa_me
如果报错:Could not open a connection to your authentication agent.无法连接到ssh agent
可执行ssh-agent bash命令后再执行ssh-add命
然后将公钥添加到git账号中 https://github.com/settings/keys
配置config文件
查看.ssh文件中是否存在config文件
如果已存在则直接编辑config文件,命令:vim config #这是linux的命令,进入了vim界面后按a或i或A或I进入编辑模式,编辑完成后按esc键输入:wq 保存文件退出
如果不存在则需要创建config文件,命令:touch config,再对config文件进行编辑
对config文件进行配置填写:
#Default 第一个账号(123456@xxxx.com)

Host default
    HostName github.com
    PreferredAuthentications publickey
    IdentityFile ~/.ssh/id_rsa_me


#second 第二个账号(38894403@xxxx.com) Host zc HostName github.com PreferredAuthentications publickey IdentityFile ~/.ssh/id_rsa
其中Host 后的名字可以随意方便自己记忆,但HostName必须为github.com(或者其它git地址)。
测试是否配置成功
使用命令:
ssh -T git@zc
出现如图的欢迎语则为配置成功。
注意:配置完成后,在连接Host不是github.com的github仓库时,远程库的地址要对应地做一些修改:
而并非原来的[email protected]:38894403/react.git
这样每次连接都会使用id_rsa_me与服务器进行连接。
配置至此,大功告成!
$ clip < ~/.ssh/id_rsa.pub
bash: /c/Users/UsersName/.ssh/id_rsa.pub: No such file or directory
【转】Generating SSH keys 生成 SSH 密钥
Step 1、检查本机现有的SSH密钥
检查~/.ssh看看是否有名为d_rsa.pub 和id_dsa.pub的2个文件。如果你什么都没得到这些文件,转到 步骤2 ;否则,请跳到 第3步。
打开你的Git Bash,输入:
$ ls -al ~/.ssh
Step 2、创建一个新的SSH密钥
注意期间“输入密码(空没有密码):再次输入密码]:[键入密码]#再次输入相同的密码”,如下:
“Enter passphrase (empty for no passphrase): [Type a passphrase] # Enter same passphrase again:”
可不管,直接一路ENTER。
$ ssh-keygen -t rsa -C "注册Github用的邮箱"
$ ssh-keygen -t rsa -C "注册Github用的邮箱"
Generating public/private rsa key pair.
Enter file in which to save the key (/c/Users/UsersName/.ssh/id_rsa):
Enter passphrase (empty for no passphrase):
Enter same passphrase again:
Your identification has been saved in /c/Users/UsersName/.ssh/id_rsa.
Your public key has been saved in /c/Users/UsersName/.ssh/id_rsa.pub.
The key fingerprint is:
SHA256:rwuerTS5wjzt86GtvvVt0jwm5nquIJWpdXt+kw2exYU 注册Github用的邮箱
The key's randomart image is:
+---[RSA 2048]----+
| |
| |
| . |
| o E .|
| = S . . |
| + o o . o |
| oo.* + o+ * |
| =+o@ *=.% . |
| =@*OO=*.o |
+----[SHA256]-----+
现在你的公钥已经保存在/c/Users/you/.ssh/id_rsa.pub中。
如果以上“ssh-keygen 生成一个公钥私钥”的过程中选择设置了密码,及可通过“ssh-add”来实现ssh免密码登陆。(详情可参照“ssh-agent用法”)
添加新的SSh密钥到ssh-keyen中:
$ eval "$ (ssh-agent -s)" #ssh-agent启动之后,如果通过公钥做身份验证,只需第一次输入密码,以后ssh-agent会帮你自动输入。
Step 3、将你的SSH key添加到GitHub
运行以下代码复制id_rsa.pub到剪切板:
$ clip < ~/.ssh/id_rsa.pub
或
手动复制 ~/.ssh文件夹下的id_rsa.pub。
现在将其添加到GitHub上(参考GitHub官网教程“Adding a new SSH key to your GitHub account”):
- 在页面的用户栏的右上角,单击 Settings ;
- 在左侧边栏点击 SSH and GPG keys.;
- 点击 New SSH key ;
- 在Title标题区域中,为新的SSH密钥添加一个描述性标签。例如,如果您使用的是个人的PC,您可以调用这个关键的“Personal MacBook Air”;
- 粘贴您的钥匙插入 Key 区域中;
- 点击 Add SSH key ;
- 确认通过输入操作GitHub的密码。
Step 4、测试SSH key是否成功的添加到GitHub
$ ssh -T [email protected] # 用 ssh 连接 github
$ ssh -T [email protected]
中途会有如下提示,选择yes即可:
Are you sure you want to continue connecting (yes/no)? yes