MMDeploy学习笔记(一):模型部署基础知识
概述
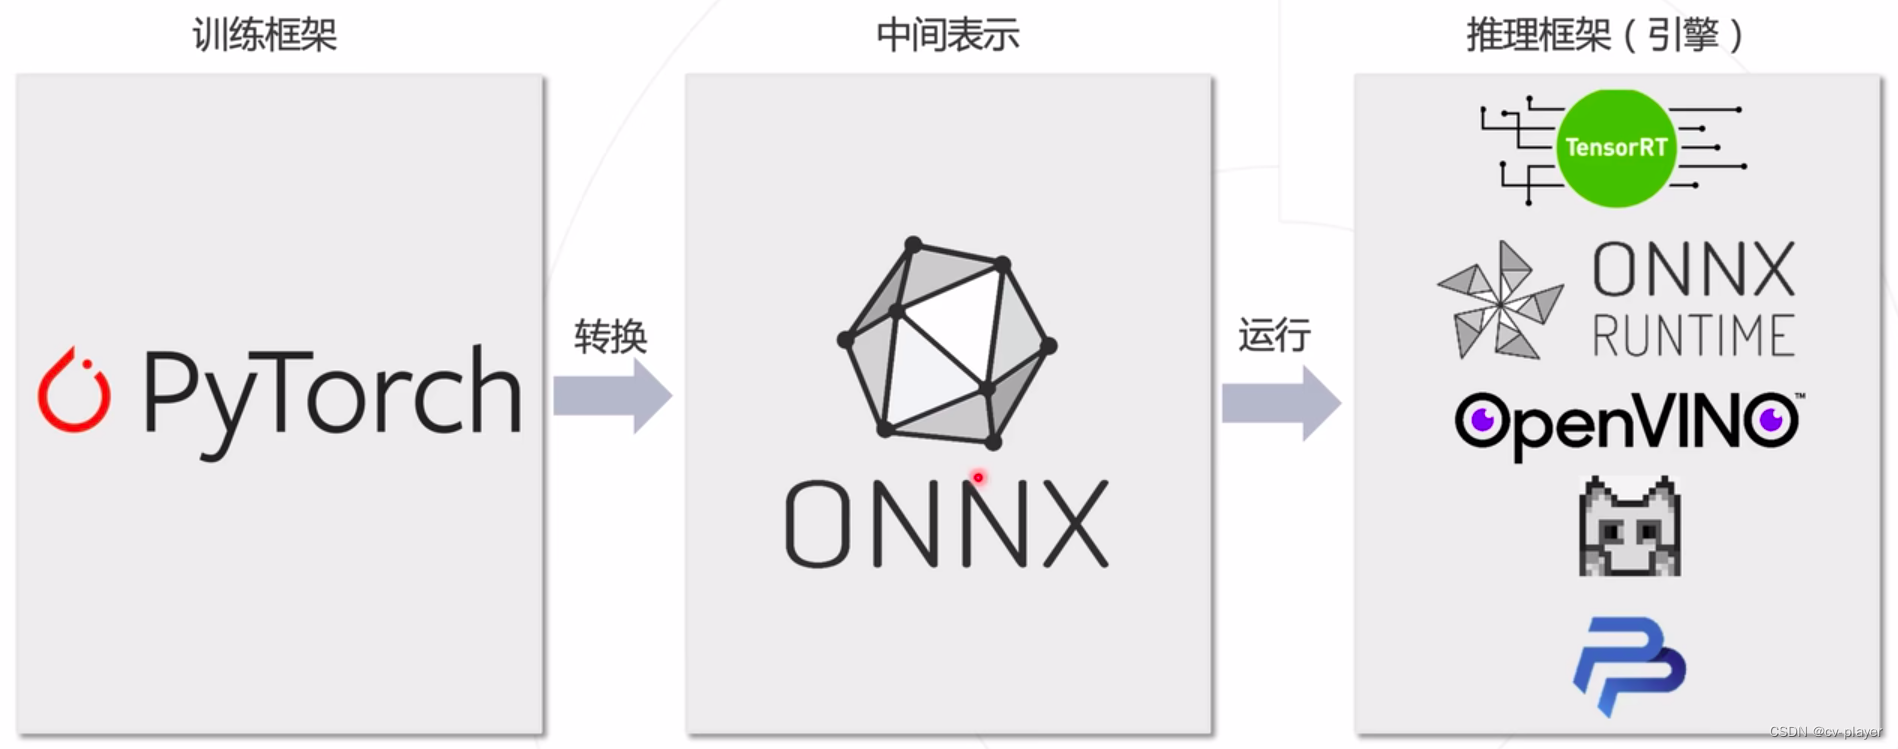
模型部署是把训练好的模型在特定的软硬件平台下进行推理,能够对输入的数据进行前向计算得到预测结果,并针对硬件的特点进行优化与加速(例如矩阵的乘法计算在CPU、GPU和DSP的实现方式各不相同,计算速度也各不相同)。将其封装成软件开发包(SDK)后,就可以利用它开发应用软件(APP)。
由于现有Pytorch、TensorFlow等不同的深度学习框架,以及Nvidia、Intel、Qualcomm、Apple、Huawei等不同的硬件平台,那么在不同的硬件平台上部署不同的深度学习框架时,需要适配不同的模型格式,这个适配的复杂度是相当大的,因此需要针对不同的深度学习框架引入一个统一的模型格式,即ONNX。
ONNX的本质是文本,而不是程序,所以它无法直接在硬件平台上运行,因此需要推理引擎(推理框架)来加载ONNX模型,并在硬件设备上进行高效的推理。市面上所有的推理引擎都支持ONNX模型,这些引擎可以分为两类:
- 芯片厂商自研的推理框架,例如Nvidia的TensorRT、Intel的openVINO、Qualcomm的SNPE、Apple的ML、Huawei的CANN等,这类推理引擎的优点是可以充分发挥自家芯片的能力,获得比较好的推理性能,缺点是不具有普适性,无法应用在其他的芯片上。
- 通用的推理引擎,例如ONNX RUNTIME、MNN、TNN、PP、tvm、TensorFlow Lite等,这些推理引擎的优点是具备通用性,可运行在不同的软硬件平台下,对于用户来说,可以降低开发的难度并提升开发效率。
因此,模型部署流程可以用下图进行描述:
ONNX模型
ONNX(Open Neural Network Exchange)模型由微软、亚马逊、Facebook和IBM等公司共同发起开发,它是一种针对机器学习所设计的开放式文件格式,用于存储训练好的模型。不同的训练框架可采用相同格式存储模型并交互。
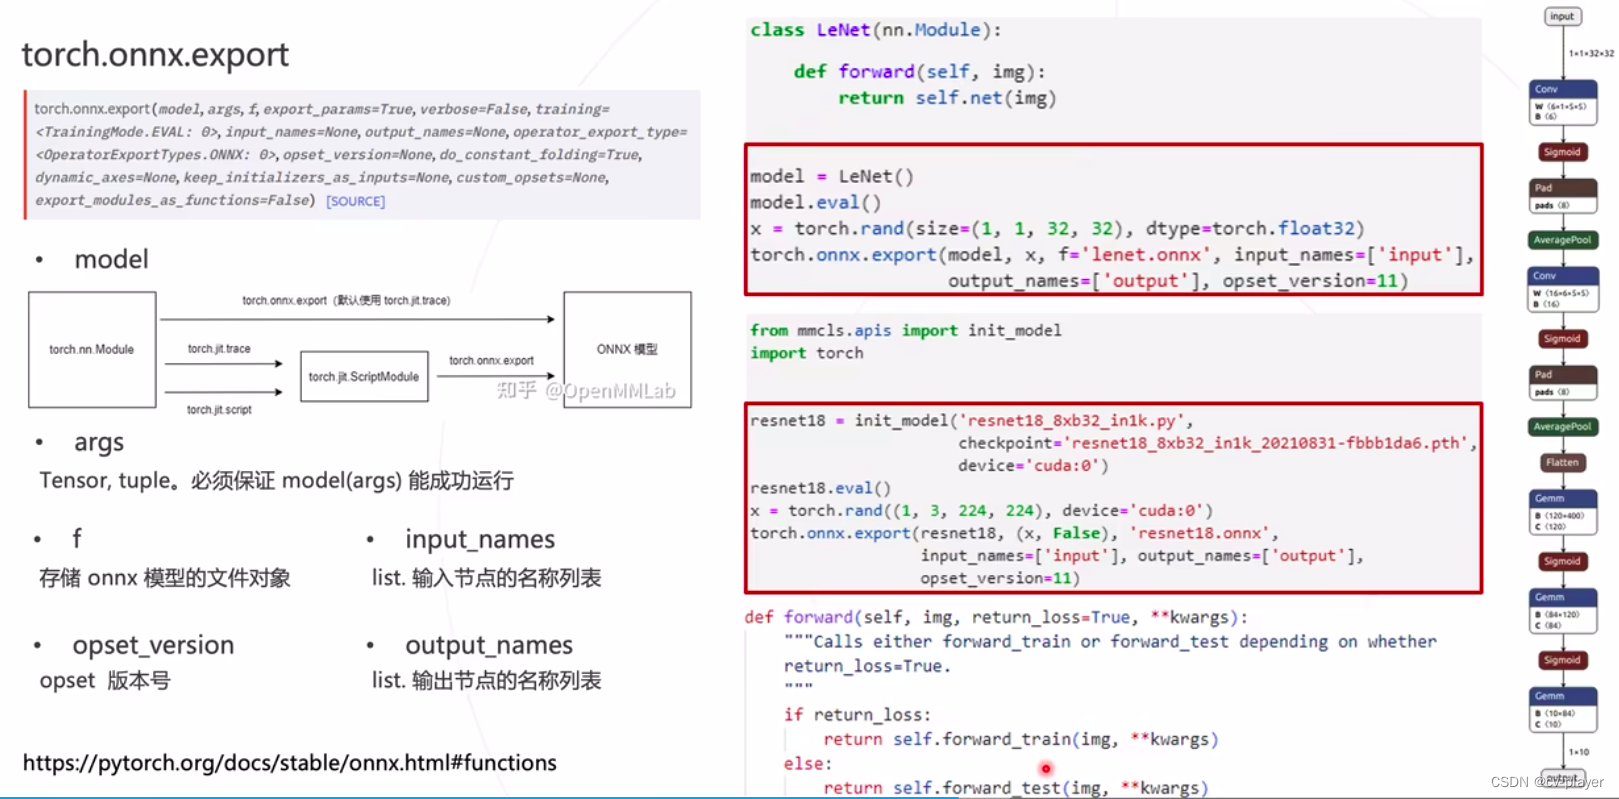
权重使用随机值,构建LeNet模型并导出ONNX的代码实例:
import torch
from torch import nn

class LeNet(nn.Module):
	def __init__(self):
		super(LeNet, self).__init__()
		self.net = nn.Sequential(
			nn.Conv2d(1, 6, kernel_size=5),
			nn.Sigmoid(),
			nn.AvgPool2d(kernel_size=2, stride=2),
			nn.Conv2d(6, 16, kernel_size=5),
			nn.Sigmoid(),
			nn.AvgPool2d(kernel_size=2, stride=2),
			nn.Flatten(),
			nn.Linear(16*5*5, 120),
			nn.Sigmoid(),
			nn.Linear(120, 84),
			nn.Sigmoid(),
			nn.Linear(84,10))

	def forward(self, img):
		return self.net(img)

model = LeNet()
model.eval()
x = torch.rand(size=(1, 1, 32, 32), dtype=torch.float32)
torch.onnx.export(model, x, f='lenet.onnx', input_names=['input'],
										output_names=['output'], opset_version=11)
ONNX的可视化可参考博主的另一篇博客ONNX可视化与编辑工具。导出的ONNX模型是一个有向无环图,图中的节点为算子,所有算子的集合成为算子集(opset),图中的边表示节点的计算顺序和数据流向。所有算子的定义可以访问官网。

模型部署案例-分类模型ResNet
Pytorch模型转ONNX模型
在此链接下载相应的模型和权重文件。使用以下代码导出ONNX模型:
from mmcls.apis import init_model
import torch

resnet18 = init_model('resnet18_8xb32_in1k.py',
											   checkpoint='resnet18_8xb32_in1k_20210831-fbbb1da6.pth',
											   device='cuda:0')
# 由于模型在训练过程中有drop_out,而且模型中BN层的参数会随着输入的变化而变化,推理的时候要消除这些影响,因此需要打开evaluation模式,起到使参数固定的作用
resnet18.eval()
x = torch.rand((1,3,224,224),device='cuda:0')
# 单张输入
torch.onnx.export(resnet18,
									  (x,False),
									  'resnet18.onnx',
									  input_names=['input'],
									  output_names=['output'],
									  opset_version=11)
注:torch.onnx.export函数说明:
使用ONNX Runtime对ONNX模型进行推理
ONNX Runtime是微软维护的一个跨平台推理引擎,可以直接加载并运行ONNX模型,支持不同的操作系统、CPU架构和AI加速设备。
import onnxruntime as ort
import torch
import mmcv
from mmcv.parallel import collate, scatter
from mmcls.datasets.pipelines import Copose
import numpy as np
session = ort.InferenceSession('resnet18.onnx', providers =['CUDAExecutionProvider'])
cfg = mmcv.Config.fromfile('resnet18_8xb32_in1k. py')
 test _ pipeline = Compose(cfg.data.test.pipeline)
input _ data = dict(img _ info=dict(filename='daisy.webp'), img _ prefix=None)
input _ data = test _ pipeline(input_data)
input _ data = collate([input_data], samples_per_gpu=1)
input _ data = scatter(input_data ,[torch.device('cuda:0')])[0]
input _ data = input_data['img']
io_binding = session.io_binding()
io _ binding.bind_input(name='input',
												  device_type='cuda',
												  device_id=0,
												  element_type=np.float32,
												  shape=input_data.shape,
												  buffer_ptr = input_data.data_ptr())
io_binding.bind_output('output')
session.run_with_iobinding(io_binding)
scores = io_binding.copy_outputs_to_cpu()[0]
pred_score = np.max(scores, axis=1)[0]
pred _ label = np.argmax(scores ,axis =1)[0]
print(pred_score, pred_label)
使用TensorRT对ONNX模型进行推理
使用TensorRT部署ONNX模型时包括以下两个阶段:
- Build Phase(构建阶段):对ONNX模型转换和优化,输出优化的模型;
trtexec --onnx=resnet18.onnx --saveEngine=resnet18.plan
- Runtime Phase(运行时阶段):加载优化后模型,执行推理。
运行时阶段的详细过程如下图所示,首先创建运行时,然后加载构建阶段优化处理后的TensorRT模型生成engine,接着创建一个context,绑定输入输出,并准备好一个buffer,用来存预处理好的数据,最后执行计算进行前向推理。

提升推理效率的两个tricks
批处理
使用批处理(模型可以接受多张图放在一个batch中进行推理)可以提升推理效率,下面演示的是如何使用批处理将Pytorch模型转为ONNX模型的代码:
from mmcls.apis import init_model
import torch

resnet18 = init_model('resnet18_8xb32_in1k.py',
											   checkpoint='resnet18_8xb32_in1k_20210831-fbbb1da6.pth',
											   device='cuda:0')
# 由于模型在训练过程中有drop_out,而且模型中BN层的参数会随着输入的变化而变化,推理的时候要消除这些影响,因此需要打开evaluation模式,起到使参数固定的作用
resnet18.eval()
x = torch.rand((1,3,224,224),device='cuda:0')
# 动态输入(批处理)
torch.onnx.export(resnet18,
	 								 	(x,False),
	 								 	'batch_resnet18.onnx',
	 									input_names=['input'],
	 									output_names=['output'],
	 									opset_version=11,
	 									dynamic_axes=dict(
	 										input=dict({

    0:'batch'}),
	 										output=dict({

    0:'batch'}))
 										)
使用TensorRT对动态输入的模型进行推理时,在构建阶段需要使用以下代码进行优化和转换:
trtexec --onnx=batch_resnet18.onnx \
				--saveEngine=batch_resnet18.plan \
				--minShapes=input:1x3x224x224 \				#最小shape
				--optShapes=input:8x3x224x224 \				#最优shape
				--maxShapes=input:32x3x224x224 \			#最大shape
				--workspace=1024
量化
使用量化(即低精度模型)同样是提升推理效率的手段。这里的可以使用fp16、int8或int4,量化为fp16一般不会有精度损失。
trtexec --onnx=batch_resnet18.onnx \
				--fp16 \
				--saveEngine=batch_fp16_resnet18.plan \
				--minShapes=input:1x3x224x224 \				#最小shape
				--optShapes=input:8x3x224x224 \				#最优shape
				--maxShapes=input:32x3x224x224 \			#最大shape
				--workspace=1024
trtexec --onnx=batch_resnet18.onnx \
				--int8 \
				--calib=calibration.cache \
				--saveEngine=batch_int8_resnet18.plan \
				--minShapes=input:1x3x224x224 \				#最小shape
				--optShapes=input:8x3x224x224 \				#最优shape
				--maxShapes=input:32x3x224x224 \			#最大shape
				--workspace=1024
常见问题
- 避免在torch model中使用numpy或者python内置类型,使用torch.Tensor。
- 使用tensor.shape时,避免in-place操作。
- 推理框架对onnx支持能力各不相同,需要专门适配:Backend adapter。
- 算法迭代更新快,但推理框架对于算子的支持相对滞后:自定义算子。
- Pytorch的动态特性(分支、循环),增加部署难度:重写模块、函数或符号。