一、Koa简介
基于 Node.js 平台的下一代 web 开发框架。 由 Express 幕后的原班人马打造, 致力于成为 web 应用和 API 开发领域中的一个更小、更富有表现力、更健壮的基石。
详细请参考Koa官网进行学习。
二、Koa基础入门
1.项目初始化
执行 npm init -y, 生成package.json
npm init -y
2.安装Koa
执行命令
npm i koa
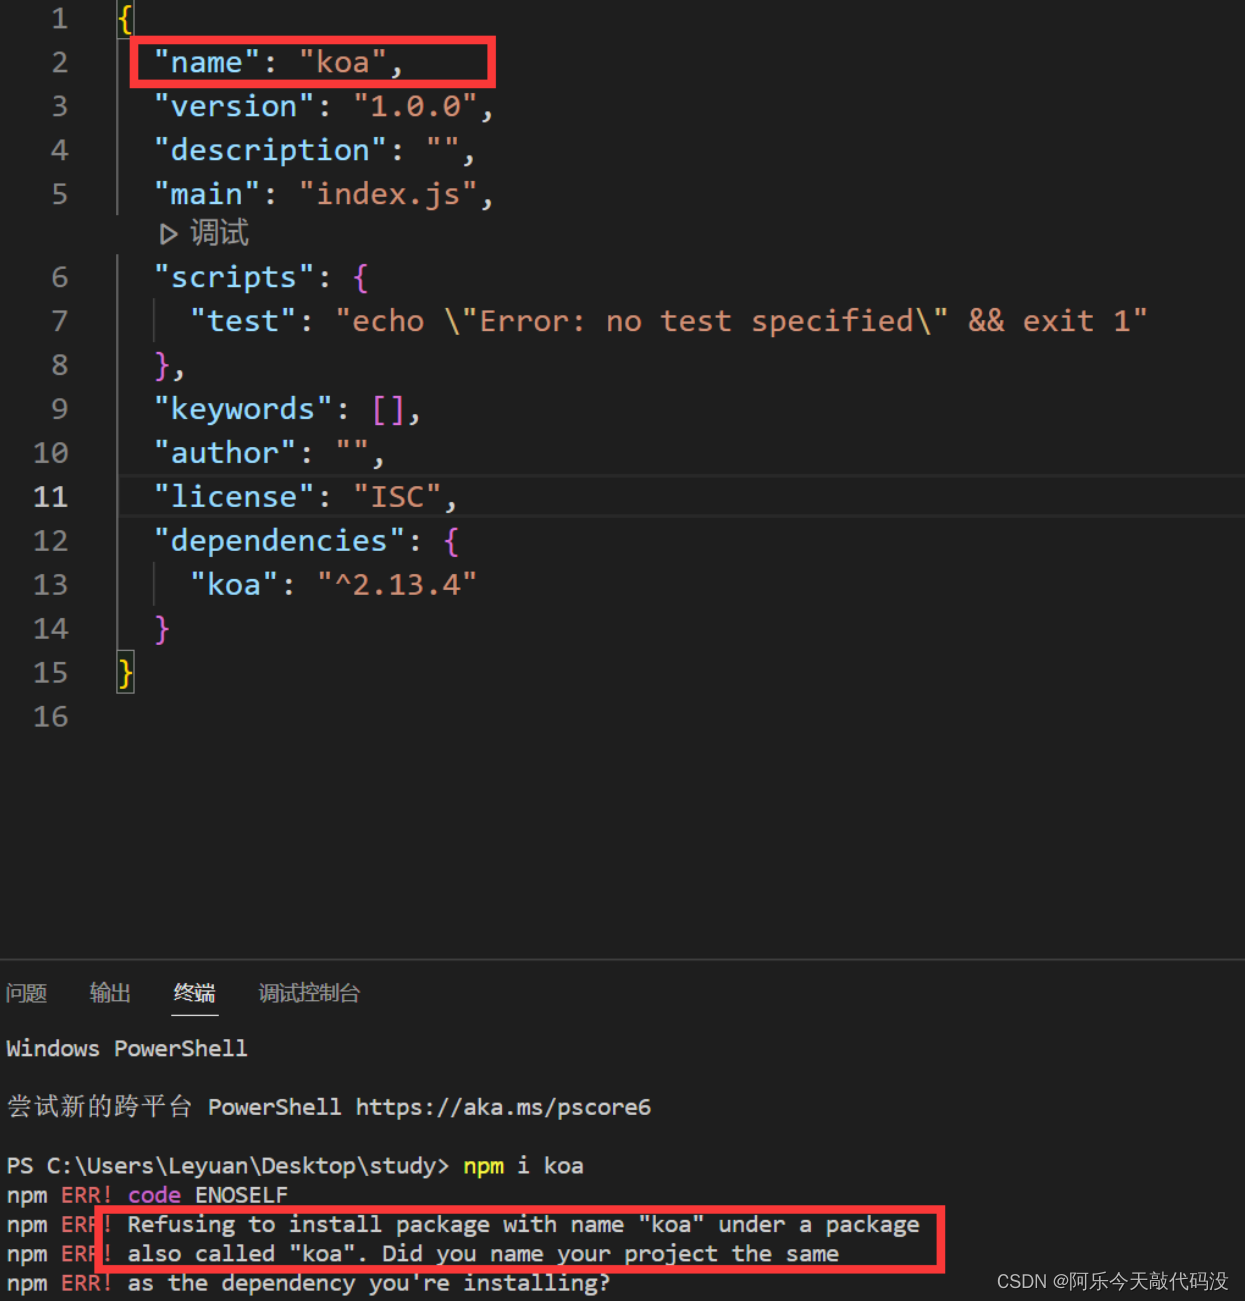
ps:项目名称不能为koa,不然就噶了
3.入门体验
1)回顾Express如何创建服务程序
//导入express
const express = require('express')
//创建web服务器
const app = express()
//编写中间件
app.use(function(req, res, next) {


  console.log('hello express');
  next()
})
//启动服务器并监听端口
app.listen(8080, () => [
  console.log('express server running at http://localhost:8080')
])
2)使用koa编写服务程序
// 一. 导入koa
const Koa = require('koa')
// 二. 实例化对象 (Koa首字母需要大写,此处实际上是类)
const app = new Koa()
// 三. 编写中间件
app.use((ctx) => {


    //ctx:content http 请求上下文
  ctx.body = 'hello Koa'
})
// 四. 启动服务
app.listen(3000, () => {


  console.log('Koa server is running on http://localhost:3000')
})
通过node +文件路径执行,可以看到终端输出了
![[外链图片转存失败,源站可能有防盗链机制,建议将图片保存下来直接上传(img-G08JPgvm-1673836833805)(C:\Users\Leyuan\AppData\Roaming\Typora\typora-user-images\image-20220725103442187.png)]](https://img-blog.csdnimg.cn/8faece58a8384ee580360755e7e62dc6.png)
同时,我们使用postman对http://localhost:3000网址发出请求,可以看到服务端发出的响应“hello koa”
![[外链图片转存失败,源站可能有防盗链机制,建议将图片保存下来直接上传(img-H8tZcAPB-1673836833805)(C:\Users\Leyuan\AppData\Roaming\Typora\typora-user-images\image-20220725103721709.png)]](https://img-blog.csdnimg.cn/0f7e89d51cfb45409fb44636e27b65c9.png)
nodemon插件的安装
安装插件,便于实时监听后缀为js、mis、json文件的修改保存,避免多次重启服务(使用nodemon +文件路径启动)
npm i nodemon -D //此为开发环境安装,全局安装不需要-D
ps:此处安装成功后,可能会出现命令执行失败的情况,可以使用如下命令安装。
npm i nodemon -g --verbose
执行 nodemon src/test命令后,修改并保存文件内容,可以看到nodemon监听到文件被修改自行重启。
![[外链图片转存失败,源站可能有防盗链机制,建议将图片保存下来直接上传(img-k7LsAOzS-1673836833806)(C:\Users\Leyuan\AppData\Roaming\Typora\typora-user-images\image-20220725105646578.png)]](https://img-blog.csdnimg.cn/a54ea004e3f8496594d327fbe1d8f134.png)
三、走进中间件
1.基本概念
有时候从请求到响应的业务比较复杂, 将这些复杂的业务拆开成一个个功能独立的函数, 就是中间件,每一个中间件就是一个函数,互不影响,但又彼此协作。
![[外链图片转存失败,源站可能有防盗链机制,建议将图片保存下来直接上传(img-QguD3XmL-1673836833806)(C:\Users\Leyuan\AppData\Roaming\Typora\typora-user-images\image-20220725135217537.png)]](https://img-blog.csdnimg.cn/7da5d4b7ab1542bf91644dbffb2da93b.png)
2.基本使用
// 一. 导入koa
const Koa = require('koa')
// 二. 实例化对象
const app = new Koa()
// 三. 编写中间件
app.use((ctx, next) => {


  console.log('我来组成身体')
    //next() 可以将当前函数暂停并将控制传递给定义的下一个中间件。
  next()
})
app.use((ctx, next) => {


  console.log('我来组成头部')
  next()
})
app.use((ctx) => {


  console.log('---------')
  //如果此处不使用ctx.body会报错“not found”
  ctx.body = '组装完成'
})
// 四. 启动服务
app.listen(3000, () => {


  console.log('server is running on http://localhost:3000')
})
app.use 可以将给定的中间件方法添加到此应用程序需要注意的是,其一次只能接受一个函数做为参数。其返回 this, 因此可以链式表达,以上代码可以简写为
// 一. 导入koa
const Koa = require('koa')
// 二. 实例化对象
const app = new Koa()
// 三. 编写中间件
app
.use((ctx, next) => {


  console.log('我来组成身体')
  next()
})
.use((ctx, next) => {


  console.log('我来组成头部')
  next()
})
.use((ctx) => {


  console.log('---------')
  //如果此处不使用ctx.body会报错“not found”
  ctx.body = '组装完成'
})
// 四. 启动服务
.listen(3000, () => {


  console.log('server is running on http://localhost:3000')
})
思考题 下面的输出顺序是?
// 1. 导入koa包
const Koa = require('koa')
// 2. 实例化对象
const app = new Koa()
// 3. 编写中间件
app.use((ctx, next) => {


  console.log(1)
  next()
  console.log(2)
  console.log('---------------')
  ctx.body = 'hello world'
})

app.use((ctx, next) => {


  console.log(3)
  next()
  console.log(4)
})

app.use((ctx)=>{


  console.log(5)
})
// 4. 监听端口, 启动服务
app.listen(3000)
console.log('server is running on http://localhost:3000')
洋葱圈模型
![[外链图片转存失败,源站可能有防盗链机制,建议将图片保存下来直接上传(img-8cClobXS-1673836833806)(C:\Users\Leyuan\AppData\Roaming\Typora\typora-user-images\image-20220725143506178.png)]](https://img-blog.csdnimg.cn/36f1af1bea214737b29ea68d569953f7.png)
- 中间件函数队列,会在最后一个中间件或一个没有调用next的中间件那里停止。
- koa官方文档上把外层的中间件称为"上游",内层的中间件为"下游"。
- 一般的中间件都会执行两次,调用next之前为第一次,调用next时把控制传递给下游的下一个中间件。当下游不再有中间件或者没有执行next函数时,就将依次恢复上游中间件的行为,让上游中间件执行next之后的代码
从源代码看use
  use(fn) {


    // 判断是否为函数
    if (typeof fn !== 'function') throw new TypeError('middleware must be a function!');
    // 判断是否为generator函数,并转化为generator函数
    if (isGeneratorFunction(fn)) {


      deprecate('Support for generators will be removed in v3. ' +
                'See the documentation for examples of how to convert old middleware ' +
                'https://github.com/koajs/koa/blob/master/docs/migration.md');
      fn = convert(fn);
    }
// 调试  DEBUG=koa* node app.js
    debug('use %s', fn._name || fn.name || '-');
    // 把中间件push进middleware
    this.middleware.push(fn);
    return this;
  }
Genertor 函数
Genertor 函数是es6 新增的一种异步编程的解决方案,语法和传统的函数完全不同;Genertor 函数的最大的特点就是可以交出函数的执行权(即暂停执行)。
1)形式上: Generator函数是一个普通的函数,不过相对于普通函数多出了两个特征。一是在function关键字和函数明之间多了’*'号;二是函数内部使用了yield表达式,用于定义Generator函数中的每个状态。
2)语法上: Generator函数封装了多个内部状态(通过yield表达式定义内部状态)。执行Generator函数时会返回一个遍历器对象(Iterator(迭代器)对象)。也就是说,Generator是遍历器对象生成函数,函数内部封装了多个状态。通过返回的3)Iterator对象,可以依次遍历(调用next方法)Generator函数的每个内部状态。
3)调用上: 普通函数在调用之后会立即执行,而Generator函数调用之后不会立即执行,而是会返回遍历器对象(Iterator对象)。通过Iterator对象的next方法来遍历内部yield表达式定义的每一个状态。
function *myGenerator() {


	yield 'Hello'
	yield 'world'
	return 'ending'
}

let MG = myGenerator()

MG.next() // {value:'Hello',done:false}
MG.next() // {value:'world',done:false}
MG.next() // {value:'ending',done:true}
MG.next() // {value:'undefined',done:false}
上面代码一共调用了四次next方法。
第一次调用,Generator 函数开始执行,直到遇到第一个yield表达式为止。next方法返回一个对象,它的value属性就是当前yield表达式的值hello,done属性的值false,表示遍历还没有结束。
第二次调用,Generator 函数从上次yield表达式停下的地方,一直执行到下一个yield表达式。next方法返回的对象的value属性就是当前yield表达式的值world,done属性的值false,表示遍历还没有结束。
第三次调用,Generator 函数从上次yield表达式停下的地方,一直执行到return语句(如果没有return语句,就执行到函数结束)。next方法返回的对象的value属性,就是紧跟在return语句后面的表达式的值(如果没有return语句,则value属性的值为undefined),done属性的值true,表示遍历已经结束。
第四次调用,此时 Generator 函数已经运行完毕,next方法返回对象的value属性为undefined,done属性为true。以后再调用next方法,返回的都是这个值。
调用 Generator 函数,返回一个遍历器对象,代表 Generator 函数的内部指针。以后,每次调用遍历器对象的next方法,就会返回一个有着value和done两个属性的对象。value属性表示当前的内部状态的值,是yield表达式后面那个表达式的值;done属性是一个布尔值,表示是否遍历结束。
koa-compose源代码
从源代码观察洋葱模型的原理
'use strict'

/**
 * Expose compositor.
 */

module.exports = compose

/**
 * Compose `middleware` returning
 * a fully valid middleware comprised
 * of all those which are passed.
 *
 * @param {Array} middleware
 * @return {Function}
 * @api public
 */

function compose (middleware) {


  // 判断接收的中间件是否为数组
  if (!Array.isArray(middleware)) throw new TypeError('Middleware stack must be an array!')
  for (const fn of middleware) {


    // 判断是否为函数
    if (typeof fn !== 'function') throw new TypeError('Middleware must be composed of functions!')
  }

  /**
   * @param {Object} context
   * @return {Promise}
   * @api public
   */
// 返回匿名函数,该函数接收两个参数
  return function (context, next) {


    // last called middleware #
    // 初始下标为-1,记录执行的中间件的索引
    let index = -1
    // 从第一个中间件并开始递归执行
    return dispatch(0)
    function dispatch (i) {


      // 这里是保证同个中间件中一个next()不被调用多次调用
      // 当i<index,next()函数被调用至少两次的时候,抛出错误
      if (i <= index) return Promise.reject(new Error('next() called multiple times'))
       // 如果i>index,则该中间件并未执行,记录索引
      index = i
      // 根据下标取出中间件
      let fn = middleware[i]

      // 当i已经是数组的length了,说明中间件函数都执行结束,即已经到了洋葱最中心
      if (i === middleware.length) fn = next
      if (!fn) return Promise.resolve()
      try {


         // 若数组下标并未到达最后一位,且存在当前中间件函数则执行当前函数并传入 dispatch(i + 1),就可看出是数组中的下一个中间件了,此时作为 next 传入了中间件函数中;
      // 也就是说我们写中间件时,已经默认注入了 ctx 与 下次执行的封装函数 next,也是因为如此我们在 koa 的中间件中才可以非常方便的判断什么时候进入下一个中间件去执行的洋葱结构,并且一定要执行 next() 否则数组将在此中断,因为这里是 Function.prototype.bind(),bind()方法会创建一个新函数,称为绑定函数.当调用这个绑定函数时,绑定函数会以创建它时传入 bind()方法的第一个参数作为 this,传入 bind()方法的第二个以及以后的参数加上绑定函数运行时本身的参数按照顺序作为原函数的参数来调用原函数.
      // 需注意的是 bind 时指向 null 也是为了以防在执行过程中你有什么骚操作改变了指向,那就不好了
      // 在不断的 Promise.resolve 中去实现递归 dispatch 函数,最终实现顺序控制执行所有中间件函数
        return Promise.resolve(fn(context, dispatch.bind(null, i + 1)));
      } catch (err) {


        return Promise.reject(err)
      }
    }
  }
}
四、路由
1、什么是路由
- 建立URL和处理函数之间的对应关系
- 主要作用: 根据不同的Method和URL返回不同的内容
app.use((ctx) => {


  if (ctx.url == '/') {


    ctx.body = '这是主页'
  } else if (ctx.url == '/users') {


    if (ctx.method == 'GET') {


      ctx.body = '这是用户列表页'
    } else if (ctx.method == 'POST') {


      ctx.body = '创建用户'
    } else {


      ctx.status = 405 // 不支持的请求方法
    }
  } else {


    ctx.status = 404
  }
})
2、使用koa-router
1)安装
npm i koa-router
或
npm i @koa/router
2)使用
// 一. 导入koa
const Koa = require('koa')
// 二. 实例化对象
const app = new Koa()
// 三. 导入koa-router, 实例化路由对象
const Router = require('koa-router')
const router = new Router()
router.get('/', (ctx) => {


  ctx.body = '这是主页'
})
router.get('/users', (ctx) => {


  ctx.body = '这是用户页'
})
router.post('/users', (ctx) => {


  ctx.body = '创建用户页'
})
// 四. 注册路由中间件
// userRouter.routes() 加载路由规则
// userRouter.allowedMethods() 对于没有实现和没有使用的请求方式做出正确的响应
app.use(router.routes())
app.use(router.allowedMethods())
// 五. 启动服务
app.listen(3000, () => {


  console.log('server is running on http://localhost:3000')
})
3) 优化
我们可以将一个模块放到一个单独的文件中. 分离出一个router路由层
创建src/router/user.route.js
// 导入koa-router, 实例化路由对象
const Router = require('koa-router')
const router = new Router()

router.get('/users', (ctx) => {


  ctx.body = '这是用户页'
})
router.post('/users', (ctx) => {


  ctx.body = '创建用户页'
})

module.exports = router
再导入
// 一. 导入koa
const Koa = require('koa')
// 二. 实例化对象
const app = new Koa()

const userRouter = require('./router/user.route')

// 四. 注册路由中间件
app.use(userRouter.routes()).use(userRouter.allowedMethods())

// 五. 启动服务
app.listen(3000, () => {


  console.log('server is running on http://localhost:3000')
})
可以给路由设置一个统一的前缀, 使代码更加简洁
// 导入koa-router, 实例化路由对象
const Router = require('koa-router')
const router = new Router({

     prefix: '/users' })

router.get('/', (ctx) => {


  ctx.body = '这是用户页'
})
router.post('/', (ctx) => {


  ctx.body = '创建用户页'
})

module.exports = router
五、请求参数
在很多场景中, 后端都需要解析请求的参数, 做为数据库操作的条件
场景一
前端希望通过请求, 获取id=1的用户信息
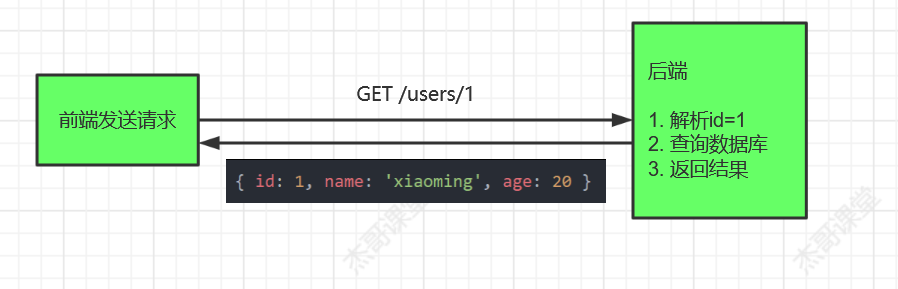
接口设计
GET /users/:id
场景二
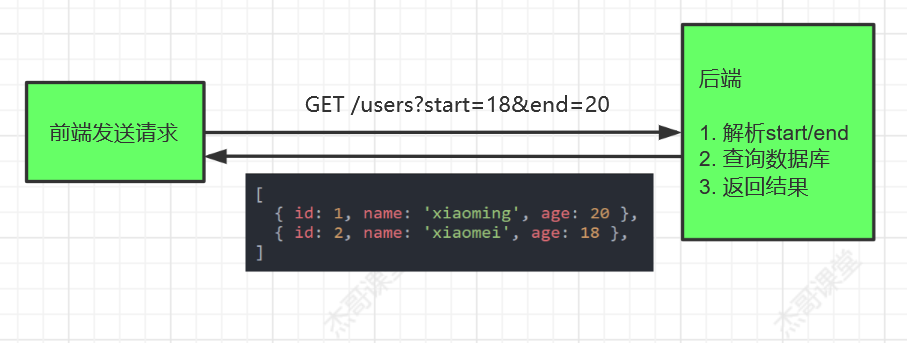
前端希望查询年龄在18到20的用户信息
场景三
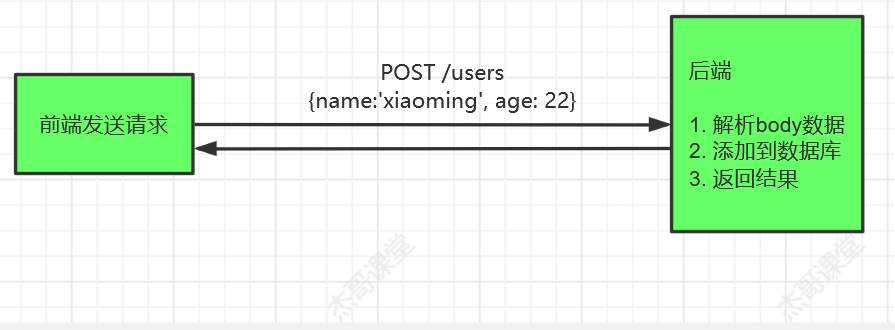
前端注册, 填写了用户名, 年龄, 传递给后端, 后端需要解析这些数据, 保存到数据库
对于不同的Http请求, 需要使用不同的方式携带参数
- GET请求: 在URL中以键值对传递
- POST/PUT/PATCH/DELET请求: 在请求体中传递
// 一. 导入koa
const Koa = require('koa')
// 二. 实例化对象
const app = new Koa()
// 三. 导入koa-router, 实例化路由对象
const Router = require('koa-router')
const router = new Router({

     prefix: '/users' })
const db=[{

    id:1,name:'小明',age:21},
          {

    id:2,name:'小红',age:18},
          {

    id:3,name:'小兰',age:19},]

//GET /users 获取所有用户信息,返回数组
router.get('/', (ctx) => {


  ctx.body = db
})

//GET /users/:id  场景一:根据id,获取该用户信息,返回对象(通过路由传参, 可以通过params得到)
router.get('/:id', (ctx) => {


  const id = ctx.params.id
  const res = db.filter((item)=>item.id==id)
  if(!res[0]) ctx.throw(404)
  ctx.body=res[0]
})

// GET /users?start=18&end=20 ---- 获取所有的用户信息, 返回一个数组(以键值对的形式传参, 可以通过query得到)
router.get('/', (ctx) => {


  // 通过 ctx.query 是ctx.request.query的代理 解析键值对参数
  const {

     start = 0, end = 0 } = ctx.query
  const res = db.filter((item) => item.age >= start && item.age <= end)
  // 解析键值对
  res.length == 0 ? ctx.throw(404) : (ctx.body = res)
})
// 四. 注册路由中间件
app.use(router.routes())
app.use(router.allowedMethods())
// 五. 启动服务
app.listen(3000, () => {


  console.log('server is running on http://localhost:3000')
})
场景三、处理body参数
Koa原生支持body参数解析, 通常借助社区的中间件实现. 官方推荐的有
- koa-bodyparser
- koa-body (支持的方法更多,推荐使用)
1)安装
npm install koa-body
2)注册
// 注册KoaBody中间件, 解析请求体中的参数, 挂载到ctx.request.body
const KoaBody = require('koa-body')
app.use(KoaBody())
3)使用
通过ctx.request.body获取请求体中的数据
app.use(ctx=>{


ctx.body=`Request Body:${

      JSON.stringify(ctx.request.body)}`
})
需要注意的是,在使用koa-body获取post请求body参数时,一定要在注册路由前使用koa-body,否则ctx.request.body获取为空
![[外链图片转存失败,源站可能有防盗链机制,建议将图片保存下来直接上传(img-r2ag5ahP-1673836833807)(C:\Users\Leyuan\AppData\Roaming\Typora\typora-user-images\image-20220801203314620.png)]](https://img-blog.csdnimg.cn/a127533376e6404a9dcf325b7f62b39c.png)
六、错误处理
1、为什么使用错误处理
- 防止程序 down 掉
- 告诉用户错误信息
- 便于开发者调试
- 一般Koa中的错误分为三类
- 404: 当请求的资源找不到, 或者没有通过
ctx.body返回时, 由koa自动返回 - 手动抛出: 通过
ctx.throw手动抛出 - 500: 运行时错误
- 404: 当请求的资源找不到, 或者没有通过
2、错误处理
1)在 async 函数中错误捕获
async 是“异步”的简写,而 await 可以认为是 async wait 的简写。async
用于申明一个 function 是异步的,而 await 用于等待一个异步方法执行完成。async 会将其后的函数的返回值封装成一个 Promise 对象,而await 会等待这个 Promise 完成,并将其 resolve 的结果返回出来。
我们通常处理 Promise 异步操作中的错误可以使用 .catch(err=>{ … }) 来处理,如:
getAsyncData().then(() => {


  console.log("成功啦")
}).catch(() => {


  console.log("出错啦")
})
同理,如果我们在koa中也这么处理会怎么样呢?
router.get('/getDatas', (ctx, next)=>{


  getAsyncData().then((data) => {


    ctx.body = {


      ok: ture,
      data: data,
      msg: ""
    }
  }).catch((err) => {


    ctx.body = {


      ok: false,
      data: "",
      msg: err.message
    }
  })
})
很显然,使用这种方式去处理响应数据是无效的。在异步函数中又创建了一个新的异步函数,新的异步函数的回调执行顺序肯定在当前异步函数的回调执行完毕之后。假如我们以这样的方式处理错误的话,当我们执行 ctx.body 赋值数据时,当前的请求已经发送完毕了,所以 ctx.body 是不能在内层的异步函数中调用的。如果我们需要通过异步获取数据,我们应该在当前的异步函数中使用 await 来阻塞数据获取的异步函数。
app.use(async (ctx,next) => {


  try {


    await next();
  } catch (err) {


    ctx.status = err.status || err.statusCode;
    ctx.body = {


      message: err.message
    }
  }
})
koa继承了emitter类,可以通过error监听错误,使用emit提交错误
app.use(async (ctx,next) => {


    try{


        await next()
    }catch(err){


        ctx.response.status = err.statusCode || err.status || 500;
        ctx.response.body = {


            message: err.message
        };
        // 如果在try...catch中已经捕捉到错误,error事件就不会发出,通过emit手动释放error事件
        ctx.app.emit('error', err, ctx);
    }
});
// 继续触发error事件
app.on('error',() => {


    console.error('server error', err.message);
    console.error(err);
});
3、插件的使用
#1) 安装
npm i koa-json-error
#2) 使用
基本使用
const error = require('koa-json-error')
app.use(error())
高级使用
const error = require('koa-json-error')
app.use(
  error({


    format: (err) => {


      return {

     code: err.status, message: err.message, result: err.stack }
    },
    postFormat: (err, obj) => {


      const {

     result, ...rest } = obj
      return process.env.NODE_ENV == 'production' ? rest : obj
    },
  })
)