注意:本教程redis放在同一服务器(主要是演示),实际要放不同服务器
搭建集群需要使用到官方提供的ruby脚本。
需要安装ruby的环境
[root@localhost ~]# yum install ruby
[root@localhost ~]# yum install rubygems
redis集群管理工具redis-trib.rb
[root@localhost /]# cd redis-3.0.0
[root@localhost redis-3.0.0]# cd src/
[root@localhost src]# ll *.rb
进入src文件夹安装pem包
1.上传redis3.0.0.pem文件
2.安装pem文件
[root@localhost src]# gem install redis-3.0.0.gem
第一步:创建6个redis实例,端口号从7001~7006
[root@localhost src]# cd /usr/local
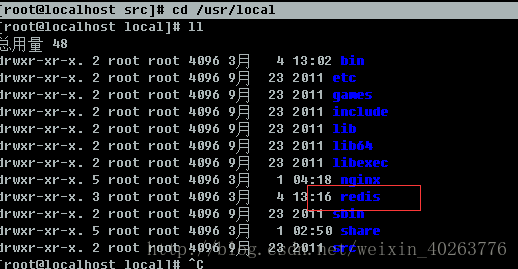
创建文件夹,放置redis实例
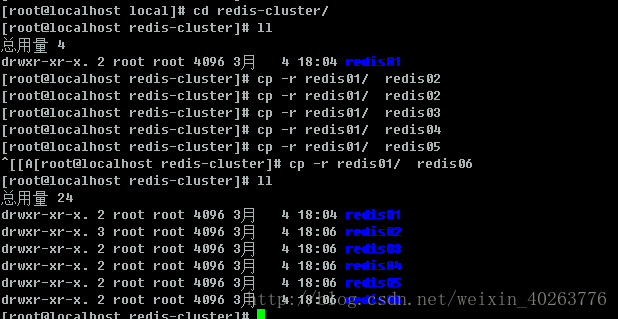
[root@localhost local]# mkdir redis-cluster
[root@localhost local]# cd redis
[root@localhost redis]# cp -r bin ../redis-cluster/redis01
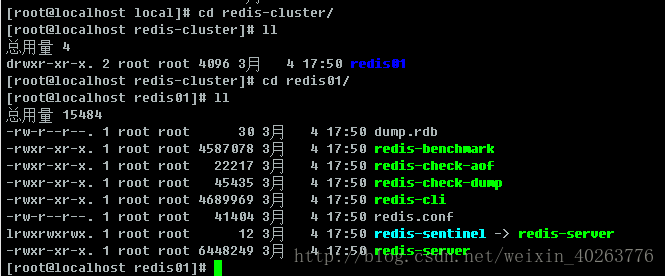
删除dump.rdb 文件
[root@localhost redis01]# rm -f dump.rdb
第二步:修改redis的配置文件
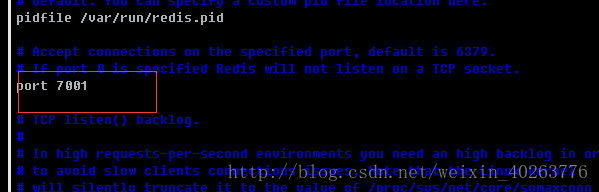
1、修改端口号
[root@localhost redis01]# vim redis.conf
端口号从7001~7006模拟6个服务器
将下面注释去掉
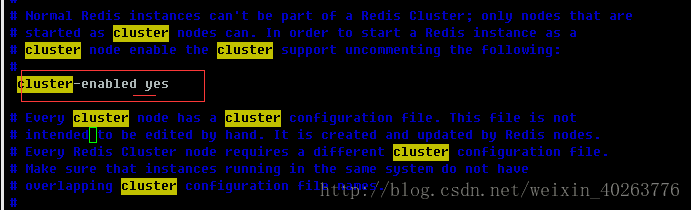
创建6个实例,并将端口号改正
把创建集群的ruby脚本复制到redis-cluster目录下。
[root@localhost /]# cd redis-3.0.0/src
[root@localhost src]# cp *.rb /usr/local/redis-cluster/
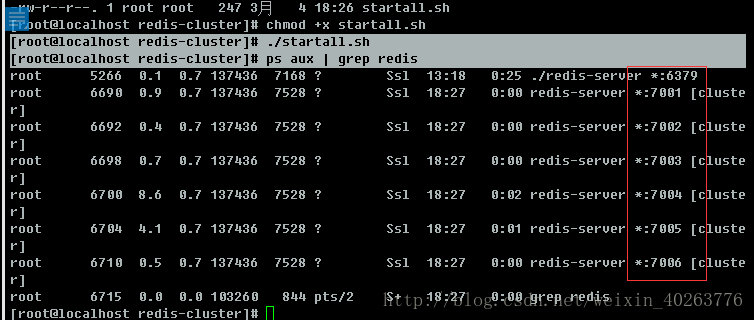
启动6个redis实例,由于很麻烦,创建脚本启动
[root@localhost /]# cd /usr/local/redis-cluster/
[root@localhost redis-cluster]# vim startall.sh
脚本文件
cd redis01
redis-server redis.conf
cd ..
cd redis02
redis-server redis.conf
cd ..
cd redis03
redis-server redis.conf
cd ..
cd redis04
redis-server redis.conf
cd ..
cd redis05
redis-server redis.conf
cd ..
cd redis06
redis-server redis.conf
cd ..
[root@localhost redis-cluster]# chmod +x startall.sh
[root@localhost redis-cluster]# ./startall.sh
查看是否启动
[root@localhost redis-cluster]# ps aux | grep redis
创建集群
注意:此处的ip是因为我的6个redis实例在同一服务器,实际要放在不同服务器,故ip是不同的
[root@localhost redis-cluster]# ./redis-trib.rb create –replicas 1 192.168.184.130:7001 192.168.184.130:7002 192.168.184.130:7003 192.168.184.130:7004 192.168.184.130:7005 192.168.184.130:7006
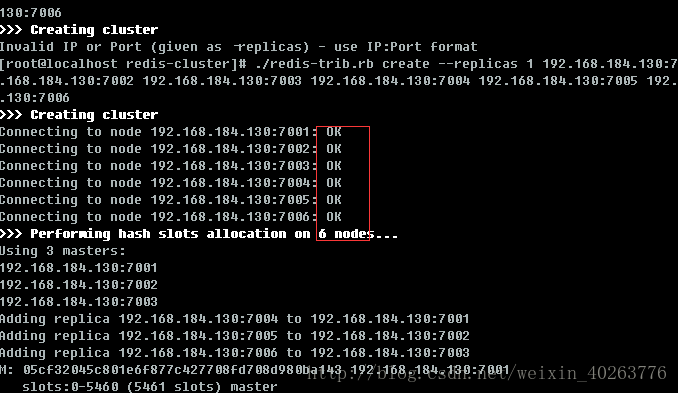
成功之后的代码
>>> Creating cluster
Connecting to node 192.168.184.130:7001: OK
Connecting to node 192.168.184.130:7002: OK
Connecting to node 192.168.184.130:7003: OK
Connecting to node 192.168.184.130:7004: OK
Connecting to node 192.168.184.130:7005: OK
Connecting to node 192.168.184.130:7006: OK
>>> Performing hash slots allocation on 6 nodes...
Using 3 masters:
192.168.184.130:7001
192.168.184.130:7002
192.168.184.130:7003
Adding replica 192.168.184.130:7004 to 192.168.184.130:7001
Adding replica 192.168.184.130:7005 to 192.168.184.130:7002
Adding replica 192.168.184.130:7006 to 192.168.184.130:7003
M: 05cf32045c801e6f877c427708fd708d980ba143 192.168.184.130:7001
   slots:0-5460 (5461 slots) master
M: e41530a607efc8a1de06aae7c97dc3aac3109974 192.168.184.130:7002
   slots:5461-10922 (5462 slots) master
M: 13e9a59cda0697a78db718e07bf8274c0e3ad654 192.168.184.130:7003
   slots:10923-16383 (5461 slots) master
S: fdad4d10857d5bc014a57115cfdc05185cb632aa 192.168.184.130:7004
   replicates 05cf32045c801e6f877c427708fd708d980ba143
S: e34a844f113194f8ef153f4b7ce69f3aab1f0f47 192.168.184.130:7005
   replicates e41530a607efc8a1de06aae7c97dc3aac3109974
S: 2bcd831c97b81756f248fdcd4c33c3a3aa1b3d85 192.168.184.130:7006
   replicates 13e9a59cda0697a78db718e07bf8274c0e3ad654
Can I set the above configuration? (type 'yes' to accept): yes
>>> Nodes configuration updated
>>> Assign a different config epoch to each node
>>> Sending CLUSTER MEET messages to join the cluster
Waiting for the cluster to join..
>>> Performing Cluster Check (using node 192.168.184.130:7001)
M: 05cf32045c801e6f877c427708fd708d980ba143 192.168.184.130:7001
   slots:0-5460 (5461 slots) master
M: e41530a607efc8a1de06aae7c97dc3aac3109974 192.168.184.130:7002
   slots:5461-10922 (5462 slots) master
M: 13e9a59cda0697a78db718e07bf8274c0e3ad654 192.168.184.130:7003
   slots:10923-16383 (5461 slots) master
M: fdad4d10857d5bc014a57115cfdc05185cb632aa 192.168.184.130:7004
   slots: (0 slots) master
   replicates 05cf32045c801e6f877c427708fd708d980ba143
M: e34a844f113194f8ef153f4b7ce69f3aab1f0f47 192.168.184.130:7005
   slots: (0 slots) master
   replicates e41530a607efc8a1de06aae7c97dc3aac3109974
M: 2bcd831c97b81756f248fdcd4c33c3a3aa1b3d85 192.168.184.130:7006
   slots: (0 slots) master
   replicates 13e9a59cda0697a78db718e07bf8274c0e3ad654
[OK] All nodes agree about slots configuration.
>>> Check for open slots...
>>> Check slots coverage...
[OK] All 16384 slots covered.
测试集群(-c 一定要加,表示连接集群)
[root@localhost redis-cluster]# redis01/redis-cli -h 192.168.184.130 -p 7002 -c
会将不同的值存进不同的redis
[root@localhost redis-cluster]# redis01/redis-cli -h 192.168.184.130 -p 7002 -c
192.168.184.130:7002> set a 100
-> Redirected to slot [15495] located at 192.168.184.130:7003
OK
192.168.184.130:7003>  set a 100
OK
192.168.184.130:7003> get a
"100"
192.168.184.130:7003> set b 1000
-> Redirected to slot [3300] located at 192.168.184.130:7001
OK
192.168.184.130:7001> get a
-> Redirected to slot [15495] located at 192.168.184.130:7003
"100"
192.168.184.130:7003> get b
-> Redirected to slot [3300] located at 192.168.184.130:7001
"1000"
192.168.184.130:7001>
查询集群信息
集群创建成功登陆任意redis结点查询集群中的节点情况。
客户端以集群方式登陆:
说明:
./redis-cli -c -h 192.168.101.3 -p 7001 ,其中-c表示以集群方式连接redis,-h指定ip地址,-p指定端口号
cluster nodes 查询集群结点信息
cluster info 查询集群状态信息
添加主节点
集群创建成功后可以向集群中添加节点,下面是添加一个master主节点
添加7007结点,参考集群结点规划章节添加一个“7007”目录作为新节点。
执行下边命令:
./redis-trib.rb add-node 192.168.101.3:7007 192.168.101.3:7001
查看集群结点发现7007已添加到集群中:
hash槽重新分配
添加完主节点需要对主节点进行hash槽分配这样该主节才可以存储数据。
redis集群有16384个槽,集群中的每个结点分配自已槽,通过查看集群结点可以看到槽占用情况。
给刚添加的7007结点分配槽:
第一步:连接上集群
./redis-trib.rb reshard 192.168.101.3:7001(连接集群中任意一个可用结点都行)
第二步:输入要分配的槽数量
输入 500表示要分配500个槽
第三步:输入接收槽的结点id
这里准备给7007分配槽,通过cluster nodes查看7007结点id为15b809eadae88955e36bcdbb8144f61bbbaf38fb
输入:15b809eadae88955e36bcdbb8144f61bbbaf38fb
第四步:输入源结点id
这里输入all
第五步:输入yes开始移动槽到目标结点id
添加从节点
集群创建成功后可以向集群中添加节点,下面是添加一个slave从节点。
添加7008从结点,将7008作为7007的从结点。
./redis-trib.rb add-node –slave –master-id 主节点id 添加节点的ip和端口 集群中已存在节点ip和端口
执行如下命令:
./redis-trib.rb add-node –slave –master-id cad9f7413ec6842c971dbcc2c48b4ca959eb5db4 192.168.101.3:7008 192.168.101.3:7001
cad9f7413ec6842c971dbcc2c48b4ca959eb5db4 是7007结点的id,可通过cluster nodes查看。
注意:如果原来该结点在集群中的配置信息已经生成cluster-config-file指定的配置文件中(如果cluster-config-file没有指定则默认为nodes.conf),这时可能会报错:
[ERR] Node XXXXXX is not empty. Either the node already knows other nodes (check with CLUSTER NODES) or contains some key in database 0
解决方法是删除生成的配置文件nodes.conf,删除后再执行./redis-trib.rb add-node指令
查看集群中的结点,刚添加的7008为7007的从节点:
删除结点:
./redis-trib.rb del-node 127.0.0.1:7005 4b45eb75c8b428fbd77ab979b85080146a9bc017
删除已经占有hash槽的结点会失败,报错如下:
[ERR] Node 127.0.0.1:7005 is not empty! Reshard data away and try again.**
关闭redis
[root@localhost redis-cluster]# redis01/redis-cli -p 7001 shutdown
[root@localhost redis-cluster]# redis01/redis-cli -p 7002 shutdown
[root@localhost redis-cluster]# redis01/redis-cli -p 7003 shutdown
[root@localhost redis-cluster]# redis01/redis-cli -p 7004 shutdown
[root@localhost redis-cluster]# redis01/redis-cli -p 7005 shutdown
[root@localhost redis-cluster]# redis01/redis-cli -p 7006 shutdown
也可以将上面代码同开启redis集群方式,新建脚本,将上面命令加进去
java调用redis代码
单机版测试
public class JedisTest {

    @Test
    public void testJedisSingle() {
        //创建一个jedis的对象。
        Jedis jedis = new Jedis("192.168.25.153", 6379);
        //调用jedis对象的方法,方法名称和redis的命令一致。
        jedis.set("key1", "jedis test");
        String string = jedis.get("key1");
        System.out.println(string);
        //关闭jedis。
        jedis.close();
    }

    /**
     * 使用连接池
     */
    @Test
    public void testJedisPool() {
        //创建jedis连接池
        JedisPool pool = new JedisPool("192.168.25.153", 6379);
        //从连接池中获得Jedis对象
        Jedis jedis = pool.getResource();
        String string = jedis.get("key1");
        System.out.println(string);
        //关闭jedis对象
        jedis.close();
        pool.close();
    }
集群版测试
@Test
public void testJedisCluster() {
        HashSet<HostAndPort> nodes = new HashSet<>();
        nodes.add(new HostAndPort("192.168.25.153", 7001));
        nodes.add(new HostAndPort("192.168.25.153", 7002));
        nodes.add(new HostAndPort("192.168.25.153", 7003));
        nodes.add(new HostAndPort("192.168.25.153", 7004));
        nodes.add(new HostAndPort("192.168.25.153", 7005));
        nodes.add(new HostAndPort("192.168.25.153", 7006));

        JedisCluster cluster = new JedisCluster(nodes);

        cluster.set("key1", "1000");
        String string = cluster.get("key1");
        System.out.println(string);

        cluster.close();
    }
jedis整合spring
单机版整合
配置文件 applicationContext-jedis.xml
<?xml version="1.0" encoding="UTF-8"?>
<beans xmlns="http://www.springframework.org/schema/beans"
    xmlns:context="http://www.springframework.org/schema/context" xmlns:p="http://www.springframework.org/schema/p"
    xmlns:aop="http://www.springframework.org/schema/aop" xmlns:tx="http://www.springframework.org/schema/tx"
    xmlns:xsi="http://www.w3.org/2001/XMLSchema-instance"
    xsi:schemaLocation="http://www.springframework.org/schema/beans http://www.springframework.org/schema/beans/spring-beans-4.0.xsd
    http://www.springframework.org/schema/context http://www.springframework.org/schema/context/spring-context-4.0.xsd
    http://www.springframework.org/schema/aop http://www.springframework.org/schema/aop/spring-aop-4.0.xsd http://www.springframework.org/schema/tx http://www.springframework.org/schema/tx/spring-tx-4.0.xsd
    http://www.springframework.org/schema/util http://www.springframework.org/schema/util/spring-util-4.0.xsd">


    <!-- 连接池配置 -->
    <bean id="jedisPoolConfig" class="redis.clients.jedis.JedisPoolConfig">
        <!-- 最大连接数 -->
        <property name="maxTotal" value="30" />
        <!-- 最大空闲连接数 -->
        <property name="maxIdle" value="10" />
        <!-- 每次释放连接的最大数目 -->
        <property name="numTestsPerEvictionRun" value="1024" />
        <!-- 释放连接的扫描间隔(毫秒) -->
        <property name="timeBetweenEvictionRunsMillis" value="30000" />
        <!-- 连接最小空闲时间 -->
        <property name="minEvictableIdleTimeMillis" value="1800000" />
        <!-- 连接空闲多久后释放, 当空闲时间>该值 且 空闲连接>最大空闲连接数 时直接释放 -->
        <property name="softMinEvictableIdleTimeMillis" value="10000" />
        <!-- 获取连接时的最大等待毫秒数,小于零:阻塞不确定的时间,默认-1 -->
        <property name="maxWaitMillis" value="1500" />
        <!-- 在获取连接的时候检查有效性, 默认false -->
        <property name="testOnBorrow" value="true" />
        <!-- 在空闲时检查有效性, 默认false -->
        <property name="testWhileIdle" value="true" />
        <!-- 连接耗尽时是否阻塞, false报异常,ture阻塞直到超时, 默认true -->
        <property name="blockWhenExhausted" value="false" />
    </bean>

    <!-- jedis客户端单机版 -->
    <bean id="redisClient" class="redis.clients.jedis.JedisPool">
        <constructor-arg name="host" value="192.168.184.130"></constructor-arg>
        <constructor-arg name="port" value="6379"></constructor-arg>
        <constructor-arg name="poolConfig" ref="jedisPoolConfig"></constructor-arg>
    </bean>


</beans>
Spring Redis整合单机版测试
    /**
     * 单机版测试
     * <p>Title: testSpringJedisSingle</p>
     * <p>Description: </p>
     */
    @Test
    public void testSpringJedisSingle() {
        ApplicationContext applicationContext = new ClassPathXmlApplicationContext("classpath:spring/applicationContext-*.xml");
        JedisPool pool = (JedisPool) applicationContext.getBean("redisClient");
        Jedis jedis = pool.getResource();
        String string = jedis.get("key1");
        System.out.println(string);
        jedis.close();
        pool.close();
    }
集群版整合
配置文件 applicationContext-jediss.xml
<?xml version="1.0" encoding="UTF-8"?>
<beans xmlns="http://www.springframework.org/schema/beans"
    xmlns:context="http://www.springframework.org/schema/context" xmlns:p="http://www.springframework.org/schema/p"
    xmlns:aop="http://www.springframework.org/schema/aop" xmlns:tx="http://www.springframework.org/schema/tx"
    xmlns:xsi="http://www.w3.org/2001/XMLSchema-instance"
    xsi:schemaLocation="http://www.springframework.org/schema/beans http://www.springframework.org/schema/beans/spring-beans-4.0.xsd
    http://www.springframework.org/schema/context http://www.springframework.org/schema/context/spring-context-4.0.xsd
    http://www.springframework.org/schema/aop http://www.springframework.org/schema/aop/spring-aop-4.0.xsd http://www.springframework.org/schema/tx http://www.springframework.org/schema/tx/spring-tx-4.0.xsd
    http://www.springframework.org/schema/util http://www.springframework.org/schema/util/spring-util-4.0.xsd">


        <bean id="redisClient" class="redis.clients.jedis.JedisCluster">

        <constructor-arg name="nodes">
            <set>
                <bean class="redis.clients.jedis.HostAndPort">
                    <constructor-arg name="host" value="192.168.184.130"></constructor-arg>
                    <constructor-arg name="port" value="7001"></constructor-arg>
                </bean>
                <bean class="redis.clients.jedis.HostAndPort">
                    <constructor-arg name="host" value="192.168.184.130"></constructor-arg>
                    <constructor-arg name="port" value="7002"></constructor-arg>
                </bean>
                <bean class="redis.clients.jedis.HostAndPort">
                    <constructor-arg name="host" value="192.168.184.130"></constructor-arg>
                    <constructor-arg name="port" value="7003"></constructor-arg>
                </bean>
                <bean class="redis.clients.jedis.HostAndPort">
                    <constructor-arg name="host" value="192.168.184.130"></constructor-arg>
                    <constructor-arg name="port" value="7004"></constructor-arg>
                </bean>
                <bean class="redis.clients.jedis.HostAndPort">
                    <constructor-arg name="host" value="192.168.184.130"></constructor-arg>
                    <constructor-arg name="port" value="7005"></constructor-arg>
                </bean>
                <bean class="redis.clients.jedis.HostAndPort">
                    <constructor-arg name="host" value="192.168.184.130"></constructor-arg>
                    <constructor-arg name="port" value="7006"></constructor-arg>
                </bean>
            </set>
        </constructor-arg>
        <constructor-arg name="poolConfig" ref="jedisPoolConfig"></constructor-arg>
    </bean>


</beans>
Spring Redis整合集群版测试
@Test
public void testSpringJedisCluster() {
        ApplicationContext applicationContext = new ClassPathXmlApplicationContext("classpath:spring/applicationContext-*.xml");
        JedisCluster jedisCluster =  (JedisCluster) applicationContext.getBean("redisClient");
        String string = jedisCluster.get("key1");
        System.out.println(string);
        jedisCluster.close();
    }
java项目中实现
注意:以下是为了方便将单机和集群共用
接口
public interface JedisClient {

     String get(String key);
     String set(String key, String value);
     String hget(String hkey, String key);
     long hset(String hkey, String key ,String value);
     long incr(String key);
     //设置过期时间
     long expire(String key, int second);
     //查询
     long ttl(String key);

}
单机实现
/**
 * 单机版reids
 * @author Administrator
 *
 */
public class JedisClientSingle implements JedisClient{


    @Autowired
    private JedisPool jedisPool;

    @Override
    public String get(String key) {

        Jedis jedis = jedisPool.getResource();
        String string = jedis.get(key);
        jedis.close();

        return string;
    }

    @Override
    public String set(String key, String value) {

        Jedis jedis = jedisPool.getResource();
        String string = jedis.set(key, value);
        jedis.close();
        return string;
    }

    @Override
    public String hget(String hkey, String key) {

        Jedis jedis = jedisPool.getResource();
        String string = jedis.hget(hkey, key);
        jedis.close();
        return string;
    }

    @Override
    public long hset(String hkey, String key, String value) {

        Jedis jedis = jedisPool.getResource();
        long result = jedis.hset(key, key, value);
        jedis.close();
        return result;
    }

    @Override
    public long incr(String key) {

        Jedis jedis = jedisPool.getResource();
        Long result = jedis.incr(key);
        jedis.close();
        return result;

    }

    @Override
    public long expire(String key, int second) {

        Jedis jedis = jedisPool.getResource();
        Long result = jedis.expire(key, second);
        jedis.close();
        return result;

    }

    @Override
    public long ttl(String key) {

        Jedis jedis = jedisPool.getResource();
        Long result = jedis.ttl(key);
        jedis.close();
        return result;

    }

}
注入applicationContext-jedis.xml文件
<bean id="jedisClient" class="com.taotao.rest.dao.JedisClientSingle"></bean>集群实现
/**
 * 集群版
 * @author Administrator
 *
 */
public class JedisClientCluster implements JedisClient {

    @Autowired
    private JedisCluster jedisCluster;

    @Override
    public String get(String key) {
        return jedisCluster.get(key);
    }

    @Override
    public String set(String key, String value) {
        return jedisCluster.set(key, value);
    }

    @Override
    public String hget(String hkey, String key) {
        return jedisCluster.hget(hkey, key);
    }

    @Override
    public long hset(String hkey, String key, String value) {
        return jedisCluster.hset(hkey, key, value);
    }

    @Override
    public long incr(String key) {
        return jedisCluster.incr(key);
    }

    @Override
    public long expire(String key, int second) {
        return jedisCluster.expire(key, second);
    }

    @Override
    public long ttl(String key) {
        return jedisCluster.ttl(key);
    }

}
注入applicationContext-jediss.xml文件
<bean id="jedisClientCluster" class="com.taotao.rest.dao.JedisClientCluster"></bean>把缓存添加到业务逻辑
    @Value("${INDEX_CONTENT_REDIS_KEY}")
    private String INDEX_CONTENT_REDIS_KEY; //这个常量key设置在resource.properties文件中
    @Override
    public List<TbContent> getContentList(long contentid) {


            //从缓存中取内容
            try {
              String result = jedisClient.hget(INDEX_CONTENT_REDIS_KEY, contentid + "");
              //StringUtils 是org.apache.commons.lang3.StringUtils包
              if (!StringUtils.isBlank(result)) {
                            //把字符串转换成list
                            List<TbContent> resultList = JsonUtils.jsonToList(result, TbContent.class);
                            return resultList;
                        }
                    } catch (Exception e) {
                        e.printStackTrace();
                    }


            //根据内容分类id查询内容列表
            TbContentExample example = new TbContentExample();
            Criteria criteria = example.createCriteria();
            criteria.andCategoryIdEqualTo(contentid);
            //执行查询
            List<TbContent> list = tbContentMapper.selectByExample(example);


            //向缓存中添加内容
            try {
                //把list转换成字符串
                String cacheString = JsonUtils.objectToJson(list);
                jedisClient.hset(INDEX_CONTENT_REDIS_KEY, contentid + "", cacheString);
            } catch (Exception e) {
                e.printStackTrace();
            }
        return list;
    }
假如数据发生改变,那么就要进行缓存同步
JedisClient添加接口,用之前的共用接口,向之前的接口中添加del方法
//删除
long del(String key);
long hdel(String hkey, String key);
实现类中(单机)
    @Override
    public long del(String key) {

        Jedis jedis = jedisPool.getResource();
        Long result = jedis.del(key);
        jedis.close();
        return result;
    }

    @Override
    public long hdel(String hkey, String key) {

        Jedis jedis = jedisPool.getResource();
        Long result = jedis.hdel(hkey, key);
        jedis.close();
        return result;
    }
实现类中(集群)
    @Override
    public long del(String key) {
        return jedisCluster.del(key);
    }

    @Override
    public long hdel(String hkey, String key) {
        return jedisCluster.hdel(key);
    }
新建RedisService接口
/**
 * redis同步
 * @author Administrator
 *
 */
public interface RedisService {

    /**
     * redis同步
     * @param contentid
     * @return
     */
    public TaotaoResult syncContent(long contentid);
}
Controller层
@Controller
@RequestMapping(value = "/cache/sync")
public class RedisController {

    @Autowired
    private RedisService redisService;


    @RequestMapping(value = "/content/{contentCid}")
    @ResponseBody
    public TaotaoResult contentCacheSync(@PathVariable Long contentCid) {
        TaotaoResult result = redisService.syncContent(contentCid);
        return result;
    }


}
同步缓存服务的调用
需要在后台管理系统中添加一个服务调用的逻辑。当修改内容信息后,需要调用此服务同步缓存。
设置在调用层的resource.properties
#服务层基础URL
REST_BASE_URL=http://localhost:8081/rest
REST_CONTENT_SYNC_URL=/cache/sync/content/
修改,删除,新增服务添加
    @Override
    public TaotaoResult addContent(TbContent content) {

        //把图片信息保存至数据库
        content.setCreated(new Date());
        content.setUpdated(new Date());
        //把内容信息添加到数据库
        contentMapper.insert(content);

        //添加缓存同步逻辑
        HttpClientUtil.doGet(REST_BASE_URL + REST_CONTENT_SYNC_URL + content.getCategoryId());

        return TaotaoResult.ok();

    }