本教程笔记来自 杨旭老师的 rust web 全栈教程,链接如下:
https://www.bilibili.com/video/BV1RP4y1G7KF?p=1&vd_source=8595fbbf160cc11a0cc07cadacf22951
学习 Rust Web 需要学习 rust 的前置知识可以学习杨旭老师的另一门教程
https://www.bilibili.com/video/BV1hp4y1k7SV/?spm_id_from=333.999.0.0&vd_source=8595fbbf160cc11a0cc07cadacf22951
项目的源代码可以查看 git:(注意作者使用的是 mysql 数据库而不是原教程的数据库)
https://github.com/aiai0603/rust_web_mysql
下面正式开始 Rust Web 全栈开发教程的学习:
TCP Server
在编写 web 之前,我们首先尝试编写一个能够相互通信的服务器和客户端程序,之后基于这个架构来编写我们的前后端交互的 web 应用。我们的通信程序基于 TCP 协议,这里使用了 rust 的 std::net 这个模块:
首先我们创建一个工作空间 s1 ,然后创建两个项目,再将我们的两个项目都包含进来
cargo new s1
cd s1
cargo new tcpserver
cargo new tcpclient
s1 / Cargo.toml
[workspace]
members = ["tcpserver", "tcpclient"]
服务端
之后进入 tcpserver 项目的 main.rs,我们需要导入 TcpListener 这个包,它绑定一个端口,之后监听这个端口的信息,使用 incoming 方法,它返回一个迭代器,返回一个 Result ,我们使用 unwrap 方法可以拿到我们的数据
use std::io::{

    Read, Write};
use std::net::TcpListener;
fn main() {


    let listener = TcpListener::bind("127.0.0.1:3000").unwrap();
    println!("Listening on port 3000");
    for stream in listener.incoming() {


        let mut _stream = stream.unwrap();
        println!("connection established.");
    }
}
现在我们可以在命令行根目录运行这个服务
cargo run -p tcpserver
客户端
之后我们编写我们的客户端,客户端需要在 127.0.0.1:3000 这个端口建立连接,我们使用
TcpStream::connect 这个函数。
use std::{


    io::{

    Read, Write},
    net::TcpStream,
    str,
};
fn main() {


    let mut _stream = TcpStream::connect("127.0.0.1:3000").unwrap();
}
现在我们可以启动我们的客户端,可以看到它建立了连接
cargo run -p tcpclient
收发数据
现在我们有了一个相互连接的客户端和服务端,之后我们希望他们相互可以发送消息,因为我们的服务器通信使用的 stream 它实现了 io 的 Write 和Read,所以我们可以使用相关的操作来接收和传递我们的消息。
在 tcpserver 里,我们使用新建一个 buff 缓存区来接收我们的数据,之后再使用 write 把它发送回去
use std::io::{

    Read, Write};
use std::net::TcpListener;
fn main() {


    let listener = TcpListener::bind("127.0.0.1:3000").unwrap();
    println!("Listening on port 3000");
    for stream in listener.incoming() {


        let mut _stream = stream.unwrap();
        println!("connection established.");
        let mut buffer = [0; 1024];
        _stream.read(&mut buffer).unwrap();
        _stream.write(&mut buffer).unwrap();
    }
}
在 client 中,我们也是同样的操作,我们先写入一个 “hello” 字符串,要注意,传输的时候要传递原始的字节,所以要使用 as_bytes 进行转化,之后我们接收服务器返回的消息,根据刚才的代码,我们会收到 hello 的信息,我们将它输出
use std::{


    io::{

    Read, Write},
    net::TcpStream,
    str,
};
fn main() {


    let mut _stream = TcpStream::connect("127.0.0.1:3000").unwrap();
    _stream.write("hello".as_bytes()).unwrap();
    let mut buf = [0; 5];
    _stream.read(&mut buf).unwrap();
    println!("{}", str::from_utf8(&buf).unwrap());
}
现在我们重新启动这两个程序,注意是先启动 server 再启动 client 可以看到在 client 打印出了 hello ,那么你的服务器就完成了。
HTTP Server
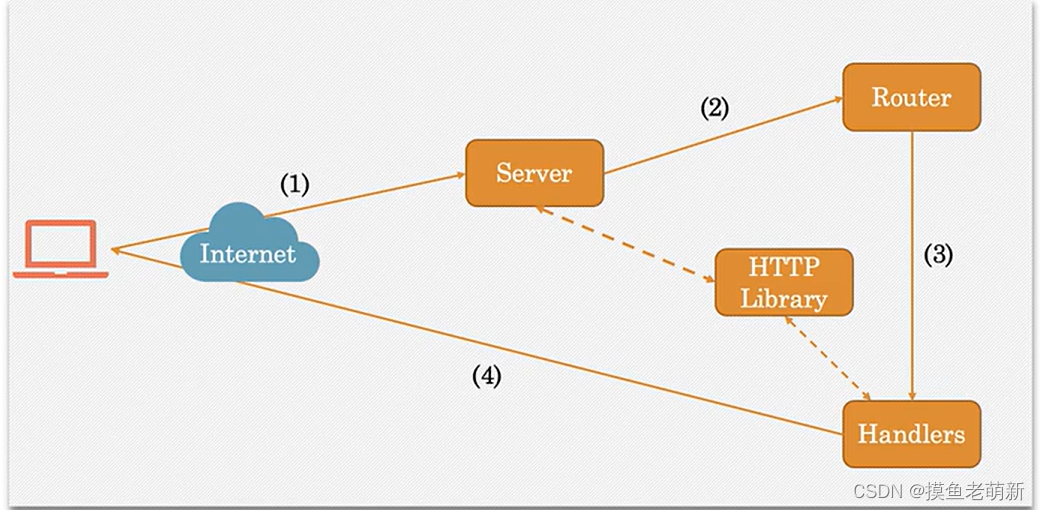
这是一个 web server 的消息流动图,当我们收到一个来自客户端浏览器的请求的时候,我们的服务器将请求放到路由器上,路由器决定我们调用哪个方法来提供一个响应返回客户端。
在 rust 中没有内置的HTTP 支持,所以我们需要的是监听 TCP 字节流,将它进行处理,分析出 HTTP 请求的信息,然后通过路由器决定调用的方法,所以这个项目的架构和之前的 TCP Server 服务器一致。我们创建一个 http 项目,然后在其中新建一个 httprequest.rs 和 一个 httpresponse.rs 作为我们服务器的收发工具
解析 HTTP
首先我们需要在之前的服务器的基础上增加解析 HTTP 请求的内容,我们需要三个数据结构来处理我们的请求, Method 和 Version 枚举来处理我们的收到请求的方法和版本,HttpRequest 结构体来处理我们一个请求的全部内容,他们需要实现三个Trait:
- From<&str> 用于把传进来的字符串切片转化成处理完毕的信息,
- Debug用于打印调试信息,
- PartialEq 用于解析和自动化测试脚本里做比较
我们先编写枚举类,可以编写一个测试来实验一下我们的类是不是编写成功
use std::collections::HashMap;

#[derive(Debug, PartialEq)]
pub enum Method {


    Get,
    Post,
    Uninitialized,
}

impl From<&str> for Method {


    fn from(s: &str) -> Self {


        match s {


            "GET" => Method::Get,
            "POST" => Method::Post,
            _ => Method::Uninitialized,
        }
    }
}

#[derive(Debug, PartialEq)]
pub enum Version {


    V1_1,
    V2_0,
    Uninitialized,
}
impl From<&str> for Version {


    fn from(s: &str) -> Version {


        match s {


            "HTTP/1.1" => Version::V1_1,
            _ => Version::Uninitialized,
        }
    }
}


mod tests {


    use super::*;

    #[test]
    fn test_method_into() {


        let m: Method = "GET".into();
        assert_eq!(m, Method::Get);
    }
    #[test]
    fn test_version_into() {


        let v: Version = "HTTP/1.1".into();
        assert_eq!(v, Version::V1_1);
    }

}
之后我们编写我们的 HttpRequest 的解析,按照 HTTP 的规范,分别获取方法、版本、路径、请求头和参数,其中请求头中的参数我们按照 key-value 对的方式来存储,所以我们使用了 HashMap 这样的结构
//请求路径是一个String ,我们通过枚举来包装它
#[derive(Debug, PartialEq)]
pub enum Resource {


    Path(String),
}

#[derive(Debug)]
pub struct HttpRequest {


    pub method: Method,
    pub version: Version,
    pub resource: Resource,
    pub headers: HashMap<String, String>,
    pub msd_body: String,
}

impl From<String> for HttpRequest {


    fn from(req: String) -> Self {


        let mut parsed_method = Method::Uninitialized;
        let mut parsed_version = Version::V1_1;
        let mut parsed_resource = Resource::Path("".to_string());
        let mut parsed_headers = HashMap::new();
        let mut parsed_msg_body = "";

        for line in req.lines() {


            //判定是不是一个 HTTP 请求的开始
            if line.contains("HTTP") {


                let (method, resource, version) = process_req_line(line);
                parsed_method = method;
                parsed_resource = resource;
                parsed_version = version;
            } else if line.contains(":") {


                //头部是 key:value 形式的,所以可以这样判定是不是进入到头部
                let (key, value) = process_header_line(line);
                parsed_headers.insert(key, value);
            } else {


                //剩余部分是参数,用于post方法
                parsed_msg_body = line;
            }
        }
		//封装成一个 HttpRequest
        HttpRequest {


            method: parsed_method,
            version: parsed_version,
            resource: parsed_resource,
            headers: parsed_headers,
            msd_body: parsed_msg_body.to_string(),
        }
    }
}

fn process_req_line(s: &str) -> (Method, Resource, Version) {


    //用空白字符分割成数组,之后一个一个遍历就依次是我们需要的内容
    let mut words = s.split_whitespace();
    let methods = words.next().unwrap();
    let resource = words.next().unwrap();
    let version = words.next().unwrap();
    (
        methods.into(),
        Resource::Path(resource.to_string()),
        version.into(),
    )
}

//取出一个一个的 key - value 对
fn process_header_line(s: &str) -> (String, String) {


    let mut header_items = s.split(':');
    let mut key = String::from("");
    let mut value = String::from("");
    if let Some(k) = header_items.next() {


        key = k.trim().to_string();
    }
    if let Some(v) = header_items.next() {


        value = v.trim().to_string();
    }
    (key, value)
}
然后我们再编写一个测试,如果顺利通过说明我们的代码正常
 #[test]
    fn test_read_http() {


        let s =
            String::from("GET /greeting HTTP/1.1\r\nHost: localhost:3000\r\nUser-Agent: curl/7.71.1\r\nAccept: */*\r\n\r\n'");
        let mut expected_header: HashMap<String, String> = HashMap::new();
        expected_header.insert("Host".into(), "localhost".into());
        expected_header.insert("Accept".into(), "*/*".into());
        expected_header.insert("User-Agent".into(), "curl/7.71.1".into());

        println!("{:?}", expected_header);
        let req: HttpRequest = s.into();
        assert_eq!(Method::Get, req.method);
        assert_eq!(Version::V1_1, req.version);
        assert_eq!(Resource::Path("/greeting".to_string()), req.resource);
        assert_eq!(expected_header, req.headers);
    }
HTTP 响应
对于一个收到的 HTTP 请求,我们的服务器需要做出应答,所以和解析 HTTP 一样,我们需要编写一个封装 HTTP 应答的类,我们先定义我们的结构,它包含版本,状态码,状态信息,头部和应答体,通过实现 Default Trait ,我们可以给我们的应答体一个默认值:
use std::collections::HashMap;
use std::io::{

    Result, Write};

#[derive(Debug, PartialEq, Clone)]
pub struct HttpResponse<'a> {


    version: &'a str,
    status_code: &'a str,
    status_text: &'a str,
    headers: Option<HashMap<&'a str, &'a str>>,
    body: Option<String>,
}

impl<'a> Default for HttpResponse<'a> {


    fn default() -> Self {


        Self {


            version: "HTTP/1.1".into(),
            status_code: "200".into(),
            status_text: "OK".into(),
            headers: None,
            body: None,
        }
    }
}
之后我们给他提供一个 new 方法来初始化一个 HttpResponse,根据传入的状态码来判定状态信息,并且为空的 headers 填充一个默认的 Content-Type 字段来保证程序的健壮性:
impl<'a> HttpResponse<'a> {


    pub fn new(
        status_code: &'a str,
        headers: Option<HashMap<&'a str, &'a str>>,
        body: Option<String>,
    ) -> HttpResponse<'a> {


        let mut response: HttpResponse<'a> = HttpResponse::default();
        if status_code != "200" {


            response.status_code = status_code.into();
        };
        response.headers = match &headers {


            Some(_h) => headers,
            None => {


                let mut h = HashMap::new();
                h.insert("Content-Type", "text/html");
                Some(h)
            }
        };
        response.status_text = match response.status_code {


            "200" => "OK".into(),
            "400" => "Bad Request".into(),
            "404" => "Not Found".into(),
            "500" => "Internal Server Error".into(),
            _ => "Not Found".into(),
        };
        response.body = body;
        response
    }
}
之后我们实现一些 get 方法来获取我们的数据,我们将数据都返回为 字符串或者字符串切片类型,目的是为了之后可以更加方便的将他们整合到一起
impl<'a> HttpResponse<'a> {


    //...
 	fn version(&self) -> &str {


        self.version
    }

    fn status_code(&self) -> &str {


        self.status_code
    }
    fn status_text(&self) -> &str {


        self.status_text
    }

    fn headers(&self) -> String {


        let map: HashMap<&str, &str> = self.headers.clone().unwrap();
        let mut header_string: String = "".into();
        for (k, v) in map.iter() {


            header_string = format!("{}{}:{}\r\n", header_string, k, v);
        }
        header_string
    }
    pub fn body(&self) -> &str {


        match &self.body {


            Some(b) => b.as_str(),
            None => "",
        }
    }
}
有了这些方法我们就可以将我们的数据整合为一个字符串了,之后再将这个字符串发送出去即可,为了整合我们的字符串,我们为 String 实现 From 这个 Trait,传入一个 HttpResponse 返回一个组装好的 HTTP 响应字符串:
impl<'a> From<HttpResponse<'a>> for String {


    fn from(res: HttpResponse) -> String {


        let res1 = res.clone();
        format!(
            "{} {} {}\r\n{}Content-Length: {}\r\n\r\n{}",
            &res1.version(),
            &res1.status_code(),
            &res1.status_text(),
            &res1.headers(),
            &res.body.unwrap().len(),
            &res1.body()
        )
    }
}
有了这个 Trait 我们就可以实现我们的返回方法,将我们封装的 HttpResponse 变成一个标准的 HTTP 响应发送出去,它接收一个 stream ,也就是上文中 TCP 服务器中我们使用的 stream,因为我们需要用这个 stream 发送数据,所以我们限定它需要实现 Write 这个 Trait:
impl<'a> HttpResponse<'a> {


	//...
    pub fn send_response(&self, write_stream: &mut impl Write) -> Result<()> {


        let res = self.clone();
        let response_string: String = String::from(res);
        let _ = write!(write_stream, "{}", response_string);

        Ok(())
    }
}
最后我们为我们的 HttpResponse 编写测试测试,整个 DEMO 的完整代码如下:
use std::collections::HashMap;
use std::io::{

    Result, Write};

#[derive(Debug, PartialEq, Clone)]
pub struct HttpResponse<'a> {


    version: &'a str,
    status_code: &'a str,
    status_text: &'a str,
    headers: Option<HashMap<&'a str, &'a str>>,
    body: Option<String>,
}

impl<'a> Default for HttpResponse<'a> {


    fn default() -> Self {


        Self {


            version: "HTTP/1.1".into(),
            status_code: "200".into(),
            status_text: "OK".into(),
            headers: None,
            body: None,
        }
    }
}

impl<'a> From<HttpResponse<'a>> for String {


    fn from(res: HttpResponse) -> String {


        let res1 = res.clone();
        format!(
            "{} {} {}\r\n{}Content-Length: {}\r\n\r\n{}",
            &res1.version(),
            &res1.status_code(),
            &res1.status_text(),
            &res1.headers(),
            &res.body.unwrap().len(),
            &res1.body()
        )
    }
}

impl<'a> HttpResponse<'a> {


    pub fn new(
        status_code: &'a str,
        headers: Option<HashMap<&'a str, &'a str>>,
        body: Option<String>,
    ) -> HttpResponse<'a> {


        let mut response: HttpResponse<'a> = HttpResponse::default();
        if status_code != "200" {


            response.status_code = status_code.into();
        };
        response.headers = match &headers {


            Some(_h) => headers,
            None => {


                let mut h = HashMap::new();
                h.insert("Content-Type", "text/html");
                Some(h)
            }
        };

        response.status_text = match response.status_code {


            "200" => "OK".into(),
            "400" => "Bad Request".into(),
            "404" => "Not Found".into(),
            "500" => "Internal Server Error".into(),
            _ => "Not Found".into(),
        };
        response.body = body;
        response
    }

    pub fn send_response(&self, write_stream: &mut impl Write) -> Result<()> {


        let res = self.clone();
        let response_string: String = String::from(res);
        let _ = write!(write_stream, "{}", response_string);

        Ok(())
    }

    fn version(&self) -> &str {


        self.version
    }

    fn status_code(&self) -> &str {


        self.status_code
    }
    fn status_text(&self) -> &str {


        self.status_text
    }

    fn headers(&self) -> String {


        let map: HashMap<&str, &str> = self.headers.clone().unwrap();
        let mut header_string: String = "".into();
        for (k, v) in map.iter() {


            header_string = format!("{}{}:{}\r\n", header_string, k, v);
        }
        header_string
    }
    pub fn body(&self) -> &str {


        match &self.body {


            Some(b) => b.as_str(),
            None => "",
        }
    }
}

#[cfg(test)]
mod tests {


    use super::*;
    #[test]

    fn test_response_struct_creation_200() {


        let response_actual = HttpResponse::new("200", None, Some("xxxx".into()));
        let response_expected = HttpResponse {


            version: "HTTP/1.1",
            status_code: "200",
            status_text: "OK",
            headers: {


                let mut h = HashMap::new();
                h.insert("Content-Type", "text/html");
                Some(h)
            },
            body: Some("xxxx".into()),
        };
        assert_eq!(response_actual, response_expected);
    }

    #[test]
    fn test_response_struct_creation_404() {


        let response_actual = HttpResponse::new("404", None, Some("xxxx".into()));
        let response_expected = HttpResponse {


            version: "HTTP/1.1",
            status_code: "404",
            status_text: "Not Found",
            headers: {


                let mut h = HashMap::new();
                h.insert("Content-Type", "text/html");
                Some(h)
            },
            body: Some("xxxx".into()),
        };
        assert_eq!(response_actual, response_expected);
    }

    #[test]
    fn test_http_response_creation() {


        let response_expected = HttpResponse {


            version: "HTTP/1.1",
            status_code: "404",
            status_text: "Not Found",
            headers: {


                let mut h = HashMap::new();
                h.insert("Content-Type", "text/html");
                Some(h)
            },
            body: Some("xxxx".into()),
        };
        let http_string: String = response_expected.into();
        let actual_string =
            "HTTP/1.1 404 Not Found\r\nContent-Type:text/html\r\nContent-Length: 4\r\n\r\nxxxx"
                .to_string();
        assert_eq!(http_string, actual_string);
    }
}
HTTP 服务器的编写
好了现在我们拥有了可以解析和发送 HTTP 请求响应的工具了,此时我们可以编写我们的服务器了,我们需要先将之前编写的 http 类引用进来,再安装我们需要的包,首先,我们在之前的 http 项目下新建一个 lib.rs 导出我们编写的模块
pub mod httprequest;
pub mod httpresponse;
之后我们新建一个 httpserver 项目,在 Cargo.toml 中导入我们的包,包括我们刚刚编写的 http 以及处理json 和 序列化的库
[package]
name = "httpserver"
version = "0.1.0"
edition = "2021"

# See more keys and their definitions at https://doc.rust-lang.org/cargo/reference/manifest.html

[dependencies]
http = { path = "../http" }
serde = { version = "1.0.131", features = ["derive"] }
serde_json = "1.0.72"
之后我们就可以开始编写我们的服务器了,首先我们在 src 文件夹下新建 server.rs 文件用于服务器的运行,它接收一个服务器的地址之后在指定的地址启动我们的服务器,循环接收数据,结构和之前的 TCP server 一致,之后调用我们刚刚编写的 HttpRequest 进行解析:
use http::httprequest::HttpRequest;
use std::io::prelude::*;
use std::net::TcpListener;
use std::str;

pub struct Server<'a> {


    socket_addr: &'a str,
}
impl<'a> Server<'a> {


    pub fn new(socket_addr: &'a str) -> Self {


        Server {

     socket_addr }
    }
    pub fn run(&self) {


        let connection_listener = TcpListener::bind(self.socket_addr).unwrap();
        println!("Running on {}", self.socket_addr);
        for stream in connection_listener.incoming() {


            let mut stream = stream.unwrap();
            println!("Connection established");
            let mut read_buffer = [0; 200];
            stream.read(&mut read_buffer).unwrap();
            let req: HttpRequest = String::from_utf8(read_buffer.to_vec()).unwrap().into();
        }
    }
}
在 main.rs 中,我们调用我们刚刚编写的方法在本地启动我们的服务器
mod handler;
mod router;
mod server;
use server::Server;
fn main() {


    println!("Hello, world!");
    let server = Server::new("localhost:3000");
    server.run();
}
现在我们的服务器可以运行了,之后我们要对我们接收到的 HttpRequest 进行处理,我们编写一个 router.rs 和 handler.rs 处理我们的请求,首先编写我们的 handler.rs ,我们定义一个 Handler ,它提供一个 handle 方法返回 http 响应,同时包含一个 load_file 函数加载我们需要的数据:
- env!(“”) 可以拿到编译时的环境变量,env!(“CARGO_MANIFEST_DIR”)是调用环境变量拿到根目录
- env::var(“”) 可以拿到构建时的环境变量,注意这些变量需要编写在文件中 .env 读取,我们暂时不编写我们的路径,那么就让这个路径等于我们的 default_path ,如果后期我们的项目发布了,可以通过配置 .env 文件来修改我们需要的路径
use http::{

    httprequest::HttpRequest, httpresponse::HttpResponse};
use serde::{

    Deserialize, Serialize};
use std::collections::HashMap;
use std::env;
use std::fs;

pub trait Handler {


    fn handle(req: &HttpRequest) -> HttpResponse;
    fn load_file(file_name: &str) -> Option<String> {


        //取到文件存放的根目录
        let default_path = format!("{}/public", env!("CARGO_MANIFEST_DIR"));
        let public_path = env::var("PUBLIC_PATH").unwrap_or(default_path);
        //完整的文件名
        let full_path = format!("{}/{}", public_path, file_name);
        let contents = fs::read_to_string(full_path);
        contents.ok()
    }
}
我们将我们需要提供的资源文件放在 public 文件夹下方,方便进行统一的管理,之后我们创建 404.html,index.html , health.html 和 styles.css 供我们测试使用。
我们将我们的响应分为三种,找不到请求内容的使用 PageNotFoundHandler ,加载静态资源的使用 StaticPageHandler ,加载接口数据的使用 WebServiceHandler ,他们都需要实现 Handler 这个 trait
pub struct StaticPageHandler;
pub struct PageNotFoundHandler;
pub struct WebServiceHandler;
- 对于 PageNotFoundHandler 我们直接返回404状态 ,并且提供一个 404.html 作为返回
impl Handler for PageNotFoundHandler {


    fn handle(_req: &HttpRequest) -> HttpResponse {


        HttpResponse::new("404", None, Self::load_file("404.html"))
    }
}
- 对于 StaticPageHandler ,我们先分割请求路径获得我们需要资源的地址,如果是页面路径则加载对应的页面;如果是请求静态文件,对于不同的文件类型,我们需要加上不一样的头部
impl Handler for StaticPageHandler {


    fn handle(req: &HttpRequest) -> HttpResponse {


        let http::httprequest::Resource::Path(s) = &req.resource;
        let route: Vec<&str> = s.split("/").collect();
        match route[1] {


            "" => HttpResponse::new("200", None, Self::load_file("index.html")),
            "health" => HttpResponse::new("200", None, Self::load_file("health.html")),
            path => match Self::load_file(path) {


                Some(contents) => {


                    let mut map: HashMap<&str, &str> = HashMap::new();
                    if path.ends_with(".css") {


                        map.insert("Content-Tvpe", "text/css");
                    } else if path.ends_with(".js") {


                        map.insert("Content-Type", "text/javascript");
                    } else {


                        map.insert("Content-Type", "text/html");
                    }
                    HttpResponse::new("200", Some(map), Some(contents))
                }
                None => HttpResponse::new("404", None, Self::load_file("404.html")),
            },
        }
    }
}
对于 WebServiceHandler 我们需要提供一个 load_json 方法来处理我们的 json 文件,我们编写一个 orders.json 文件放在 data 文件夹下提供我们测试使用,这里我们只是用 json 文件做一个简单的测试,后续这部分将会替换成通过数据库查询得到的数据,成为一个完整的 api 后台
[
    {


        "order_id": 1,
        "order_date": "21 Jan 2020",
        "order_status": "Delivered"
    },
    {


        "order_id": 2,
        "order_date": "2 Feb 2020",
        "order_status": "Pending"
    }
]
为了解析 json 我们需要我们的 serde_json 这个包,同时创建一个结构体来定义我们收到的 json 的每一项的内容,因为它对应的是 json 里的数据,所以我们要给他提供序列化和反序列化的方法
#[derive(Serialize, Deserialize)]
pub struct OrderStatus {


   order_id: i32
   order_date: String,
   order_status: String,
}
impl WebServiceHandler {


   fn load_json() -> Vec<OrderStatus> {


       let default_path = format!("{}/data", env!("CARGO_MANIFEST_DIR"));
       let data_path = env::var("DATA_PATH").unwrap_or(default_path);
       let full_path = format!("{}/{}", data_path, "orders.json");
       let json_contents = fs::read_to_string(full_path);
       let orders: Vec<OrderStatus> =
           serde_json::from_str(json_contents.unwrap().as_str()).unwrap();
       orders
   }
}
这里我们假设我们的路径是 127.0.0.1:3000 / api / shipping / orders,通过分割字符串来解析出我们的路径判定 / shipping / orders 是不是匹配,如果路径正确,我们就将我们的 json 数据取出放到我们的 body 中返回,同时要修改我们的头部的来表示这是一组 json 数据,至于 / api 路径的处理,我们放在我们的 router 方法中:
impl Handler for WebServiceHandler {


    fn handle(req: &HttpRequest) -> HttpResponse {


        let http::httprequest::Resource::Path(s) = &req.resource;
        let route: Vec<&str> = s.split("/").collect();

        match route[2] {


            "shipping" if route.len() > 2 && route[3] == "orders" => {


                let body = Some(serde_json::to_string(&Self::load_json()).unwrap());
                let mut headers: HashMap<&str, &str> = HashMap::new();
                headers.insert("Content-Type", "application/json");
                HttpResponse::new("2oo", Some(headers), body)
            }
            _ => HttpResponse::new("404", None, Self::load_file("404.html")),
        }
    }
}
至此我们的 handler.rs 编写完毕,我们对静态资源,api接口和找不到路径三种情况进行判定,提供了返回,完整的代码如下:
use http::{

    httprequest::HttpRequest, httpresponse::HttpResponse};
use serde::{

    Deserialize, Serialize};
use std::collections::HashMap;
use std::env;
use std::fs;

pub trait Handler {


    fn handle(req: &HttpRequest) -> HttpResponse;
    fn load_file(file_name: &str) -> Option<String> {


        let default_path = format!("{}/public", env!("CARGO_MANIFEST_DIR"));
        let public_path = env::var("PUBLIC_PATH").unwrap_or(default_path);
        let full_path = format!("{}/{}", public_path, file_name);
        let contents = fs::read_to_string(full_path);
        contents.ok()
    }
}

pub struct StaticPageHandler;
pub struct PageNotFoundHandler;
pub struct WebServiceHandler;

#[derive(Serialize, Deserialize)]
pub struct OrderStatus {


    order_id: i32,
    order_date: String,
    order_status: String,
}

impl Handler for PageNotFoundHandler {


    fn handle(_req: &HttpRequest) -> HttpResponse {


        HttpResponse::new("404", None, Self::load_file("404.html"))
    }
}

impl Handler for StaticPageHandler {


    fn handle(req: &HttpRequest) -> HttpResponse {


        let http::httprequest::Resource::Path(s) = &req.resource;
        let route: Vec<&str> = s.split("/").collect();
        match route[1] {


            "" => HttpResponse::new("200", None, Self::load_file("index.html")),
            "health" => HttpResponse::new("200", None, Self::load_file("health.html")),
            path => match Self::load_file(path) {


                Some(contents) => {


                    let mut map: HashMap<&str, &str> = HashMap::new();
                    if path.ends_with(".css") {


                        map.insert("Content-Tvpe", "text/css");
                    } else if path.ends_with(".js") {


                        map.insert("Content-Type", "text/javascript");
                    } else {


                        map.insert("Content-Type", "text/html");
                    }
                    HttpResponse::new("200", Some(map), Some(contents))
                }
                None => HttpResponse::new("404", None, Self::load_file("404.html")),
            },
        }
    }
}

impl WebServiceHandler {


    fn load_json() -> Vec<OrderStatus> {


        let default_path = format!("{}/data", env!("CARGO_MANIFEST_DIR"));
        let data_path = env::var("DATA_PATH").unwrap_or(default_path);
        let full_path = format!("{}/{}", data_path, "orders.json");
        let json_contents = fs::read_to_string(full_path);
        let orders: Vec<OrderStatus> =
            serde_json::from_str(json_contents.unwrap().as_str()).unwrap();
        orders
    }
}

impl Handler for WebServiceHandler {


    fn handle(req: &HttpRequest) -> HttpResponse {


        let http::httprequest::Resource::Path(s) = &req.resource;
        let route: Vec<&str> = s.split("/").collect();

        match route[2] {


            "shipping" if route.len() > 2 && route[3] == "orders" => {


                let body = Some(serde_json::to_string(&Self::load_json()).unwrap());
                let mut headers: HashMap<&str, &str> = HashMap::new();
                headers.insert("Content-Type", "application/json");
                HttpResponse::new("2oo", Some(headers), body)
            }
            _ => HttpResponse::new("404", None, Self::load_file("404.html")),
        }
    }
}
最后我们编写我们的路由 router.rs , 它就很简单,分割我们拿到的 http 路径,根据路径和方法的不同分别调用不同的 handler 即可,这里我们先只处理 GET 请求,POST 的处理将会后续更新
use super::handler::{

    Handler, PageNotFoundHandler, StaticPageHandler, WebServiceHandler};
use http::{

    httprequest, httprequest::HttpRequest, httpresponse::HttpResponse};
use std::io::prelude::*;

pub struct Router;

impl Router {


    pub fn route(req: HttpRequest, stream: &mut impl Write) -> () {


        match req.method {


            httprequest::Method::Get => match &&req.resource {


                httprequest::Resource::Path(s) => {


                    let route: Vec<&str> = s.split('/').collect();
                    match route[1] {


                        "api" => {


                            let resp: HttpResponse = WebServiceHandler::handle(&req);
                            let _ = resp.send_response(stream);
                        }
                        _ => {


                            let resp: HttpResponse = StaticPageHandler::handle(&req);
                            let _ = resp.send_response(stream);
                        }
                    }
                }
            },
            _ => {


                let resp: HttpResponse = PageNotFoundHandler::handle(&req);
                let _ = resp.send_response(stream);
            }
        }
    }
}
我们将我们的路由处理方法放在之前编写的 server.rs 中,现在每当你收到一个 HTTP 的请求,服务器就会解析你的路径,通过不同的方式进行处理后返回给你数据:
use super::router::Router;
use http::httprequest::HttpRequest;
use std::io::prelude::*;
use std::net::TcpListener;
use std::str;

pub struct Server<'a> {


    socket_addr: &'a str,
}

impl<'a> Server<'a> {


    pub fn new(socket_addr: &'a str) -> Self {


        Server {

     socket_addr }
    }

    pub fn run(&self) {


        let connection_listener = TcpListener::bind(self.socket_addr).unwrap();
        println!("Running on {}", self.socket_addr);
        for stream in connection_listener.incoming() {


            let mut stream = stream.unwrap();
            println!("Connection established");
            let mut read_buffer = [0; 200];
            stream.read(&mut read_buffer).unwrap();
            let req: HttpRequest = String::from_utf8(read_buffer.to_vec()).unwrap().into();

            Router::route(req, &mut stream)
        }
    }
}
你可以在命令行中启动我们的项目,然后进行如下的测试
- 在浏览器访问 http://localhost:3000/ 可以看到 index.html 的内容(有红色字体)
- 在浏览器访问 http://localhost:3000/health 可以看到 health.html 的 内容
- 在浏览器访问 http://localhost:3000/api/shipping/orders 可以看到一组订单数据
- 在浏览器访问 http://localhost:3000/hhhhhhhhh 将会弹出 404.html 页面
如果你的测试完全符合预期,那么你的服务器编写成功了,否则你可以查看这个 git 仓库
https://github.com/aiai0603/rust_web_mysql