目录
第三次导入的JAR包(AOP):AspectJ框架相关的JAR包
7.3 掌握基于 XML 和 Annotation 的声明式事务的使用
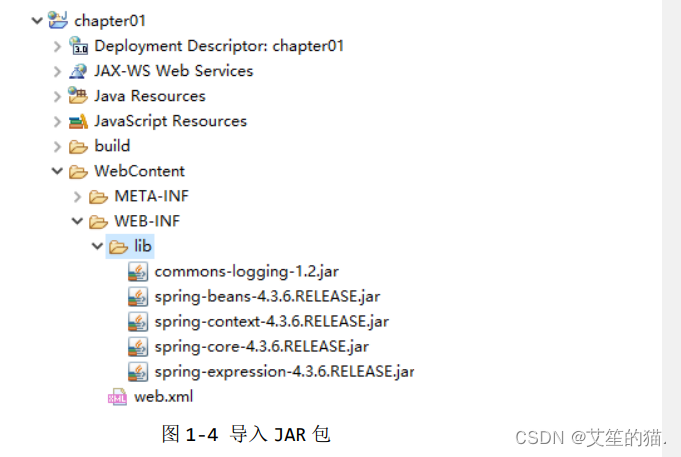
第一部分-JAR包的导入
第一次导入的JAR包(基础):
1.第三方依赖包:commons-logging-1.2.jar
2.Spring 的4个基础包:
① spring-core-4.3.6.RELEASE.jar
② spring-beans-4.3.6.RELEASE.jar
③ spring-context-4.3.6.RELEASE.jar
④ spring-expression-4.3.6.RELEASE.jar
第二次导入的JAR包(AOP):
① spring-aop-4.3.6.RELEASE.jar 是 Spring 为 AOP 提供的实现包,(并支持注解扫描)
② aopallince-1.0.jar 是 AOP 联盟提供的规范包,该 JAR 包可以通过地址 http://mvnrepository.com/artifact/aopalliance/aopalliance/1.0 下载。
第三次导入的JAR包(AOP):AspectJ框架相关的JAR包
① spring-aspects-4.3.6.RELEASE.jar Spring 为 AspectJ 提供的实现
② aspectjweaver-1.8.0.RELEASE.jar 是 AspectJ 框架所提供的规范,可以通过网址 https://mvnrepository.com/artifact/org.aspectj/aspectjweaver/1.8.10 下载
第四次导入的JAR包(JDBC和事务):
① mysql-connector-java-5.1.0-bin.jar MySQL数据库的驱动JAR包
② spring-jdbc-4.3.6.RELEASE.jar JDBC的JAR包
③ spring-tx-4.3.6.RELEASE.jar Spring事务处理的JAR包
一共12个JAR包。
注意:Spring 框架包 Spring 4.3.6 版本的框架压缩包,名称为 spring-framework-4.3.6.RELEASE-dist. zip , 此 压 缩 包 可 以 通 过 地 址 https://repo.spring.io/release/org/springframework/spring/4.3.6.RELEASE/s pring-framework-4.3.6.RELEASE-dist.zip 下载。
第二部分-项目实战
1.Spring的核心容器:
1.1 BeanFactory在实际开发中用的少,这里略过。
1.2 ApplicationContext(使用)
1. 2.1 通过 ClassPathXmlApplicationContext 创建(使用)
ApplicationContext applicationContext = new ClassPathXmlApplicationContext(String configLoction);
1.2.2. 通过 FileSystemXmlApplicationContext 创建(不用,所以略过)
2. Spring的入门程序:
⑴ 创建项目,导入包:
⑵ 在 src 目录下,创建一个 com.neko.dao 包,并在包中创建接口 UserDao,然后在接 口中定义一个 say( )方法,
package com.neko.dao;
public interface UserDao {
  public void say();
}
⑶ 在 com.neko.dao.impl 包下,创建 UserDao 接口的实现类 UserDaoImpl,该类需要实现 接口中的 say( )方法,并在方法中编写一条输出语句,
package com.neko.dao.impl;
public class UserDaoImpl implements UserDao{
  @Override
  public void say() {
    System.out.println("userDao say Hello World!");
  }
}
(4) 在项目目录下创建 config 文件夹专门存放配置文件,再创建 Spring 的配置文件 applicationContext. xml,并在配置 文件中创建一个 id 为 userDao 的 Bean ,
<?xml version="1.0" encoding="UTF-8"?>
<beans xmlns="http://www.springframework.org/schema/beans"
xmlns:xsi="http://www.w3.org/2001/XMLSchema-instance"
xsi:schemaLocation="http://www.springframework.org/schema/beans
http://www.springframework.org/schema/beans/spring-beans.xsd">
  <!-- 将指定的类配置给Spring,让Spring创建其对象的实例 -->
  <bean id="userDao" class="com.sinven.ioc.UserDaoImpl" />
</beans>
(5) 在 com.neko.test 包下创建测试类 TestIoC,并在类中编写 main( )方法。在 main( )方法中,需要初始化 Spring 容器,并加载配置文件,然后通过 Spring 容器获取 UserDao 实例(即 Java 对象),最后调用实例中的 say( )方法,
package com.neko.test;
import org.springframework.context.ApplicationContext;
import
org.springframework.context.support.ClassPathXmlApplicationContext;
public class TestIoC {
public static void main(String[] args) {
  // 1、初始化spring容器加载配置文件
  ApplicationContext applicationContext = new
  ClassPathXmlApplicationContext("config/applicationContext.xml");
  // 2、通过容器获取UserDao实例
  UserDao userDao = (UserDao) applicationContext.getBean("userDao");
  // 3、调用示例中的say()方法
  userDao.say();
  }
}
执行程序后,控制台的输出如图:
3.依赖注入“DI”
3.1 依赖注入的概念
依赖注入( Dependency Injection ,简称 DI) 与控制反转(IoC) 的含义相同,只不过 这两个称呼是从两个角度描述的同一个概念。对于一个 Spring 初学者来说,这两种称呼很 难理解,下面我们将通过简单的语言来描述这两个概念。
当某个 Java 对象(调用者)需要调用另一个 Java 对象(被调用者,即被依赖对象)时,在 传统模式下,调用者通常会采用"new 被调用者"的代码方式来创建对象,如图 1-8 所示。这 种方式会导致调用者与被调用者之间的耦合性增加,不利于后期项目的升级和维护。
图:
图 1-8 调用者创建被调用者对象 在使用 Spring 框架之后,对象的实例不再由调用者来创建,而是由 Spring 容器来创 建,Spring 容器会负责控制程序之间的关系,而不是由调用者的程序代码直接控制。这样, 控制权由应用代码转移到了 Spring 容器,控制权发生了反转,这就是 Spring 的控制反转。
从 Spring 容器的角度来看,Spring 容器负责将被依赖对象赋值给调用者的成员变量, 这相当于为调用者注入了它依赖的实例,这就是 Spring 的依赖注入,如图 1-9 所示。
图 :
3.2 依赖注入的实现方式
① 属性 setter 方法注入:指 IoC 容器使用 setter 方法注入被依赖的实例。通过调用无 参构造器或无参静态工厂方法实例化 Bean 后,调用该 Bean 的 setter 方法,即可实现基于 setter 方法的依赖注入。(在实际开发中最常用)
② 构造方法注入:指 IoC 容器使用构造方法注入被依赖的实例。基于构造方法的依赖注 入通过调用带参数的构造方法来实现,每个参数代表着一个依赖。
下面以属性 setter 方法注入的方式为例,实现依赖注入:
(1) 在 com.neko.service 包中,创建接口 UserService,在接口中编写一个 say( )方法,
package com.neko.service;
public interface UserService {
  public void say();
}
(2) 在 com.neko.service.impl 包中,创建 UserService 接口的实现类 UserServiceImpl,在类中 声明 userDao 属性,并添加属性的 setter 方法,
package com.neko.service.impl;
public class UserServiceImpl implements UserService {
  //声明UserDao属性
  private UserDao userDao;
  //添加UserDao属性的setter方法,用于实现依赖注入
  public void setUserDao(UserDao userDao) {
    this.userDao = userDao;
  }
  //实现接口中方法
  @Override
  public void say() {
  //调用userDao中的say()方法,并执行输出语句
    this.userDao.say();
    System.out.println("userService say Hello World");
  }
}
(3) 在配置文件 applicationContext.xml 中,创建一个 id 为 userService 的 Bean, 该 Bean 用于实例化 UserServiceImpl 类的信息 ,并将 userDao 的实例注入到 userService 中,
<!-- 添加一个id为userService的实例 -->
<bean id="userService" class="com.sinven.ioc.UserServiceImpl">
  <!-- 将id为userDao的Bean实例注入到UserService实例 -->
  <property name="userDao" ref="userDao"/>
</bean>
在上述代码中,是元素的子元素,它用于调用 Bean 实例中的 setUserDao( )方法完成属性赋值,从而实现依赖注入。其 name 属性表示 Bean 实例中的相应 属性名,ref 属性用于指定其属性值。
(4) 在 com.neko.test 包中,创建测试类 TestDI,来对程序进行测试,
package com.neko.test;
import org.springframework.context.ApplicationContext;
import org.springframework.context.support.ClassPathXmlApplicationContext;
public class TestDI {
  public static void main(String[] args) {
    // 1、初始化spring容器加载配置文件
    ApplicationContext applicationContext =
    new ClassPathXmlApplicationContext("applicationContext.xml");
    // 2、通过容器获取UserService实例
    UserService userService =
    (UserService) applicationContext.getBean("userService");
    // 3、调用示例中的say()方法
    userService.say();
  }
}
执行程序后,控制台的输出结果如图:
图:
4.Spring 中的 Bean
4.1 Bean 的配置
图:
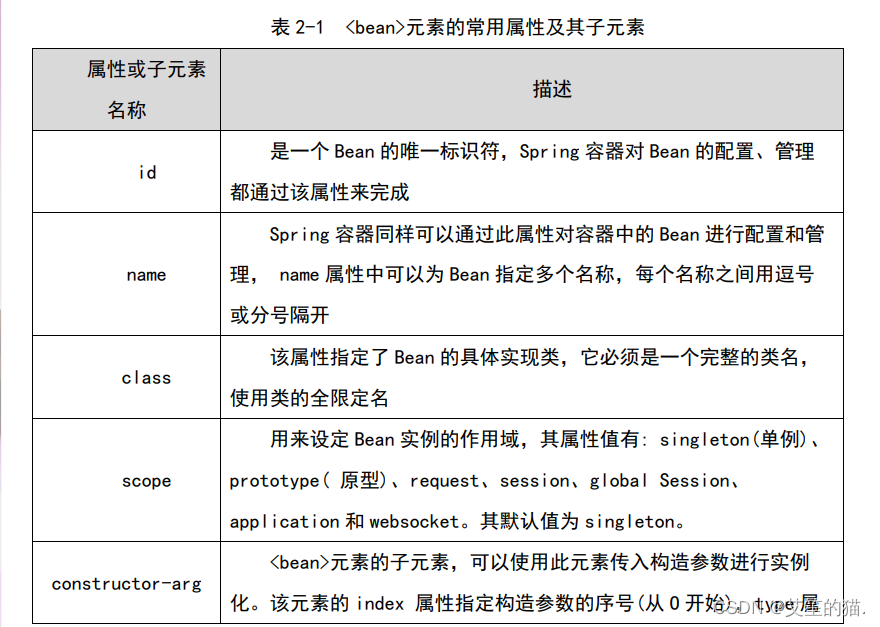
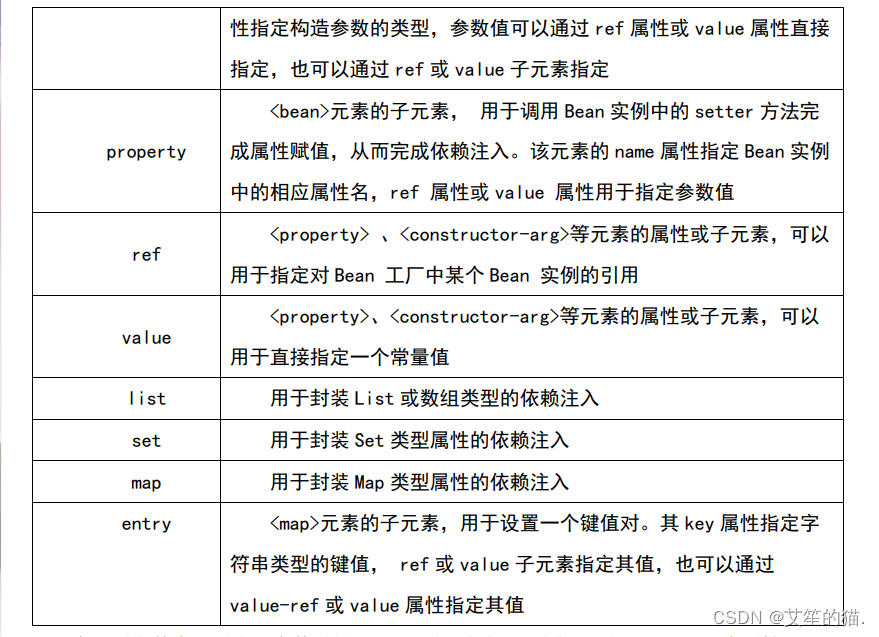
在配置文件中,通常一个普通的 Bean 只需要定义 id (或 name)和 class 两个属性即可, 定义 Bean 的方式如下所示。
<?xml version="1.0" encoding="UTF-8"?>
<beans xmlns="http://www.springframework.org/schema/beans"
xmlns:xsi="http://www.w3.org/2001/XMLSchema-instance"
xsi:schemaLocation="http://www.springframework.org/schema/beans
http://www.springframework.org/schema/beans/spring-beans.xsd">
  <!--使用id 属性定义bean1 ,其对应的实现类为com.sinven.Bean1 -->
  <bean id="bean1" class="com.sinven.Bean1" />
  <!--使用name属性定义bean2 ,其对应的实现类为com.sinven.Bean2 -->
  <bean id="bean2" class="com.sinven.Bean2" />
</beans>
在上述代码中,分别使用 id 属性和 name 属性定义了两个 Bean,并使用 class 元素指定 其对应的实现类。
注意:如果在 Bean 中未指定 id 和 name,则 Spring 会将 class 值当做 id 用。
4.2 Bean 的实例化(3种)
4.2.1 构造器实例化(最常用)
构造器实例化是指 Spring 容器通过 Bean 对应类中默认的无参构造方法来实例化 Bean 。
演示:
(1) 在 Eclipse 中,创建一个名为 chapter02 的 Web 项目,在该项目的 lib 目录中加入 Spring 支持和依赖的 JAR 包。
(2) 在 chapter02 项目的 src 目录下,创建一个 com.neko.instance.constructor 包(案例>建造者),在该包中创建 Bean1 类,
package com.neko.instance.constructor;
public class Bean1 {
}
(3)在 com.sinven.instance.constructor 包中,创建 Spring 的配置文件 beans1.xml, 在配置文件中定义一个 id 为 bean1 的 Bean ,并通过 class 属性指定其对应的实现类为 Bean1,
?xml version="1.0" encoding="UTF-8"?>
<beans xmlns="http://www.springframework.org/schema/beans"
xmlns:xsi="http://www.w3.org/2001/XMLSchema-instance"
xsi:schemaLocation="http://www.springframework.org/schema/beans
http://www.springframework.org/schema/beans/spring-beans.xsd">
  <!--使用id 属性定义bean1 ,其对应的实现类为com.sinven.Bean1 -->
  <bean id="bean1" class="com.neko.instance.constructor.Bean1" />
</beans>
(4) 在 com.neko.instance.constructor 包中,创建测试类 InstanceTest1,来测试构造 器是否能实例化 Bean,
package com.neko.instance.constructor;
import org.springframework.context.ApplicationContext;
import
org.springframework.context.support.ClassPathXmlApplicationContext;
public class InstanceTest1 {
  public static void main(String[] args) {
    // 定义配置文件路径
    String xmlPath = "com/sinven/instance/constructor/beans1.xml";
    // 1、初始化spring容器加载配置文件,对Bean进行实例化
    ApplicationContext applicationContext = new
    ClassPathXmlApplicationContext(xmlPath);
    Bean1 bean = (Bean1) applicationContext.getBean("bean1");
    System.out.println(bean);
  }
}
在上面代码中,首先定义了配置文件的路径,然后 Spring 容器 ApplicationContext 会 加载配置文件。在加载时,Spring 容器会通过 id 为 bean1 的实现类 Bean1 中默认的无参构 造方法对 Bean 进行实例化。执行程序后,控制台的输出结果如图:
图:
4.2.2 静态工厂方式实例化(略)
4.2.3 实例工厂方式实例化(略)
4.3 Bean 的作用域
通过 Spring 容器创建一个 Bean 的实例时,不仅可以完成 Bean 的实例化,还可以为 Bean 指定特定的作用域。
4.3.1 作用域的种类
Spring 4.3 中为 Bean 的实例定义了 7 种作用域,这 7 种作用域及其说明如表
图:
4.3.2 singleton 作用域
4.3.3 prototype 作用域
4.4 Bean 的生命周期
4.5 Bean 的装配方式
4.5.1 基于 XML 的装配(过渡)
(1) 在项目 chapter02 的 src 目录下,创建一个 com.neko.po 包,在该包中 创建 User 类,并在类中定义 username、password 和 list 集合三个属性及其对应的 setter 方法,
package com.neko.po;
import java.util.List;
public class User {
  private String username;
  private String password;
  private List<String> list;
  /**
  * 1.使用构造注入
  * 1.1提供带所有参数的有参构造方法。
  */
  public User(String username, String password, List<String> list) {
    super();
    this.username = username;
    this.password = password;
    this.list = list;
  }
  /**
  * 2.使用设值注入
  * 2.1提供默认无参构造方法
  * 2.2为所有属性提供setter方法
  */
  public User() {
    super();
  }
  public void setUsername(String username) {
    this.username = username;
  }
  public void setPassword(String password) {
    this.password = password;
  }
  public void setList(List<String> list) {
    this.list = list;
  }
  @Override
  public String toString() {
    return "User [username=" + username + ", password=" + password
    + ", list=" + list + "]";
  }
}注意:由于要使用构造注入,所以需要其有参和无参的构造方法。同时,为 了输出时能够看到结果,还重写了其属性的 toString()方法。
(2) 在 config 文件夹中,创建配置文件 bean5.xml,在配置文件中通过构造注 入和设值注入的方式装配 User 类的实例,
<?xml version="1.0" encoding="UTF-8"?>
<beans xmlns="http://www.springframework.org/schema/beans"
xmlns:xsi="http://www.w3.org/2001/XMLSchema-instance"
xsi:schemaLocation="http://www.springframework.org/schema/beans
http://www.springframework.org/schema/beans/spring-beans.xsd">
  <!-- 使用构造注入方式装配User实例 -->
  <bean id="user1" class="com.neko.po.User">
    <constructor-arg index="0" value="andy" />
    <constructor-arg index="1" value="123456" />
    <constructor-arg index="2">
      <list>
        <value>"constructorvalue1"</value>
        <value>"constructorvalue2"</value>
      </list>
    </constructor-arg>
  </bean>
  <!-- 2.使用设值注入方式装配User实例 -->
  <bean id="user2" class="com.neko.po.User">
    <property name="username" value="张三"/>
    <property name="password" value="7654321"/>
    <property name="list">
      <list>
        <value>setlistvalue1</value>
        <value>setlistvalue2</value>
      </list>
    </property>
  </bean>
</beans>
(3) 在 com.neko.test 包中,创建测试类 XmlBeanAssembleTest,在类中分别获取 并输出配置文件中的 user1 和 user2 实例,
package com.neko.test;
import org.springframework.context.ApplicationContext;
import
org.springframework.context.support.ClassPathXmlApplicationContext;
public class XmlBeanAssembleTest {
  public static void main(String[] args) {
    //定义配置文件的位置
    String xmlPath ="config/bean5.xml";
    //ApplicationContext在加载配置文件时,对Bean进行实例化
    ApplicationContext applicationContext =
    new ClassPathXmlApplicationContext(xmlPath);
    //输出获得的实例
    System.out.println(applicationContext.getBean("user1"));
    System.out.println(applicationContext.getBean("user2"));
  }
}
执行程序后,控制台的输出结果如图:
图:
4.5.2 基于 Annotation 的装配(使用)
Spring 中定义了一系列的注解,常用的注解如下所示。
⚫ @Component:可以使用此注解描述 Spring 中的 Bean,但它是一个泛化的概念,仅仅 表示一个组件(Bean),并且可以作用在任何层次。使用时只需将该注解标注在相应类 上即可。
⚫ @Repository:用于将数据访问层(DAO 层)的类标识为 Spring 中的 Bean,其功能与 @Component 相同。
⚫ @Service:通常作用在业务层(Service 层),用于将业务层的类标识为 Spring 中的 Bean,其功能与@Component 相同。
⚫ @Controller:通常作用在控制层(如 Spring MVC 的 Controller),用于将控制层 的类标识为 Spring 中的 Bean,其功能与@Component 相同。
⚫ @Autowired:用于对 Bean 的属性变量、属性的 setter 方法及构造方法进行标注, 配合对应的注解处理器完成 Bean 的自动配置工作。默认按照 Bean 的类型进行装配。
⚫ @Resource:其作用与 Autowired 一样。其区别在于@Autowired 默认按照 Bean 类 型装配,而@Resource 默认按照 Bean 实例名称进行装配。@Resource 中有两个重要属性:name 和 type。Spring 将 name 属性解析为 Bean 实例名称,type 属性解析为 Bean 实例类型。如果指定 name 属性,则按实例名称进行装配;如果指定 type 属性, 则按 Bean 类型进行装配;如果都不指定,则先按 Bean 实例名称装配,如果不能匹配, 再按照 Bean 类型进行 装 配 ; 如果都 无 法 匹 配 , 则 抛 出 NoSuchBeanDefinitionException 异常。
⚫ @Qualifier: 与@Autowired 注解配合使用,会将默认的按 Bean 类型装配修改为按 Bean 的实例名称装配,Bean 的实例名称由@Qualifier 注解的参数指定。
注意:在上面几个注解中,虽然@Repository、@Service 与@Controller 功能与@Component 注解的功能相同,但为了使标注类本身用途更加清晰,建议在实际开发中使用@Repository、 @Service 与@Controller 分别对实现类进行标注。
案例演示:
(1) 在 chapter02 项目的 src 目录下,创建一个 com.neko.dao 包,在该包中创 建接口 UserDao,并在接口中定义一个 save( )方法,
package com.neko.dao;
public interface UserDao {
  public void save();
}
(2) 在 com.neko.dao.impl 包中,创建 UserDao 的实现类 UserDaoImpl,该类需要实 现接口中的 save( )方法,
package com.neko.dao.impl;
import org.springframework.stereotype.Repository;
@Repository
public class UserDaoImpl implements UserDao{
  @Override
  public void save() {
    System.out.println("Dao.......save.......");
  }
}
首先使用@Repository 注解将 UserDaoImpl 类标识为 Spring 中的 Bean, 其写法相当于配置文件中的编写。然后在 save( )方法中输出打印一 句话,用于验证是否成功调用了该方法。
(3) 在 com.neko.service 包中,创建接口 UserService,在接口中同样定义一个 save()方法,
package com.neko.service;
public interface UserService {
  public void save();
}
(4) 在 com.neko.service.impl 包中,创建 UserService 接口的实现类 UserServiceImpl,该类需要实现接口中的 save( )方法,
package com.ne.service.impl;
import javax.annotation.Resource;
import org.springframework.stereotype.Service;
@Service("userService")
public class UserServiceImpl implements UserService{
  @Resource(name="userDao")
  private UserDao userDao;
  @Override
  public void save() {
    //调用UserDao的save()方法
    userDao.save();
    System.out.println("Service......save.....");
  }
}
首先使用@Service 注解将 UserServiceImpl 类标识为 Spring 中的 Bean,这相当于配置文件中的编写;然后使用@Resource 注解 标注在属性 userDao 上,这相当于配置文件中 的写法;最后在该类的 save( )方法中调用 userDao 中的 save( )方 法,并输出一句话。
(5)在 com.neko.controller 包中,创建控制器类 UserController,
package com.neko.controller;
import javax.annotation.Resource;
import org.springframework.stereotype.Controller;
@Controller("userController")
public class UserController {
  @Resource(name="userService")
  private UserService userService;
  public void save() {
    userService.save();
    System.out.println("controller......save......");
  }
}
首先使用@Controller 注解标注了 UserController 类,这相当于在 配置文件中编写; 然后使用了@Resource 注解标注 在 userService 属性上,这相当于在配置文件中编写;最后在其 save( )方法中调用了 userService 中的 save( )方 法,并输出一句话。
(6) 在 com.sinven.annotation 包中,创建配置文件 bean6.xml,在配置文件中编 写基于 Annotation 装配的代码,
<?xml version="1.0" encoding="UTF-8"?>
<beans xmlns="http://www.springframework.org/schema/beans"
 xmlns:xsi="http://www.w3.org/2001/XMLSchema-instance"
xmlns:context="http://www.springframework.org/schema/context"
xsi:schemaLocation="http://www.springframework.org/schema/beans
http://www.springframework.org/schema/beans/spring-beans-3.2.xsd
http://www.springframework.org/schema/context
 http://www.springframework.org/schema/context/spring-context.xsd">
  <!--使用 context 命名空间,在配置文件中开启相应的注解处理器 -->
  <context:annotation-config/>
  <!-- 分别定义 3 个 Bean 的实例 -->
  <bean id="userDao" class="com.neko.dao.impl.UserDaoImpl"/>
  <bean id="userService"
    class="com.neko.service.impl.UserServiceImpl"/>
  <bean id="userController"
    class="com.neko.controller.UserController"/>
</beans>
开启包扫描,简化代码,可以把上面的代码替换
<context:component-scan base-package = "com.neko">
表示扫描com.neko 包下所有类
替换后的bean6.xml文件:
<?xml version="1.0" encoding="UTF-8"?>
<beans xmlns="http://www.springframework.org/schema/beans"
 xmlns:xsi="http://www.w3.org/2001/XMLSchema-instance"
xmlns:context="http://www.springframework.org/schema/context"
xsi:schemaLocation="http://www.springframework.org/schema/beans
http://www.springframework.org/schema/beans/spring-beans-3.2.xsd
http://www.springframework.org/schema/context
http://www.springframework.org/schema/context/spring-context.xsd">
  <!--使用 context 命名空间,通知 Spring 扫描指定包下所有 Bean 类,进行注解解
  析-->
  <context:component-scan base-package="com.neko"/>
</beans>注意:Spring 4.0 以上版本使用上面的代码对指定包中的注解进行扫描前,需要先向项目中 导入 SpringAOP 的 JAR 包 spring-aop-4.3.6.RELEASE.jar,否则程序在运行时会报出 "java.lang.NoClassDefFoundError: org/springframework/aop/TargetSource"错 误。
(7)在 com.neko.test 包中,创建测试类 AnnotationAssembleTest,在类 中编写测试方法并定义配置文件的路径,然后通过 Spring 容器加载配置文件并获取 UserController 实例,最后调用实例中的 save( )方法,
package com.neko.test;
import org.springframework.context.ApplicationContext;
import
org.springframework.context.support.ClassPathXmlApplicationContext;
public class AnnotationAssembleTest {
  public static void main(String[] args) {
    // 定义配置文件的位置
    String xmlPath = "config/bean6.xml";
    // ApplicationContext 在加载配置文件时,对 Bean 进行实例化
    ApplicationContext applicationContext =
    new ClassPathXmlApplicationContext(xmlPath);
    //获取 UserController 实例
    UserController userController =
    (UserController) applicationContext.getBean("userController");
    //调用 UserController 的 save 方法
    userController.save();
  }
}
执行程序后,结果如图:
可以看到,Spring 容器已成功获取了 UserController 的实例,并通过调用 实例中的方法执行了各层中的输出语句,这说明已成功实现了基于 Annotation 装配 Bean。 小提示 上述案例中如果使用注:@Autowired 注解替换@Resource 注解,也可以达到同样的效果。
4.5.3 自动装配(了解)
Spring 的元素中包含一个 autowire 属性,我们可以通过设置 autowire 的属性值来自动装配 Bean。所谓自动装配,就是将一个 Bean 自动地注入到其他 Bean 的 Property 中。
autowire 属性有 5 个值,其值及说明如表 2-3 所示。
图:
下面通过修改 2.5.2 节中的案例来演示如何使用自动装配。
(1)修改前面基于Annotation装配中的文件 UserServiceImpl 和文件 UserController, 分别在文件中增加类属性的 setter 方法。
(2)重新编写 xml 配置文件 bean7.xml。将配置文件修改成自动装配形式,
<?xml version="1.0" encoding="UTF-8"?>
<beans xmlns="http://www.springframework.org/schema/beans"
 xmlns:xsi="http://www.w3.org/2001/XMLSchema-instance"
 xmlns:context="http://www.springframework.org/schema/context"
 xsi:schemaLocation="http://www.springframework.org/schema/beans
 http://www.springframework.org/schema/beans/spring-beans-3.2.xsd
 http://www.springframework.org/schema/context
 http://www.springframework.org/schema/context/spring-context.xsd">
   <!-- 使用 bean 元素的 autowire 属性完成自动装配 -->
   <bean id="userDao" class="com.neko.dao.impl.UserDaoImpl"/>
   <bean id="userService"
    class="com.neko.service.impl.UserServiceImpl" autowire="byName"/>
   <bean id="userController"
   class="com.neko.controller.UserController" autowire="byName"/>
</beans>
上述配置文件中,用于配置 userService 和 userController 的元素中除了 id 和 class 属性外,还增加了 autowire 属性,并将其属性值设置为 byName。在默认情况 下,配置文件中需要通过 ref 来装配 Bean,但设置了 autowire=" byName"后,Spring 会 自动寻找 userService Bean 中的属性,并将其属性名称与配置文件中定义的 Bean 做匹 配。由于 UserServicelmpl 中定义了 userDao 属性及其 setter 方法,这与配置文件中 id 为 userDao 的 Bean 相匹配,所以 Spring 会自动地将 id 为 userDao 的 Bean 装配到 id 为 userService 的 Bean 中。
执行程序后,控制台的输出结果如图:
图:
从上图 可以看出,使用自动装配同样完成了依赖注入。
4.6 注入不同数据类型
4.6.1. 注入直接量(基本数据类型、字符串)
对于基本数据类型及其包装类、字符串,除了可以使用 value 属性,还可以通过子元素进行注 入,关键代码如下例所示 :
<bean id="user" class="com.neko.po.User">
  <property name="username">
    <value>张三</value>
  </property>
  <property name="age">
     <value>20</value>
  </property>
  <property name="email">
    <value>[email protected]</value>
  </property>
</bean>
如果属性值中包含 XML 中的特殊字符(&、<、>、”、’),则注入时需要进行处理。通常可以采 用两种方法:使用<![CDATA[ ]]>标记或把特殊字符替换为实体引用。关键代码如下例所示
<!-- 使用<![CDATA[]]> 标记处理特殊字符-->
<bean id="product" class="com.neko.po.Product">
<property name="productName">
<value>高露洁牙膏</value>
</property>
<property name="brand">
<value><![CDATA[P&G]]></value>
</property>
</bean>
<!-- 把 XML 特殊字符替换为实体引用 -->
<bean id="product" class="com.neko.po.Product">
<property name="productName">
<value>高露洁牙膏</value>
</property>
<property name="brand">
<value>P&G</value>
</property>
</bean>4.6.2. 引用其他 Bean 组件
Spring 中定义的 Bean 可以互相引用,从而建立依赖关系,除了使用 ref 属性,还可以通过子元 素实现,关键代码如下:
<!-- 定义 UserDao 对象,并指定 id 为 userDao -->
<bean id="userDao" class="com.neko.dao.impl.UserDaoImpl"/>
<!-- 定义 UserService 对象,并指定 id 为 userService -->
<bean id="userService" class="com.neko.service.impl.UserServiceImpl">
  <property name="userDao">
    <!-- 引用 id 为 userDao 的对象为 userService 的 userDao 属性赋值 -->
    <ref bean="userDao"/>
  </property>
</bean>
标签中的 bean 属性用来指定要引用的 Bean 的 id。除了 bean 属性,这里再为大家介绍 local 属 性。关键代码如以下示例所示 :
<!-- 定义UserDao对象,并指定id为userDao -->
<bean id="userDao" class="com.neko.dao.userDaoImpl"/>
<!-- 定义UserService对象,并指定id为userService -->
<bean id="userService" class="com.neko.service.impl.UserServiceImpl">
  <!-- 为UserService的userDao属性赋值,需要注意的是,这里要调用setDao方法 -->
  <property name="userDao">
    <!-- 引用id为userDao的对象为userService的userDao属性赋值 -->
    <ref local="userDao"/>
  </property>
</bean>
从代码上看,local 属性和 bean 属性的用法似乎是一样的,都是用来指定要引用的 Bean 的 id.他们的 区别在于,Spring 的配置文件是可以拆分成多个的,使用 local 属性只能在同一个配置文件中检索 Bean 的 id,而使用 bean 属性可以在其他配置文件中检索 id。
注意:从 Spring4 开始,不再支持 ref local 的方式。 如果想继续使用的话将 xsd 指向 3.2, xsi:schemaLocation=”http://www.springframework.org/schema/beans http://www.springframework.org/schema/beans/spring-beans-3.2.xsd”
4.6.3. 使用内部 Bean
如果一个 Bean 组件仅在一处需要使用,可以把它定义为内部 Bean。关键代码如以下示例所示:
<!-- 定义UserService对象,并指定id为userService -->
<bean id="userService" class="com.neko.service.impl.UserServiceImpl">
  <property name="userDao">
    <!-- 定义UserDao对象 -->
    <bean class="com.sinven.dao.UserDaoImpl"/>
  </property>
</bean>
这样,这个 UserDaoImpl 类型的 Bean 就只能被 userService 使用,无法被其他的 Bean 引用
4.6.4. 注入集合类型的属性
对于 List 或数组类型的属性,可以使用标签注入。关键代码如以下示例所示:
<bean id="user" class="com.neko.po.User">
  <property name="hobbies">
    <list>
      <!-- 定义list或数组中的元素 -->
      <value>足球</value>
      <value>篮球</value>
    </list>
  </property>
</bean>
标签中间可以使用、等标签注入集合元素,甚至是另一个标签。 对于 Set 类型的属性,可以使用标签注入。关键代码如以下示例所示:
<bean id="user" class="com.neko.po.User">
  <property name="hobbies">
    <set>
      <!-- 定义Set中的元素 -->
      <value>足球</value>
      <value>篮球</value>
    </set>
  </property>
</bean
标签中间也可以使用、等标签注入集合属性。
对于 Map 类型的属性,可以使用以下示例所示方式注入:
<bean id="user" class="com.neko.po.User">
  <property name="hobbies">
    <map>
      <!-- 定义Map中的键值对 -->
      <entry>
        <key>
          <value>football</value>
        </key>
        <value>足球</value>
      </entry>
      <entry>
        <key>
          <value>basketball</value>
        </key>
        <value>篮球</value>
      </entry>
    </map>
  </property>
</bean>
如果 Map 中的键或值是 Bean 对象,可以把上面代码中的换成。
对于 Properties 类型的属性,可以使用如下示例方式注入。
<bean id="user" class="com.neko.po.User">
  <property name="hobbies">
    <props>
      <!-- 定义Properties中的键值对 -->
      <prop key="football">足球</prop>
      <prop key="basketball">篮球</prop>
    </props>
  </property>
</bean>
4.6.5. 注入 null 和空字符串值
可以使用注入空字符串值,使用注入 null 值。关键代码如以下示例所示。
<!-- 注入空字符串值 -->
<bean id="user" class="com.neko.po.User">
  <property name="email">
    <value></value>
  </property>
</bean>
<!-- 注入null值 -->
<bean id="user" class="com.sinven.pojo.User">
  <property name="email">
    <null />
  </property>
</bean>
5.Spring AOP
AOP 的全称是Aspect-Oriented Programming ,即面向切面编程(也称面向方面编程)。它 是面向对象编程(OOP)的一种补充,目前已成为一种比较成熟的编程方式。
在 AOP 思想中,类与切面的关系如图:
图:
从图 3-1 可以看出,通过 Aspect(切面)分别在 Class1 和 Class2 的方法中加入了事务、 日志、权限和异常等功能。
AOP 的使用,使开发人员在编写业务逻辑时可以专心于核心业务,而不用过多地关注于其 他业务逻辑的实现,这不但提高了开发效率,而且增强了代码的可维护性。
目前最流行的 AOP 框架有两个,分别为 Spring AOP 和 AspectJ。Spring AOP 使用纯 Java 实现,不需要专门的编译过程和类加载器,在运行期间通过代理方式向目标类织入增强 的代码。
AspectJ 是一个基于 Java 语言的 AOP 框架,从 Spring 2.0 开始,Spring AOP 引入了 对 AspectJ 的支持,AspectJ 扩展了 Java 语言,提供了一个专门的编译器,在编译时提供横 向代码的织入。
6.Spring 的数据库开发(了解)
后面,我们会使用MyBatis进行数据库开发,所以这里略过。