简介
学习完了mybatis、spring、springMVC之后就是对这几个框架的整合了。采用的工具和软件:
- IDEA
- mysql 5.7
- spring
- springMVC
- mybatis
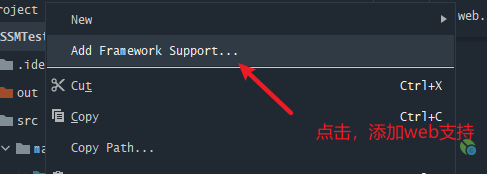
项目的创建过程是:使用maven创建普通项目—>如果没有对应的包创建包–>对项目添加web支持。
SSM整合
1. 导入对应的maven依赖:
<?xml version="1.0" encoding="UTF-8"?>
<project xmlns="http://maven.apache.org/POM/4.0.0"
         xmlns:xsi="http://www.w3.org/2001/XMLSchema-instance"
         xsi:schemaLocation="http://maven.apache.org/POM/4.0.0 http://maven.apache.org/xsd/maven-4.0.0.xsd">
    <modelVersion>4.0.0</modelVersion>

    <groupId>org.example</groupId>
    <artifactId>SSMTest2</artifactId>
    <version>1.0-SNAPSHOT</version>

    <properties>
        <maven.compiler.source>9</maven.compiler.source>
        <maven.compiler.target>9</maven.compiler.target>
    </properties>
    <!--配置静态资源导出路径-->
    <build>
        <resources>
            <resource>
                <directory>src/main/java</directory>
                <includes>
                    <include>**/*.properties</include>
                    <include>**/*.xml</include>
                </includes>
                <filtering>false</filtering>
            </resource>
            <resource>
                <directory>src/main/resources</directory>
                <includes>
                    <include>**/*.properties</include>
                    <include>**/*.xml</include>
                </includes>
                <filtering>false</filtering>
            </resource>
        </resources>
    </build>

    <!--导入依赖-->
    <dependencies>
        <!--单元测试-->
        <dependency>
            <groupId>junit</groupId>
            <artifactId>junit</artifactId>
            <version>4.13</version>
            <scope>test</scope>
        </dependency>
        <!--JDBC-->
        <dependency>
            <groupId>mysql</groupId>
            <artifactId>mysql-connector-java</artifactId>
            <version>5.1.47</version>
        </dependency>
        <dependency>
            <groupId>com.mchange</groupId>
            <artifactId>c3p0</artifactId>
            <version>0.9.5.2</version>
        </dependency>
        <!--servlet-->
        <dependency>
            <groupId>javax.servlet</groupId>
            <artifactId>servlet-api</artifactId>
            <version>2.5</version>
        </dependency>
        <dependency>
            <groupId>javax.servlet.jsp</groupId>
            <artifactId>jsp-api</artifactId>
            <version>2.1</version>
        </dependency>
        <dependency>
            <groupId>javax.servlet</groupId>
            <artifactId>jstl</artifactId>
            <version>1.2</version>
        </dependency>
        <!--mybatis-->
        <dependency>
            <groupId>org.mybatis</groupId>
            <artifactId>mybatis</artifactId>
            <version>3.5.2</version>
        </dependency>
        <dependency>
            <groupId>org.mybatis</groupId>
            <artifactId>mybatis-spring</artifactId>
            <version>2.0.2</version>
        </dependency>
        <!--spring-->
        <dependency>
            <groupId>org.springframework</groupId>
            <artifactId>spring-webmvc</artifactId>
            <version>5.1.7.RELEASE</version>
        </dependency>
        <dependency>
            <groupId>org.springframework</groupId>
            <artifactId>spring-jdbc</artifactId>
            <version>5.1.7.RELEASE</version>
        </dependency>

        <!--其他工具-->
        <dependency>
            <groupId>org.projectlombok</groupId>
            <artifactId>lombok</artifactId>
            <version>1.18.16</version>
        </dependency>
        <dependency>
            <groupId>org.jetbrains</groupId>
            <artifactId>annotations</artifactId>
            <version>RELEASE</version>
            <scope>compile</scope>
        </dependency>
    </dependencies>
</project>
2. 配置环境
使用SSM构建项目需要如下的配置文件:
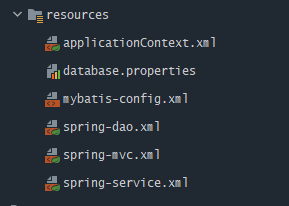
每个spring-xxx文件是专门负责一个层的,最后全部导入applicationContext.xml文件中。
2.1 database.properties
数据库的配置资源:
jgbc.driver=com.mysql.jdbc.Driver
jdbc.url=jdbc:mysql://localhost:3306/mydemo?useSSL=false&useUnicode=true&characterEncoding=utf8
jdbc.username=root
jdbc.password=123456
数据库表如下:
mysql> desc emp;
+----------+-------------+------+-----+---------+-------+
| Field    | Type        | Null | Key | Default | Extra |
+----------+-------------+------+-----+---------+-------+
| EMPNO    | int(4)      | NO   | PRI | NULL    |       |
| ENAME    | varchar(10) | YES  |     | NULL    |       |
| JOB      | varchar(9)  | YES  |     | NULL    |       |
| MGR      | int(4)      | YES  |     | NULL    |       |
| HIREDATE | date        | YES  |     | NULL    |       |
| SAL      | double(7,2) | YES  |     | NULL    |       |
| COMM     | double(7,2) | YES  |     | NULL    |       |
| DEPTNO   | int(2)      | YES  |     | NULL    |       |
+----------+-------------+------+-----+---------+-------+
8 rows in set (0.01 sec)
2.2 mybatis-config.xml
理论上使用spring整合mybatis可以完全舍弃这个配置文件,但是从项目构建的角度来说,可以将一些具备mybatis特点是操作放在该配置文件中:
<?xml version="1.0" encoding="UTF-8" ?>
<!DOCTYPE configuration
        PUBLIC "-//mybatis.org//DTD Config 3.0//EN"
        "http://mybatis.org/dtd/mybatis-3-config.dtd">
<configuration>
    <typeAliases>
        <package name="com.yindarui.POJO"/>
    </typeAliases>
    <mappers>
        <mapper class="com.yindarui.dao.EmpMapper"/>
    </mappers>
</configuration>
2.3 spring-dao.xml
该配置文件用于整合mybatis的配置文件并实现对数据库配置:
<?xml version="1.0" encoding="UTF-8"?>
<beans xmlns="http://www.springframework.org/schema/beans"
       xmlns:xsi="http://www.w3.org/2001/XMLSchema-instance"
       xmlns:context="http://www.springframework.org/schema/context"
       xsi:schemaLocation="http://www.springframework.org/schema/beans
        http://www.springframework.org/schema/beans/spring-beans.xsd
         http://www.springframework.org/schema/context
          https://www.springframework.org/schema/context/spring-context.xsd">
    <!--配置数据库-->
<!--    1. 关联数据库配置文件-->
    <context:property-placeholder location="classpath:database.properties"/>
<!--    2. 选择连接池-->
    <bean id="dataSource" class="com.mchange.v2.c3p0.ComboPooledDataSource">
        <property name="jdbcUrl" value="${jdbc.url}"/>
        <property name="driverClass" value="${jgbc.driver}"/>
        <property name="user" value="${jdbc.username}"/>
        <property name="password" value="${jdbc.password}"/>
    </bean>
<!--3. 注入SqlSessionFactory-->
    <bean id="sqlSessionFactory" class="org.mybatis.spring.SqlSessionFactoryBean">
        <property name="dataSource" ref="dataSource"/>
        <property name="configLocation" value="classpath:mybatis-config.xml"/>
    </bean>
    <!--配置dao接口扫描包,动态的实现了Dao接口注入到Spring容器中-->
    <bean class="org.mybatis.spring.mapper.MapperScannerConfigurer">
        <property name="sqlSessionFactoryBeanName" value="sqlSessionFactory"/>
        <property name="basePackage" value="com.yindarui.dao"/>
    </bean>
</beans>
2.4 spring-service.xml
该配置文件用于将项目的service层的bean注入到容器中:
<?xml version="1.0" encoding="UTF-8"?>
<beans xmlns="http://www.springframework.org/schema/beans"
       xmlns:xsi="http://www.w3.org/2001/XMLSchema-instance" xmlns:context="http://mybatis.org/schema/mybatis-spring"
       xsi:schemaLocation="http://www.springframework.org/schema/beans http://www.springframework.org/schema/beans/spring-beans.xsd http://mybatis.org/schema/mybatis-spring http://mybatis.org/schema/mybatis-spring.xsd">
    <!--1. 扫描包-->
    <context:scan base-package="com.yindarui.service"/>
    <!--
    2. 将业务类注入到spring中,可以手动导入,也可以使用
    @Service和@AutoWired自动导入
    -->
    <bean id="empServiceImpl" class="com.yindarui.service.EmpServiceImpl"/>
<!--    <bean id="c1" class="com.yindarui.controller.EmpController"/>-->
    <!--3. 声明式事务-->
    <bean id="transactionManager" class="org.springframework.jdbc.datasource.DataSourceTransactionManager">
        <property name="dataSource" ref="dataSource"/>
    </bean>
</beans>
2.5 spring-mvc.xml
是视图层的核心配置,要仔细配置这一块,很容易出问题:
<?xml version="1.0" encoding="UTF-8"?>
<beans xmlns="http://www.springframework.org/schema/beans"
       xmlns:xsi="http://www.w3.org/2001/XMLSchema-instance"
       xmlns:context="http://www.springframework.org/schema/context"
       xmlns:mvc="http://www.springframework.org/schema/mvc"
       xsi:schemaLocation="http://www.springframework.org/schema/beans
        http://www.springframework.org/schema/beans/spring-beans.xsd
        http://www.springframework.org/schema/mvc
        http://www.springframework.org/schema/mvc/spring-mvc.xsd
        http://www.springframework.org/schema/context
        http://www.springframework.org/schema/context/spring-context.xsd">
    <!-- 把标记了@Controller注解的类转换为bean -->
    <context:component-scan base-package="com.yindarui.controller"/>
<!--    过滤一些静态资源的加载,防止在视图解析时的字符串拼接导致访问名的错误-->
    <mvc:default-servlet-handler/>

   <!--
    支持mvc注解驱动
    在spring中一般采用@RequestMapping注解来完成映射关系
    要想使@RequestMapping注解生效
    必须向上下文中注册DefaultAnnotationHandLerMapping和
    一个AnnotationMethodHandLerAdapter实例
    这两个实例分别在类级别和方法级别处理。
    而annotation-driven配置帮助我们自动完成上述两个实例的注入。
    -->
    <mvc:annotation-driven/>


    <!-- 对模型视图名称的解析,即在模型视图名称添加前后缀 -->
    <bean class="org.springframework.web.servlet.view.InternalResourceViewResolver">
        <property name="prefix" value="/WEB-INF/jsp/"/>
        <property name="suffix" value=".jsp"/>
    </bean>
</beans>
2.6 applicationContext.xml
整合之前所有的配置文件,并由web.xml导入。
<?xml version="1.0" encoding="UTF-8"?>
<beans xmlns="http://www.springframework.org/schema/beans"
       xmlns:xsi="http://www.w3.org/2001/XMLSchema-instance"
       xsi:schemaLocation="http://www.springframework.org/schema/beans
        http://www.springframework.org/schema/beans/spring-beans.xsd">
    <import resource="classpath:spring-dao.xml"/>
    <import resource="classpath:spring-service.xml"/>
    <import resource="classpath:spring-mvc.xml"/>
</beans>
3. web包:
包结构如下:

3.1 核心配置文件
因为我们使用的是SpringMVC来完成视图层的控制,所以必须在web.xml中配置好DispatcherServlet。这个类是springMVC的最核心的类,他主要完成:
- 请求的url处理;
- 与controller(servlet)的匹配,使用restful风格;
- 封装controller传递的结果;
- 视图的跳转;
其继承关系如下(图片来源):

<?xml version="1.0" encoding="UTF-8"?>
<web-app xmlns="https://jakarta.ee/xml/ns/jakartaee"
         xmlns:xsi="http://www.w3.org/2001/XMLSchema-instance"
         xsi:schemaLocation="https://jakarta.ee/xml/ns/jakartaee https://jakarta.ee/xml/ns/jakartaee/web-app_5_0.xsd"
         version="5.0">
    <!-- SpringMVC的前端控制器 -->
    <servlet>
        <servlet-name>Hello</servlet-name>
        <servlet-class>org.springframework.web.servlet.DispatcherServlet</servlet-class>
        <!-- 设置自己定义的控制器xml文件 -->
        <init-param>
            <param-name>contextConfigLocation</param-name>
            <param-value>classpath:applicationContext.xml</param-value>
        </init-param>
        <!--启动级别-->
        <load-on-startup>1</load-on-startup>
    </servlet>
    <!-- Spring MVC配置文件结束 -->

    <!-- 拦截设置 -->
    <servlet-mapping>
        <servlet-name>Hello</servlet-name>
        <!-- 由SpringMVC拦截所有请求:
         “/” —— 不包括.jsp请求
         “/*” ——包括.jsp请求
         -->
        <url-pattern>/</url-pattern>
    </servlet-mapping>


    <!--spring配置过滤器-->
    <filter>
        <filter-name>encoding</filter-name>
        <filter-class>org.springframework.web.filter.CharacterEncodingFilter</filter-class>
        <init-param>
            <param-name>encoding</param-name>
            <param-value>utf8</param-value>
        </init-param>
    </filter>
    <filter-mapping>
        <filter-name>encoding</filter-name>
        <url-pattern>/*</url-pattern>
    </filter-mapping>
</web-app>
3.2 empList.jsp
显示查询的结果:
<%--
  Created by IntelliJ IDEA.
  User: 13918
  Date: 2021/1/20
  Time: 17:18
  To change this template use File | Settings | File Templates.
--%>
<%@ page contentType="text/html;charset=UTF-8" language="java" %>
<html>
<head>
    <title>EmpList</title>
    <link href="https://cdn.staticfile.org/twitter-bootstrap/3.3.7/css/bootstrap.min.css" rel="stylesheet"/>
</head>
<body>
<div class="container">
    <div class="row_clearfix">
        <div class="col-md-12 column">
            <div class="page-header">
                <h1>${list}</h1>
            </div>
        </div>
    </div>
</div>

</body>
</html>
4. java包
java包结构如下:

4.1 POJO
该包下主要存放和数据库相关的实体类,本demo中的实体类是Emp.java
package com.yindarui.POJO;
import lombok.AllArgsConstructor;
import lombok.Data;
import lombok.NoArgsConstructor;
import java.util.Date;
/**
 * 使用lombok来简化实体类的代码
 */
@Data
@AllArgsConstructor
@NoArgsConstructor
public class Emp {


    private int empno;
    private String ename;
    private String job;
    private String mgr;
    private Date hireDate;
    private double sal;
    private double comm;
    private int deptno;
}
4.2 dao包:
该包下的主要是对数据库的操作,由于采用mybatis,主要就是存储mapper接口和对应的xml文件。
mp.java:
package com.yindarui.dao;

import com.yindarui.POJO.Emp;
import java.util.List;


public interface EmpMapper {


    //    增加员工
    public int addEmp(Emp emp);
    //    删除员工
    public int deleteEmp(int id);
    //    修改员工
    public int updateEmp(Emp emp, int id);
    //    查询员工列表
    public List<Emp> getEmpList();
    //    通过id查询员工
    public Emp getEmpById(int id);

}
EmpMapper.xml:
<?xml version="1.0" encoding="UTF-8" ?>
<!DOCTYPE mapper
        PUBLIC "-//mybatis.org//DTD Config 3.0//EN"
        "http://mybatis.org/dtd/mybatis-3-mapper.dtd">
<mapper namespace="com.yindarui.dao.EmpMapper">
    <insert id="addEmp" parameterType="Emp">
        insert into mydemo value (#{empno}, #{ename}, #{job}, #{mgr}, #{hireDate},
            #{sal}, #{comm}, #{deptno});
    </insert>
    <delete id="deleteEmp" parameterType="int">
        delete from emp where empno = #{id};
    </delete>
    <update id="updateEmp" parameterType="Emp">
        update emp set
                       empno=#{empno},
                       ename=#{ename},
                       job=#{job},
                       mgr=#{mgr},
                       hireDate=#{hireDate},
                       sal=#{sal},
                       comm=#{comm},
                       deptno=#{deptno}
        where id=#{id}
    </update>
    <select id="getEmpList" resultType="Emp">
        select * from emp
    </select>
    <select id="getEmpById" resultType="Emp" parameterType="int">
        select * from emp where empno=#{id};
    </select>

</mapper>
4.3 service包:
存储业务逻辑相关的代码,需要在spring-service.xml文件中进行扫描,或者使用注解注入:
EmpService.java
package com.yindarui.service;

import com.yindarui.POJO.Emp;

import java.util.List;

/**
 *
 */
public interface EmpService {


    //    增加员工
    public int addEmp(Emp emp);
    //    删除员工
    public int deleteEmp(int id);
    //    修改员工
    public int updateEmp(Emp emp, int id);
    //    查询员工列表
    public List<Emp> getEmpList();
    //    通过id查询员工
    public Emp getEmpById(int id);
}
EmpServiceImpl.java
package com.yindarui.service;

import com.yindarui.POJO.Emp;
import com.yindarui.dao.EmpMapper;
import org.springframework.beans.factory.annotation.Autowired;
import org.springframework.stereotype.Service;

import java.util.List;

/**
 *
 */
@Service
public class EmpServiceImpl implements EmpService{


//    导入dao层
    @Autowired
    private EmpMapper empMapper;
    public void setEmpMapper(EmpMapper empMapper) {


        this.empMapper = empMapper;
    }
    @Override
    public int addEmp(Emp emp) {


        return empMapper.addEmp(emp);
    }

    @Override
    public int deleteEmp(int id) {


        return empMapper.deleteEmp(id);
    }

    @Override
    public int updateEmp(Emp emp, int id) {


        return empMapper.updateEmp(emp, id);
    }

    @Override
    public List<Emp> getEmpList() {


        return empMapper.getEmpList();
    }

    @Override
    public Emp getEmpById(int id) {


        return empMapper.getEmpById(id);
    }
}
4.4 controller包:
controller是springMVC中和视图层的控制相关的类,相当于servlet。由于springMVC提供了DispatcherServlet,使得对视图的操作变得简化,并为我们提供了一个新的接口:controller。
package com.yindarui.controller;
import com.yindarui.POJO.Emp;
import com.yindarui.service.EmpService;
import org.springframework.beans.factory.annotation.Autowired;
import org.springframework.beans.factory.annotation.Qualifier;
import org.springframework.stereotype.Controller;
import org.springframework.ui.Model;
import org.springframework.web.bind.annotation.PathVariable;
import org.springframework.web.bind.annotation.RequestMapping;
import java.util.List;

@Controller
@RequestMapping("/emp")
public class EmpController {


    @Autowired
    @Qualifier("empServiceImpl")
    private EmpService empService;
    @RequestMapping("/getAll")
    public String getEmpList(Model model) {


        List<Emp> empList = empService.getEmpList();
        model.addAttribute("list",empList);
        return "empList";
    }

    @RequestMapping("/get/{id}")
    public String getEmpList(@PathVariable int id, Model model) {


        Emp empList = empService.getEmpById(id);
        model.addAttribute("list",empList);
        return "empList";
    }
}
5. 测试:
配置tomcat,启动服务:
 跳转:http://localhost:8080/emp/getAll
 试试其他的:

总结
整合的过程会遇到很多问题,可以编写测试类,使用junit从底层向上进行调试。最后再次感谢狂神说系列教学视频。