1. 什么是Bean的生命周期:
Spring其实就是一个管理Bean对象的工厂, 它负责对象的创建, 对象的销毁等
所谓的生命周期就是: 对象从创建开始到最终销毁的整个过程
Spring容器只对singleton的Bean进行完整的生命周期管理, 如果是prototype作用域的Bean, Spring容器只负责将该Bean初始化完毕. 等客户端程序一旦获取到该Bean之后, Spring容器就不再管理该对象的生命周期了
// 等客户端程序一旦获取到该Bean, 例如:
Person person = ctx.getBean("person", Person.class);这俩步(检查Bean是否实现了DisposableBean接口, 并调用接口方法和销毁Bean), prototype不管了
2. Bean的生命周期之五步:
第一步: 实例化Bean(调用无参构造方法)
第二步: Bean属性赋值(调用set方法)
第三步: 初始化Bean(会调用Bean的init方法, 这个init方法需要自己写自己配)
第四步: 使用Bean
第五步: 销毁Bean(会调用Bean的destroy方法, 这个destroy方法需要自己写自己配)
bean标签需要指定init-method destroy-method 属性

// 普通的bean
public class Person {
    private String name;

    public Person() {
        System.out.println("第一步: 无参构造方法执行!");
    }

    public void setName(String name) {
        this.name = name;
        System.out.println("第二步: 给对象的属性赋值!");
    }

    // 这个方法需要自己写自己配
    public void initBean(){
        System.out.println("第三步: 初始化Bean!");
    }

    // 这个方法需要自己写自己配
    public void destroy(){
        System.out.println("第五步: 销毁Bean!");
    }
}

// xml
// 需要指定init-method destroy-method 属性
<bean id="person" class="com.powernode.xxxx.Person" init-method="initBean" destroy-method="destroy">
    <property name="name" value="大锤"/>
</bean>

// @Test
public void Bean5(){
    ApplicationContext ctx = new
        	ClassPathXmlApplicationContext("Bean_life.xml");
    Person person = ctx.getBean("person", Person.class);
    System.out.println("第四步: 使用Bean ." + person);

    // 注意需要手动关闭Spring容器, 这样Spring容器才会销毁Bean
    ClassPathXmlApplicationContext context =
        				(ClassPathXmlApplicationContext) ctx;
    context.close();
}
3. Bean的生命周期之七步:
在上述的五步中, 第三步是初始化Bean, 如果你还想在初始化前和初始化后添加代码, 可以加入"Bean后处理器"
编写一个类实现BeanPostProcessor接口, 并且重写before和after方法
哪七步? :
第一步: 实例化Bean(调用无参构造方法)
第二步: Bean属性赋值(调用set方法)
第三步: 执行"Bean后处理器"的before方法
第四步: 初始化Bean(会调用Bean的init方法, 这个init方法需要自己写自己配)
第五步: 执行"Bean后处理器"的after方法
第六步: 使用Bean
第七步: 销毁Bean(会调用Bean的destroy方法, 这个destroy方法需要自己写自己配)
bean标签需要配置Bean后处理器

// 实现BeanPostProcessor接口的类
public class LogBeanPostProcessor implements BeanPostProcessor {
// 方法有俩个参数
// 第一个参数: 刚创建的bean对象
// 第二个参数: bean的名字
@Override
public Object postProcessBeforeInitialization(Object bean, String beanName) throws BeansException {
System.out.println("执行Bean后处理器的before方法");
return BeanPostProcessor.super.postProcessBeforeInitialization(bean, beanName);
}
@Override
public Object postProcessAfterInitialization(Object bean, String beanName) throws BeansException {
System.out.println("执行Bean后处理器的after方法");
return BeanPostProcessor.super.postProcessAfterInitialization(bean, beanName);
}
}
// xml
// 配置Bean后处理器
// 注意: 这个bean后处理器将作用域整个配置文件中所有的Bean
<bean class="com.powernode.xxxx.LogBeanPostProcessor"/>
<bean id="person" class="com.powernode.xxxx.Person" init-method="initBean" destroy-method="destroyBean">
<property name="name" value="大锤"/>
</bean>
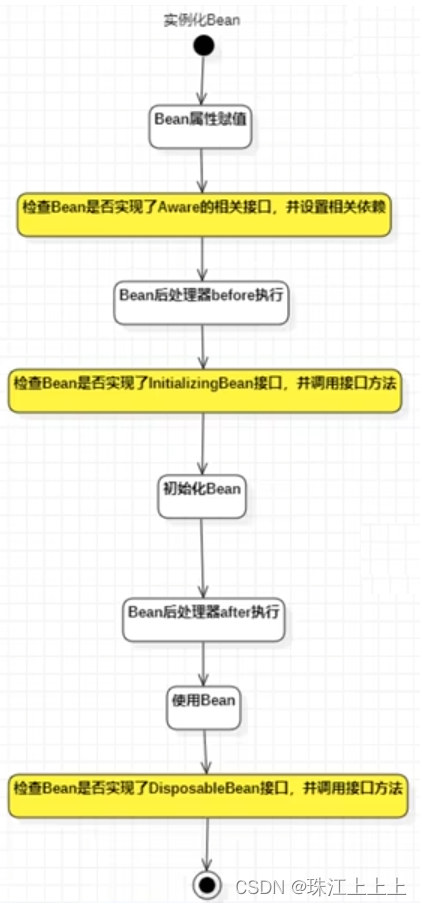
// 其他代码和Bean生命周期五步相同4. Bean的生命周期之十步:
Bean生命周期的十步: 比七步添加的那三步在哪里?
点位1: 在"Bean后处理器"before方法之前
干了什么事?
检查Bean是否实现了Aware相关的接口, 如果实现了接口则调用这些接口中的方法
然后调用这些方法的目的是为了给你传递一些数据, 让你更加方便使用
点位2: 在"Bean后处理器"before方法之后
干了什么事?
检查Bean是否实现了InitializingBean接口, 如果实现了, 则调用接口中的方法
点位3: 使用Bean之后, 或者说销毁Bean之前
干了什么事?
检查Bean是否实现了DisposableBean接口, 如果实现了, 则调用接口中的方法
添加的这三个点位的特点: 都是在检查你这个Bean是否实现了某些特定的接口, 如果实现了这些接口, 则Spring容器会调用这个接口中的方法
检查是否实现了Aware的相关接口是什么意思?
Aware相关的接口包括: BeanNameAware, BeanClassLoaderAware, BeanFactoryAware
当Bean实现了BeanNameAware, Spring会将Bean的名字传递给Bean
当Bean实现了BeanClassLoaderAware, Spring会将加载该Bean的类加载器传递给Bean
当Bean实现了BeanFactoryAware, Spring会将Bean工厂对象传递给Bean
// 普通的bean
public class Person implements BeanNameAware, BeanClassLoaderAware,
					BeanFactoryAware, InitializingBean,DisposableBean {

    private String name;

    public Person() {
        System.out.println("第一步: 无参构造方法执行!");
    }

    public void setName(String name) {
        this.name = name;
        System.out.println("第二步: 给对象的属性赋值!");
    }

    // 这个方法需要自己写自己配
    public void initBean(){
        System.out.println("第三步: 初始化Bean!");
    }

	// 这个方法需要自己写自己配
    public void destroyBean(){
        System.out.println("第五步: 销毁Bean!");
    }

    @Override
    public void setBeanClassLoader(ClassLoader classLoader) {
        System.out.println("Bean这个类的加载器: " + classLoader);
    }

    @Override
    public void setBeanFactory(BeanFactory beanFactory) throws BeansException {
        System.out.println("生产这个Bean的工厂对象是: " + beanFactory);
    }

    @Override
    public void setBeanName(String s) {
        System.out.println("这个Bean的名字是: " + s);
    }

    @Override
    public void afterPropertiesSet() throws Exception {
        System.out.println("InitializingBean's afterPropertiesSet 执行!");
    }

    @Override
    public void destroy() throws Exception {
        System.out.println("DisposableBean's destroy 方法执行!");
    }
}

// xml
// 配置Bean后处理器
// 注意: 这个bean后处理器将作用域整个配置文件中所有的Bean
<bean class="com.powernode.xxxx.LogBeanPostProcessor"/>
<bean id="person" class="com.powernode.xxxx.Person" init-method="initBean" destroy-method="destroyBean">
	<property name="name" value="大锤"/>
</bean>

// @Test
public void Bean5(){
    ApplicationContext ctx = new
        			ClassPathXmlApplicationContext("Bean_life.xml");
    Person person = ctx.getBean("person", Person.class);
    System.out.println("第四步: 使用Bean ." + person);

    // 注意需要手动关闭Spring容器, 这样Spring容器才会销毁Bean
    ClassPathXmlApplicationContext context =
        					(ClassPathXmlApplicationContext) ctx;
    context.close();
}
5. 自己new的对象纳入Spring容器管理:
@Test
public void testRegisterBean(){
    // 自己new对象
    Student student = new Student();
    System.out.println(student);// com.powernode.bean.Student@1b9e1916

    // 将以上自己new的这个对象纳入到Spring容器来管理, 半路上交给Spring来管理
    DefaultListableBeanFactory factory = new DefaultListableBeanFactory();
    factory.registerSingleton("studentBean",student);

    // 从Spring中获取
    Object studentBean = factory.getBean("studentBean");
    System.out.println(studentBean);// com.powernode.bean.Student@1b9e1916
}