步骤
- 首先, 数据源使用c3p0连接池
- spring整合dao层 :spring-dao.xml
- spring整合service层 :spring-service.xml
- 注意关联xml文件
一、编写spring-dao.xml
<?xml version="1.0" encoding="UTF-8"?>
<beans xmlns="http://www.springframework.org/schema/beans"
       xmlns:xsi="http://www.w3.org/2001/XMLSchema-instance"
       xmlns:context="http://www.springframework.org/schema/context"
       xsi:schemaLocation="http://www.springframework.org/schema/beans
        http://www.springframework.org/schema/beans/spring-beans.xsd
        http://www.springframework.org/schema/context
        https://www.springframework.org/schema/context/spring-context.xsd">


    <!-- 配置整合mybatis -->
    <!-- 1.关联数据库文件 -->
    <context:property-placeholder location="classpath:database.properties"/>
    <!-- 2.数据库连接池 -->
    <!--数据库连接池
        dbcp  半自动化操作  不能自动连接
        c3p0  自动化操作(自动的加载配置文件 并且设置到对象里面)
    -->
    <bean id="dataSource" class="com.mchange.v2.c3p0.ComboPooledDataSource">
        <!-- 配置连接池属性 -->
        <property name="driverClass" value="${jdbc.driver}"/>
        <property name="jdbcUrl" value="${jdbc.url}"/>
        <property name="user" value="${jdbc.username}"/>
        <property name="password" value="${jdbc.password}"/>
        <!-- c3p0连接池的私有属性 -->
        <property name="maxPoolSize" value="30"/>
        <property name="minPoolSize" value="10"/>
        <!-- 关闭连接后不自动commit -->
        <property name="autoCommitOnClose" value="false"/>
        <!-- 获取连接超时时间 -->
        <property name="checkoutTimeout" value="10000"/>
        <!-- 当获取连接失败重试次数 -->
        <property name="acquireRetryAttempts" value="2"/>
    </bean>
    <!-- 3.配置SqlSessionFactory对象 -->
    <bean id="sqlSessionFactory" class="org.mybatis.spring.SqlSessionFactoryBean">
        <!-- 注入数据库连接池 -->
        <property name="dataSource" ref="dataSource"/>
        <!-- 配置MyBaties全局配置文件:mybatis-config.xml -->
        <property name="configLocation" value="classpath:mybatis-config.xml"/>
    </bean>
    <!-- 4.配置扫描Dao接口包,动态实现Dao接口注入到spring容器中 -->

    <bean class="org.mybatis.spring.mapper.MapperScannerConfigurer">
        <!-- 注入sqlSessionFactory -->
        <property name="sqlSessionFactoryBeanName" value="sqlSessionFactory"/>
        <!-- 给出需要扫描Dao接口包 -->
        <property name="basePackage" value="com.chen.dao"/>
    </bean>
</beans>
注意!
配置扫描Dao接口包中的 value中路径要写对,这里扫描的是mapper接口
二、编写spring-service.xml
<?xml version="1.0" encoding="UTF-8"?>
<beans xmlns="http://www.springframework.org/schema/beans"
       xmlns:xsi="http://www.w3.org/2001/XMLSchema-instance"
       xmlns:context="http://www.springframework.org/schema/context"
       xsi:schemaLocation="http://www.springframework.org/schema/beans
    http://www.springframework.org/schema/beans/spring-beans.xsd
    http://www.springframework.org/schema/context
    http://www.springframework.org/schema/context/spring-context.xsd">

    <!-- 扫描service相关的bean -->
    <context:component-scan base-package="com.chen.service" />
    <!--BookServiceImpl注入到IOC容器中-->
    <!--
    	这里的ref不暴红,关键在spring-dao.xml和spring-service.xml产生关联。
-->
    <bean id="BookServiceImpl" class="com.chen.service.BookServiceImpl">
        <property name="bookMapper" ref="bookMapper"/>
    </bean>
    <!-- 配置事务管理器-->
    <bean id="transactionManager" class="org.springframework.jdbc.datasource.DataSourceTransactionManager">
        <!-- 注入数据库连接池 -->
        <property name="dataSource" ref="dataSource" />
    </bean>

</beans>
三、xml文件产生关联的方法(2个)
-
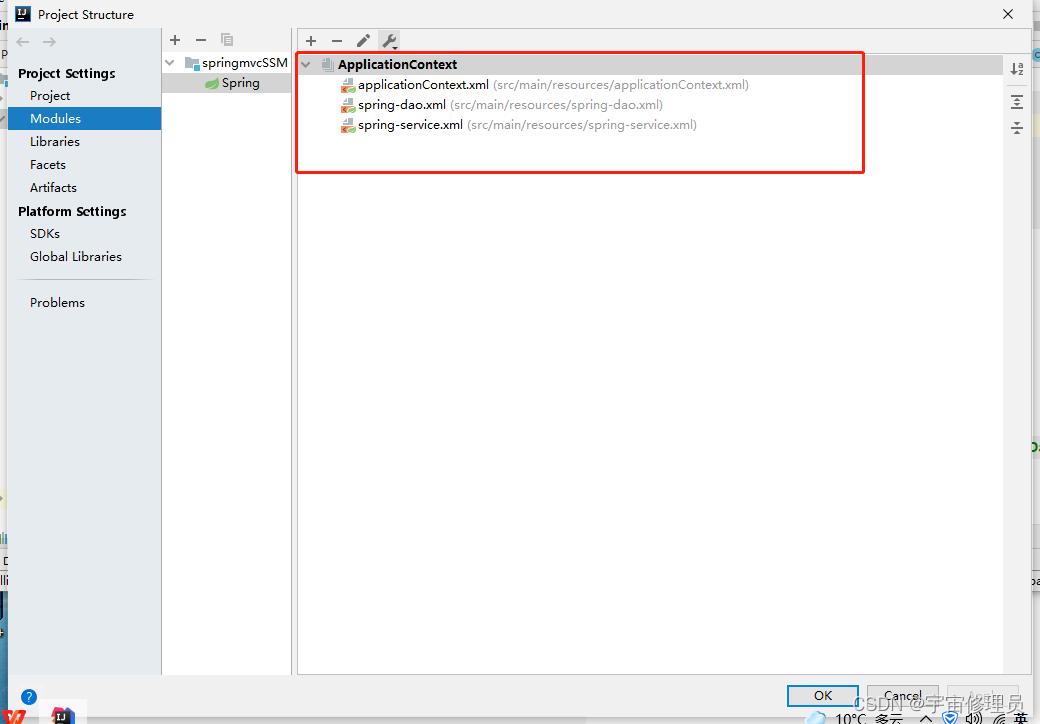
用IDEA自动产生关联的方法:
File-----Project Settings:将spring-dao.xml和spring-service.xml放在同一个上下文中。
-
在resources中新建files:application Context.xml使用import方法
<?xml version="1.0" encoding="UTF-8"?>
<beans xmlns="http://www.springframework.org/schema/beans"
       xmlns:xsi="http://www.w3.org/2001/XMLSchema-instance"
       xsi:schemaLocation="http://www.springframework.org/schema/beans
        http://www.springframework.org/schema/beans/spring-beans.xsd">

   <!--
   关联方式(两种):
        1.IDEA帮忙:放在同一个上下文中context
        2. import
   -->
	<import resource="classpath:spring-dao.xml"/>
    <import resource="classpath:spring-service.xml"/>
</beans>