绘制图形文字:
绘图函数包括:直线、矩形、圆、椭圆、文字 等。
1. 绘制直线:
img = cv2.line (img, pt1, pt2, color, thickness)
pt1:左上角为0点开始,起始点。
pt2:左上角为0点开始,终止点。
color:线条颜色。
thickness:线条的粗细。
上代码:
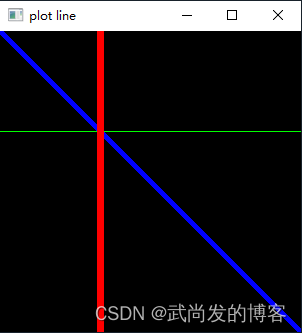
import numpy as np
import cv2

n = 300
img = np.zeros((n+1,n+1,3), np.uint8) # 绘制背景:这个3是表示是三维数组的意思,如果是灰色图像则不用写3。三维数组指的是彩色图像
img = cv2.line(img,(0,0),(n,n),(255,0,0),3) # 绘制直线(pt1x,pt1y,pt2x,pt2y,color,thickness)
img = cv2.line(img,(0,100),(n,100),(0,255,0),1)
img = cv2.line(img,(100,0),(100,n),(0,0,255),6)

cv2.imshow('plot line', img)
cv2.waitKey(0)
cv2.destroyAllWindows()
运行:
2. 绘制矩形:
img = cv2.rectangle(img, pt1, pt2, color, thickness)
pt1:左上角为0点开始,起始点。
pt2:左上角为0点开始,矩形对角点。
color:线条颜色。
thickness:线条的粗细。
上代码:
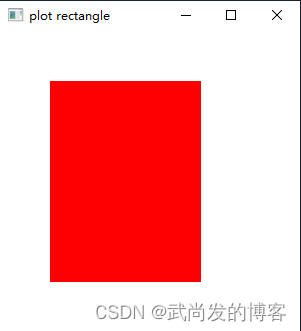
import numpy as np
import cv2

n = 300
img = np.ones((n,n,3), np.uint8)*255 #*255表示将背景色由黑色反转为白色
img = cv2.rectangle(img,(50,50),(n-100,n-50),(0,0,255),-1) # 笔粗为-1表示填充色

cv2.imshow('plot rectangle', img)
cv2.waitKey(0)
cv2.destroyAllWindows()
运行:
3. 绘制圆形:
img = cv2.circle(img, center, radius, color, thickness)
center:圆心坐标。
radius:半径。
上代码:
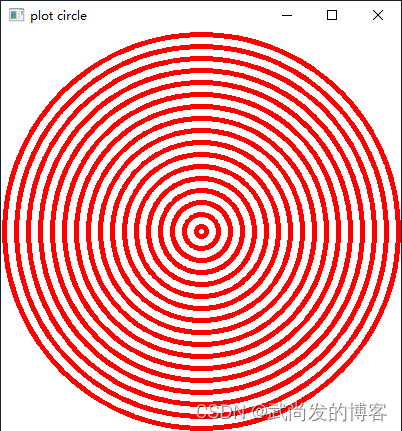
import numpy as np
import cv2

d = 400
img = np.ones((d,d,3),dtype="uint8")*255 # 白色画布

# round:表示四舍五入
# x,y=img的尺寸的一半,img尺寸的一半
(centerX,centerY) = (round(img.shape[0] / 2),round(img.shape[0] / 2))

# 5到d/2,每次递增12,第一次r=2,第二次r=5+12=17,第三次r=17+12=29.....
for r in range(5,round(d/2),12):
    cv2.circle(img,(centerX,centerY),r,(0,0,255),3) # circle(载体图像,圆心,半径,颜色)

cv2.imshow("plot circle",img)
cv2.waitKey(0)
cv2.destroyAllWindows()
运行:
4. 绘制椭圆:
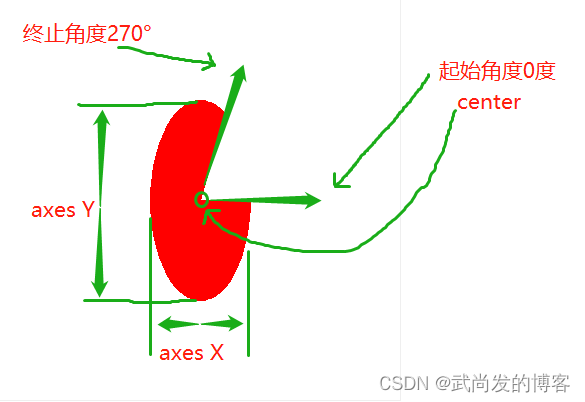
img = cv2.ellipse(img, center, axes, angle, startAngle, endAngle, color, thickness)
center:圆心坐标。
axes:轴的长度。
angle:椭圆长度方向的角度。
startAngle:圆弧起始角角度。
endAngle:圆弧终止角角度。
上代码:
import numpy as np
import cv2

d = 400
img = np.ones((d,d,3),dtype="uint8")*255
#生成白色背景
center=(round(d/2),round(d/2))

size=(50,100) # x方向50,y方向100
cv2.ellipse(img, center,size, 0, 0, 300, (0,0,255),-1)

cv2.imshow("plot ellipse",img)
cv2.waitKey(0)
cv2.destroyAllWindows()
运行:
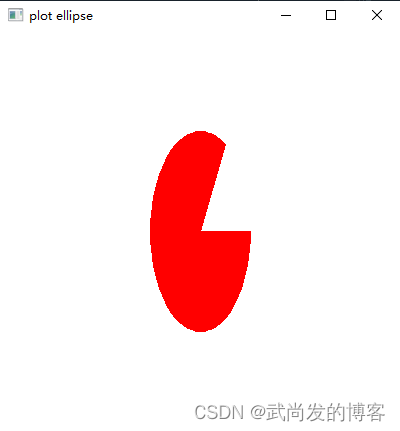
分析:
5. 绘制多边形:
img = cv2.polylines(img, pts, isClosed, color, thickness)
pts:为多边形的各个顶点。
isClosed:如果为true则第一个点与最后一个点将连接,否则只连接各个点成一条曲线。
上代码:
import numpy as np
import cv2

d = 400
img = np.ones((d,d,3),dtype="uint8")*255 # 生成白色背景

#生成各个顶点,注意数据类型为int32
pts=np.array([[200,50],[300,200],[200,350],[100,200]], np.int32)

# 注意这里的pts是数组
cv2.polylines(img,[pts],True,(0,255,0),8) # 多边形封闭

# cv2.polylines(img,[pts],False,(0,255,0),8) # 不闭合的的多边形

cv2.imshow("plot polygon",img)
cv2.waitKey(0)
cv2.destroyAllWindows()
运行:
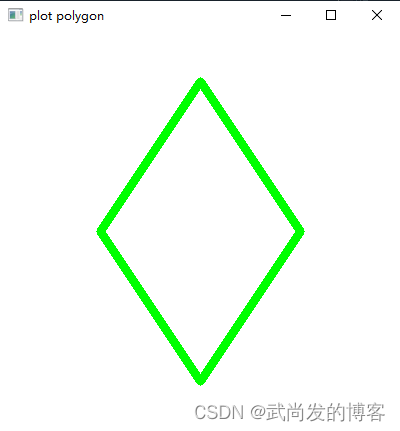
不闭合的多边形:

6. 绘制文字:
img = cv2.putText(img,text, org, fontFace, fontScale, color, thickness)
- text:要绘制的字符串。
- org:要绘制字体的坐标(以左下角为起点)。
- fontFace:字体类型。
cv2.FONT_HERSHEY_SIMPLEX:正常大小的sans-serif字体。
cv2.FONT_HERSHEY_PLAIN:小号的sans-serif字体。
cv2.FONT_HERSHEY_DUPLEX:正常大小的sans-serif字体(比FONT_HERSHEY_
SIMPLEX字体样式更复杂)。
cv2.FONT_HERSHEY_COMPLEX:正常大小的serif字体。
cv2.FONT_HERSHEY_TRIPLEX:正常大小的serif字体(比FONT_HERSHEY_COMPLEX
字体样式更复杂)。
cv2.FONT_HERSHEY_COMPLEX_SMALL:FONT_HERSHEY_COMPLEX字体样式的的简化版。
cv2.FONT_HERSHEY_SCRIPT_SIMPLEX:手写风格的字体。
cv2.FONT_HERSHEY_SCRIPT_COMPLEX:FONT_HERSHEY_SCRIPT_SIMPLEX字体样式的进阶版。
cv2.FONT_ITALIC:斜体。 - fontScale:字体大小。
上代码:
import numpy as np
import cv2
h = 400
w = 800
img = np.ones((h,w,3),dtype="uint8")*255 # 生成白色背景

font=cv2.FONT_HERSHEY_SIMPLEX
cv2.putText(img,'Give you color see see',(20,200),font, 2,(0,0,255),15)# 字体粗15
cv2.putText(img,'Give you color see see',(20,200),font, 2,(0,255,0),5)# 字体粗5,就可以绘制出字体边缘效果

cv2.imshow("plot string",img)
cv2.waitKey(0)
cv2.destroyAllWindows()
运行:

感谢路过,记得点关注点赞哦!谢谢啦。。。