在短短的两个星期内,ChatGPT 迅速成为公众聊天的焦点。超过一百万的人与OpenAI的新聊天机器人“交谈”,让它写诗和大学论文,生成创意食谱,创建虚拟机…它也被用来撰写新闻文章和YouTube视频的介绍。
作为计算机视觉公司的机器学习工程师,我在过去的几天里一直尝试了解 ChatGPT 对 CV 了解的极限。我想知道这种语言模型对该领域的未来(和现在)意味着什么。
该帖子分为 5 个部分:
什么是ChatGPT?
ChatGPT擅长的地方
面临的挑战
在哪些方面需要极度谨慎
为什么可以为 ChatGPT 授予CV工程师
什么是ChatGPT?
ChatGPT 于2022年11月30日发行,是OpenAI的最新产品。像GPT1,GPT2,GPT3和指令之前一样,ChatGPT是一种Generative PretrainTed Transformer(GPT)模型,这是一种具有“self - attention”概念的语言模型,它允许该模型灵活地识别哪些部分是有效输入。
大语言模型(LLMs)经过大量文本数据(例如书籍和文章)的训练,以了解人类语言的模式和结构。这使他们能够生成听起来更符合人类讲话习惯的文本,从而使它们对于语言翻译类和问答类等任务非常有效。
在过去的几年中,LLMs一直在迅速增长。这些模型的规模成倍增加:尽管2017年推出的第一个 Transformer 模型具有6500万个参数 —— GPT3,直到2021年中,仍具有1750亿个参数。随着它们规模的增大,其表达能力也迅速加强。ChatGPT 是在更新版本的GPT3的最新版本中创建的,称为GPT3.5。这种巨大的表达能力以及对其进行训练的数据(大概与GPT3相似),使得 ChatGPT 如此有能力理解包括各种人类和编程语言,数字方程式和和弦的输入。
作为一种生成模型,ChatGPT是专门设计的,旨在根据其从训练数据中学到的模式创建新文本。聊天机器人不仅可以及时给出响应,而且还能够集成用户提供的反馈,以更好地完成所需的任务。当然,这不是完美的,但是此功能为一系列交互式应用打开了新的大门。
仅供参考:本节中的三个句子由Chatgpt撰写。我会让你猜测哪一个!
ChatGPT擅长的地方
据我所知,ChatGPT 在计算机视觉应用程序方面,比较可靠的主要有三类:commonplace code,dressed individual method calls 和 clean concatenations of simple components。ChatGPT对这三个类别中任何一个中的查询的回答都比较令人满意。我将举例说明每个例子。
commonplace code
这应该不足为奇,但是一个接受过包括文本和代码在内的大型语料库训练的生成模型,通常非常擅长生成频繁出现且在互联网上几乎没有变化的代码块。当基于代码的解决方案基本上是规范的(并且可能在训练数据中无处不在)时,ChatGPT 的概率偏好将以很高的概率生成经过验证的真实结果。
这方面的两个例子包括在信号处理和计算机视觉(以及其他领域)中无处不在的快速傅里叶变换(FFT) :
import numpy as np


def fft(x):
    """Compute the discrete Fourier Transform of the 1D array x"""
    x = np.asarray(x, dtype=float)
    N = x.shape[0]


    if N <= 1:  # base case
        return x


    # split the array into even and odd components
    even = fft(x[0::2])
    odd = fft(x[1::2])


    # compute the FFT of the even and odd components
    T = [np.exp(-2j*np.pi*k/N)*odd[k] for k in range(N//2)]
    return np.concatenate([even + T, even - T])
池化层,这是所有卷积神经网络必不可少的组成部分(CNN):
def min_pooling(inputs, pool_size):
    # Get the dimensions of the input array
    n_rows, n_cols, n_channels = inputs.shape

    # Calculate the size of the output array
    out_rows = n_rows // pool_size
    out_cols = n_cols // pool_size

    # Create an empty array to store the output
    outputs = np.zeros((out_rows, out_cols, n_channels))

    # Iterate over the input array and compute the output
    for r in range(out_rows):
        for c in range(out_cols):
            for k in range(n_channels):
                # Extract a patch of the input array
                patch = inputs[r*pool_size:(r+1)*pool_size, c*pool_size:(c+1)*pool_size, k]

                # Compute the min of the patch
                outputs[r, c, k] = np.min(patch)

    return outputs
当然,这些实现并不总是有效的,比如上面的 min _ pool() 函数,它使用嵌套的 for 循环。对于像 ChatGPT 这样的半黑盒人工智能模型,我们并不总是清楚这种解决方案是为了方便而有意选择的,或者它真的选择了它认为是最优的解决方案。在这样的场景中,您可以使用 ChatGPT 以反馈为导向的特性来请求改进。例如,在共享的情况下,可以指示 ChatGPT 并行化代码或向量化 for 循环。知道要求哪些改进是绝对必要的!
Dressed method calls
同样,ChatGPT 对所有常见的机器学习和计算机视觉库(直到2021年)都有很好的掌握,包括 PyTorch、 TensorFlow、 Scikit-learn、 PIL、 Skimage 和 OpenCV。当聊天机器人可以调用这些库中修饰方法进行适当的预处理步骤(如输入输出处理、将彩色图像转换为灰度以及 reshape 数组),可以处于最佳状态。
这方面的一些例子,从最简单到最复杂,都在锐化图像:
from PIL import Image, ImageFilter


# Open the image
im = Image.open('image.jpg')


# Apply a sharpening filter
sharpened_im = im.filter(ImageFilter.SHARPEN)


# Save the sharpened image
sharpened_im.save('sharpened_image.jpg')
使用 Otsu 阈值:
from skimage import io
from skimage.filters import threshold_otsu


# Load the image
image = io.imread('image.png')


# Convert the image to grayscale
gray_image = np.mean(image, axis=2)


# Calculate the Otsu threshold
threshold = threshold_otsu(gray_image)


# Apply the threshold to the image to create a binary image
binary_image = gray_image > threshold
并计算一组图像的 tail-distributed stochastic neighbor(t-SNE):
import numpy as np
from scipy.spatial.distance import pdist, squareform
from sklearn.manifold import TSNE
from scipy.spatial.distance import pdist, squareform
from PIL import Image


def tsne(images, perplexity=30.0, learning_rate=200.0, n_components=2):
    # Convert the images to grayscale
    grayscale_images = [np.array(image.convert('L')) for image in images]


    # Stack the grayscale images into a single array
    stacked_images = np.stack(grayscale_images)


    # Flatten the stacked images into a single array
    flattened_images = stacked_images.reshape(len(images), -1)


    # Compute the pairwise distances between the flattened images
    distances = squareform(pdist(flattened_images, 'euclidean'))


    # Compute the low-dimensional embedding of the images using t-SNE
    tsne = TSNE(perplexity=perplexity, learning_rate=learning_rate, n_components=n_components, init='random')
    embedding = tsne.fit_transform(distances)


    return embedding
不幸的是,ChatGPT 并不熟练,甚至不熟悉新的CV库,比如 FiftyOne。
Concatenating simple components
虽然 ChatGPT 的行为肯定是非理性的,但是模型具有基本的逻辑功能,可以将多个(简单的)输入合成到复合输出中:只需向 ChatGPT 询问表单中的一些问题
“ X 和 Y 有什么共同点”?
例如,我要求 ChatGPT 执行以下操作:
”编写代码将两个图像的大小调整为(100,200) ,将数据集增加6个图像,将所有输入图像合并为一个图像,然后将所有图像绘制在一个网格中。把这个提示写在第三个图上“
它的解决方案是这样:
import matplotlib.pyplot as plt
from skimage import io, transform
from skimage.util import random_noise


# load and resize images
img1 = io.imread("image1.png")
img1 = transform.resize(img1, (100, 200))
img2 = io.imread("image2.png")
img2 = transform.resize(img2, (100, 200))


# augment dataset with 6 additional images
augmented_imgs = []
for i in range(6):
    augmented_imgs.append(random_noise(img1))
    augmented_imgs.append(random_noise(img2))


# blend images
blended_img = img1 * 0.5 + img2 * 0.5
for img in augmented_imgs:
    blended_img += img * 0.5 / len(augmented_imgs)


# plot all images in a grid
fig, ax = plt.subplots(nrows=3, ncols=3)
ax[0, 0].imshow(img1)
ax[0, 1].imshow(img2)
ax[0, 2].imshow(blended_img)
for i in range(6):
    ax[1 + i // 3, i % 3].imshow(augmented_imgs[i])


# add text to third plot
ax[0, 2].set_title("Resized, augmented, and blended images")
令人惊奇的其他地方
它也能够毫无问题地完成其他任务包括:
1. 在三维点云上执行分割(使用 DBSCAN)
2. 使用 DeOldify 恢复旧图像的颜色
3. 在视频中执行目标跟踪
面临的挑战
在经过和 ChatGPT 进行有关”计算机视觉“任务的交流之后,似乎仍然存在之前反复出现的问题:long-tail scenarios, mathy manipulations, 和 expansive code blocks。与前一节一样,我将给出每个例子。
Long tail
在任何领域,都会有各种各样的任务,这些任务是某些子领域的主要内容,但是与用于训练 LLMs 的庞大语料库中更常见的主题相比,它们相形见绌。ChatGPT 在这些领域有相当一部分的问题,并且在小众主题上提示时对细节非常敏感。
这方面的一个例子是 3D 计算机视觉,这是一个小但强大的子领域计算机视觉涉及三维空间数据。ChatGPT 有关于点云的工作知识,
“点云是 3D 空间中的一组点,代表一个物体的表面。点云中的每个点都由它的 3D 坐标(x,y 和 z)定义,还可能包括其他信息,如颜色或法向量。点云通常用于计算机视觉和 3D 建模应用”
当我要求它“编写代码来定义作用于点云的 PointNet 体系结构”时,它的回复包括 symmetric max pooling 函数,该函数允许模型直接作用于非结构化的点云数据。
import tensorflow as tf


# Define the input layer
input_layer = tf.keras.layers.Input(shape=(None, 3))


# Use a shared MLP to process the input point cloud
mlp1 = tf.keras.layers.Dense(64, activation="relu")
mlp2 = tf.keras.layers.Dense(64, activation="relu")
mlp3 = tf.keras.layers.Dense(64, activation="relu")
x = mlp1(input_layer)
x = mlp2(x)
x = mlp3(x)


# Use max pooling to get the features of the entire point cloud
global_features = tf.keras.layers.GlobalMaxPooling1D()(x)


# Use a fully connected layer to predict the output
output_layer = tf.keras.layers.Dense(units=1, activation=None)(global_features)


# Create the model
model = tf.keras.Model(inputs=input_layer, outputs=output_layer)
”这段代码定义了一个 PointNet 体系结构,它接受一个点云作为输入,并使用一个共享的多层感知器(MLP)来独立处理每个点。然后,每个点的 MLP 输出通过一个全局最大池化层传递,该层提取整个点云的特征。最后,根据点云的全局特征,采用一个全连接层来预测输出。
这只是 PointNet 体系结构的一种可能的实现,根据项目的具体需求,可以对体系结构进行许多不同的变化和修改。”
当我只提示 ChatGPT“为 PointNet 模型体系结构编写代码”(省略了点云的明确提示)时,我得到的回应如下:
import torch
from torch import nn


class PointNet(nn.Module):
  def __init__(self):
    super(PointNet, self).__init__()


    # define the neural network layers
    self.fc1 = nn.Linear(3, 64)
    self.fc2 = nn.Linear(64, 64)
    self.fc3 = nn.Linear(64, 64)
    self.fc4 = nn.Linear(64, 128)
    self.fc5 = nn.Linear(128, 1024)
    self.fc6 = nn.Linear(1024, 512)
    self.fc7 = nn.Linear(512, 256)
    self.fc8 = nn.Linear(256, 128)
    self.fc9 = nn.Linear(128, 64)
    self.fc10 = nn.Linear(64, 10)


  def forward(self, x):
    # apply the neural network layers to the input point cloud
    x = F.relu(self.fc1(x))
    x = F.relu(self.fc2(x))
    x = F.relu(self.fc3(x))
    x = F.relu(self.fc4(x))
    x = F.relu(self.fc5(x))
    x = F.relu(self.fc6(x))
    x = F.relu(self.fc7(x))
    x = F.relu(self.fc8(x))
    x = F.relu(self.fc9(x))
    x = self.fc10(x)
    return x
”此代码定义一个从 nn.Module 扩展的 PointNet 类。PointNet 类定义了一个具有10个全连接层的神经网络,这些层在该类的 __init__ 方法中定义。forward 方法将这些层应用于输入点云并返回模型的输出。
要使用 PointNet 模型,我们将创建 PointNet 类的一个实例,然后在输入点云上调用 forward 方法。模型的输出将是一个形状为 (1,10) 的张量,其中包含了模型对输入点云的预测”。
Math manipulations get messy
虽然 ChatGPT 能够解决令人惊讶的独立数学问题,甚至能够生成自己的证明,但是聊天机器人却很难将多行数学代码串在一起。例如,当被要求在不使用计算机视觉库的情况下实现 Otsu 阈值或霍夫变换时,ChatGPT 就会失败。
Otsu 阈值:
def otsus_method(img):
    # calculate histogram of grayscale values
    histogram = np.zeros(256)
    for i in range(img.shape[0]):
        for j in range(img.shape[1]):
            histogram[img[i, j]] += 1

    # normalize histogram
    histogram = histogram / img.size

    # calculate cumulative sum of normalized histogram
    cumulative_sum = np.cumsum(histogram)

    # calculate cumulative sum of squares of normalized histogram
    cumulative_sum_of_squares = np.cumsum(histogram ** 2)

    # initialize variables
    optimal_threshold = 0
    max_variance = 0

    # iterate over all possible threshold values
    for i in range(256):
        # calculate background and foreground probabilities
        p_background = cumulative_sum[i]
        p_foreground = 1 - p_background

        # calculate means
        mean_background = np.sum(np.arange(256) * histogram[:i+1]) / p_background
        mean_foreground = np.sum(np.arange(i+1, 256) * histogram[i+1:]) / p_foreground

        # calculate between-class variance
        variance = p_background * p_foreground * (mean_background - mean_foreground) ** 2

        # update optimal threshold if necessary
        if variance > max_variance:
            max_variance = variance
            optimal_threshold = i

    return optimal_threshold
运行 ChatGPT 生成的 Otsu 阈值代码后抛出错误
霍夫变换:
def hough_transform(img, theta_resolution=1, rho_resolution=1):
    # convert image to grayscale
    img = cv2.cvtColor(img, cv2.COLOR_BGR2GRAY)

    # detect edges in the image using Canny edge detection
    edges = cv2.Canny(img, 50, 200)

    # create accumulator array with dimensions determined by theta and rho resolutions
    theta = np.linspace(-90, 90, 180 // theta_resolution)
    rho = np.linspace(-np.sqrt(2) * img.shape[0], np.sqrt(2) * img.shape[0], 2 * np.sqrt(2) * img.shape[0] // rho_resolution)
    accumulator = np.zeros((len(theta), len(rho)))

    # find non-zero edge pixels in the image
    y_idxs, x_idxs = np.nonzero(edges)

    # convert x and y indices to cartesian coordinates
    points = np.stack([x_idxs, y_idxs], axis=1)

    # iterate over all edge points
    for x, y in points:
        # iterate over all theta values
        for i, t in enumerate(theta):
            # calculate rho for current theta value
            r = x * np.cos(t) + y * np.sin(t)

            # find closest rho value and increment corresponding accumulator bin
            j = np.argmin(np.abs(rho - r))
            accumulator[i, j] += 1

    return accumulator, theta, rho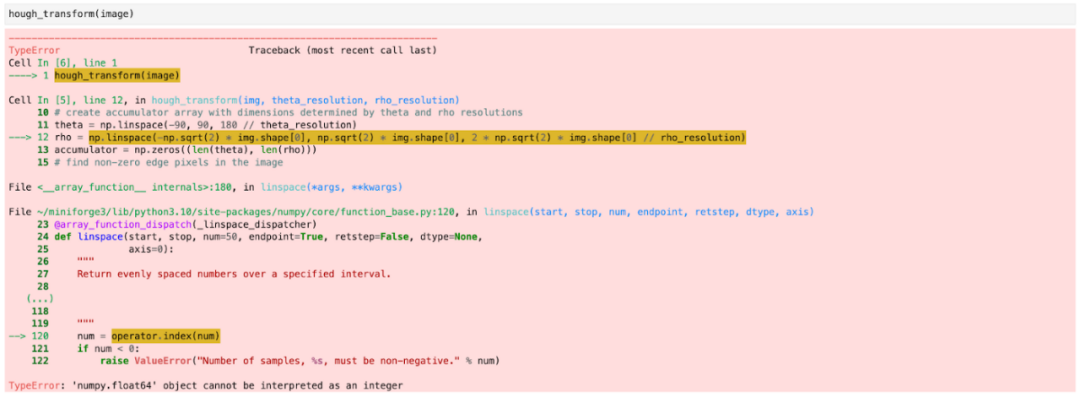
运行 ChatGPT 生成的 Hough 转换代码后引发的错误
在许多情况下,高级逻辑流并不一定是错误的,或者至少不会太离谱。相反,在某行代码上的调整,可能会引起上下文代码的冲突:当 Otsu 阈值代码试图将不兼容形状的操作数一起进行广播操作时,它失败了。
其中一些数学错误很容易纠正,无论是通过将 int 转换为 float,还是重写代码。其他时间,这些表面上的错误可能掩盖了更多潜在的问题。如果您打算使用 ChatGPT 处理这些类型的问题,请谨慎处理。可以让 ChatGPT 编写的代码越模块化越好。
Expansive solutions breed errors
这可能不会太令人惊讶,但是生成的代码越多,就越有可能出现错误(或多个错误)。毕竟,人们可以很容易地争辩说,人类是一样的。对于 Transformer 模型,一个众所周知的问题是,随着输出中“块”数的增加,相干性(和模型性能)降低。包含计算机视觉代码的块也不例外。
例如,当我要求 ChatGPT“从头开始实现光学字符识别(OCR)”时,该模型无可挽回地失败了。这次失败与其说是一系列可以理解的数学错误,不如说是一个完全的混乱。
当然,这并不意味着 ChatGPT 无法执行 OCR。
当我提示聊天机器人“应用光学字符识别”时,它表明至少它知道如何在 pytesseract 中使用相关方法:
import pytesseract


# Load the license plate image
# image = cv2.imread("license_plate.png")


# Convert the image to grayscale
gray = cv2.cvtColor(image, cv2.COLOR_BGR2GRAY)


# Apply Otsu's thresholding to binarize the image
threshold, binary = cv2.threshold(gray, 0, 255, cv2.THRESH_BINARY+cv2.THRESH_OTSU)


# Use Tesseract to perform OCR on the license plate image
text = pytesseract.image_to_string(binary, lang="eng")


# Print the recognized text
print(text)
当 ChatGPT 在 PyTorch、 TensorFlow 或 Sklearn 构建神经网络时,这个问题经常会暴露出来,在这些网络中,它可能会以一种无法完成任何使用任务的方式将一系列层串在一起。
在哪些方面需要极度谨慎
前三个类别只是触及了计算机视觉中使用 ChatGPT 可能出现问题的表面。在某些方面,人工智能也可能会给你错得离谱的答案。
当我请求 ChatgPT 给我“10个最佳目标检测模型的推断时间年份”时,我得到了下面回应:
# Define the names and years of the 10 best object detection models
model_names = ["Faster R-CNN", "YOLOv3", "SSD", "RetinaNet", "Mask R-CNN", "R-FCN", "SSD with FPN", "YOLOv4", "Grid R-CNN", "FCOS"]
model_years = [2015, 2018, 2016, 2017, 2017, 2016, 2017, 2020, 2019, 2019]


# Define the inference times of the 10 best object detection models (in milliseconds)
model_inference_times = [100, 30, 20, 40, 60, 50, 25, 15, 35, 45]
粗略一看,这似乎相当可信。这些模型在目标检测上都相当有名ーー而且“最佳”在某种程度上有些主观。年份也核实过了。所有这些都在推理时间上出现了问题。这些时间来自不同的来源,都有不同的条件和假设。ChatGPT 的回应让人觉得他们可以把苹果比作苹果,这显然是错误的。
问一个关于推理时间这种模糊问题是一个糟糕的开始。但是,即使是更好的问题也可能给出错误的答案。
同样,每当 ChatGPT 给出没有作为示例显式给出的特定数值时,您可能应该小心。有时候这些值是合适的,比如当它知道用给定的平均值和标准差规范化 AlexNet 时:
当我要求 ChatGPT 使用立体图像执行深度知觉时,它包含了一行代码,内容如下:
transforms.Normalize(mean=[0.485, 0.456, 0.406], std=[0.229, 0.224, 0.225]当被问及为什么选择这些值时,它回应:
# Calculate the depth of each pixel
depth = 9.0 * 0.54 / (disparity + 0.00001)
“这个公式利用立体相机系统的已知参数,例如基线(两个相机之间的距离)和焦距,将视差值(左右图像中像素水平位置的差异)转换为深度值。”
这个公式中使用的特定值(9.0和0.54)只是示例,它们可能不适用于所有的立体相机系统。一般来说,根据视差计算深度的公式是:
depth = baseline * focal_length / (disparity + epsilon)其中 baseline 是两个摄像机之间的距离,focal_length 是摄像机的焦距,disparity 是从立体图像中计算出来的视差图,epsilon 是用来避免被零除的一个小值。这些参数的值将取决于您所使用的特定立体摄像系统”。
另一个值得关注的领域是数据集和模型质量的评估。当被要求编写“评估图像数据集的质量和多样性”的代码时,ChatGPT 给出了以下代码:
import os
from PIL import Image
from sklearn.neighbors import NearestNeighbors


# Define the path to the dataset directory
dataset_dir = './dataset'


# Load the images in the dataset
images = []
for filename in os.listdir(dataset_dir):
    # Load the image
    image = Image.open(os.path.join(dataset_dir, filename))


    # Convert the image to grayscale and resize it to a fixed size
    image = image.convert('L').resize((128, 128))


    # Add the image to the list of images
    images.append(image)


# Flatten the images into a single array
flattened_images = np.stack([np.array(image) for image in images]).reshape(len(images), -1)


# Compute the nearest neighbors of the flattened images
nbrs = NearestNeighbors(n_neighbors=5).fit(flattened_images)
distances, indices = nbrs.kneighbors(flattened_images)


# Compute the mean and standard deviation of the distances to the nearest neighbors
mean_distance = np.mean(distances[:, 1:])
std_distance = np.std(distances[:, 1:])


print('Mean distance to nearest neighbor:', mean_distance)
print('Standard deviation of distances:', std_distance)
同时还附上了一个说明:
”在本例中,images 变量是数据集中的图像列表。首先从磁盘上的文件加载图像,然后使用 PIL.Image 模块中的 Convert 和 resize 方法将图像转换为灰度并调整到固定大小。然后使用堆栈和从数字模块重塑图像形状的方法将图像压平成一个单独的数组。nbrs 变量使用来自 skLearn.friends 模块的 NearestNeighbors 类计算图像的最近邻。mean_distance 和 std_distance 变量计算到最近邻的距离的均值和标准差,这可以作为衡量数据集质量和多样性的指标。平均距离越短,标准差越高,说明数据集的质量越高,种类也越多。”
尽管这种方法并不一定是错误的,或者在技术上是错误的,但它至少是非常简单的。
当我要求 ChatGPT 计算一个图像数据集中的分布偏移时,我得到了一个类似的令人沮丧的答案,它对原始像素值使用了 t 检验(一个只比较两组样本平均值的检验)。你也可以看到,ChatGPT 试图计算两组图像之间的均方差,这只有在图像大小相同的情况下才有意义,但是我们在这里会给聊天机器人一点怀疑的余地,然后继续下一步。
# Import necessary libraries
import numpy as np
from scipy.stats import ttest_ind
from sklearn.metrics import mean_squared_error


# Load the original and new datasets
original_data = ...
new_data = ...


# Calculate the mean squared error between the original and new images
mse = mean_squared_error(original_data, new_data)


# Use a t-test to compare the means of the original and new datasets
t, p = ttest_ind(original_data, new_data)


# Print the results
print("Mean squared error:", mse)
print("T-test results: t =", t, "p =", p)


# If the mean squared error is large and the t-test p-value is small,
# this indicates a significant distribution shift in the data
计算机器学习中的分布变化通常是一个困难的问题,但至少对各种类型的可能变化的基本理解是标准的,有多种比应用 t 检验更微妙的方法。
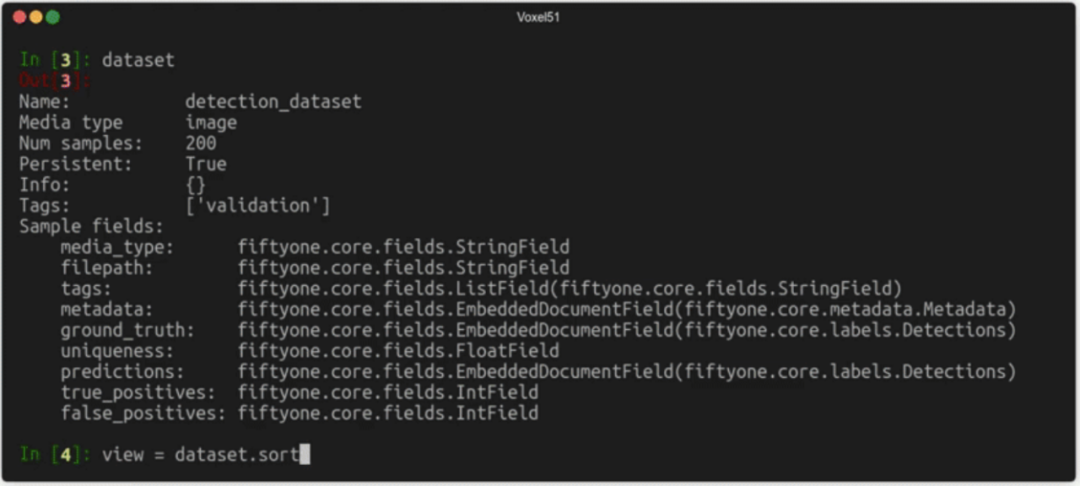
最后一个例子是有启发性的:我提示 ChatGPT“计算我的模型被给予一组基本真值、预测和预测置信度得分的错误程度”,它的回答的关键是“你可以使用一个像准确度或精确度这样的度量来衡量你的模型的表现”,这完全错过了分数,而且根本没有使用置信度得分。作为参考,在开源计算机视觉库 FiftyOne 中,可以通过调用 dataset.cdomputer_mistakenness() 为 dataset 数据集计算这种类型的数量。
为什么可以为 ChatGPT 授予CV工程师
然而,尽管有这些缺点,ChatGPT 仍然可以成为计算机视觉领域的一股力量。至少这是一个人的观点。
您可能已经注意到了我所包含的示例中的一个主题。ChatGPT 是一个工具,可以帮助计算机视觉工程师和从业人员更有效地完成他们的工作。这是一个非常强大的工具,也可以是相当”危险“的。就像任何工具一样,它的好坏取决于它的使用者如何使用。
从编程的角度来看,和许多优秀的人类工程学能够产生优秀的机器生成代码的原则是相同的:以模块化设计为目标,如果可能的话将高级任务分解为多个部分,利用现有的库而不是重造轮子。
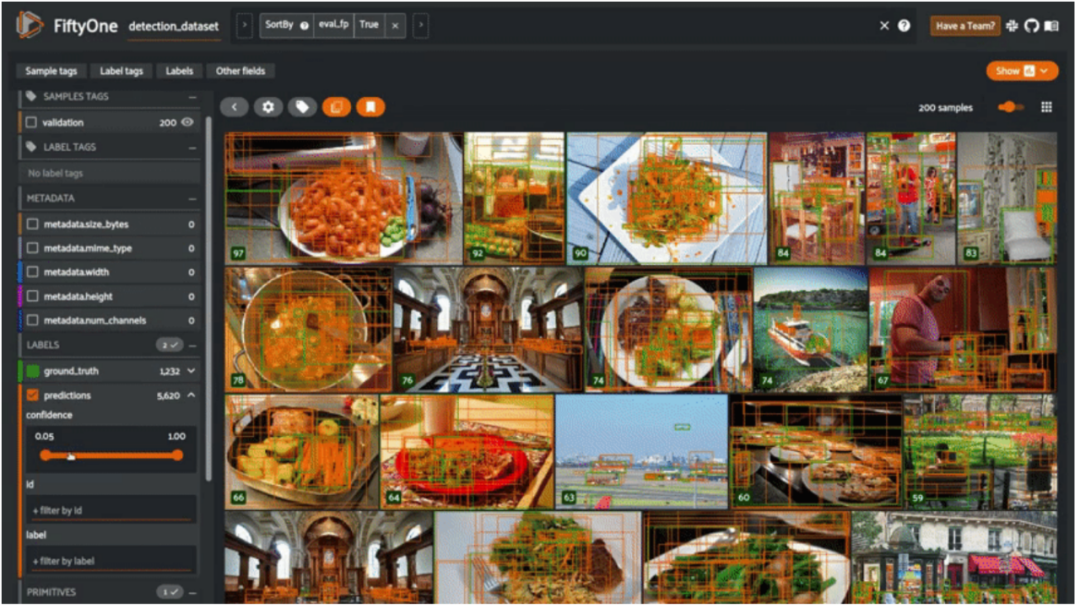
如果使用得当,ChatGPT 可以帮助CV工程师更快地编写CV代码,使人们可以利用 Scale、 V7和 Voxel51等公司的工具集,专注于建立高质量的数据集和评估机器学习模型等重要任务。
计算机视觉工具集
FiftyOne 是由 Voxel51开发的一个开源机器学习工具集,它使数据科学团队能够通过帮助他们管理高质量的数据集,评估模型,发现错误,可视化嵌入,更快地进入生产,从而提高他们的计算机视觉模型的性能。
· END ·
HAPPY LIFE
