参考视频(编程不良人)
注销登录
默认情况下,如果我们已经登录了,然后get方式访问/logout接口就会注销登录,下次再访问受限资源就会提示我们重新登录。
我们可以在ss过滤器的配置里面添加下面的配置
.and()
                .logout()
                .logoutUrl("/logout")//指定注销登录的接口,默认就是get方式
                .invalidateHttpSession(true)//是否让当前的session失效
                .clearAuthentication(true)//清除认证标记
                .logoutSuccessUrl("")//可以指定退出登录之后跳转的路径
默认的注销的方式是get,我们可以配置其他的注销的方式。
.and()
                .logout()
//                .logoutUrl("/logout")//指定注销登录的接口
                .logoutRequestMatcher(new OrRequestMatcher(
                        new AntPathRequestMatcher("/aa","GET"),
                        new AntPathRequestMatcher("/bb","POST")
                ))
                .invalidateHttpSession(true)//是否让当前的session失效
                .clearAuthentication(true)//清除认证标记
                .logoutSuccessUrl("")//可以指定退出登录之后跳转的路径
前后端分离项目注销成功返回json消息
这个和前面的前后端分离项目实现的方式相同
继承类LogoutSuccessHandler重写方法
@Override
    public void onLogoutSuccess(HttpServletRequest request, HttpServletResponse response, Authentication authentication) throws IOException, ServletException {


        HashMap<String,Object> hashMap = new HashMap<>();
        hashMap.put("code",200);
        hashMap.put("msg","注销登录成功。");
        response.setContentType("application/json;charset=utf-8");
        String s = new ObjectMapper().writeValueAsString(hashMap);
        response.getWriter().write(s);
    }
配置里面
.and()
                .logout()
//                .logoutUrl("/logout")//指定注销登录的接口
                .logoutRequestMatcher(new OrRequestMatcher(
                        //指定注销登录的接口和方式
                        new AntPathRequestMatcher("/aa","GET"),
                        new AntPathRequestMatcher("/bb","POST")
                ))
                .invalidateHttpSession(true)//是否让当前的session失效
                .clearAuthentication(true)//清除认证标记
//                .logoutSuccessUrl("")//可以指定退出登录之后跳转的路径
                .logoutSuccessHandler(new MyAuthenticationHandler())
获取用户数据
对于已经认证的用户,如果我们在处理业务逻辑的时候需要用到用户的数据,这个时候我们怎么样才能获取到用户的数据呢?
针对于前后端分离的项目来说,只需要后端代码中获取即可。但是对于前后端在一起的传统的web项目而言,就稍微麻烦一点。
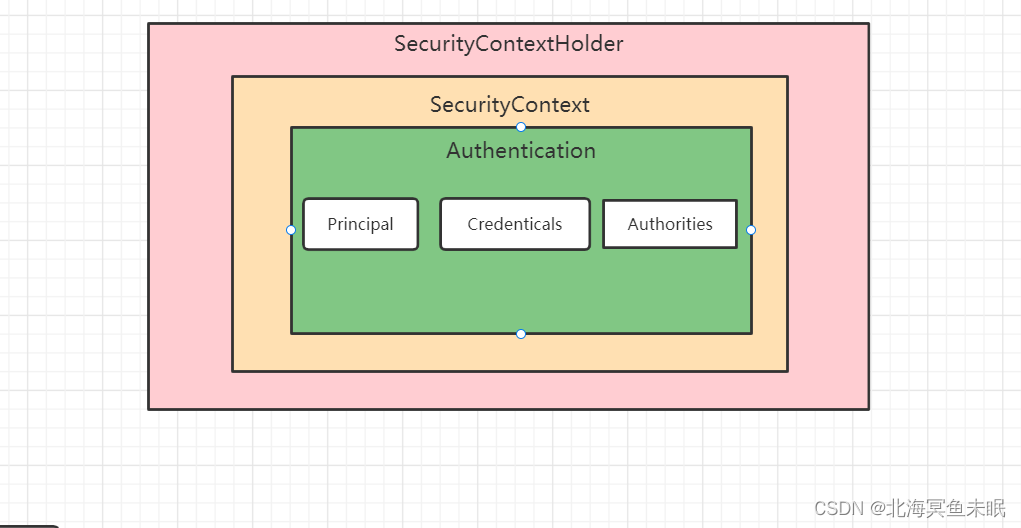
服务器会把用户的身份验证信息存放到session里面,默认session的存活时间是30min,如果用户携带sessionId发起请求,就会刷新session的存活时间。每次用户发起请求过来的时候都会从session中取出用户的身份信息放到SecurityContextHolder中,SecurityContextHolder中的数据保存是使用ThreadLocal来实现的。方便在该请求的后续过程中使用,同时在请求结束的时候将数据放回session中然后SecurityContextHolder中的数据清空。实际上SecurityContextHolder中存储的SecurityContext,SecurityContext中存储的是Authentication;
这里面就涉及到策略模式的使用了。
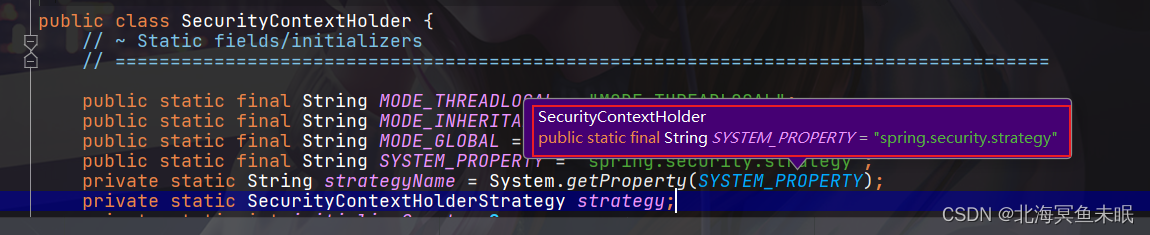
public class SecurityContextHolder {


	// ~ Static fields/initializers
	// =====================================================================================

	public static final String MODE_THREADLOCAL = "MODE_THREADLOCAL";
	public static final String MODE_INHERITABLETHREADLOCAL = "MODE_INHERITABLETHREADLOCAL";
	public static final String MODE_GLOBAL = "MODE_GLOBAL";
	public static final String SYSTEM_PROPERTY = "spring.security.strategy";
	private static String strategyName = System.getProperty(SYSTEM_PROPERTY);
	private static SecurityContextHolderStrategy strategy;
	private static int initializeCount = 0;

	static {


		initialize();
	}

	// ~ Methods
	// ========================================================================================================

	/**
	 * Explicitly clears the context value from the current thread.
	 */
	public static void clearContext() {


		strategy.clearContext();
	}

	/**
	 * Obtain the current <code>SecurityContext</code>.
	 *
	 * @return the security context (never <code>null</code>)
	 */
	public static SecurityContext getContext() {


		return strategy.getContext();
	}

	/**
	 * Primarily for troubleshooting purposes, this method shows how many times the class
	 * has re-initialized its <code>SecurityContextHolderStrategy</code>.
	 *
	 * @return the count (should be one unless you've called
	 * {@link #setStrategyName(String)} to switch to an alternate strategy.
	 */
	public static int getInitializeCount() {


		return initializeCount;
	}

	private static void initialize() {


		if (!StringUtils.hasText(strategyName)) {


			// Set default
			strategyName = MODE_THREADLOCAL;
		}

		if (strategyName.equals(MODE_THREADLOCAL)) {


			strategy = new ThreadLocalSecurityContextHolderStrategy();
		}
		else if (strategyName.equals(MODE_INHERITABLETHREADLOCAL)) {


			strategy = new InheritableThreadLocalSecurityContextHolderStrategy();
		}
		else if (strategyName.equals(MODE_GLOBAL)) {


			strategy = new GlobalSecurityContextHolderStrategy();
		}
		else {


			// Try to load a custom strategy
			try {


				Class<?> clazz = Class.forName(strategyName);
				Constructor<?> customStrategy = clazz.getConstructor();
				strategy = (SecurityContextHolderStrategy) customStrategy.newInstance();
			}
			catch (Exception ex) {


				ReflectionUtils.handleReflectionException(ex);
			}
		}

		initializeCount++;
	}

	/**
	 * Associates a new <code>SecurityContext</code> with the current thread of execution.
	 *
	 * @param context the new <code>SecurityContext</code> (may not be <code>null</code>)
	 */
	public static void setContext(SecurityContext context) {


		strategy.setContext(context);
	}

	/**
	 * Changes the preferred strategy. Do <em>NOT</em> call this method more than once for
	 * a given JVM, as it will re-initialize the strategy and adversely affect any
	 * existing threads using the old strategy.
	 *
	 * @param strategyName the fully qualified class name of the strategy that should be
	 * used.
	 */
	public static void setStrategyName(String strategyName) {


		SecurityContextHolder.strategyName = strategyName;
		initialize();
	}

	/**
	 * Allows retrieval of the context strategy. See SEC-1188.
	 *
	 * @return the configured strategy for storing the security context.
	 */
	public static SecurityContextHolderStrategy getContextHolderStrategy() {


		return strategy;
	}

	/**
	 * Delegates the creation of a new, empty context to the configured strategy.
	 */
	public static SecurityContext createEmptyContext() {


		return strategy.createEmptyContext();
	}

	@Override
	public String toString() {


		return "SecurityContextHolder[strategy='" + strategyName + "'; initializeCount="
				+ initializeCount + "]";
	}
}
从上面的源码中可以看到几种存储策略
MODE_THREADLOCAL:这种适合于没有多线程的情况,因为如果用户线程开启了子线程,在子线程中是获取不到用户的身份信息的。MODE_INHERITABLETHREADLOCAL:这种模式适合于多线程的情况,内部用的是InheritableThreadLocal类实现在子线程中也可以获取用户的身份数据。MODE_GLOBAL:这种模式是把用户的数据放到一个全局的静态变量里面。
获取用户的身份信息
@RequestMapping("/private/auth")
    public String getAuth(){


        Authentication authentication = SecurityContextHolder.getContext().getAuthentication();

        return authentication.toString();
    }
自定义存储策略
默认的模式就是ThrrealLocal实现的
测试用例
@RequestMapping("/private/auth")
    public String getAuth(){


        Authentication authentication = SecurityContextHolder.getContext().getAuthentication();
        System.out.println("父线程中获取");
        System.out.println(authentication.getPrincipal());//获取身份信息
        System.out.println(authentication.getAuthorities());//获取权限信息

       new Thread(new Runnable(){


            @Override
            public void run() {


                try {


                    Thread.sleep(200);
                } catch (InterruptedException e) {


                    e.printStackTrace();
                }
                System.out.println("子线程中获取");
                Authentication authentication1 = SecurityContextHolder.getContext().getAuthentication();
                System.out.println(authentication1.getPrincipal());//获取身份信息
                System.out.println(authentication1.getAuthorities());//获取权限信息
            }
        }).start();
        return authentication.toString();
    }
登录之后访问这个接口


可以看到子线程报空指针,也就是说子线程中获取的authentication是null。
通过上面的SecurityContextHolder源码我们发现
可以直接在参数里面指定策略。
在启动参数里面填写-Dspring.security.strategy=MODE_INHERITABLETHREADLOCAL

然后登录访问接口


可以看到这里的打印的子线程依然可以获取用户身份信息。
当然我们也可以在启动类里面设置
@SpringBootApplication
public class SpringBootTestApplication {


    public static void main(String[] args) {


        SpringApplication.run(SpringBootTestApplication.class, args);
        SecurityContextHolder.setStrategyName("MODE_INHERITABLETHREADLOCAL");
    }

}
这样同样可以实现上述的效果。
内部通过不同的接口实现SecurityContextHolderStrategy实现存储策略。里面只有四种方法。
/*
 * Copyright 2004, 2005, 2006 Acegi Technology Pty Limited
 *
 * Licensed under the Apache License, Version 2.0 (the "License");
 * you may not use this file except in compliance with the License.
 * You may obtain a copy of the License at
 *
 *      https://www.apache.org/licenses/LICENSE-2.0
 *
 * Unless required by applicable law or agreed to in writing, software
 * distributed under the License is distributed on an "AS IS" BASIS,
 * WITHOUT WARRANTIES OR CONDITIONS OF ANY KIND, either express or implied.
 * See the License for the specific language governing permissions and
 * limitations under the License.
 */

package org.springframework.security.core.context;

/**
 * A strategy for storing security context information against a thread.
 *
 * <p>
 * The preferred strategy is loaded by {@link SecurityContextHolder}.
 *
 * @author Ben Alex
 */
public interface SecurityContextHolderStrategy {


	// ~ Methods
	// ========================================================================================================

	/**
	 * Clears the current context.
	 * 清除当前上下文
	 */
	void clearContext();

	/**
	 * Obtains the current context.
	 * 获取当前线程上下文
	 * @return a context (never <code>null</code> - create a default implementation if
	 * necessary)
	 */
	SecurityContext getContext();

	/**
	 * Sets the current context.
	 * 设置线程上下文
	 * @param context to the new argument (should never be <code>null</code>, although
	 * implementations must check if <code>null</code> has been passed and throw an
	 * <code>IllegalArgumentException</code> in such cases)
	 */
	void setContext(SecurityContext context);

	/**
	 * Creates a new, empty context implementation, for use by
	 * <tt>SecurityContextRepository</tt> implementations, when creating a new context for
	 * the first time.
	 * 创建线程上下文
	 * @return the empty context.
	 */
	SecurityContext createEmptyContext();
}
传统web项目中获取用户身份信息
加入依赖
<dependency>
	  <groupId>org.thymeleaf.extras</groupId>
	  <artifactId>thymeleaf-extras-springsecurity5</artifactId>
</dependency>
然后引入security的命名空间
xmlns:sec="http://www.thymeleaf.org/thymeleaf-extras-springsecurity5"
定义接口
@RequestMapping("/userDetail.html")
    public String userDetail(){


        System.out.println("userDetail");
        return "userDetail";
    }
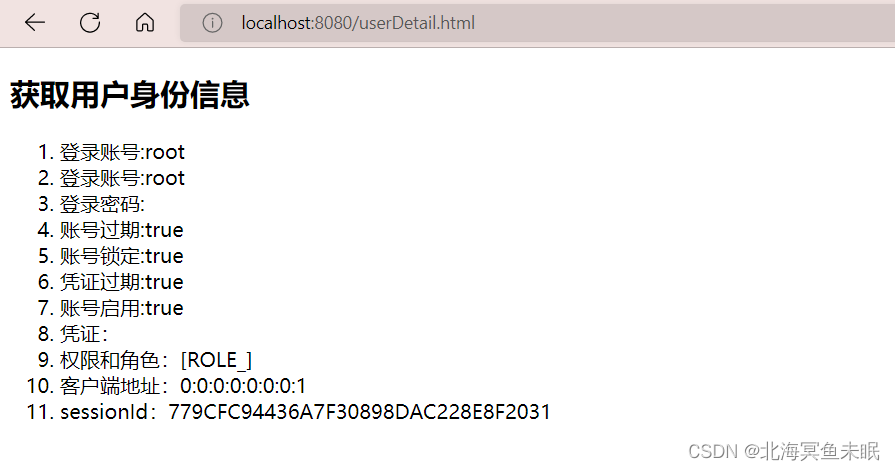
编写html页面userDetail.html
<!DOCTYPE html>
<html lang="zh"
      xmlns:th="http://www.thymeleaf.org"
      xmlns:sec="http://www.thymeleaf.org/thymeleaf-extras-springsecurity5">
<head>
    <meta charset="UTF-8">
    <title>权限信息</title>
</head>
<body>
<h2>获取用户身份信息</h2>
<ol>
    <!-- 属性获取,authentication:n. 证明;鉴定;证实 -->
    <li>登录账号:<span sec:authentication="name"></span></li>
    <!-- principal相当于UserDetails信息 -->
    <li>登录账号:<span sec:authentication="principal.username"></span></li>
    <li>登录密码:<span sec:authentication="principal.password"></span></li>
    <li>账号过期:<span sec:authentication="principal.accountNonExpired"></span></li>
    <li>账号锁定:<span sec:authentication="principal.accountNonLocked"></span></li>
    <li>凭证过期:<span sec:authentication="principal.credentialsNonExpired"></span></li>
    <li>账号启用:<span sec:authentication="principal.enabled"></span></li>
    <li>凭证:<span sec:authentication="credentials"></span></li>
    <li>权限和角色:<span sec:authentication="authorities"></span></li>
    <!-- WebAuthenticationDetails实例 -->
    <li>客户端地址:<span sec:authentication="details.remoteAddress"></span></li>
    <li>sessionId:<span sec:authentication="details.sessionId"></span></li>
</ol>
</body>
</html>
启动后登录访问