目录
配置mybatis核心配置文件(mybatis-config.xml)
使用Mybatis+Mapper,完成对数据库数据库的增删改查(CRUD)
准备环境
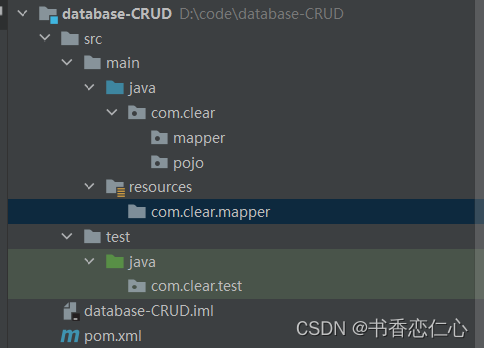
创建模块
第一步:点击Project Structure
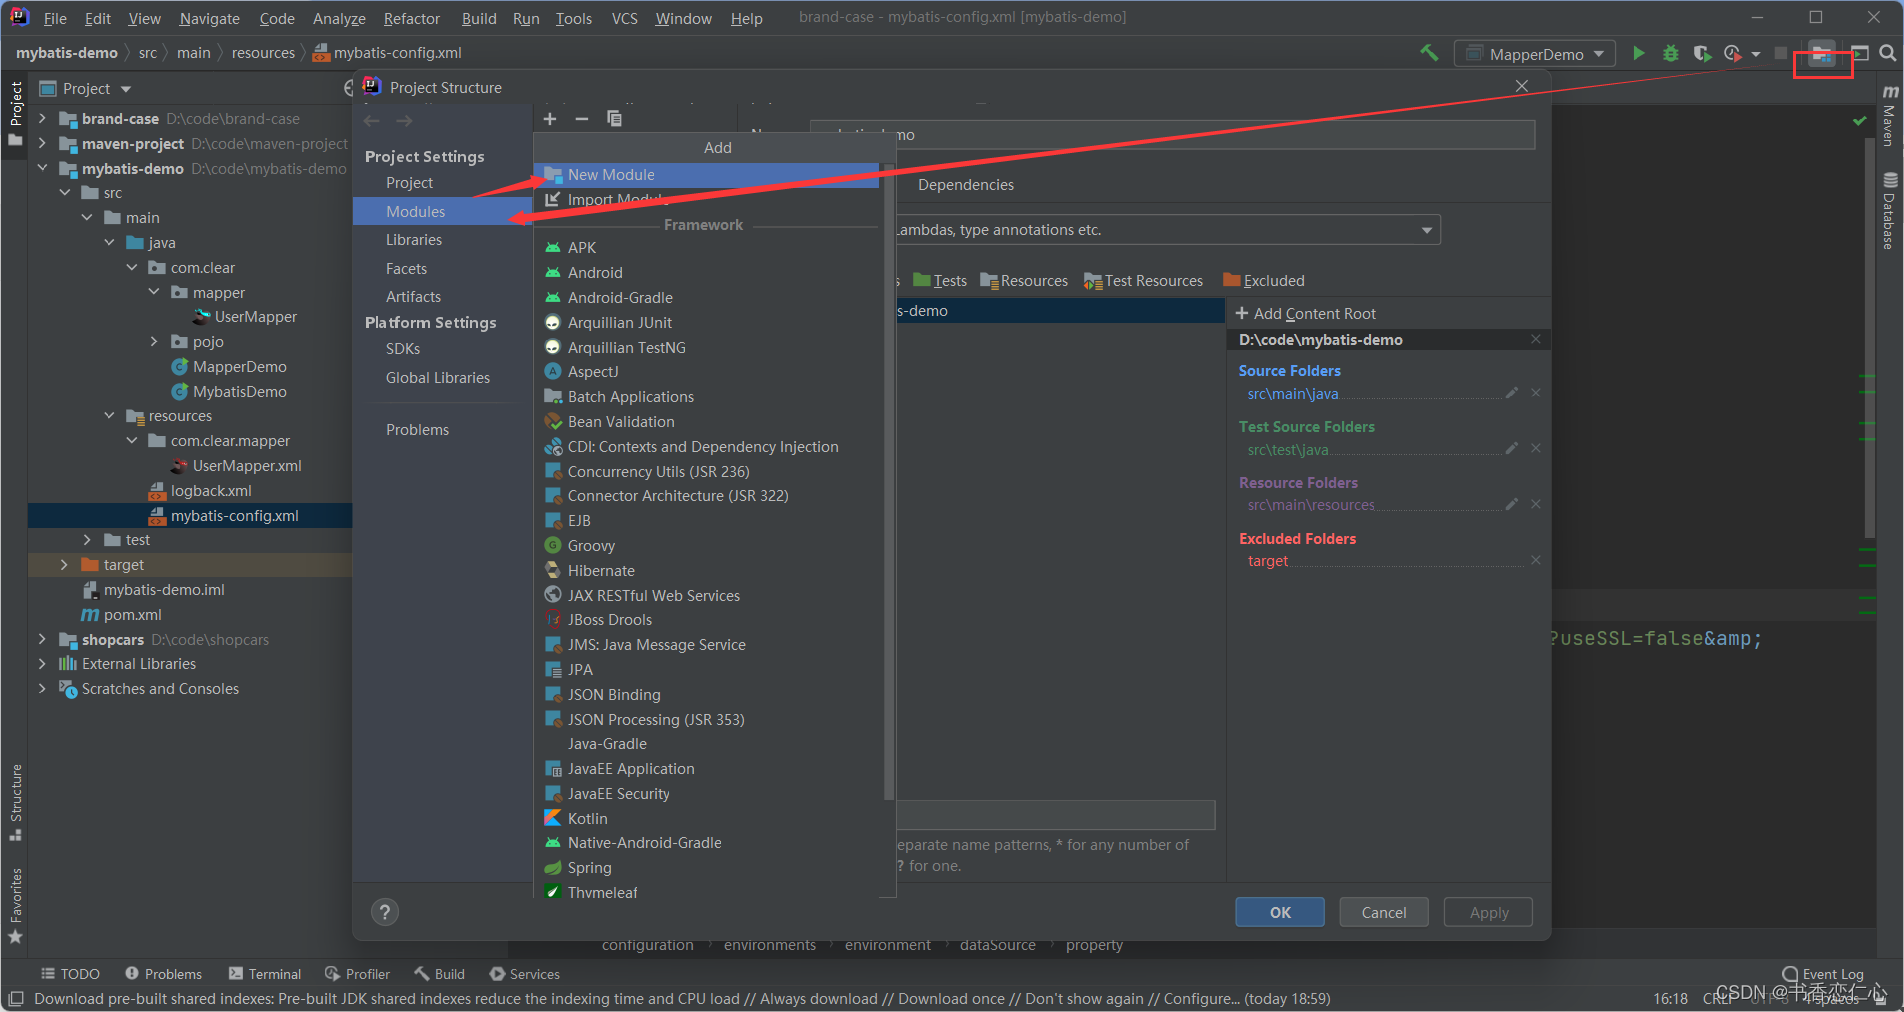
第二步:选择Maven——> next
第三步:设置模块名称

第四步:补全项目结构
导入相关依赖坐标
第四步:在pom.xml导入一些需要的坐标依赖
<?xml version="1.0" encoding="UTF-8"?>
<project xmlns="http://maven.apache.org/POM/4.0.0"
         xmlns:xsi="http://www.w3.org/2001/XMLSchema-instance"
         xsi:schemaLocation="http://maven.apache.org/POM/4.0.0 http://maven.apache.org/xsd/maven-4.0.0.xsd">
    <modelVersion>4.0.0</modelVersion>

    <!--模块坐标-->
    <groupId>org.example</groupId>
    <artifactId>database-CRUD</artifactId>
    <version>1.0-SNAPSHOT</version>

    <properties>
        <maven.compiler.source>8</maven.compiler.source>
        <maven.compiler.target>8</maven.compiler.target>
    </properties>

    <dependencies>
        <!--mybatis 依赖-->
        <dependency>
            <groupId>org.mybatis</groupId>
            <artifactId>mybatis</artifactId>
            <version>3.5.5</version>
        </dependency>

        <!--mysql 驱动-->
        <dependency>
            <groupId>mysql</groupId>
            <artifactId>mysql-connector-java</artifactId>
            <version>5.1.46</version>
        </dependency>

        <!--junit 单元测试-->
        <dependency>
            <groupId>junit</groupId>
            <artifactId>junit</artifactId>
            <version>4.13</version>
            <scope>test</scope>
        </dependency>

        <!--添加slf4j日志api-->
        <dependency>
            <groupId>org.slf4j</groupId>
            <artifactId>slf4j-api</artifactId>
            <version>1.7.20</version>
        </dependency>
        <!--添加logback-classic依赖-->
        <dependency>
            <groupId>ch.qos.logback</groupId>
            <artifactId>logback-classic</artifactId>
            <version>1.2.3</version>
        </dependency>

        <!--添加logback-core依赖-->
        <dependency>
            <groupId>ch.qos.logback</groupId>
            <artifactId>logback-core</artifactId>
            <version>1.2.3</version>
        </dependency>

    </dependencies>


</project>
准备数据库表
create table tb_brand
(
    id           int auto_increment
        primary key,
    brand_name   varchar(20)  null,
    company_name varchar(20)  null,
    -- 排序
    ordered      int          null,
    -- 描述信息
    description  varchar(100) null,
    -- 状态
    status       int          null
);


INSERT INTO tb_brand (brand_name, company_name, ordered, description, status)
VALUES ('三只松鼠', '三只松鼠股份有限公司', 5, '好吃不上火', 0),
('华为', '华为科技有限公司', 100, '华为致力于把数字世界带入每个人、每个家庭、每个组织,构建万物互联的智能世界', 1),
('小米', '小米科技有限公司', 50, 'are you ok', 1)
准备实体类(POJO)
package com.clear.pojo;

public class Brand {
    // id 主键
    private Integer id;
    // 商品名称
    private String brandName;
    // 企业名称
    private String companyName;
    // 排序字段
    private Integer ordered;
    // 描述信息
    private String description;
    // 状态:0 禁用  1 启用
    private Integer status;

    public Integer getId() {
        return id;
    }

    public void setId(Integer id) {
        this.id = id;
    }

    public String getBrandName() {
        return brandName;
    }

    public void setBrandName(String brandName) {
        this.brandName = brandName;
    }

    public String getCompanyName() {
        return companyName;
    }

    public void setCompanyName(String companyName) {
        this.companyName = companyName;
    }

    public Integer getOrdered() {
        return ordered;
    }

    public void setOrdered(Integer ordered) {
        this.ordered = ordered;
    }

    public String getDescription() {
        return description;
    }

    public void setDescription(String description) {
        this.description = description;
    }

    public Integer getStatus() {
        return status;
    }

    public void setStatus(Integer status) {
        this.status = status;
    }

    @Override
    public String toString() {
        return "Brand{" +
                "id=" + id +
                ", brandName='" + brandName + '\'' +
                ", companyName='" + companyName + '\'' +
                ", ordered=" + ordered +
                ", description='" + description + '\'' +
                ", status=" + status +
                '}';
    }
}
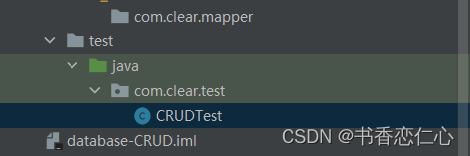
导入测试用例
安装MybatisX插件
MybatisX是一款基于IDEA的快速开发插件,为效率而生。
主要功能有:
XML 和 接口方法 之间的快速跳转(alt + 鼠标左键)
根据接口方法生成statement(即SQL映射文件中的sql语句)
安装:
File——> settings——> Plugins——> 搜索MybatisX ——> Insatll——> 重启IDEA即可
配置mybatis核心配置文件(mybatis-config.xml)
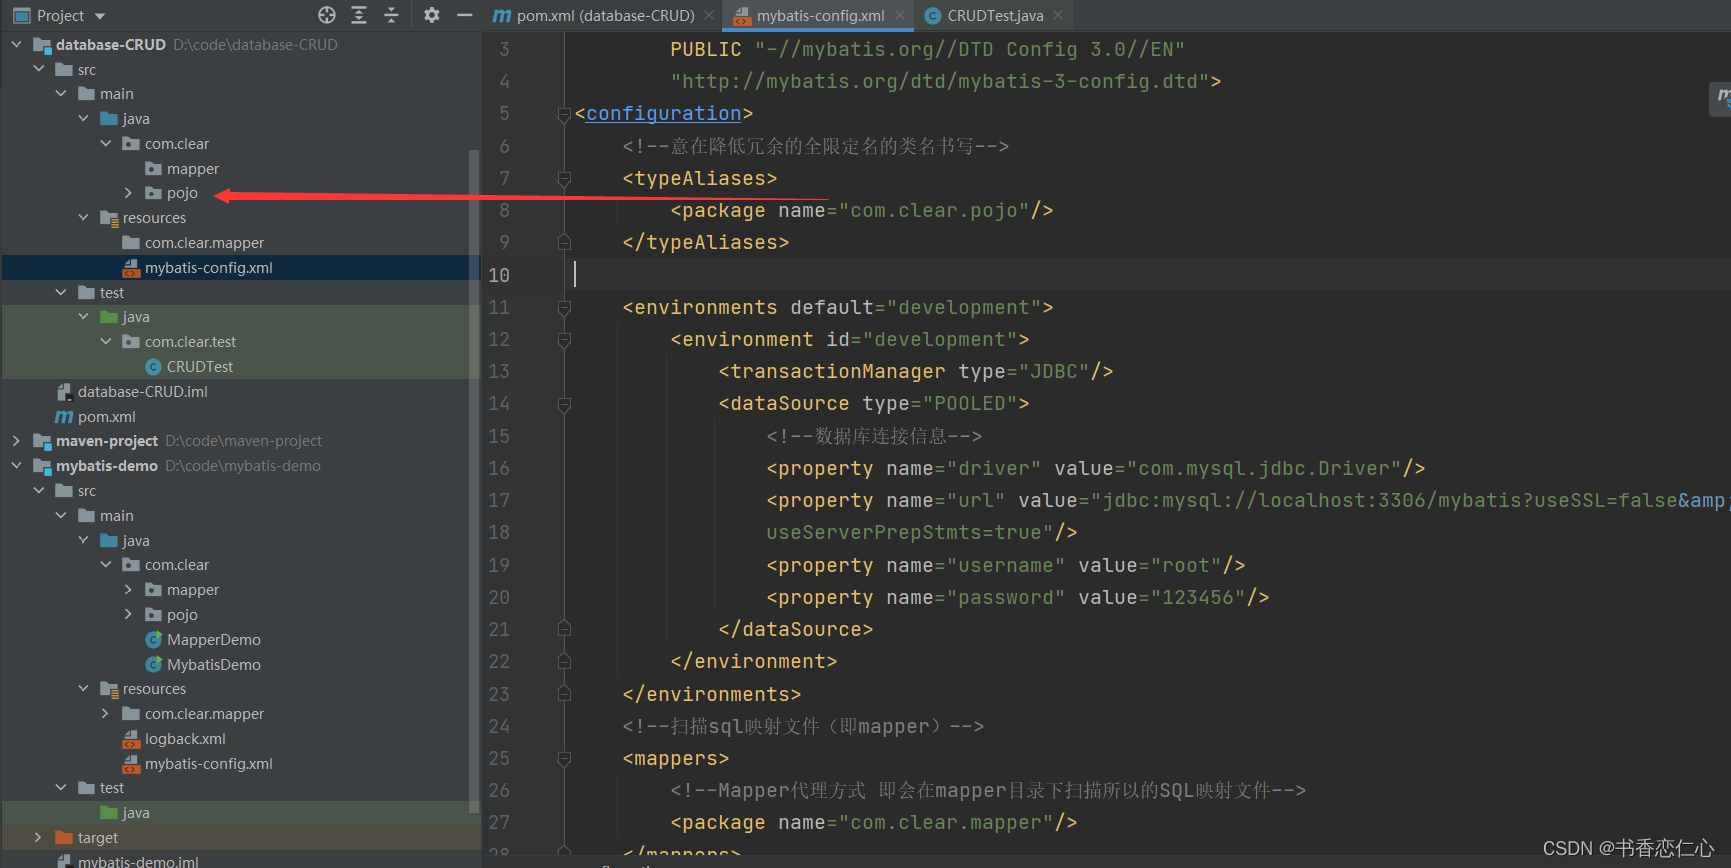
mybatis核心配置文件 mybatis-config.xml 如下:
<?xml version="1.0" encoding="UTF-8" ?>
<!DOCTYPE configuration
PUBLIC "-//mybatis.org//DTD Config 3.0//EN"
"http://mybatis.org/dtd/mybatis-3-config.dtd">
<configuration>
<!--意在降低冗余的全限定名的类名书写-->
<typeAliases>
<package name="com.clear.pojo"/>
</typeAliases>
<environments default="development">
<environment id="development">
<transactionManager type="JDBC"/>
<dataSource type="POOLED">
<!--数据库连接信息-->
<property name="driver" value="com.mysql.jdbc.Driver"/>
<property name="url" value="jdbc:mysql://localhost:3306/mybatis?useSSL=false&
useServerPrepStmts=true"/>
<property name="username" value="root"/>
<property name="password" value="123456"/>
</dataSource>
</environment>
</environments>
<!--扫描sql映射文件(即mapper)-->
<mappers>
<!--Mapper代理方式 即会在mapper目录下扫描所以的SQL映射文件-->
<package name="com.clear.mapper"/>
</mappers>
</configuration>配置SQL映射文件
配置SQL映射文件,操作哪张数据库表,表名就为:
数据库表+Mapper(BrandMapper.xml)

SQL映射文件 BrandMapper.xml 如下
<?xml version="1.0" encoding="UTF-8" ?>
<!DOCTYPE mapper
PUBLIC "-//mybatis.org//DTD Mapper 3.0//EN"
"http://mybatis.org/dtd/mybatis-3-mapper.dtd">
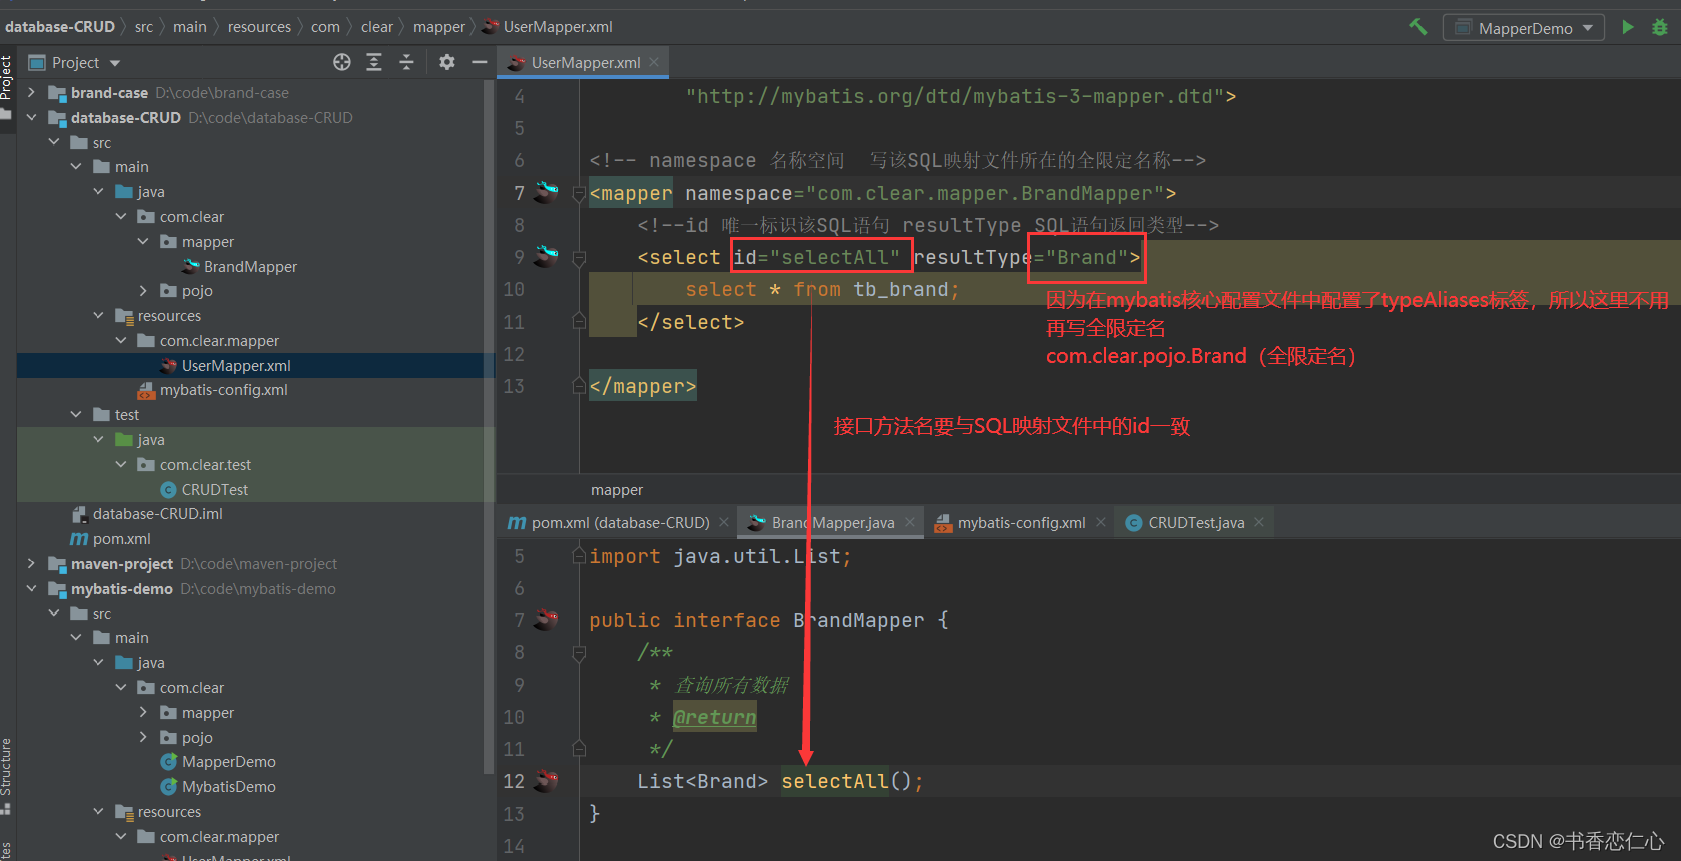
<!-- namespace 名称空间 写该SQL映射文件所在的全限定名称-->
<mapper namespace="com.clear.mapper.BrandMapper">
<!--id 唯一标识该SQL语句 resultType SQL语句返回类型-->
<!-- <select id="selectBlog" resultType="Blog">
select * from Blog where id = #{id}
</select>-->
</mapper>导入logback配置文件
在resources下导入logback.xml
<?xml version="1.0" encoding="UTF-8"?>
<configuration>
    <!--
        CONSOLE :表示当前的日志信息是可以输出到控制台的。
    -->
    <appender name="Console" class="ch.qos.logback.core.ConsoleAppender">
        <encoder>
            <pattern>[%level]  %cyan([%thread]) %boldGreen(%logger{15}) - %msg %n</pattern>
        </encoder>
    </appender>

    <logger name="com.clear" level="DEBUG" additivity="false">
        <appender-ref ref="Console"/>
    </logger>

    <!--

      level:用来设置打印级别,大小写无关:TRACE, DEBUG, INFO, WARN, ERROR, ALL 和 OFF
     , 默认debug
      <root>可以包含零个或多个<appender-ref>元素,标识这个输出位置将会被本日志级别控制。
      -->
    <root level="DEBUG">
        <appender-ref ref="Console"/>
    </root>
</configuration>
查询
查询所有数据
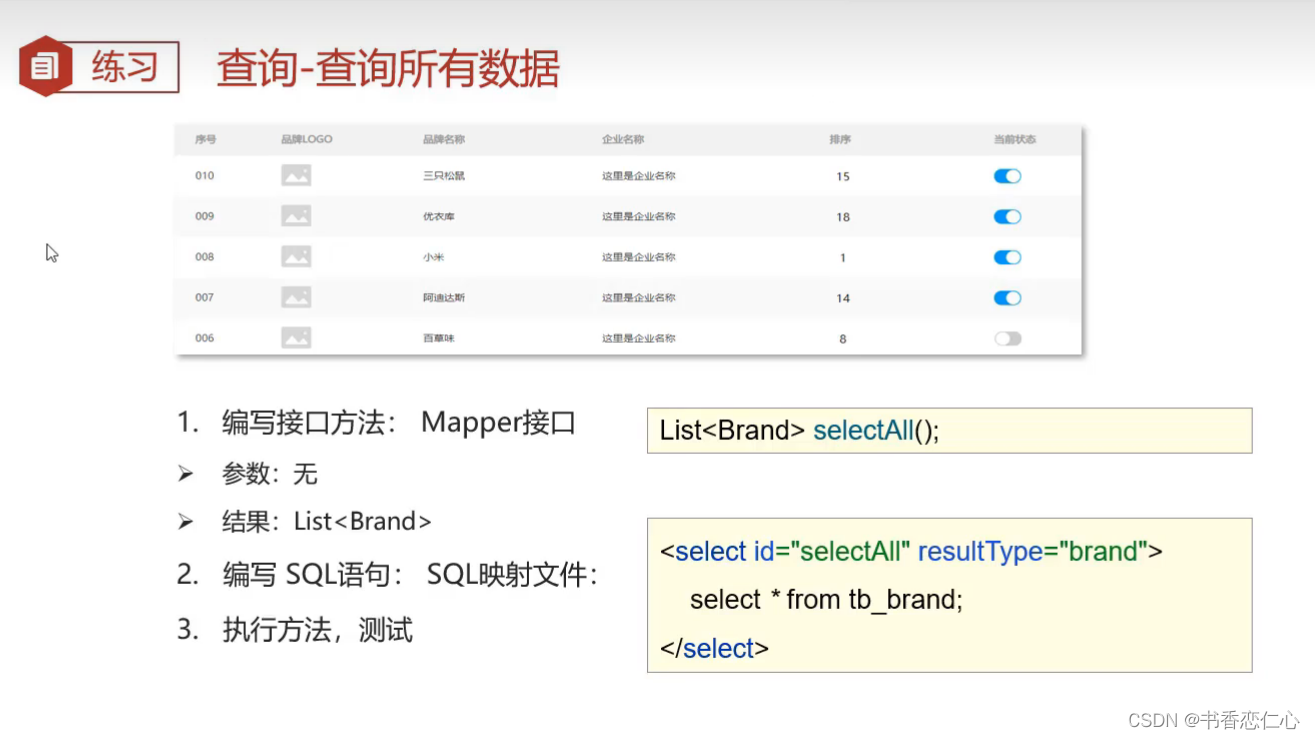
1、编写接口方法
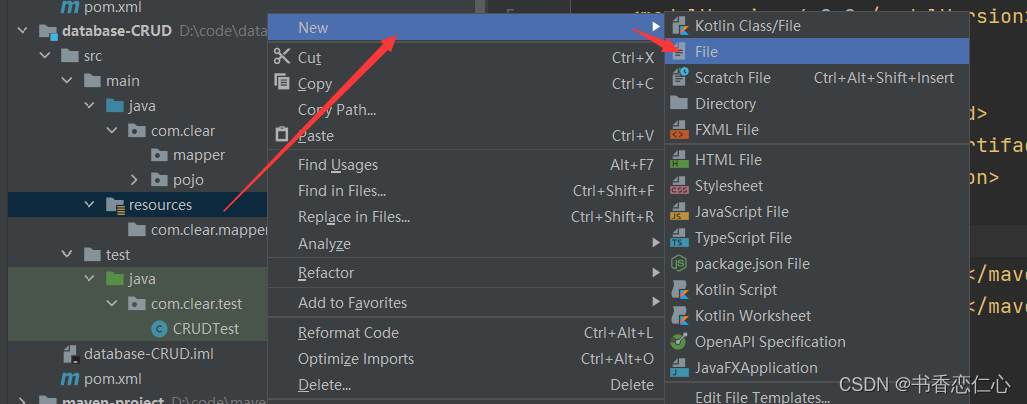
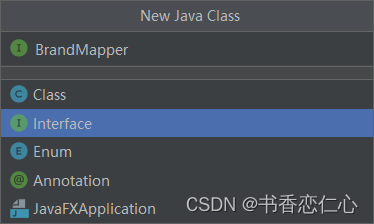
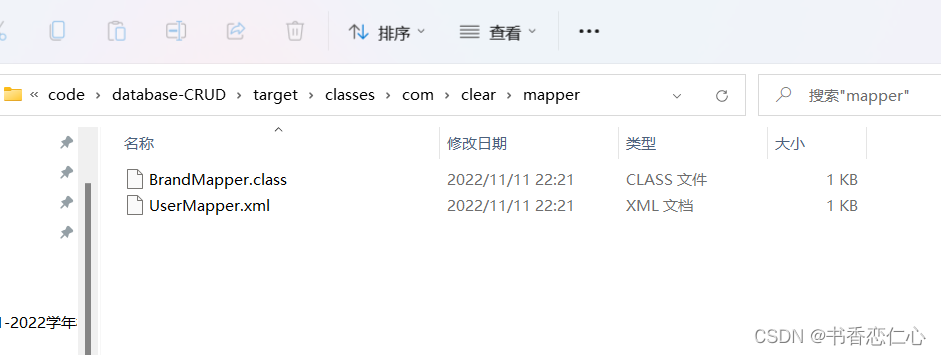
在com/clear/mapper中建立接口(接口名与SQL映射文件一致),且SQL映射文件与接口要在同一目录下
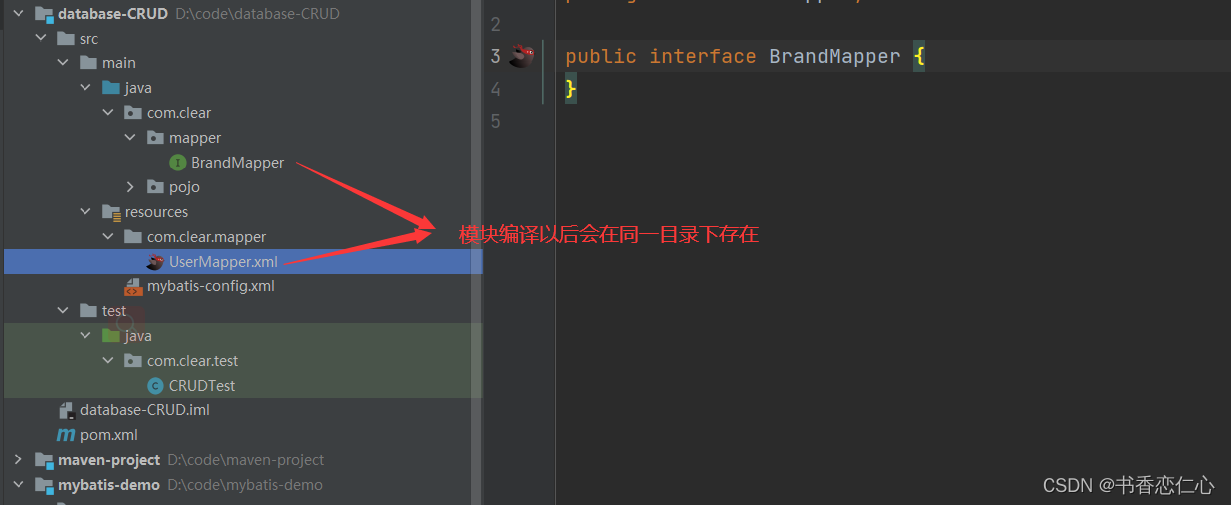
如下图:SQL映射文件与接口编译后的字节码文件在同一目录
2、在SQL映射文件中定义好SQL语句
3、执行方法、测试
代码如下:
package com.clear.test;


import com.clear.mapper.BrandMapper;
import com.clear.pojo.Brand;
import org.apache.ibatis.io.Resources;
import org.apache.ibatis.session.SqlSession;
import org.apache.ibatis.session.SqlSessionFactory;
import org.apache.ibatis.session.SqlSessionFactoryBuilder;
import org.junit.Test;

import java.io.IOException;
import java.io.InputStream;
import java.util.List;

public class CRUDTest {
    @Test
    public void testSelectAll() throws IOException {
        // 1、加载核心配置文件,获取SqlSessionFactory对象
        String resource = "mybatis-config.xml";
        InputStream inputStream = Resources.getResourceAsStream(resource);
        SqlSessionFactory sqlSessionFactory = new SqlSessionFactoryBuilder().build(inputStream);
        // 2、获取SqlSession对象
        SqlSession sqlSession = sqlSessionFactory.openSession();
        // 3、获取Mapper接口的代理对象
        BrandMapper brandMapper = sqlSession.getMapper(BrandMapper.class);
        // 4、执行方法
        List<Brand> brands = brandMapper.selectAll();
        System.out.println(brands);

        // 5、释放资源
        sqlSession.close();
    }
}

但是我们发现有些数据保存的是null,这是由于数据库表中字段名与 POJO实体类中属性名不一样造成的,因为这样就不会自动封装了
可以通过修改SQL映射文件解决
起别名
方法一:起别名:对不一样的字段名起别名,让别名与实体类中属性名一致
缺点:这种方法不够灵活,每次查询都要起别名

SQL片段
方法二:使用SQL片段
缺点:显然这种方法不灵活,当查询不同字段时需要定义很多SQL片段

resultMap
方法三:resultMap:1、定义<resuletMap>标签
2、在<select>标签中用resultMap属性代替resultType属性
优点:这种方法使用灵活
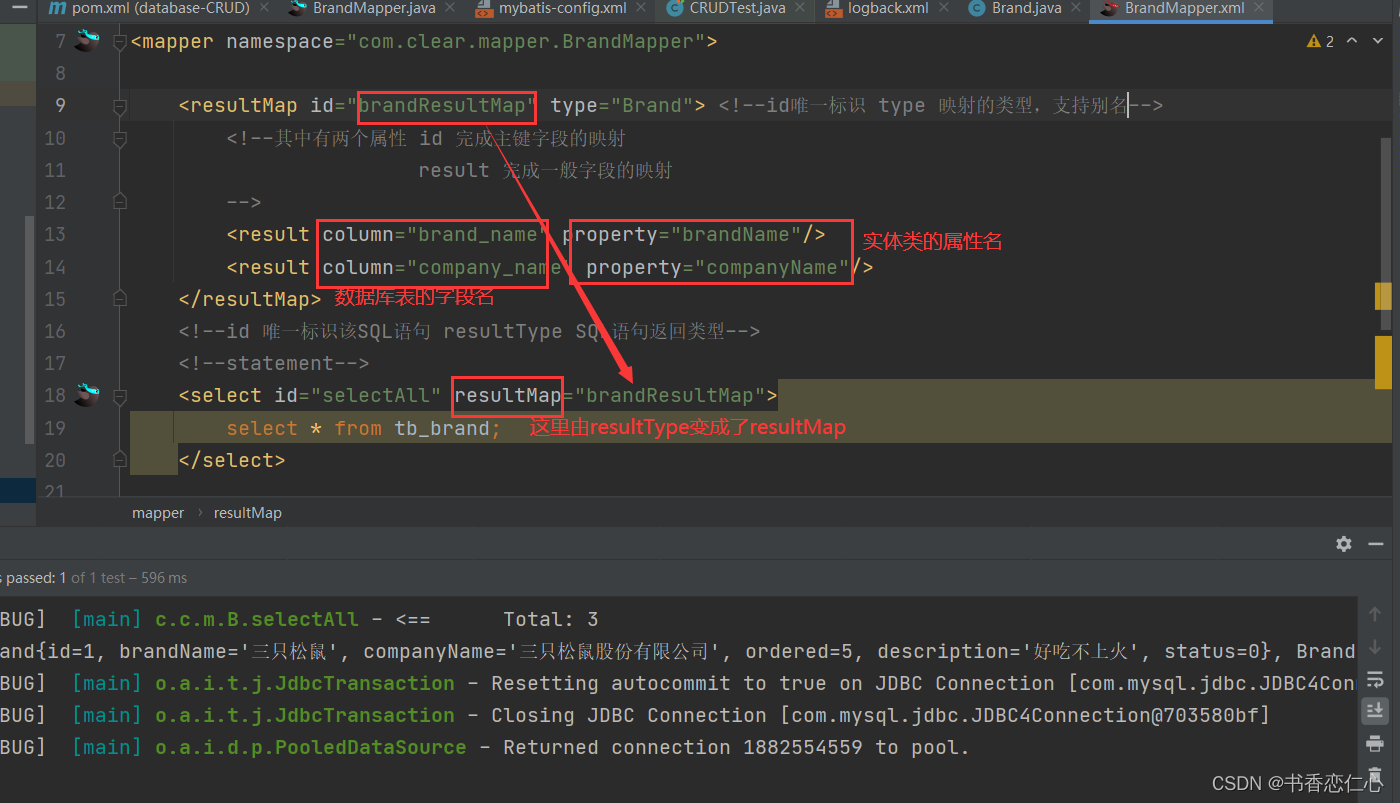
总结:
实体类与数据库表字段名不一致,不能自动封装
1)起别名:在sql语句中,对不一样的字段名起别名,别名与实体类属性名一样
2)定义<sql>片段,提高复用性
3)resultMap:定义<resultMap>完成不一致的属性名与字段名的映射
查看详情
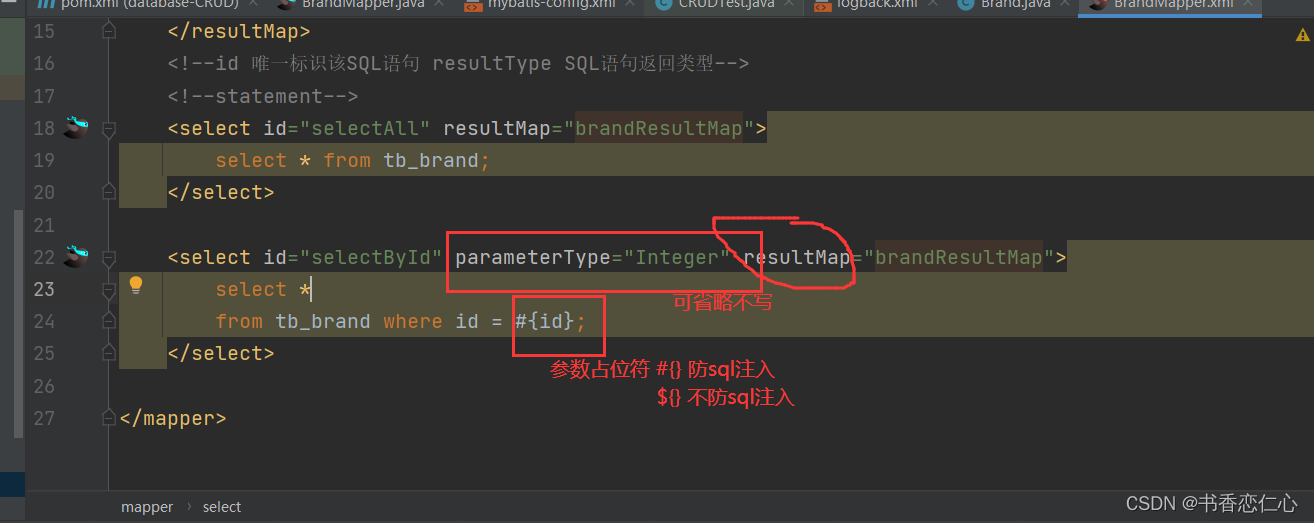
通过传入主键值id,查询商品详情
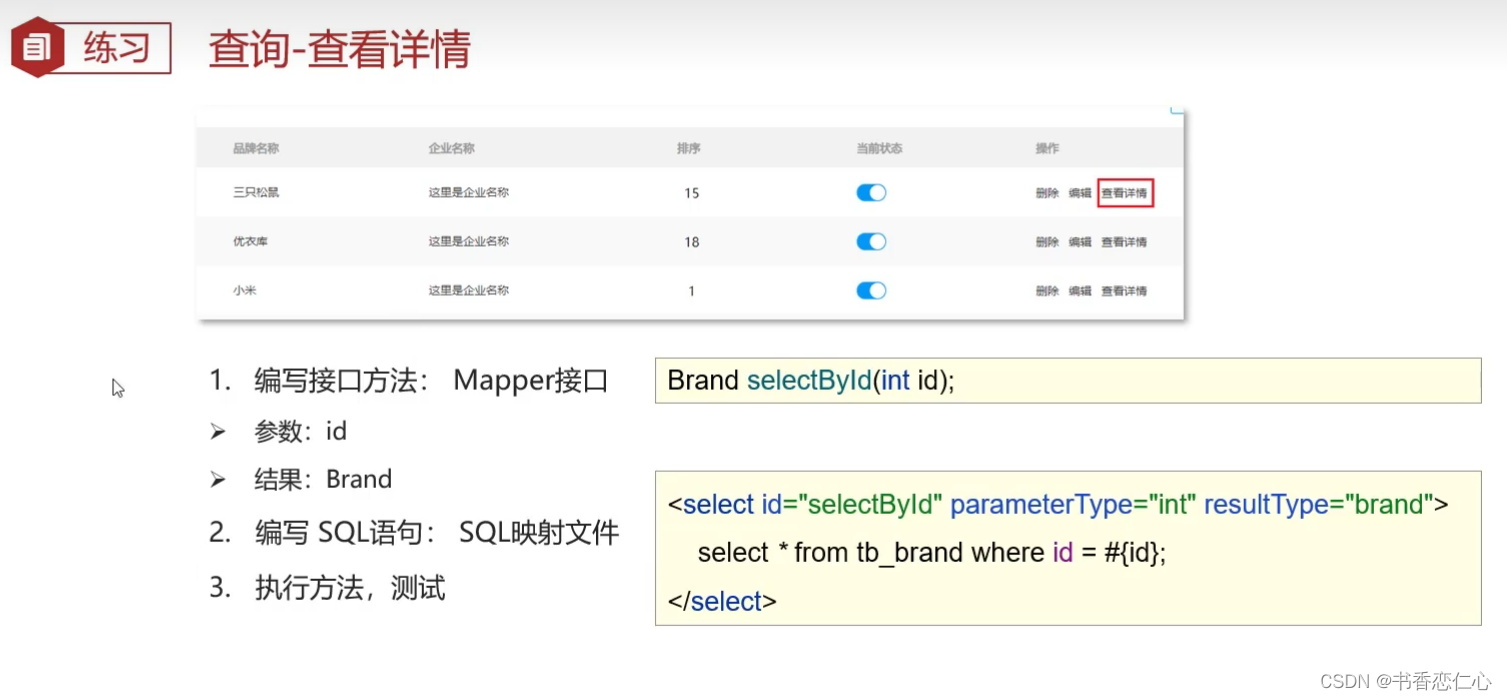
1、编写接口方法
在BrandMapper接口中编写方法

2、在SQL映射文件中编写SQL语句
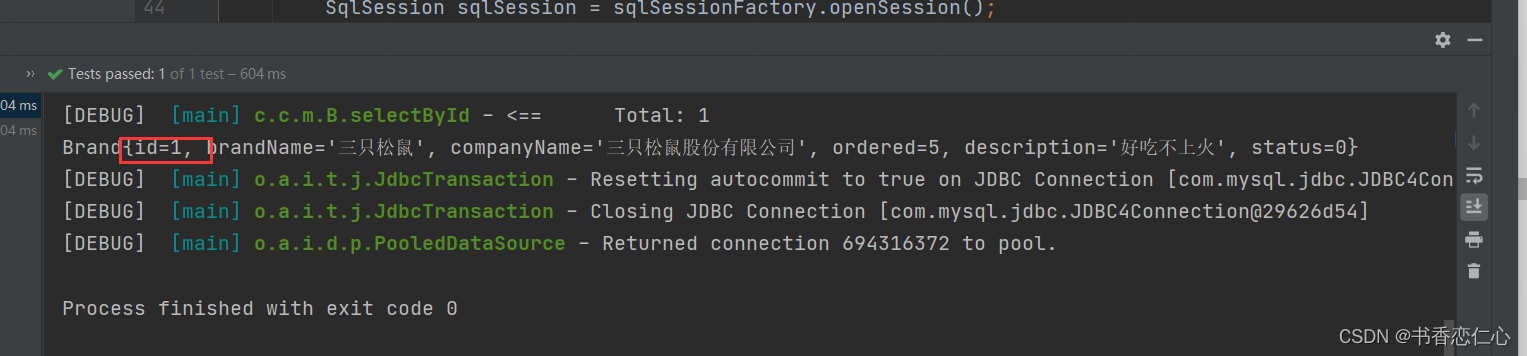
3、测试方法如下:
 @Test
    public void selectByIdTest() throws IOException{
        Integer id = 1;  // 模拟的数据
        // 1、获取SqlSessionFactory对象
        String resource = "mybatis-config.xml";
        InputStream inputStream = Resources.getResourceAsStream(resource);
        SqlSessionFactory sqlSessionFactory = new SqlSessionFactoryBuilder().build(inputStream);

        // 2、获取sqlSession对象
        SqlSession sqlSession = sqlSessionFactory.openSession();
        // 3、获取Mapper接口代理对象
        BrandMapper brandMapper = sqlSession.getMapper(BrandMapper.class);
        // 4、执行方法
        Brand brand = brandMapper.selectById(id);
        System.out.println(brand);
        sqlSession.close();
    }
测试结果如下
总结:
参数占位符
#{} 会将其替换为?,为了防止SQL注入
${} 拼SQL,会存在SQL注入问题
使用时机:
作为参数传递时:#{}
表名或字段名不固定的情况下:${}
参数类型:parameterTpye:可以省略
特殊字符处理:
1、转义字符 (ep: <)
2、CDATA区
<![CDATA[ 内容 ]]>
多条件查询
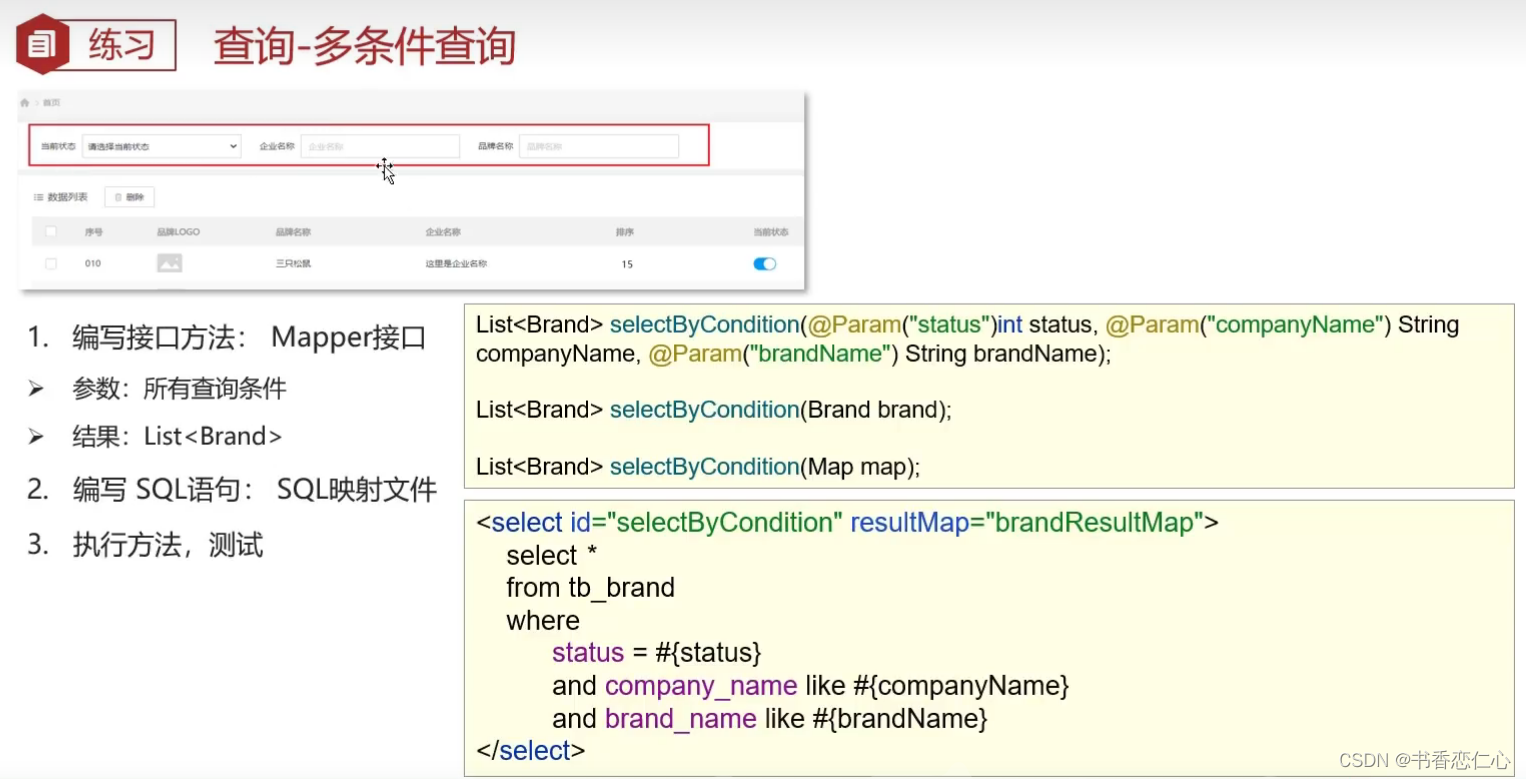
多条件查询 —— 散装参数(需要使用@Param)
1、编写接口方法
在BrandMapper接口中编写方法

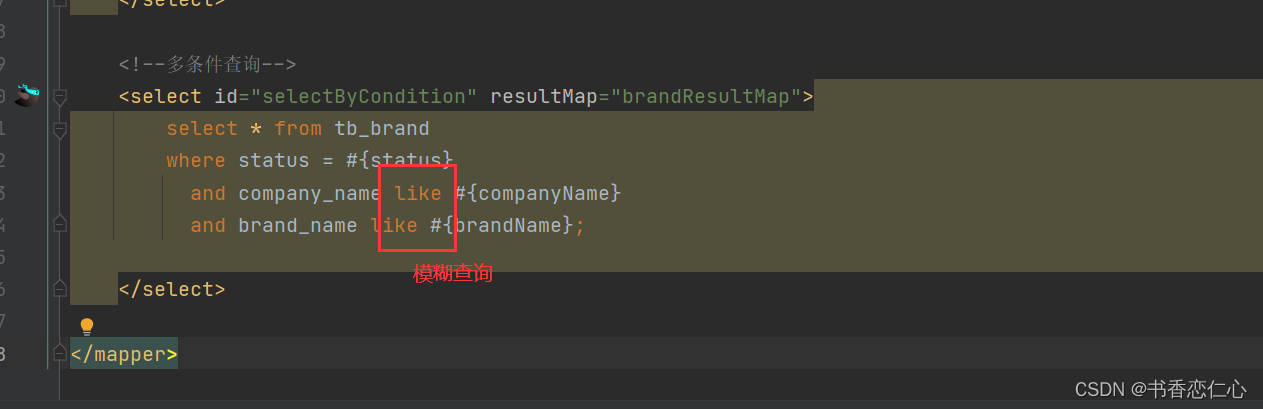
2、编写SQL语句
在SQL映射文件中编写SQL语句
3、执行方法、测试
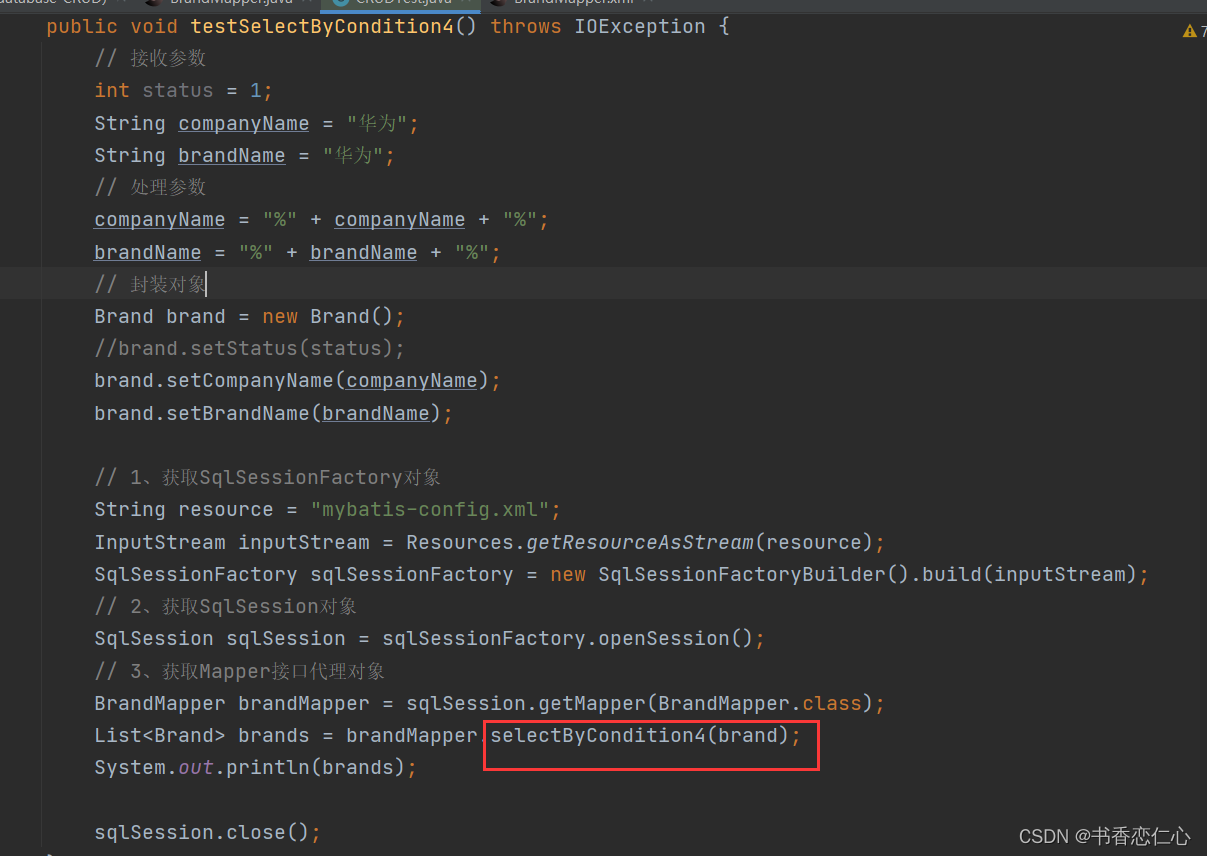
    @Test
    public void testSelectByCondition() throws IOException {
        // 接收参数
        int status = 1;
        String companyName = "华为";
        String brandName = "华为";

        // 处理参数
        companyName = "%" + companyName + "%";
        brandName = "%" + brandName + "%";

        // 1、获取SqlSessionFactory对象
        String resource = "mybatis-config.xml";
        InputStream inputStream = Resources.getResourceAsStream(resource);
        SqlSessionFactory sqlSessionFactory = new SqlSessionFactoryBuilder().build(inputStream);
        // 2、获取SqlSession对象
        SqlSession sqlSession = sqlSessionFactory.openSession();
        // 3、获取Mapper接口代理对象
        BrandMapper brandMapper = sqlSession.getMapper(BrandMapper.class);
        List<Brand> brands = brandMapper.selectByCondition(status,companyName,brandName);
        System.out.println(brands);

        sqlSession.close();
    }

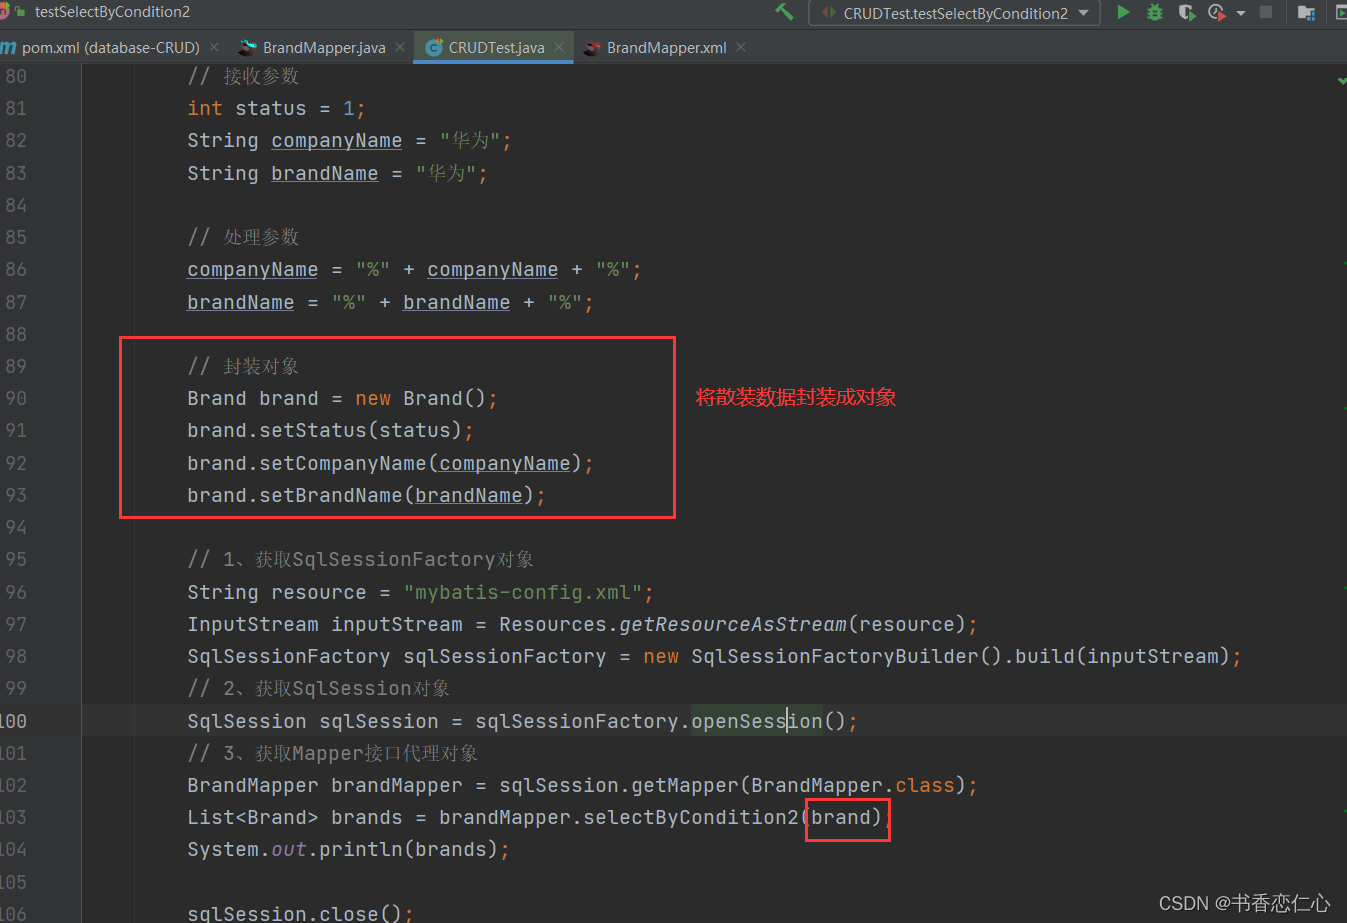
多条件查询——对象参数
1、编写Mappe接口方法
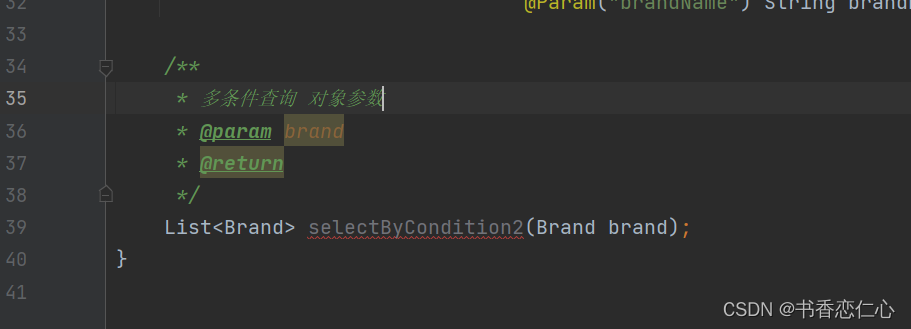
2、编写SQL映射文件
在SQL映射文件中编写SQL语句

3、执行方法、测试
多条件查询——使用Map集合
1、编写Mapper接口方法
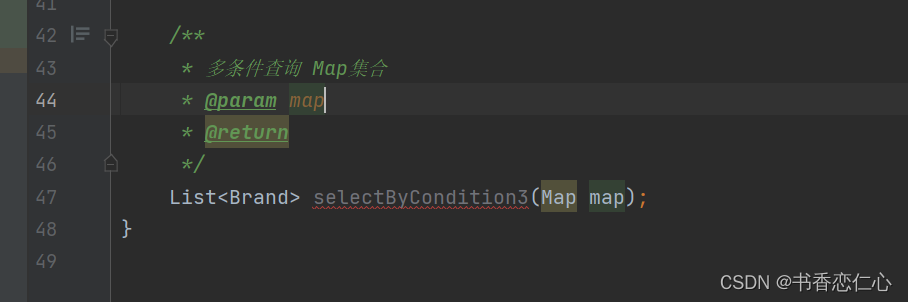
2、编写SQL映射文件
在SQL映射文件中编写SQL语句

3、执行方法

总结
参数接收:
1、散装参数:如果方法中有多个参数,需要使用@Param("SQL参数占位符")
2、对象参数:对象的属性要和SQL语句参数占位符名称一致
3、map集合:只需要保证SQL语句中参数占位符和map集合中键的名称对应即可
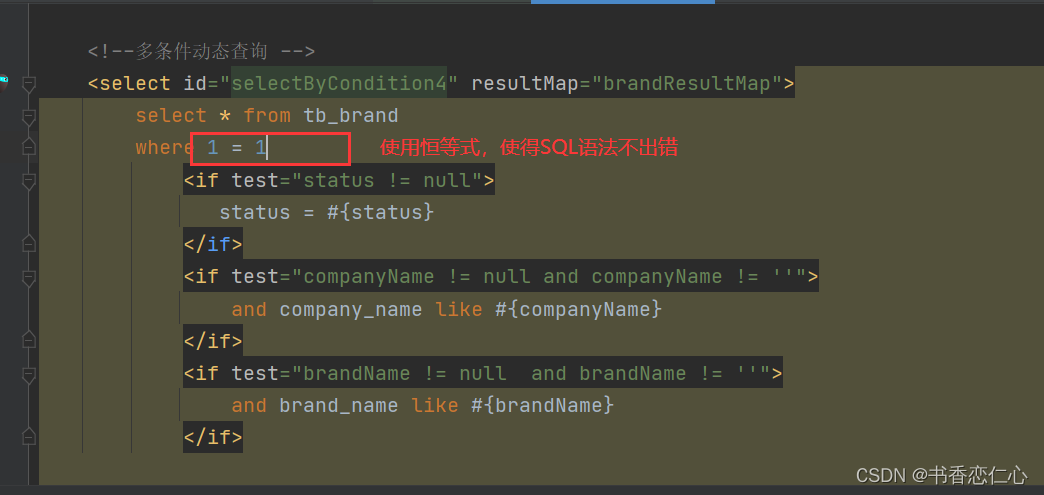
动态查询
多条件动态查询

1、编写Mapper接口方法
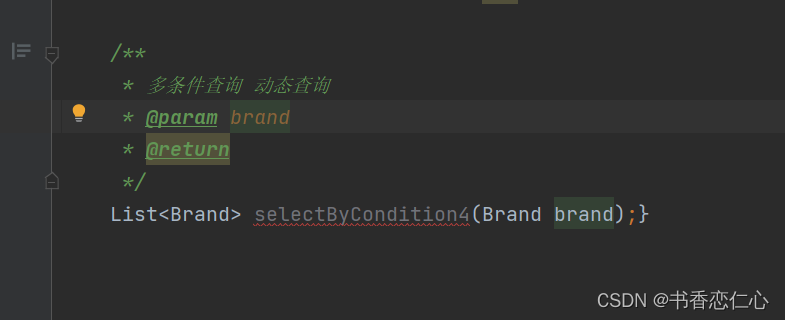
2、编写SQL映射文件
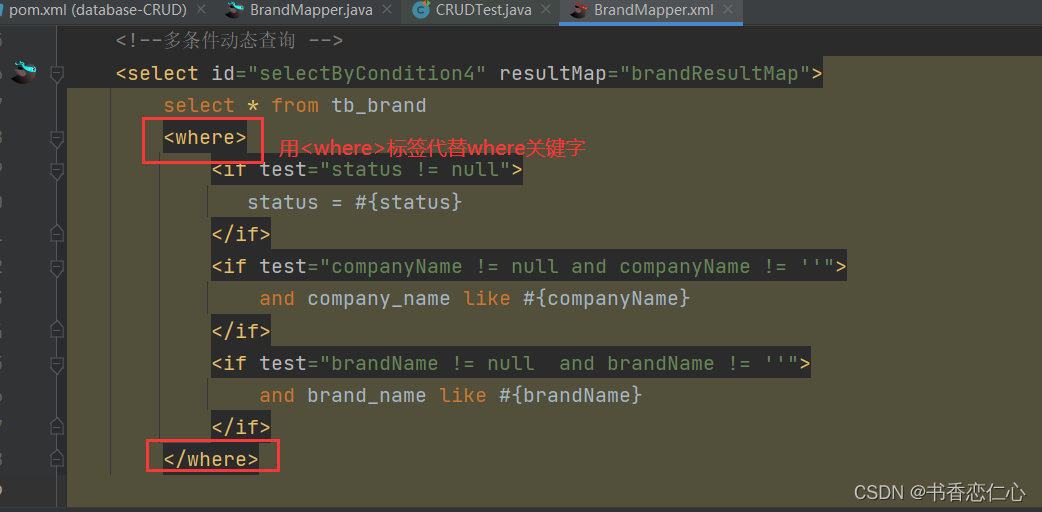
3、执行方法
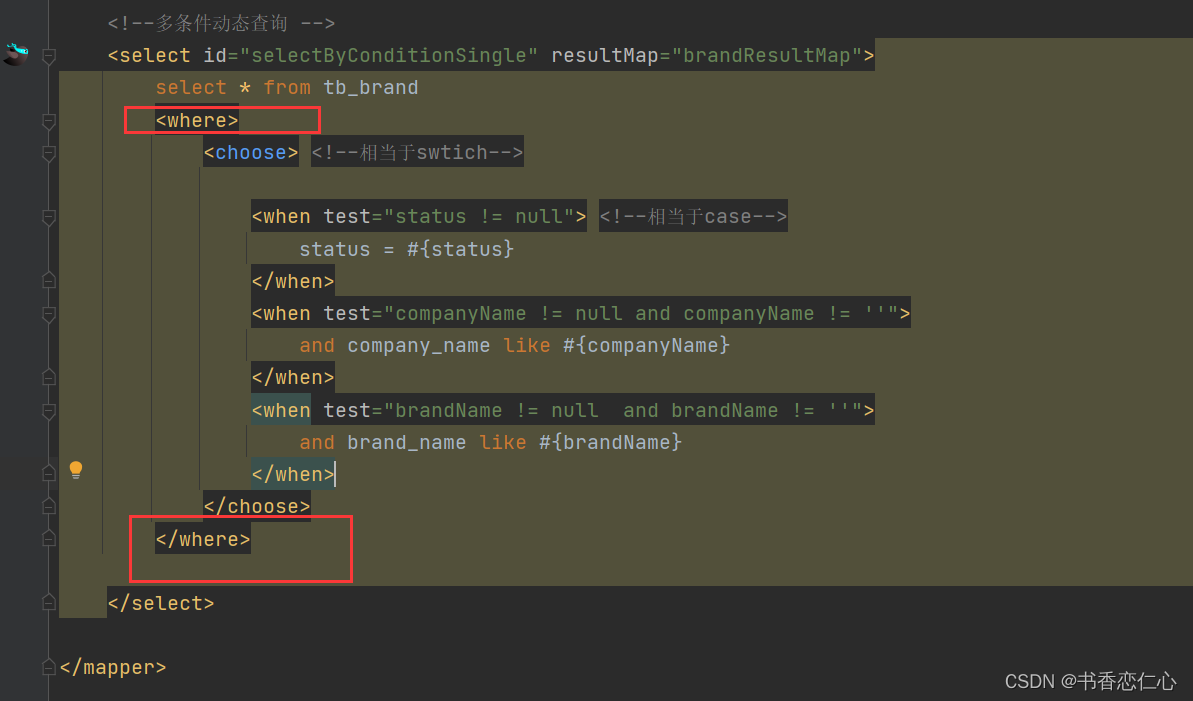
单条件动态查询

1、编写Mapper接口方法
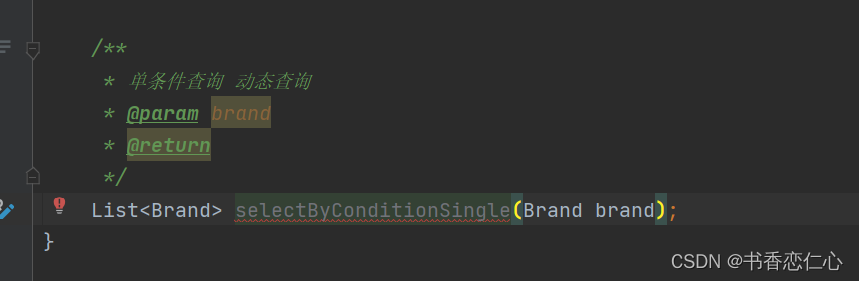
2、编写SQL映射文件
在SQL映射文件中编写SQL语句
因为是单条件查询,所以需要使用<choose>标签 相当于switch

3、执行方法、测试
/**
     * 单条件动态查询
     * @throws IOException
     */
    @Test
    public void testSelectByConditionSingle() throws IOException {
        // 接收参数
        int status = 1;
        String companyName = "华为";
        String brandName = "华为";
        // 处理参数
        companyName = "%" + companyName + "%";
        brandName = "%" + brandName + "%";
        // 封装对象
        Brand brand = new Brand();
        //brand.setStatus(status);
        //brand.setCompanyName(companyName);
        //brand.setBrandName(brandName);

        // 1、获取SqlSessionFactory对象
        String resource = "mybatis-config.xml";
        InputStream inputStream = Resources.getResourceAsStream(resource);
        SqlSessionFactory sqlSessionFactory = new SqlSessionFactoryBuilder().build(inputStream);
        // 2、获取SqlSession对象
        SqlSession sqlSession = sqlSessionFactory.openSession();
        // 3、获取Mapper接口代理对象
        BrandMapper brandMapper = sqlSession.getMapper(BrandMapper.class);
        List<Brand> brands = brandMapper.selectByConditionSingle(brand);
        System.out.println(brands);

        sqlSession.close();
    }
添加
添加数据
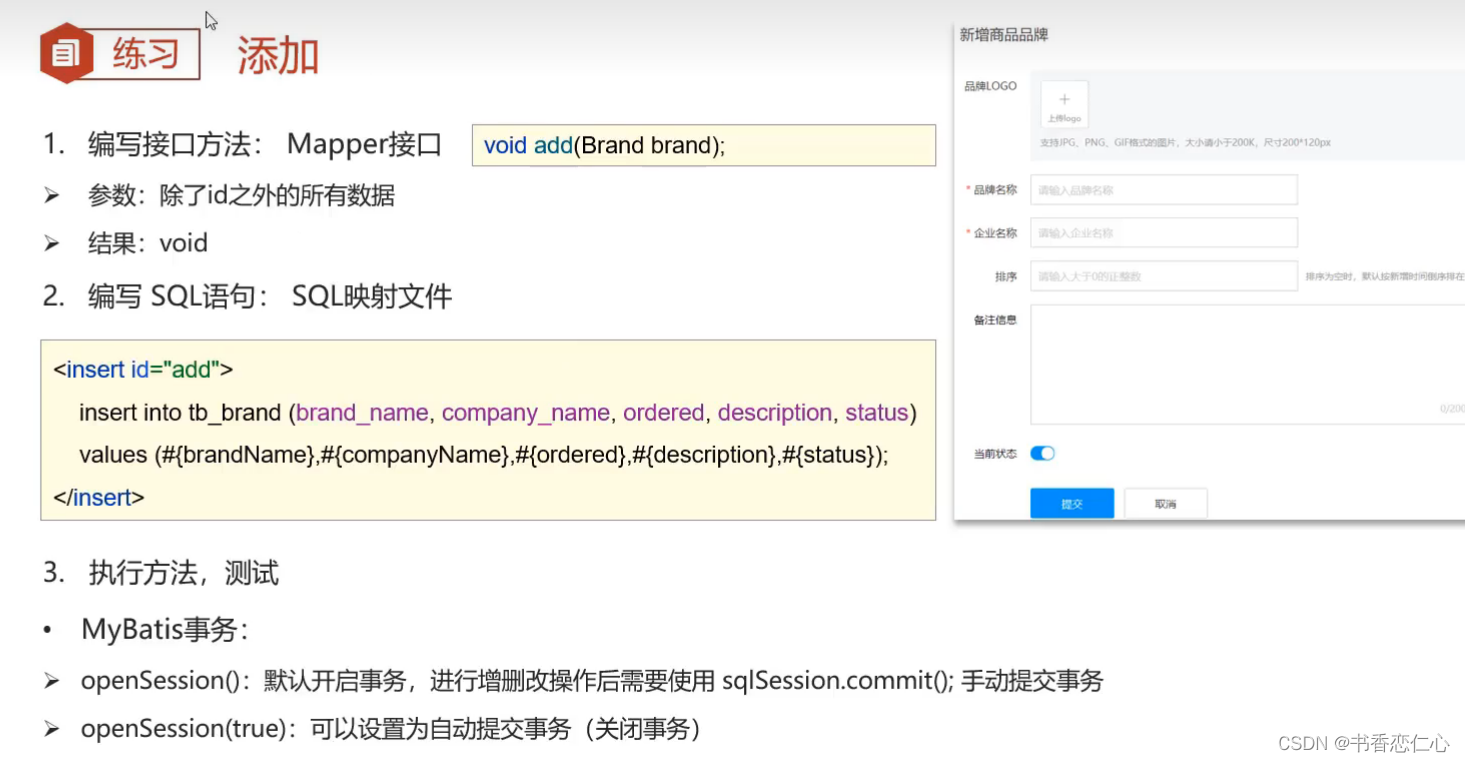
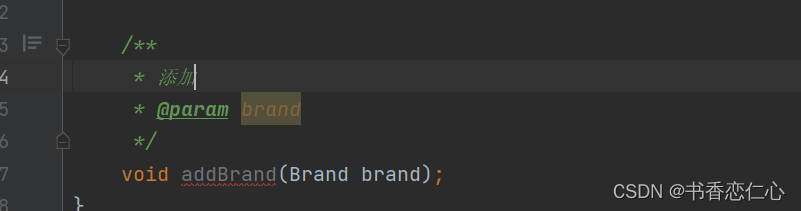
1、编写Mapper接口方法
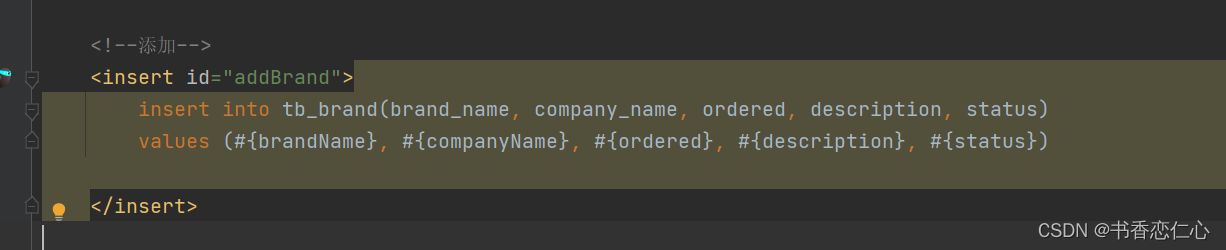
2、编写SQL映射文件
在SQL映射文件中编写SQL语句
3、执行方法、测试
@Test
    public void testAddBrand() throws IOException{
        // 获取数据
        String brandName="菠萝手机";
        String companyName="菠萝手机总经销商";
        int ordered=10086;
        String description="这不是一般的手机,这是王维诗里的手机";
        int status = 1;
        // 封装数据
        Brand brand = new Brand();
        brand.setBrandName(brandName);
        brand.setCompanyName(companyName);
        brand.setOrdered(ordered);
        brand.setDescription(description);
        brand.setStatus(status);

        // 1、加载核心配置文件,获取SqlSessionFactory对象
        String resource = "mybatis-config.xml";
        InputStream inputStream = Resources.getResourceAsStream(resource);
        SqlSessionFactory sqlSessionFactory = new SqlSessionFactoryBuilder().build(inputStream);
        //2、获取SqlSession对象
        SqlSession sqlSession = sqlSessionFactory.openSession(true); // 开启自动提交事务
        // 3、获取Mapper接口代理对象
        BrandMapper brandMapper = sqlSession.getMapper(BrandMapper.class);
        brandMapper.addBrand(brand);

        sqlSession.close();
    }
}
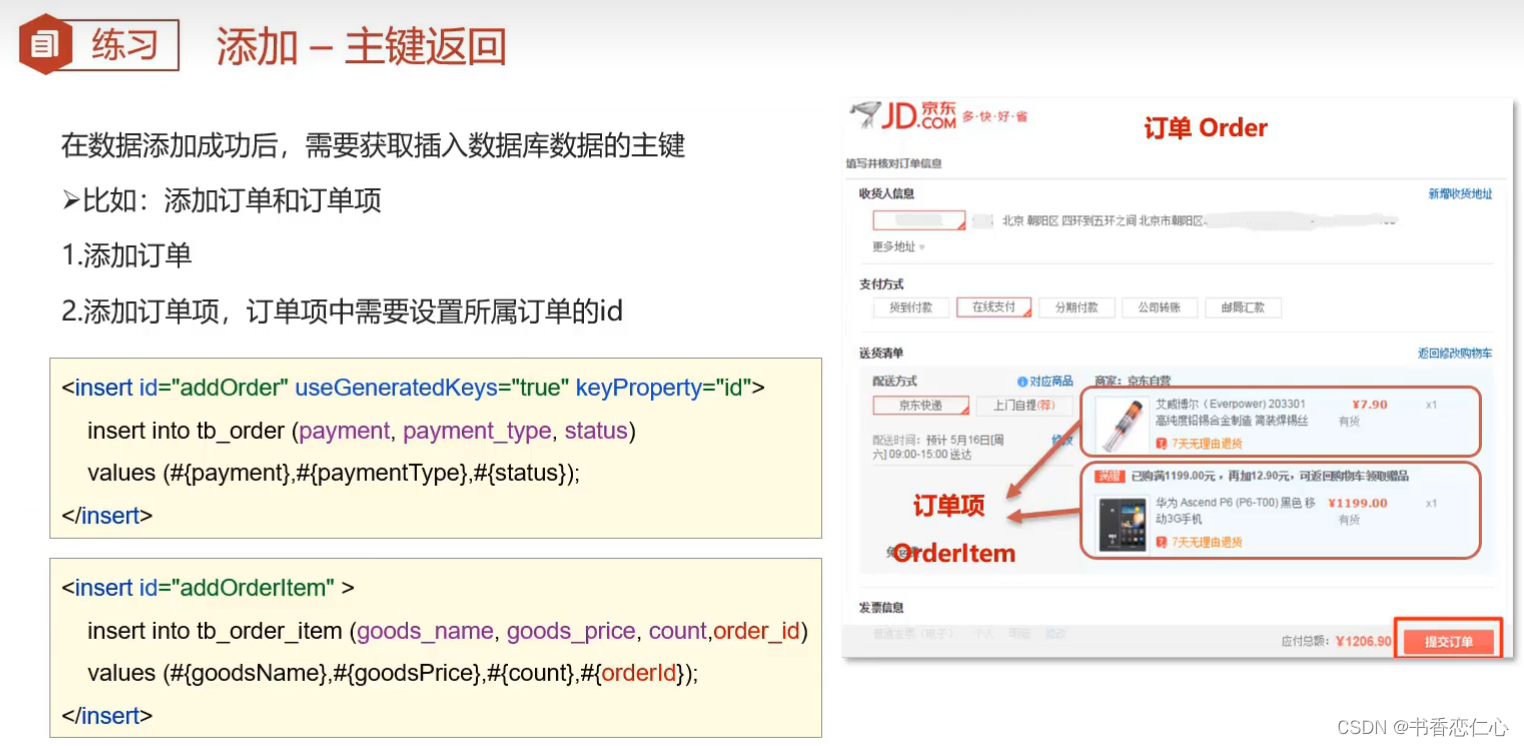
添加后返回主键
如果需要在添加后返回主键,著需要在SQL映射文件中的SQL语句添加以下属性即可
< useGeneratedKeys="true" keyProperty="id">其余操作与上述添加数据操作一致
修改
修改全部字段
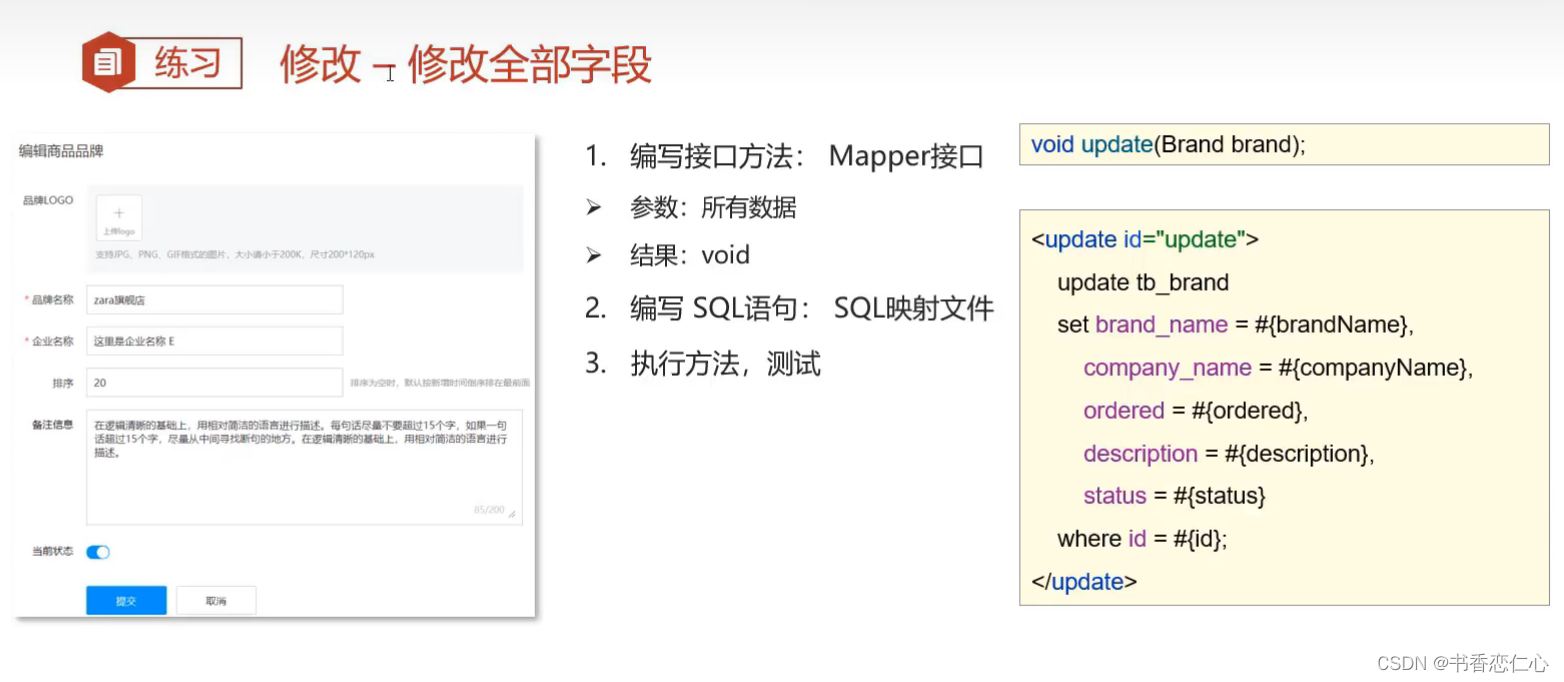
1、编写Mapper接口方法

2、编写SQL映射文件
在SQL映射文件中编写SQL语句
3、执行方法、测试
 @Test
    public void testUpdateBrand() throws IOException{
        // 获取数据
        String brandName="波导手机";
        String companyName="波导手机总经销商";
        int ordered=86;
        String description="干翻华为";
        int status = 1;
        int id = 5;
        // 封装数据
        Brand brand = new Brand();
        brand.setBrandName(brandName);
        brand.setCompanyName(companyName);
        brand.setOrdered(ordered);
        brand.setDescription(description);
        brand.setStatus(status);
        brand.setId(id);

        // 1、加载核心配置文件,获取SqlSessionFactory对象
        String resource = "mybatis-config.xml";
        InputStream inputStream = Resources.getResourceAsStream(resource);
        SqlSessionFactory sqlSessionFactory = new SqlSessionFactoryBuilder().build(inputStream);
        //2、获取SqlSession对象
        SqlSession sqlSession = sqlSessionFactory.openSession(true); // 开启自动提交事务
        // 3、获取Mapper接口代理对象
        BrandMapper brandMapper = sqlSession.getMapper(BrandMapper.class);
        int count = brandMapper.updateBrand(brand);  // 影响的行数
        System.out.println(count);
        sqlSession.close();
    }
修改动态字段
有时候,只想修改表中个别字段,就不需要传入所有字段的数据

1、编写Mapper接口方法

2、编写SQL映射文件

3、执行方法、测试
 @Test
    public void testUpdateBrand2() throws IOException{
        // 获取数据
        String brandName="苹果手机";
        String companyName="苹果手机总经销商";
        int ordered=186;
        String description="干翻华为";
        int status = 1;
        int id = 6;
        // 封装数据
        Brand brand = new Brand();
        brand.setBrandName(brandName);
        brand.setCompanyName(companyName);
        //brand.setOrdered(ordered);
        brand.setDescription(description);
        brand.setStatus(status);
        brand.setId(id);

        // 1、加载核心配置文件,获取SqlSessionFactory对象
        String resource = "mybatis-config.xml";
        InputStream inputStream = Resources.getResourceAsStream(resource);
        SqlSessionFactory sqlSessionFactory = new SqlSessionFactoryBuilder().build(inputStream);
        //2、获取SqlSession对象
        SqlSession sqlSession = sqlSessionFactory.openSession(true); // 开启自动提交事务
        // 3、获取Mapper接口代理对象
        BrandMapper brandMapper = sqlSession.getMapper(BrandMapper.class);
        int count = brandMapper.updateBrand2(brand);  // 影响的行数
        System.out.println(count);
        sqlSession.close();
    }
删除
删除数据库表一条记录
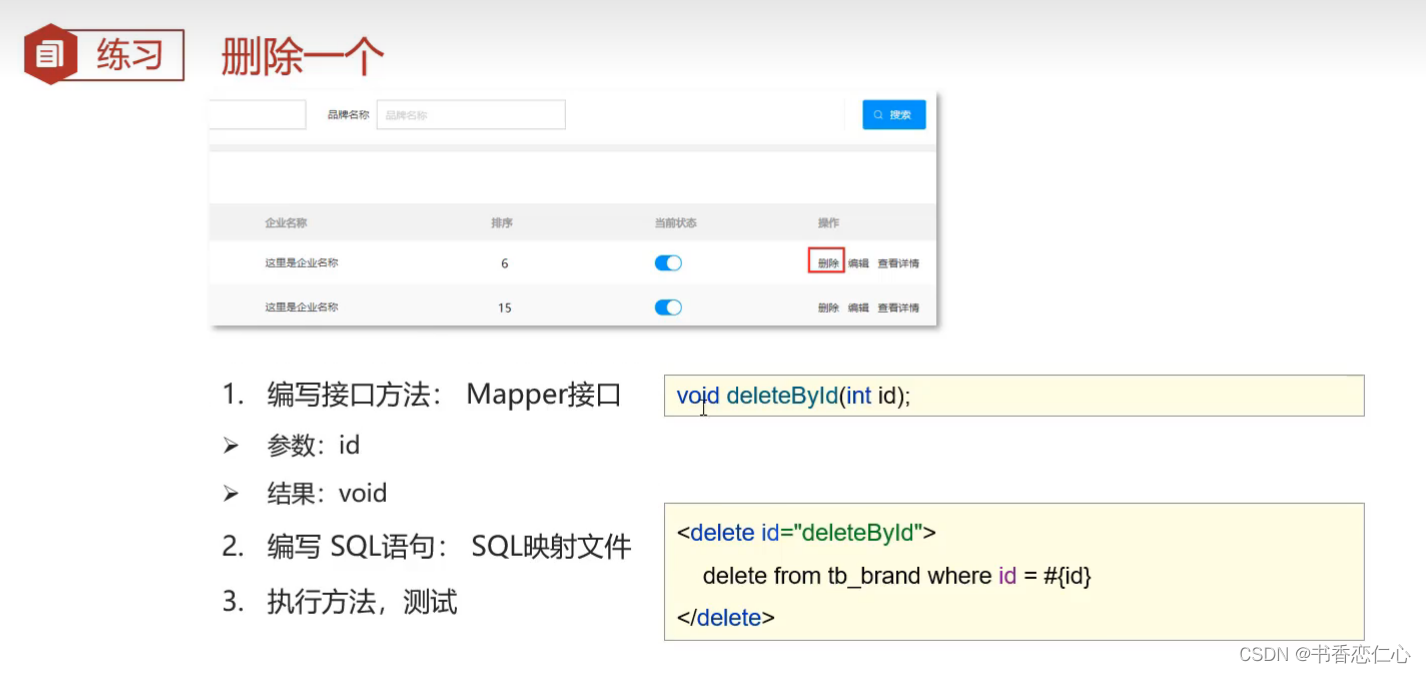
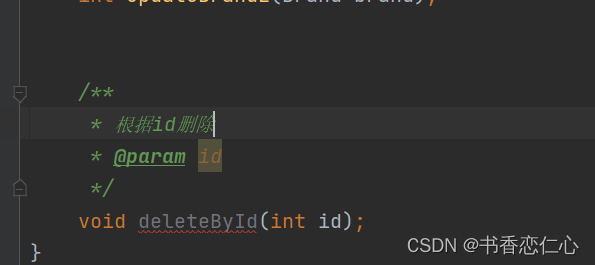
1、编写Mapper接口方法
2、编写SQL映射文件

3、执行方法、测试
@Test
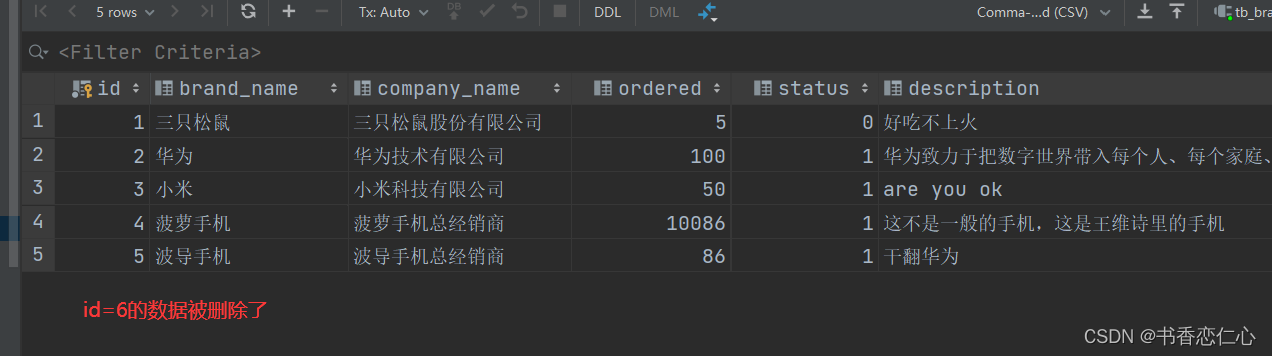
public void testDeleteById() throws IOException{
// 接收数据
int id = 6;
// 1、加载核心配置文件,获取SqlSessionFactory对象
String resource = "mybatis-config.xml";
InputStream inputStream = Resources.getResourceAsStream(resource);
SqlSessionFactory sqlSessionFactory = new SqlSessionFactoryBuilder().build(inputStream);
//2、获取SqlSession对象
SqlSession sqlSession = sqlSessionFactory.openSession(true); // 开启自动提交事务
// 3、获取Mapper接口代理对象
BrandMapper brandMapper = sqlSession.getMapper(BrandMapper.class);
brandMapper.deleteById(id);
sqlSession.close();
}
批量删除
批量删除时,只需要传入需要删除的数据的id值,便可删除
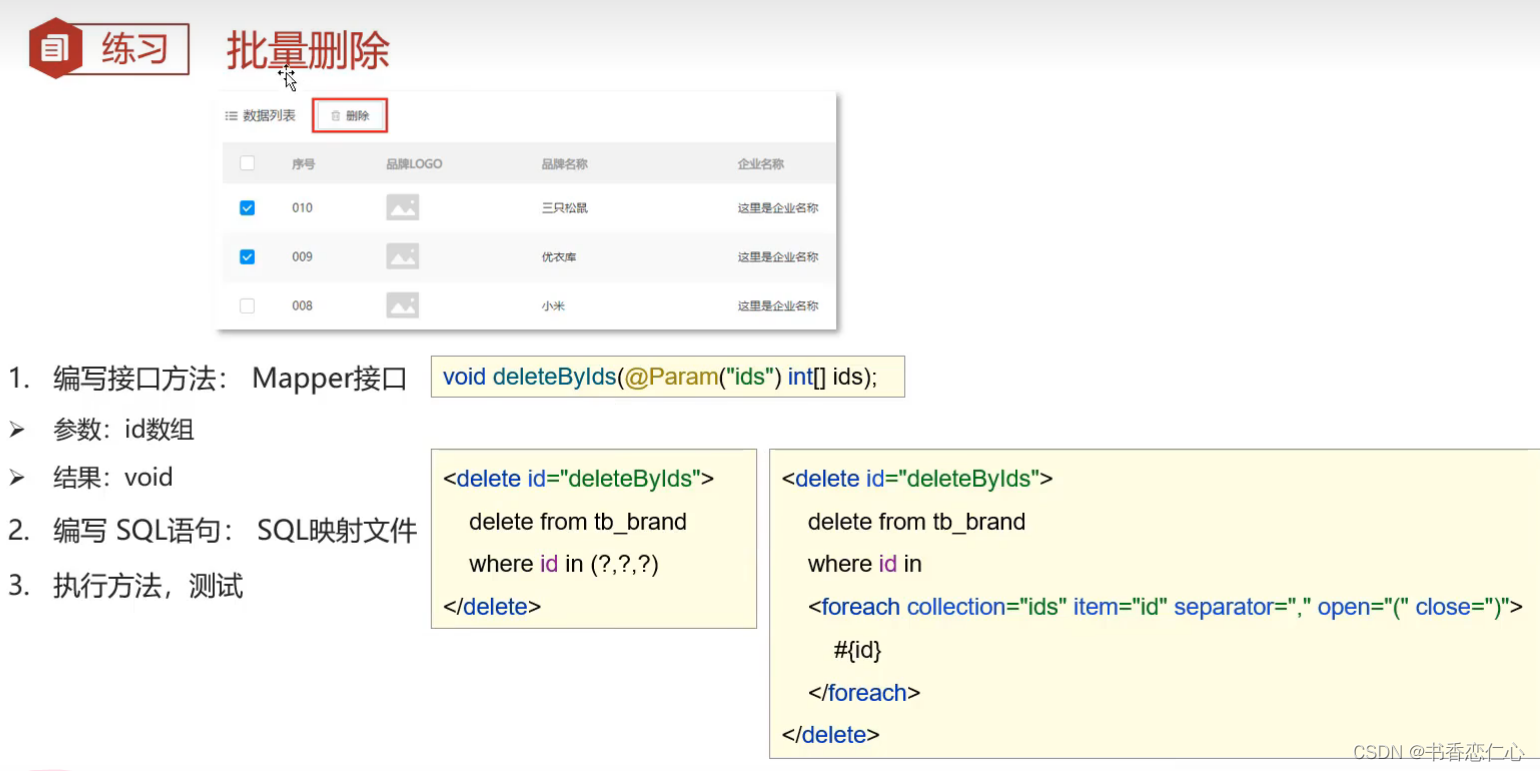
1、编写Mapper接口方法

2、编写SQL映射文件
mybatis默认会将数组参数,封装成map集合
默认 array=数组
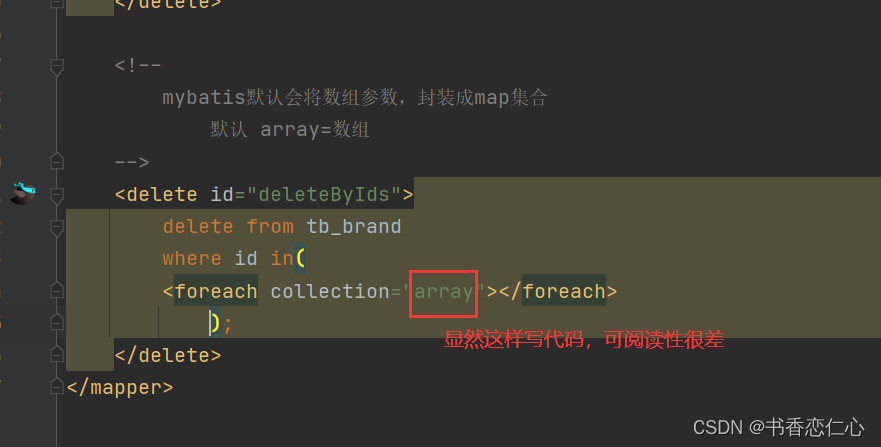
可以使用@Param注解改变map集合的默认key名称,如下图
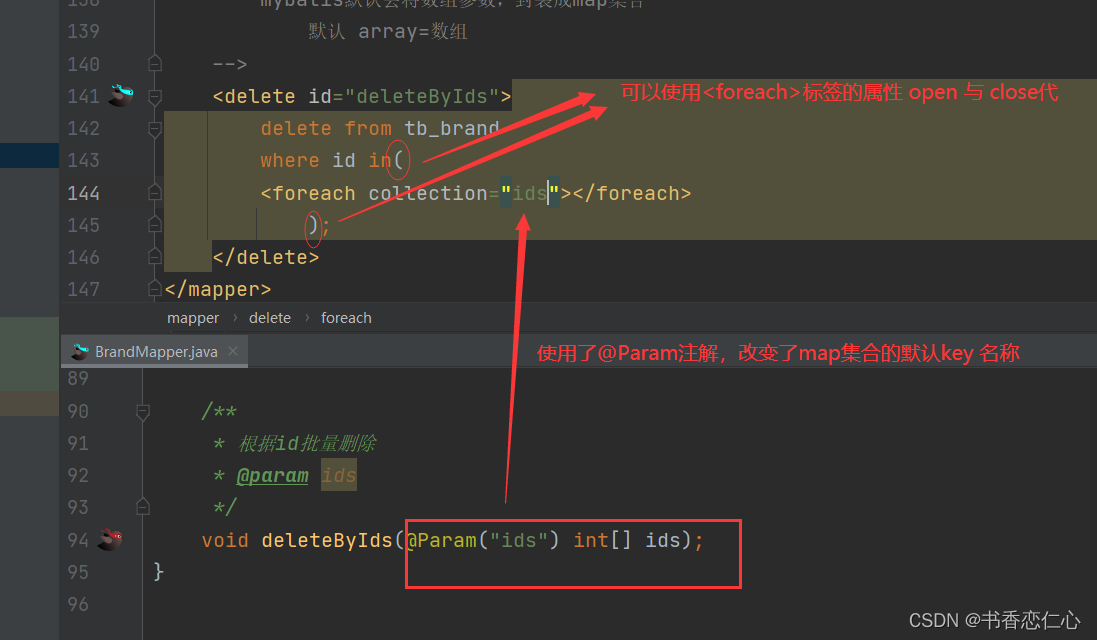
优化后的sql语句如下:

3、执行方法、测试
   @Test
    public void testDeleteByIds() throws IOException{
        // 接收数据
        int[] ids = {4,5};

        // 1、加载核心配置文件,获取SqlSessionFactory对象
        String resource = "mybatis-config.xml";
        InputStream inputStream = Resources.getResourceAsStream(resource);
        SqlSessionFactory sqlSessionFactory = new SqlSessionFactoryBuilder().build(inputStream);
        //2、获取SqlSession对象
        SqlSession sqlSession = sqlSessionFactory.openSession(true); // 开启自动提交事务
        // 3、获取Mapper接口代理对象
        BrandMapper brandMapper = sqlSession.getMapper(BrandMapper.class);
        brandMapper.deleteByIds(ids);
        sqlSession.close();
    }
Mybatis参数传递
Mybaits接口方法中可以接收各种各样的参数,mybatis底层对于这些参数进行不同的封装处理

单个参数
Mybatis提供了ParamNameResolver类进行参数封装
POJO类型
直接使用,属性名与sql语句参数占位符一致即可
Map集合
直接使用,键名key与sql语句参数占位符一致即可
Collecion
封装为map集合
map.put("arg0",collection集合)
map.put("collection",collection集合)
List
封装为map集合
Array
封装为map集合
map.put("arg0",数组)
map.put("array",数组)
其他类型
直接使用
多个参数
多个参数:封装为map集合,可以使用@Param注解替换map集合中默认的arg键名
map.put("arg0",参数值1)
map.put("param1",参数值1)
map.put("param2",参数值2)
map.put("arg1",参数值2)
使用注解完成增删改查
对于简单的SQL语句使用注解
对于复杂的SQL语句使用SQL映射文件
mybatis官方也是这么说的
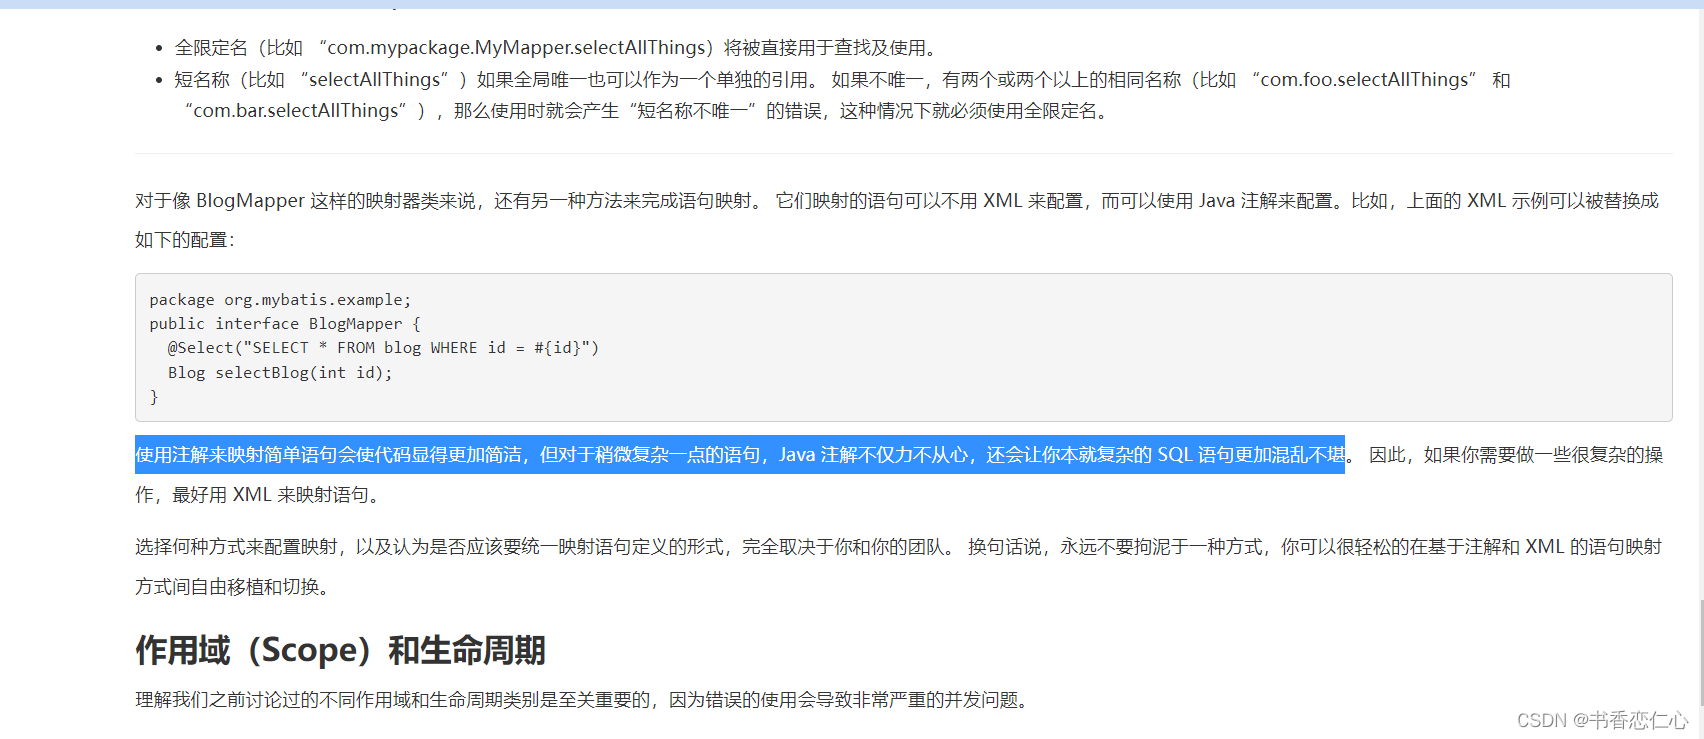
例子:使用注解来查询数据

总结
mybatis完成操作需要如下几步:
编写接口方法——>编写SQL——>执行方法
实体类与数据库表字段名不一致,不能自动封装
1)起别名:在sql语句中,对不一样的字段名起别名,别名与实体类属性名一样
2)定义<sql>片段,提高复用性
3)resultMap:定义<resultMap>完成不一致的属性名与字段名的映射
总结:
参数占位符
#{} 会将其替换为?,为了防止SQL注入
${} 拼SQL,会存在SQL注入问题
使用时机:
作为参数传递时:#{}
表名或字段名不固定的情况下,需要动态设置时:${}
参数类型:parameterTpye:可以省略
特殊字符处理:
1、转义字符 (ep: <)
2、CDATA区
<![CDATA[ 内容 ]]>
总结
参数接收:
1、散装参数:如果方法中有多个参数,需要使用@Param("SQL参数占位符")
2、对象参数:对象的属性要和SQL语句参数占位符名称一致
3、map集合:只需要保证SQL语句中参数占位符和map集合中键的名称对应即可
动态SQL
动态SQL是mybatis的强大特性之一。

if:用于判断是否有值,使用test属性进行条件判断
存在的问题:第一个条件不需要逻辑运算符
解决方案:
使用恒等式 (ep 1 = 1)
<where>标签代替where关键字
mybatis默认会将数组参数,封装成map集合
默认 array=数组
可以使用@Param注解改变map集合的默认key名称