Spring Boot通过websocket实现即时通讯
环境信息
| 名称 | 版本号 |
|---|---|
| Spring Boot | 2.4.5 |
| Idea | 2021.3.2 |
服务端实现
导入依赖
<dependency>
    <groupId>org.springframework.boot</groupId>
    <artifactId>spring-boot-starter-websocket</artifactId>
</dependency>
注意:Spring Boot在父工程中已经管理了websocket的版本信息,所以不用指定版本号也是可以的
创建配置类
package com.fenzhichuanmei.configuration;

import org.springframework.context.annotation.Bean;
import org.springframework.context.annotation.Configuration;
import org.springframework.web.socket.server.standard.ServerEndpointExporter;

/**
 * @author Yi Dai [email protected]
 * @since 2022/5/13 11:34
 */

@Configuration
public class WebsocketConfiguration {


    @Bean
    public ServerEndpointExporter serverEndpointExporter() {


        return new ServerEndpointExporter();
    }

}
创建此配置类的目的只是为了把ServerEndpointExporter 这个类的实例交给spring 容器进行管理,您可以用任意一种方式交给容器,如使用@Import(ServerEndpointExporter.class)这种方式等进行操作;此处只是我的编码风格如此;并非必须这样操作
创建一个注解式的端点并在其中通过配套注解声明回调方法
package com.fenzhichuanmei.websocket;


import com.fenzhichuanmei.websocket.utils.SessionManager;
import lombok.extern.slf4j.Slf4j;
import org.springframework.stereotype.Component;

import javax.annotation.Resource;
import javax.websocket.*;
import javax.websocket.server.PathParam;
import javax.websocket.server.ServerEndpoint;

/**
 * @author Yi Dai [email protected]
 * @since 2022/3/7 15:47
 */

@Slf4j
@Component
@ServerEndpoint("/arcticFoxServerEndpoint/{websocketClientType}")
public class ArcticFoxServerEndpoint {


    private static SessionManager sessionManager;

    @Resource
    public void setProcessor(SessionManager sessionManager) {


        ArcticFoxServerEndpoint.sessionManager = sessionManager;
    }

    /**
     * 建立连接成功的回调方法
     *
     * @param session             会话对象
     * @param websocketClientType 此参数就是路径中{websocketClientType}位置传入的参数
     */
    @OnOpen
    public void onOpen(Session session, @PathParam("websocketClientType") int websocketClientType) {


        sessionManager.onOpen(session, websocketClientType);
    }

    /**
     * 当会话关闭时执行的回调方法
     *
     * @param session             会话对象
     * @param websocketClientType 此参数就是路径中{websocketClientType}位置传入的参数
     */
    @OnClose
    public void onClose(Session session, @PathParam("websocketClientType") int websocketClientType) {


        sessionManager.onClose(session, websocketClientType);
    }

    /**
     * 当收到客户端信息时执行的回调方法
     *
     * @param session             会话对象
     * @param message             客户端传递过来的信息
     * @param websocketClientType 此参数就是路径中{websocketClientType}位置传入的参数
     */
    @OnMessage
    public void onMessage(Session session, String message, @PathParam("websocketClientType") int websocketClientType) {


        sessionManager.onMessage(session, message, websocketClientType);
    }

    /**
     * 当发生错误时的回调方法
     *
     * @param session             会话对象
     * @param e                   异常对象
     * @param websocketClientType 此参数就是路径中{websocketClientType}位置传入的参数
     */
    @OnError
    public void onError(Session session, Throwable e, @PathParam("websocketClientType") int websocketClientType) {


        sessionManager.onError(session, e, websocketClientType);
    }

}
@ServerEndpoint注解标注此类为一个服务端的端点类,此注解有一个必须的参数,用于指定客户端访问的地址,本案例中为:/arcticFoxServerEndpoint,而路径后面的/{websocketClientType}这个是路径中参数的占位符,有点类似与Spring Mvc中Rest接口和@PathVariable注解的作用
注意事项: 一定要将此类交给spring 容器进行管理!!还有一个坑就是,此类的实例时非单例的,所以如果要在此类中注入其他的bean,不能使直接在属性上使用@Resource注解或者@Autowired等注解进行注入,否则会报错。正确操作应该是把要注入的字段设置为静态的,然后通过非静态的set方法进行注入,具体代码请看上方实例
服务端主动发送消息给客户端
通过上面的代码我们可以知道每个回调方法中都会收到一个Session对象,正如您所想,要向客户端发送消息正是要借助此对象;Session对象有一个getAsyncRemote方法,调用此方法可以得到一个RemoteEndpoint.Async对象,查看此对象,发现有很多send打头的方法;
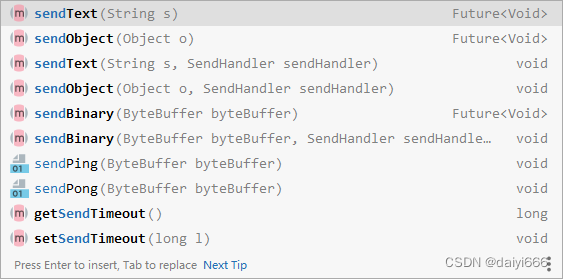
是的,这些方法就是发送消息的方法,博主这个项目中主要是通过JSON来进行交互的,所以我使用了sendText方法,示例代码:
RemoteEndpoint.Async asyncRemote = session.getAsyncRemote();
asyncRemote.sendText(jsonString);
很显然中转变量asyncRemote 没什么太大的用处,不如直接写成:
session.getAsyncRemote().sendText(jsonString);
通过方法名看到,似乎还可以发送对象,二进制序列等,博主没有深入研究,有兴趣的小伙伴可以尝试尝试
客户端实现
一般来讲客户端应该是用Java Script实现,但是博主这个项目比较特殊,需要用Java来实现客户端,下面博主先以Java客户端说明其实现细节,然后再说再前端如何实现
Java客户端实现
导入依赖
<dependency>
    <groupId>org.java-websocket</groupId>
    <artifactId>Java-WebSocket</artifactId>
    <version>1.5.3</version>
</dependency>
其实Java中实现WebSocket的第三方包还有很多,博主这个地方使用的是Java-WebSocket,有兴趣的小伙伴可以试试其他的包
建立连接和处理回调
package com.fenzhichuanmei.websocket;

import com.fasterxml.jackson.core.JsonProcessingException;
import com.fasterxml.jackson.databind.ObjectMapper;
import com.fenzhichuanmei.components.PaymentComponent;
import com.fenzhichuanmei.pojo.Instructions;
import com.fenzhichuanmei.utils.WebsocketClientType;
import lombok.Data;
import lombok.extern.slf4j.Slf4j;
import org.java_websocket.client.WebSocketClient;
import org.java_websocket.enums.ReadyState;
import org.java_websocket.handshake.ServerHandshake;
import org.springframework.boot.context.properties.ConfigurationProperties;
import org.springframework.stereotype.Component;

import javax.annotation.Resource;
import java.net.URI;
import java.net.URISyntaxException;

/**
 * @author Yi Dai [email protected]
 * @since 2022/5/13 10:16
 */

@Slf4j
@Component
public class ArcticFoxWebSocketClient {


    @Resource
    private ObjectMapper objectMapper;

    @Resource
    private PaymentComponent paymentComponent;

    @Resource
    private ArcticFoxWebSocketClientProperties properties;

    public void establishConnection() throws URISyntaxException {


        WebSocketClient webSocketClient = new WebSocketClient(new URI(String.format("%s/%d", properties.getWebSocketServerUrl(), WebsocketClientType.PAYMENT_DEVICE))) {


            @Override
            public void onOpen(ServerHandshake serverHandshake) {


                log.info("WebSocketClient: onOpen : {}", serverHandshake);
            }

            @Override
            public void onMessage(String jsonString) {


                try {


                    Instructions instructions = objectMapper.readValue(jsonString, Instructions.class);
                    if (instructions.getType() == Instructions.NOTICE_PAYMENT) {


                        paymentComponent.queryAnUnpaidOrdersAndPay();
                    } else {


                        throw new RuntimeException("错误的指令类型");
                    }
                } catch (JsonProcessingException e) {


                    e.printStackTrace();
                }
            }

            @Override
            public void onClose(int i, String s, boolean b) {


                log.info("WebSocketClient: onClose : i:{},s:{},b:{}", i, s, b);
                try {


                    Thread.sleep(1000 * 20);
                    establishConnection();
                } catch (InterruptedException | URISyntaxException e) {


                    e.printStackTrace();
                }
            }

            @Override
            public void onError(Exception e) {


                log.error("WebSocketClient: onError {}", e.getMessage());
            }
        };
        webSocketClient.connect();
        while (!(webSocketClient.getReadyState() == ReadyState.OPEN)) {


            try {


                Thread.sleep(1000 * 2);
            } catch (InterruptedException e) {


                e.printStackTrace();
            }
        }
        log.info("WebSocketClient: connection established successfully");
    }


    @Data
    @Component
    @ConfigurationProperties("arctic-fox-web-socket-client.properties")
    public static class ArcticFoxWebSocketClientProperties {


        private String webSocketServerUrl;

    }
}
代码解释: 其实我的establishConnection方法中上来就实例化了一个WebSocketClient 类的实例,请注意,此类是个抽象类,我在这里用匿名实现类的方式实现的,此类有几个抽象方法需要实现,也就是onOpen,onMessage,onClose,onError四个方法,其作用其实已经是很见名知意了,和服务端的回调方法一样,就不过多解释;实例化此类需要传入一个URI对象,这个URI对象其实就是封装了对服务端连接的地址,由于博主不希望把服务端的地址给写死了,所以我配置到了配置文件中,然后通过String.format静态方法配合占位符拼接url地址和参数;路径的规则是:协议名://IP地址(或域名):端口号/服务端声明的地址/参数;举个例子:
ws://192.168.88.88:8080/arcticFoxServerEndpoint/1
ws://localhost:8080/arcticFoxServerEndpoint/2
ws://为协议;实例化WebSocketClient 类的实例之后,调用其connect()方法即开始建立连接,调用getReadyState()方法可以获得其状态;由于我的服务端可能随时都连不上,所以我在客户端的onClose回调函数中进行了一个递归(20秒后),用于重新连接。
客户端向服务端发送消息
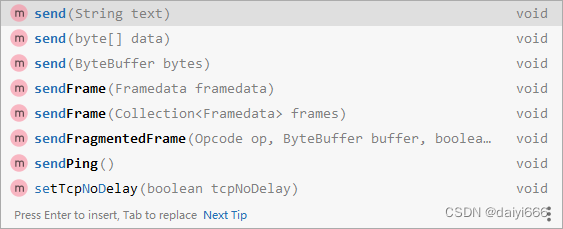
通过WebSocketClient 类的实例,我们可以看到有以下方法,很明显send方法就是用来发送消息使用的
示例代码:
//判断一下是否为空
if (Objects.nonNull(webSocketClient)) {


    try {


    	//通过jackson将对象转换为json字符串(非必须)
        String jsonString = objectMapper.writeValueAsString(feedback);
        //发送信息
        webSocketClient.send(jsonString);
    } catch (JsonProcessingException e) {


        e.printStackTrace();
    }
} else {


    log.warn("no connection established");
}
在前端环境(vue)中使用websocket
安装reconnecting-websocket包(非必须)
npm i --save reconnecting-websocket
安装这个包是为了websocket能在断线之后重新连接,其实不使用这个包也是可以用原生Java Script实现的;但是他和原生的api几乎一样;
示例代码:
import ReconnectingWebSocket from "reconnecting-websocket";

export default function initializationWebsocket() {


    let reconnectingWebSocket = new ReconnectingWebSocket(`ws://localhost:8080/arcticFoxServerEndpoint/${

      2}`);
    reconnectingWebSocket.onopen = event => {


        console.log("on open :", event);
    };

    reconnectingWebSocket.onmessage = event => {


    	//event对象中data存储的就是服务端发送过来的消息
        let parse = JSON.parse(event.data);
        console.log("webSocket on message :", parse);
    };

    reconnectingWebSocket.onclose = event => {


        console.log(event);
    };

    reconnectingWebSocket.onerror = event => {


        console.log(event);
    };

	//窗口关闭时断开连接
    window.onbeforeunload = function () {


        reconnectingWebSocket.close();
    }
}
在前端中实现websocket就比较简单了,就上面的几行代码即可,不用调用其他函数进行连接,实例化之后就开始连接了
想服务端发送信息
在前端中发送信息就更简单了,直接调用reconnectingWebSocket的send方法,传入要发送的数据即可