文章目录
一、json转png
打开anaconda prompt,激活labelme的环境
输入labelme_json_to_dataset F:\PROJECT\xxx\New_data\410.json可以直接转换
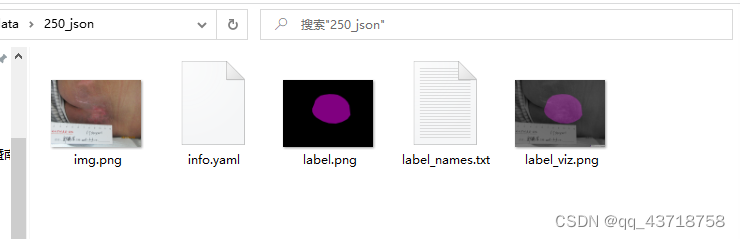
生成了1个文件夹,有5个文件:
注:我测试的json数据中,有两个版本分别为3.16.7和5.0.1
使用2个版本的labelme环境对两个版本的json都可以进行转换
故,可以理解为:不需要考虑版本不匹配的问题。
但是当我们生成了多个png后,发现了一个问题:
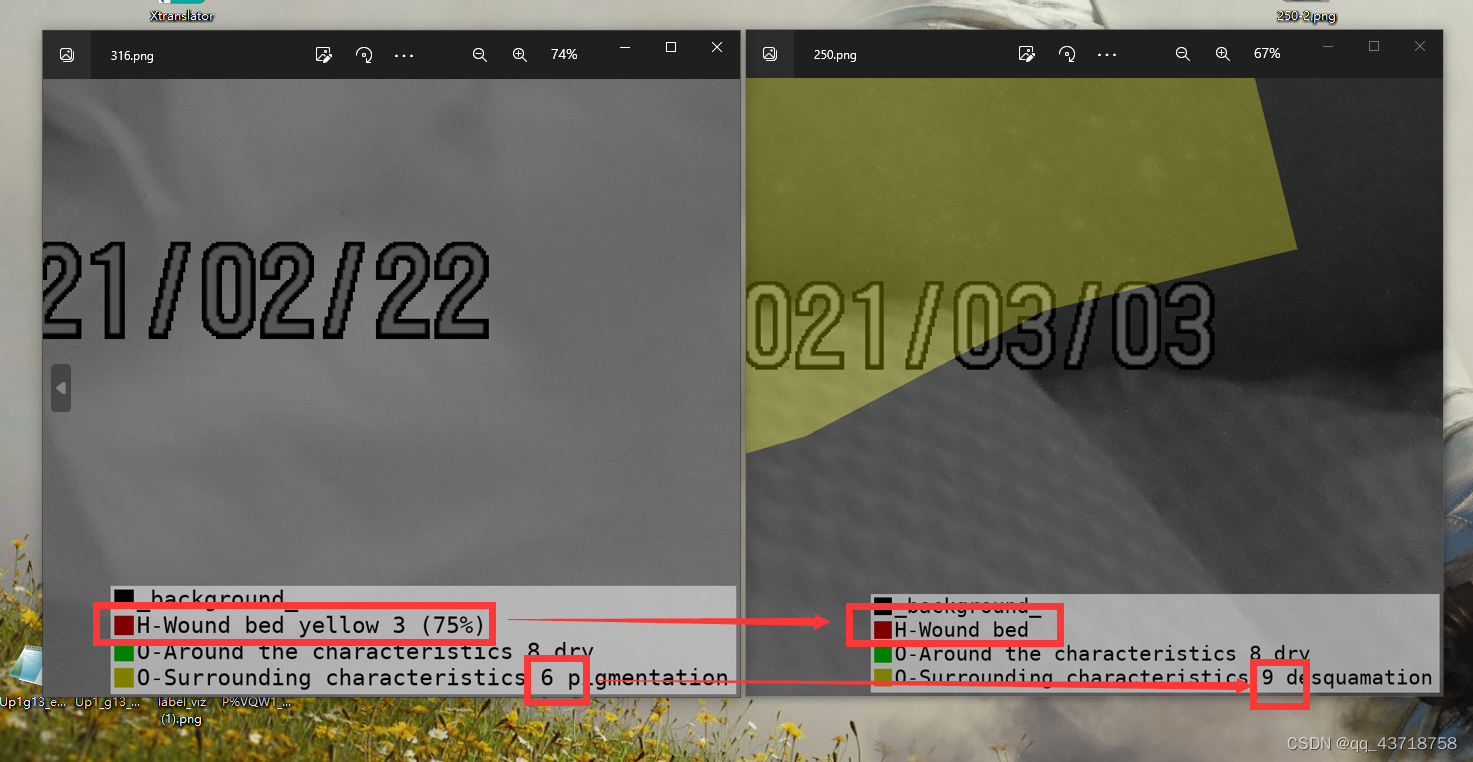
但是,在这两张照片中,可以看到对于不同的标签,颜色竟然也是一样的,这显然是不对的。
同样的,在同一个标签中。
如下图所示,当我们把左图中红色的标签删去,可以发现,另外一个标签变成了红色,这个标签在之前是绿色的
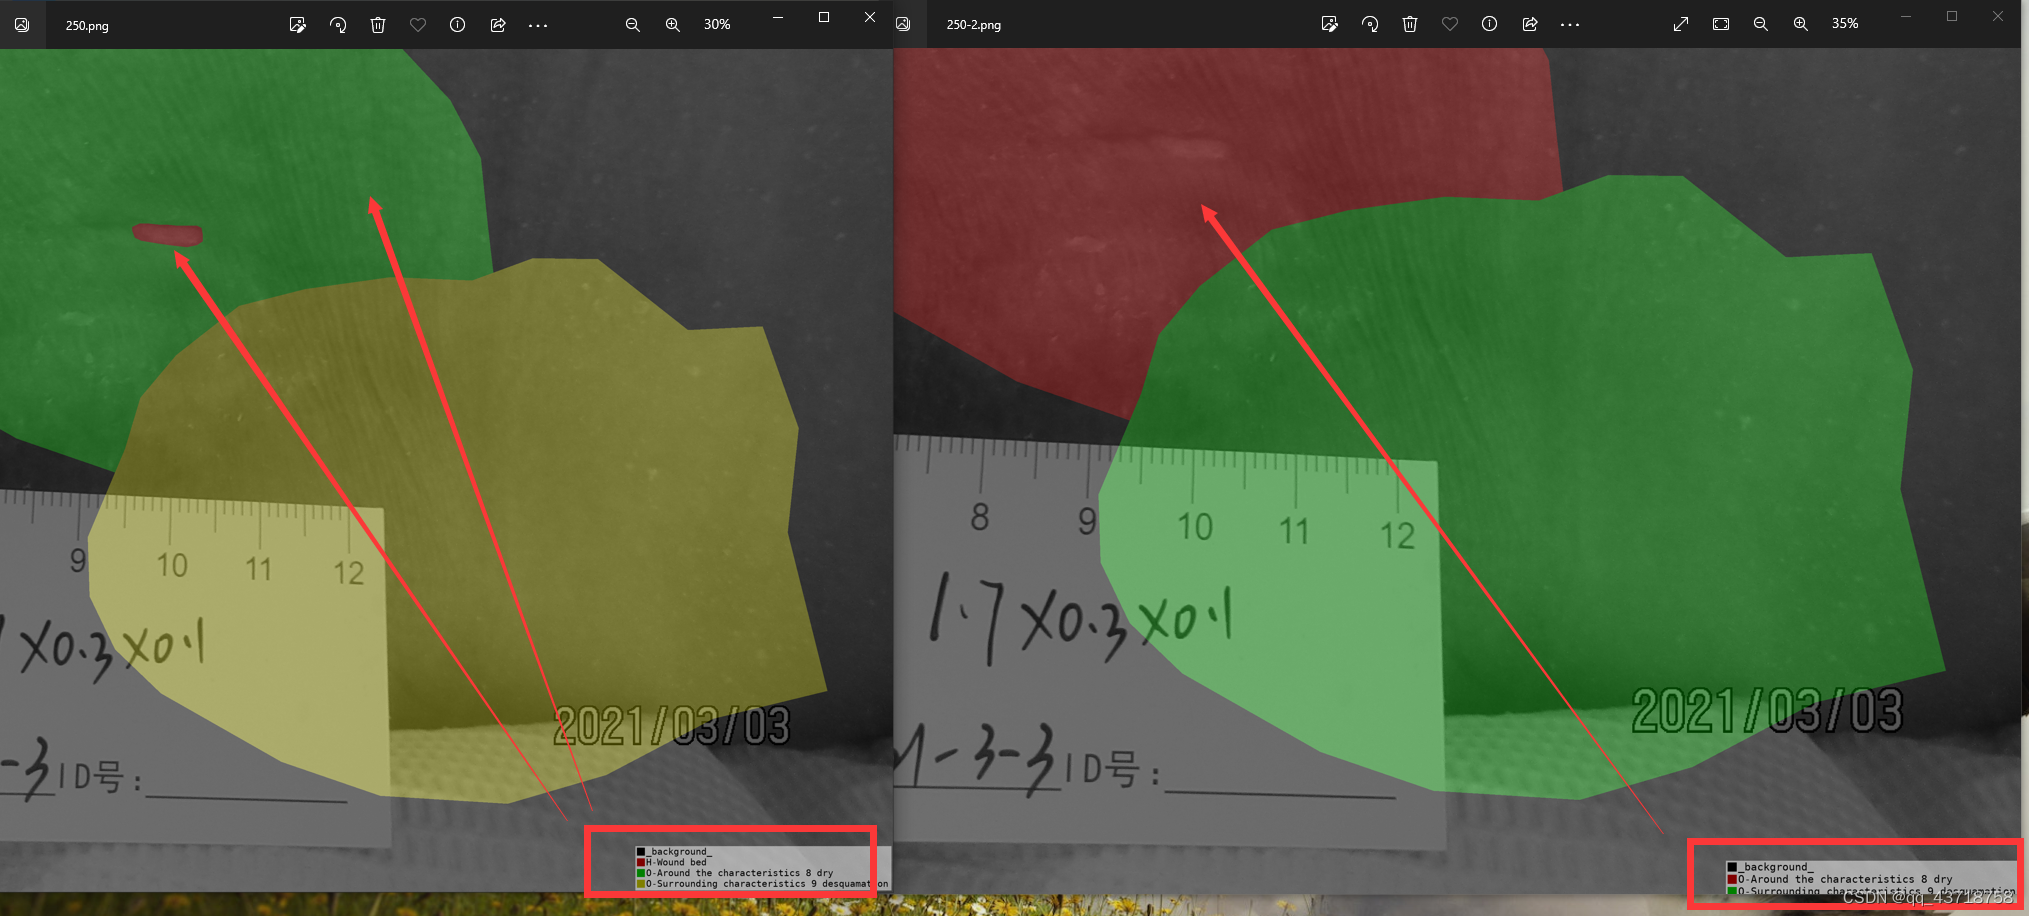
因此,我们推断,标签的颜色,是根据出现的顺序了分配的。
为了更加规范我们的数据集,我们需要把json数据转换成VOC格式的png数据
因为在voc的语义分割数据集中,我们可以发现,同一类的物体,在所有图片中的颜色都是相同的。
二、json转换为VOC数据
1、在GitHub下载官方工具,对官方数据进行转换
在github上链接:https://github.com/zhong110020/labelme/tree/master/examples/semantic_segmentation
文件路径:labelme/examples/semantic_segmentation/

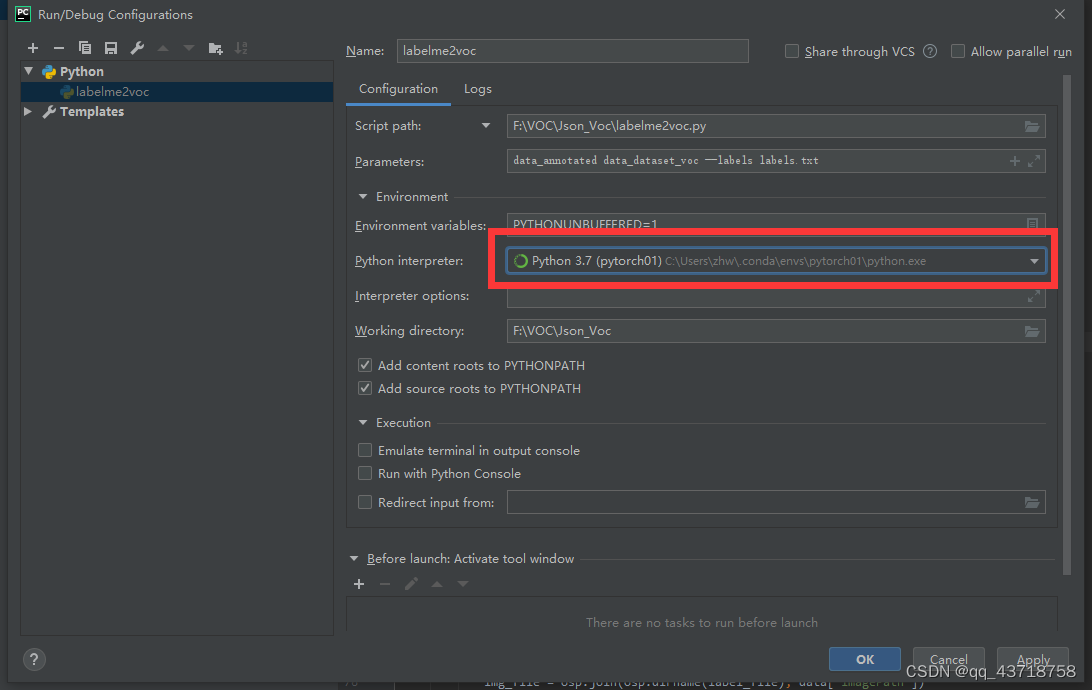
在pycharm中打开,选择conda打开。
labelme5.0.1
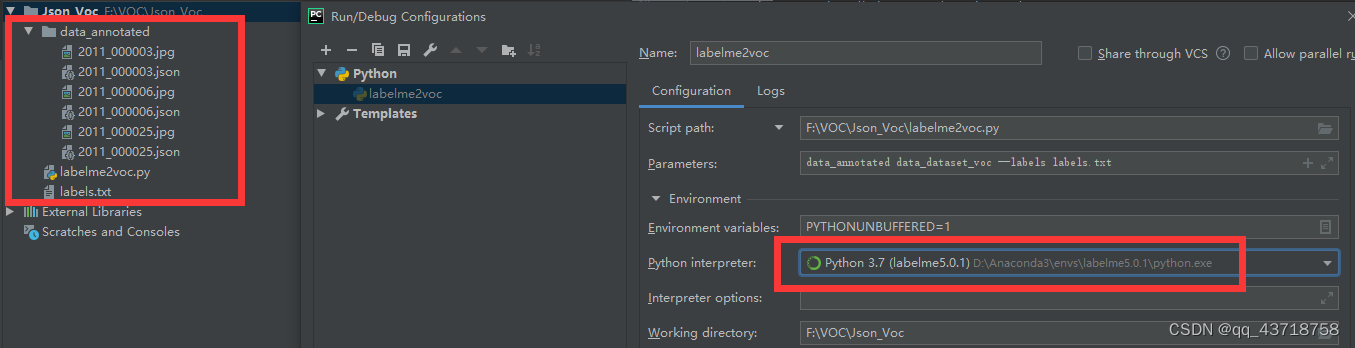
可以看到,我选择了labelme版本是5.0.1,并且把data_annotated、labelme2voc.py、labels.txt放到同一文件夹下
修改参数:data_annotated data_dataset_voc --labels labels.txt

运行:
D:\Anaconda3\envs\labelme5.0.1\python.exe F:/VOC/Json_Voc/labelme2voc.py data_annotated data_dataset_voc --labels labels.txt
Creating dataset: data_dataset_voc
class_names: ('_background_', 'aeroplane', 'bicycle', 'bird', 'boat', 'bottle', 'bus', 'car', 'cat', 'chair', 'cow', 'diningtable', 'dog', 'horse', 'motorbike', 'person', 'potted plant', 'sheep', 'sofa', 'train', 'tv/monitor')
Saved class_names: data_dataset_voc\class_names.txt
Traceback (most recent call last):
  File "F:/VOC/Json_Voc/labelme2voc.py", line 95, in <module>
    main()
  File "F:/VOC/Json_Voc/labelme2voc.py", line 56, in main
    colormap = labelme.utils.label_colormap(255)
AttributeError: module 'labelme.utils' has no attribute 'label_colormap'

Process finished with exit code 1
问题原因:版本不匹配
labelme3.16.7
解决办法:我更换了环境,pytorch01,这里安装的labelme版本为3.16.7
再次运行:

C:\Users\zhw\.conda\envs\pytorch01\python.exe F:/VOC/Json_Voc/labelme2voc.py data_annotated data_dataset_voc --labels labels.txt
Output directory already exists: data_dataset_voc

Process finished with exit code 1
解决:我们只需要把刚刚生成的data_dataset_voc删除即可(运行失败但也会生成文件夹)(在之后的运行中,每次报错修改后都需要删除文件夹后再运行!)
再次运行:
C:\Users\zhw\.conda\envs\pytorch01\python.exe F:/VOC/Json_Voc/labelme2voc.py data_annotated data_dataset_voc --labels labels.txt
Creating dataset: data_dataset_voc
class_names: ('_background_', 'aeroplane', 'bicycle', 'bird', 'boat', 'bottle', 'bus', 'car', 'cat', 'chair', 'cow', 'diningtable', 'dog', 'horse', 'motorbike', 'person', 'potted plant', 'sheep', 'sofa', 'train', 'tv/monitor')
Saved class_names: data_dataset_voc\class_names.txt
Generating dataset from: data_annotated\2011_000003.json
Generating dataset from: data_annotated\2011_000006.json
Generating dataset from: data_annotated\2011_000025.json

Process finished with exit code 0
2、使用官方py文件转换自己的数据集
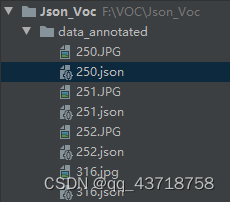
将自己的数据放到文件夹下
运行:
Traceback (most recent call last):
  File "F:/VOC/Json_Voc/labelme2voc.py", line 96, in <module>
    main()
  File "F:/VOC/Json_Voc/labelme2voc.py", line 78, in main
    img = np.asarray(PIL.Image.open(img_file))
  File "C:\Users\zhw\.conda\envs\pytorch01\lib\site-packages\PIL\Image.py", line 3092, in open
    fp = builtins.open(filename, "rb")
FileNotFoundError: [Errno 2] No such file or directory: 'data_annotated\\2011_000003.jpg'

Process finished with exit code 1
报错原因:在标注时,是用图片.bmp标注的,所以在json中的imagePath值为图片.bmp,但是文件夹中只有jpg,所以报错。
因为在实验过程中,标注实验的人可能使用了jpg,也可能使用bmp。
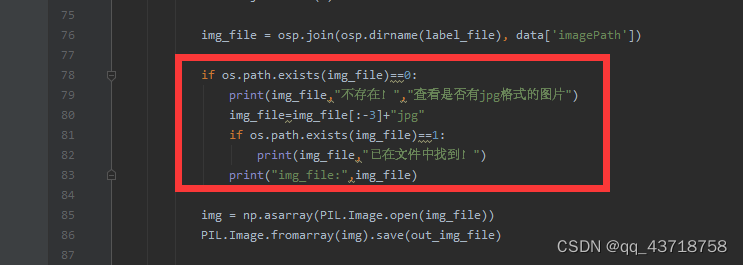
所以我修改代码:
 			img_file = osp.join(osp.dirname(label_file), data['imagePath'])

            if os.path.exists(img_file)==0:
                print(img_file,"不存在!","查看是否有jpg格式的图片")
                img_file=img_file[:-3]+"jpg"
                if os.path.exists(img_file)==1:
                    print(img_file,"已在文件中找到!")
                print("img_file:",img_file)#这句话之后删掉了

            img = np.asarray(PIL.Image.open(img_file))
运行
报错:
Traceback (most recent call last):
  File "F:/VOC/Json_Voc/labelme2voc.py", line 101, in <module>
    main()
  File "F:/VOC/Json_Voc/labelme2voc.py", line 89, in main
    label_name_to_value=class_name_to_id,
  File "C:\Users\zhw\.conda\envs\pytorch01\lib\site-packages\labelme\utils\shape.py", line 67, in shapes_to_label
    cls_id = label_name_to_value[cls_name]
KeyError: 'O-Around the characteristics 8 dry'

Process finished with exit code 1
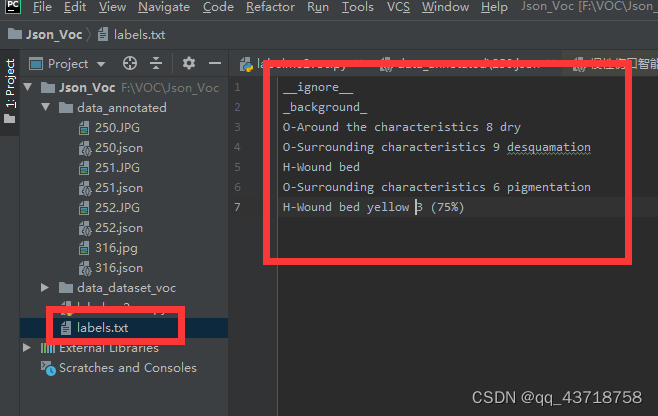
需要修改labels.txt,标签改为自己数据集的名称
再次运行:成功!
C:\Users\zhw\.conda\envs\pytorch01\python.exe F:/VOC/Json_Voc/labelme2voc.py data_annotated data_dataset_voc --labels labels.txt
Creating dataset: data_dataset_voc
class_names: ('_background_', 'O-Around the characteristics 8 dry', 'O-Surrounding characteristics 9 desquamation', 'H-Wound bed', 'O-Surrounding characteristics 6 pigmentation', 'H-Wound bed yellow 3 (75%)')
Saved class_names: data_dataset_voc\class_names.txt
Generating dataset from: data_annotated\250.json
data_annotated\250.bmp 不存在! 查看是否有jpg格式的图片
data_annotated\250.jpg 已在文件中找到!
Generating dataset from: data_annotated\251.json
data_annotated\251.bmp 不存在! 查看是否有jpg格式的图片
data_annotated\251.jpg 已在文件中找到!
Generating dataset from: data_annotated\252.json
data_annotated\252.bmp 不存在! 查看是否有jpg格式的图片
data_annotated\252.jpg 已在文件中找到!
Generating dataset from: data_annotated\316.json
data_annotated\316.BMP 不存在! 查看是否有jpg格式的图片
data_annotated\316.jpg 已在文件中找到!

Process finished with exit code 0

可以看到,解决了我们在第一节中提到的:相同类别颜色却不同的这一问题!
注:在之前部署U-net模型时,其实转换还有其他的方法
labelme2voc.py源码(没有进行过修改的)
from __future__ import print_function

import argparse
import glob
import json
import os
import os.path as osp
import sys

import numpy as np
import PIL.Image

import labelme


def main():
    parser = argparse.ArgumentParser(
        formatter_class=argparse.ArgumentDefaultsHelpFormatter
    )
    parser.add_argument('input_dir', help='input annotated directory')
    parser.add_argument('output_dir', help='output dataset directory')
    parser.add_argument('--labels', help='labels file', required=True)
    args = parser.parse_args()

    if osp.exists(args.output_dir):
        print('Output directory already exists:', args.output_dir)
        sys.exit(1)
    os.makedirs(args.output_dir)
    os.makedirs(osp.join(args.output_dir, 'JPEGImages'))
    os.makedirs(osp.join(args.output_dir, 'SegmentationClass'))
    os.makedirs(osp.join(args.output_dir, 'SegmentationClassPNG'))
    os.makedirs(osp.join(args.output_dir, 'SegmentationClassVisualization'))
    print('Creating dataset:', args.output_dir)

    class_names = []
    class_name_to_id = {

    }
    for i, line in enumerate(open(args.labels).readlines()):
        class_id = i - 1  # starts with -1
        class_name = line.strip()
        class_name_to_id[class_name] = class_id
        if class_id == -1:
            assert class_name == '__ignore__'
            continue
        elif class_id == 0:
            assert class_name == '_background_'
        class_names.append(class_name)
    class_names = tuple(class_names)
    print('class_names:', class_names)
    out_class_names_file = osp.join(args.output_dir, 'class_names.txt')
    with open(out_class_names_file, 'w') as f:
        f.writelines('\n'.join(class_names))
    print('Saved class_names:', out_class_names_file)

    colormap = labelme.utils.label_colormap(255)

    for label_file in glob.glob(osp.join(args.input_dir, '*.json')):
        print('Generating dataset from:', label_file)
        with open(label_file) as f:
            base = osp.splitext(osp.basename(label_file))[0]
            out_img_file = osp.join(
                args.output_dir, 'JPEGImages', base + '.jpg')
            out_lbl_file = osp.join(
                args.output_dir, 'SegmentationClass', base + '.npy')
            out_png_file = osp.join(
                args.output_dir, 'SegmentationClassPNG', base + '.png')
            out_viz_file = osp.join(
                args.output_dir,
                'SegmentationClassVisualization',
                base + '.jpg',
            )

            data = json.load(f)

            img_file = osp.join(osp.dirname(label_file), data['imagePath'])
            img = np.asarray(PIL.Image.open(img_file))
            PIL.Image.fromarray(img).save(out_img_file)

            lbl = labelme.utils.shapes_to_label(
                img_shape=img.shape,
                shapes=data['shapes'],
                label_name_to_value=class_name_to_id,
            )
            labelme.utils.lblsave(out_png_file, lbl)

            np.save(out_lbl_file, lbl)

            viz = labelme.utils.draw_label(
                lbl, img, class_names, colormap=colormap)
            PIL.Image.fromarray(viz).save(out_viz_file)


if __name__ == '__main__':
    main()
2.3 对数据集进行 训练/验证 的划分
主要工作就是生成了4个txt的文档,并且路径是按照voc的数据集修改的

注意:目前还没有对代码进行优化,因此在每次运行时,都需要把ImageSets全部删去再运行。
voc_annotation.py源码如下:若要使用该代码,若需要修改,则主要修改路径即可
import os
import random

import numpy as np
from PIL import Image
from tqdm import tqdm

#-------------------------------------------------------#
#   想要增加测试集修改trainval_percent
#   修改train_percent用于改变验证集的比例 9:1
#
#   当前该库将测试集当作验证集使用,不单独划分测试集
#-------------------------------------------------------#
trainval_percent    = 1
train_percent       = 0.8
#	训练集占 训练+验证的 80%
#-------------------------------------------------------#
#   指向VOC数据集所在的文件夹
#   默认指向根目录下的VOC数据集
#-------------------------------------------------------#
VOCdevkit_path      = 'data_dataset_voc'

if __name__ == "__main__":
    random.seed(0)
    print("Generate txt in ImageSets.")
    #
    #键文件夹,如果再次运行需要删掉已经建好的,目前还没有进行优化
    os.mkdir('data_dataset_voc/ImageSets')
    os.mkdir('data_dataset_voc/ImageSets/Segmentation')

    #segfilepath     = os.path.join(VOCdevkit_path, 'SegmentationClass')
    segfilepath = os.path.join(VOCdevkit_path, 'SegmentationClassPNG')
    #获取语义分割png格式数据集的路径,但是在这里需要改为SegmentationClassPng
    saveBasePath    = os.path.join(VOCdevkit_path, 'ImageSets/Segmentation')
    #获取txt的存储路径

    temp_seg = os.listdir(segfilepath)
    #temp_seg 为语义分割数据集名字列表,一会会对这个列表进行筛选
    total_seg = []
    #筛选后的图片列表
    for seg in temp_seg:
        if seg.endswith(".png"):
            total_seg.append(seg)
    #只把png格式的数据加入到列表中

    num     = len(total_seg)
    #存储一共有多少个数据
    list    = range(num)
    #可迭代的一个列表0---最后一个值 用来标识所有的数据
    print("list:",list,"type(list):",type(list))
    tv      = int(num*trainval_percent)
    #tv 可以理解为 训练+验证 总数
    tr      = int(tv*train_percent)
    #tr 训练集总数
    trainval= random.sample(list,tv)
    #生成 训练+验证 数据集 索引列表(类似数组)
    train   = random.sample(trainval,tr)
    #生成 训练集的 索引列表
    print('trainval',type(trainval),trainval)
    #random.sample(list, k) 从list样本或集合中随机抽取K个不重复的元素形成新的序列

    print("train and val size",tv)
    print("train size",tr)
    ftrainval   = open(os.path.join(saveBasePath,'trainval.txt'), 'w')
    ftest       = open(os.path.join(saveBasePath,'test.txt'), 'w')
    ftrain      = open(os.path.join(saveBasePath,'train.txt'), 'w')
    fval        = open(os.path.join(saveBasePath,'val.txt'), 'w')

    for i in list:
        name = total_seg[i][:-4]+'\n'
        #   写入,去掉“ .png",并且加入换行
        if i in trainval:
            ftrainval.write(name)
            if i in train:
                ftrain.write(name)
                #   在trainval中,且在train中,写入
            else:
                fval.write(name)
                #   对于trainval中的数据,如果不在train中,那就把他归为验证集
        else:
            ftest.write(name)

    ftrainval.close()
    ftrain.close()
    fval.close()
    ftest.close()
    print("Generate txt in ImageSets done.")

###################################################################
#########这里下面的代码可以省略
    print("Check datasets format, this may take a while.")
    print("检查数据集格式是否符合要求,这可能需要一段时间。")
    classes_nums        = np.zeros([256], np.int)
    for i in tqdm(list):
        name            = total_seg[i]
        png_file_name   = os.path.join(segfilepath, name)
        if not os.path.exists(png_file_name):
            raise ValueError("未检测到标签图片%s,请查看具体路径下文件是否存在以及后缀是否为png。"%(png_file_name))

        png             = np.array(Image.open(png_file_name), np.uint8)
        if len(np.shape(png)) > 2:
            print("标签图片%s的shape为%s,不属于灰度图或者八位彩图,请仔细检查数据集格式。"%(name, str(np.shape(png))))
            print("标签图片需要为灰度图或者八位彩图,标签的每个像素点的值就是这个像素点所属的种类。"%(name, str(np.shape(png))))

        classes_nums += np.bincount(np.reshape(png, [-1]), minlength=256)

    print("打印像素点的值与数量。")
    print('-' * 37)
    print("| %15s | %15s |"%("Key", "Value"))
    print('-' * 37)
    for i in range(256):
        if classes_nums[i] > 0:
            print("| %15s | %15s |"%(str(i), str(classes_nums[i])))
            print('-' * 37)

    if classes_nums[255] > 0 and classes_nums[0] > 0 and np.sum(classes_nums[1:255]) == 0:
        print("检测到标签中像素点的值仅包含0与255,数据格式有误。")
        print("二分类问题需要将标签修改为背景的像素点值为0,目标的像素点值为1。")
    elif classes_nums[0] > 0 and np.sum(classes_nums[1:]) == 0:
        print("检测到标签中仅仅包含背景像素点,数据格式有误,请仔细检查数据集格式。")

    print("JPEGImages中的图片应当为.jpg文件、SegmentationClass中的图片应当为.png文件。")
    print("如果格式有误,参考:")
    print("https://github.com/bubbliiiing/segmentation-format-fix")