这是微信小程序最近修复问题,里面有关于loadFontFace的修复
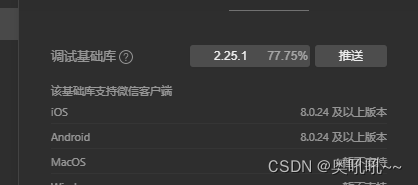
在使用前要先把调试基础库调整为2.25.1,我调到这个版本就好其他的版本我也没试
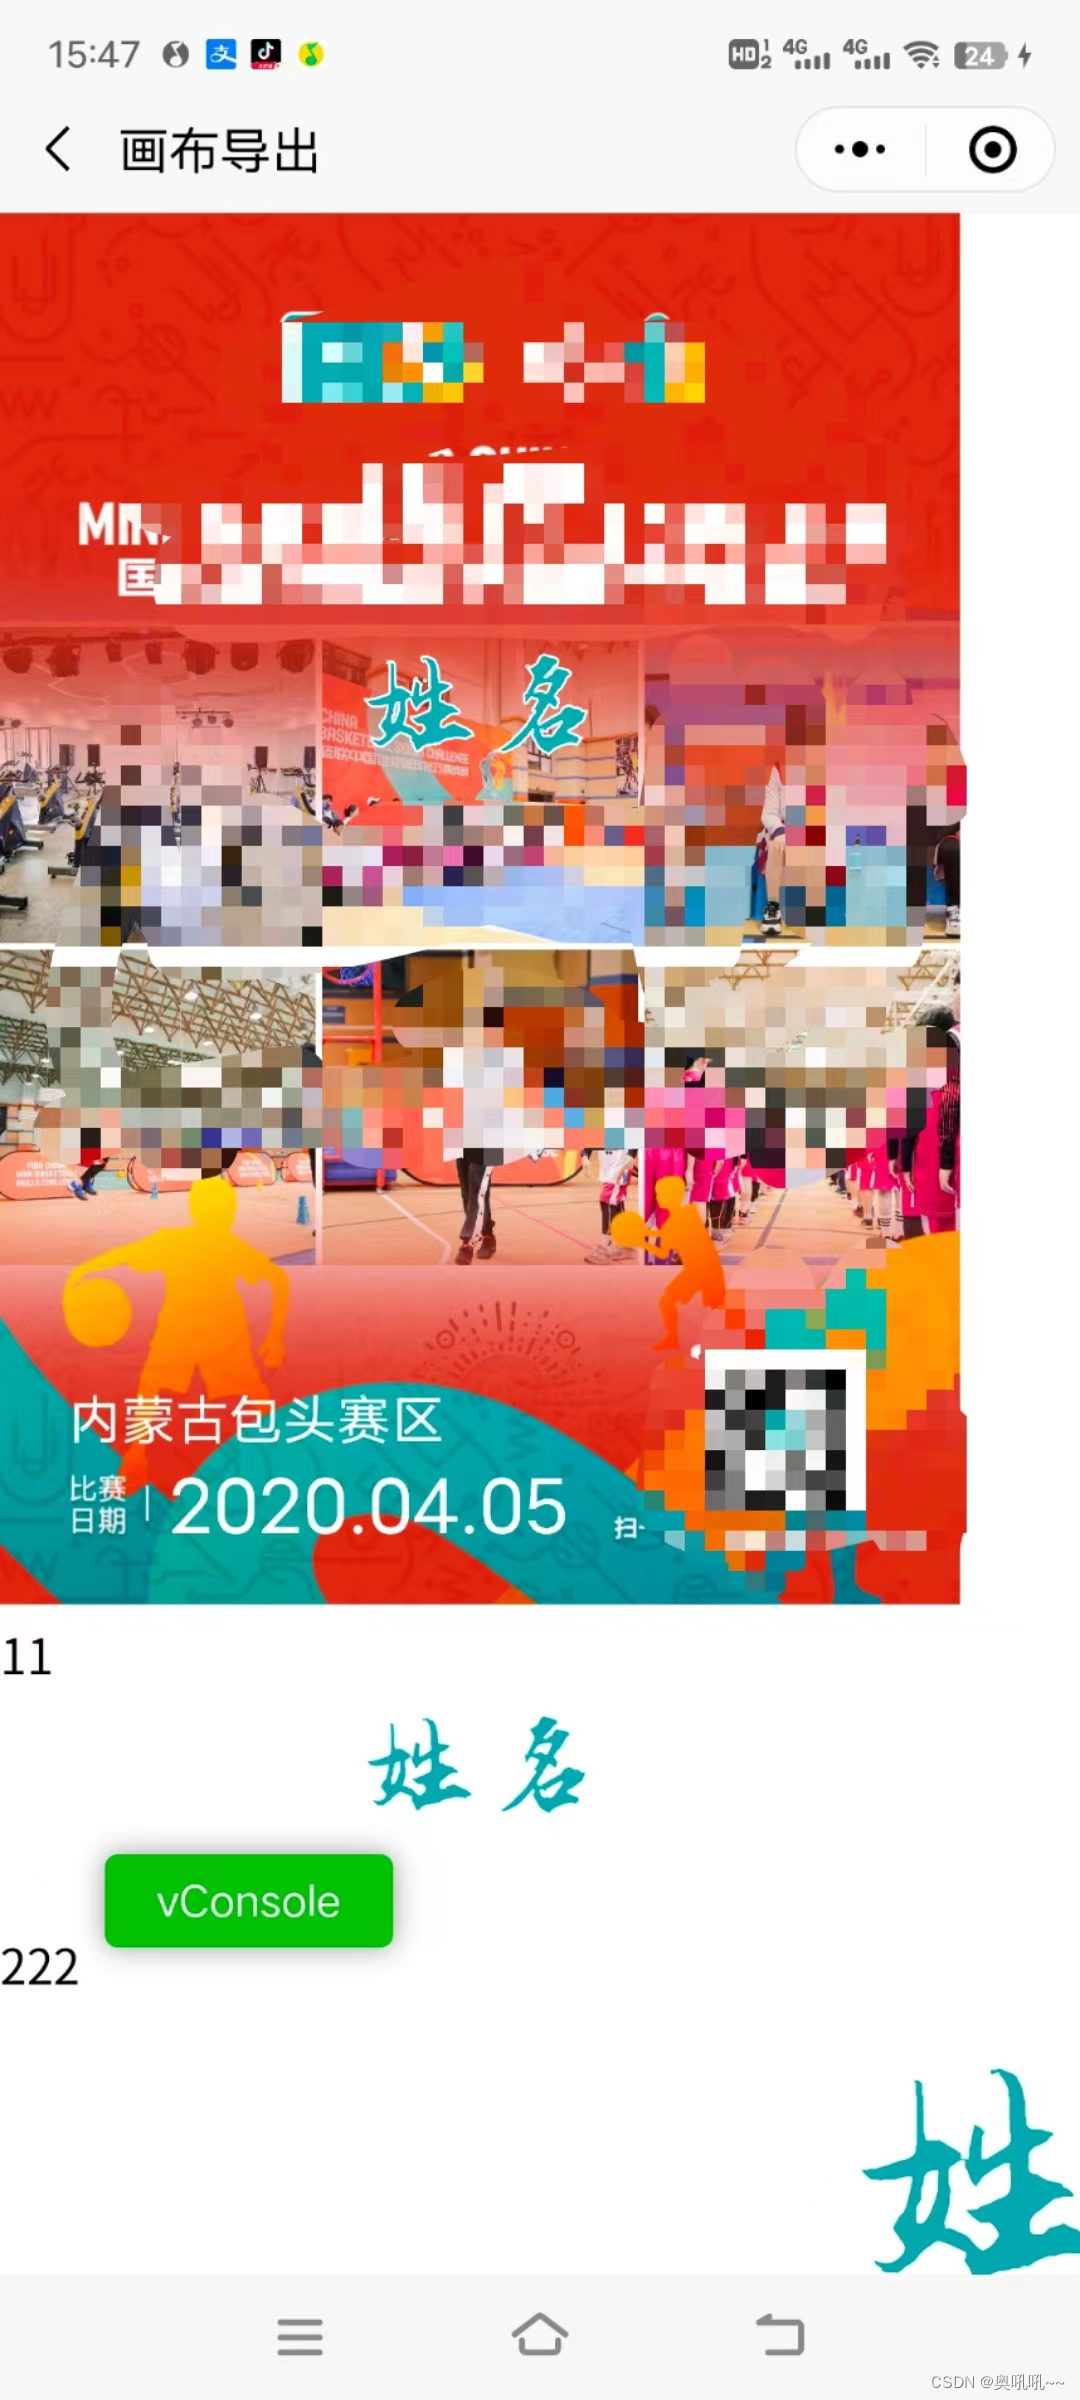
下面是我画布导出的大概效果姓名这里使用了字体,白色的轮廓是字体轮廓填充
首先要了解一个api名称:uni.loadfontface
这里source里面只能是网络链接,因为我没有服务器,也不想装搭本地服务,所以我使用的是vscode中Live server然后访问字体链接先把效果搞出来,之后再是上服务器配置安全域名
scopes这个属性,native表示可以在canvas2d中使用这个字体
下面是部分必要代码片段
大致逻辑就是等字体加载成功之后获取画布对象然后把文字绘制到画布上面然后导出base64的图片
至于750和176是我代码的逻辑,按照自己的代码逻辑动态修改或者写死都可以
<template>
<canvas type="2d" id="canvasName" :style="{width:750 + 'px',height:176 + 'px'}" />
</template>
<script>
let canvas = null
let ctx = null
let dpr = null
uni.loadFontFace({


	global: true,
	family: "DINMedium",
	source: 'url("http://192.168.108.240:5500/files/iconfont2.ttf")',
	success: () => {


		this.draw()
	},
	scopes: ["webview", "native"],
})
methods:{


	draw() {


		const self = this;
			let fm = 'DINMedium';
			const query = wx.createSelectorQuery()
			query.select('#canvasName')
				.fields({


					node: true,
					size: true
				})
				.exec((res) => {


					console.log(res)
					canvas = res[0].node
					ctx = canvas.getContext('2d')
					dpr = wx.getSystemInfoSync().pixelRatio
					canvas.width = res[0].width * dpr
					canvas.height = res[0].height * dpr
					ctx.scale(dpr, dpr)
					let x = 20
					let y = 20
					let fontSize = 20
					this.drawText(ctx, "姓名", 88, "#01A5AE", 750 / 2, 88, 400, true,
						'center', true,fm)
					ctx.lineWidth = 2
					ctx.strokeStyle = '#ffffff'
					// ctx.font = "bold " + fontSize + 'px ' + fm;
					ctx.strokeText("姓名", 750 / 2, 88)
					ctx.restore()
					this.name = canvas.toDataURL()
				})

		},
	drawText(ctx, text, fontSize, color, x, y, maxWidth, bold, align, shadow,fontFamily) {


		if (bold) {


			ctx.font = `bold ${
        fontSize}px ${
        fontFamily ? fontFamily : 'normal'}`;
		} else {


			ctx.font = `normal ${
        fontSize}px  ${
        fontFamily ? fontFamily : 'normal'}`;
		}
		if (align) {


			ctx.textAlign = align
		} else {


			ctx.textAlign = 'left'
		}
		ctx.fillStyle = color
		if (ctx.measureText(text).width > maxWidth) {


			var count = 1;
			while (ctx.measureText(text.slice(0, text.length - count)).width > 693) {


				count++
			}
			if (shadow) {


				ctx.shadowOffsetX = 3; //用来设定阴影在 X轴的延伸距
				ctx.shadowOffsetX = 3; //用来设定阴影在 Y轴的延伸距
				ctx.shadowBlur = 4; //设定阴影的模糊程度 默认0
				ctx.shadowColor = "rgba(0, 0, 0, 0.5)";
			}

			ctx.fillText(text.slice(0, text.length - (count + 1)) + "...", x, y)
		} else {


			ctx.fillText(text, x, y)
		}
	},
}

</script>
APP和H5字体是正常的不管是用uni.loadFontFace还是用@font-face都可以直接用,就小程序事情多

通过上面代码不难发现,我将这个带字体样式的文字单独绘制成了一张图片,这是因为在绘制它之前我已经把九宫格图片布局以及底板大部分样式已经使用uni.createCanvasContext这个api绘制完了,最后发现微信小程序字体只能通过上面那种方式进行绘制,为了不让之前的努力白费,我选择将名字单独绘制然后将绘制出来的base64转化为一个临时链接绘制到我之前已经写好绘制过程的画布内容上,所以现在的运行逻辑里有两个画布,一个是图片
下面是将base64转成临时链接的逻辑,因为我发现base64在小程序上面不能直接绘制到画布上面,我裂开
base64ToTemp(base64){


	return new Promise((r) => {


		let qrcode = base64.replace(/\. +/g, '').replace(/[\r\n]/g, '')
		const fs = wx.getFileSystemManager();
		//随机定义路径名称
		var times = new Date().getTime();
		var codeimg = wx.env.USER_DATA_PATH + '/' + times + '.png';

		//将base64图片写入
		var that = this;
		fs.writeFile({


			filePath: codeimg,
			data: qrcode.split('data:image/png;base64,')[1],
			encoding: 'base64',
			complete(res) {


				console.log(res)
			},
			success: () => {


				r(codeimg)
			}
		})
	})
},
// 为了兼容小程序和APP所以这里分开处理了
使用逻辑(){


	// #ifdef MP
	var temp = await this.base64ToTemp(this.name)
	console.log(temp)
	this.temp = temp
		this.ctx.drawImage(temp, 0, 554 * (this
			.canvasWidth / 750) - 230, this.canvasWidth, 176)
	// #endif
	// #ifndef MP
	this.drawText(this.ctx, "姓名", 88, "#01A5AE", this.canvasWidth / 2, 554 * (this
			.canvasWidth / 750) - 140, 400, true,
		'center', true)
	this.ctx.lineWidth = 2
	this.ctx.setStrokeStyle('#ffffff')
	this.ctx.strokeText("姓名", this.canvasWidth / 2, 554 * (this.canvasWidth / 750) - 140)
	this.ctx.restore()
	// #endif
}
下面是我绘制九宫格已经底板的所有逻辑
设计到的一些封装方法可以参考我这个文章
部分方法有点改动不过大逻辑都一样
squaredDraw() {


			var colCount = 3;
			var gap = 5;
			var imageWidth = (750 - ((colCount - 1) * gap)) / colCount
			var TextB = 60

			this.canvasWidth = 750
			var bottomTitle = 72;
			var bottomQrCode = 200;
			var QrCodeWidth = 160;
		this.canvasHeight = TextB + bottomQrCode + bottomTitle + (imageWidth + 5) * Math.ceil(this.drawImageList
				.length / colCount)
			this.$nextTick(async () => {


				uni.showLoading({


					title: "加载中...",
					mask: true
				})
				this.ctx = uni.createCanvasContext('myCanvas')
				this.drawText(this.ctx, "篮球比赛篮球比赛篮球比赛", 32, "#222222", 375, 46, 200, true, 'center')
				for (let i = 0; i < this.drawImageList.length; i++) {


					uni.hideLoading()
					uni.showLoading({


						title: `(${

      i + 1}/${

      this.drawImageList.length})`,
						mask: true
					})
					await this.drawImageWidthFix1(this.ctx, this.drawImageList[i] + '?type=1&size=300', (
						i % colCount == 0 ? 0 :
						(imageWidth + 5) * (i % colCount)), (bottomTitle + (imageWidth + gap) *
						parseInt(i / colCount)), imageWidth, imageWidth)
				}
				uni.hideLoading()
				uni.showLoading({


					title: `生成中...`,
					mask: true
				})
				this.ctx.drawImage('../../static/3.png', (750 - 120) / 2, bottomTitle + (
					imageWidth + 5) * Math.ceil(this.drawImageList.length / colCount) + (
					bottomQrCode - QrCodeWidth) / 2, QrCodeWidth, QrCodeWidth)
				this.drawText(this.ctx, "篮球比赛的文字描述篮球比赛的文字描述篮球比赛的文字描述", 32, "#222222", 375, bottomTitle + (
						imageWidth + 5) * Math.ceil(this.drawImageList.length / colCount) +
					bottomQrCode + 20, 400, true, 'center')
				this.ctx.drawImage('../../static/top.png', 0, 0, this.canvasWidth, 554 * (this
					.canvasWidth / 750))


				// #ifdef MP
				var temp = await this.base64ToTemp(this.name)
				console.log(temp)
				this.temp = temp
					this.ctx.drawImage(temp, 0, 554 * (this
						.canvasWidth / 750) - 230, this.canvasWidth, 176)
				// #endif


					// #ifndef MP
				this.drawText(this.ctx, "姓名", 88, "#01A5AE", this.canvasWidth / 2, 554 * (this
						.canvasWidth / 750) - 140, 400, true,
					'center', true)
				this.ctx.lineWidth = 2
				this.ctx.setStrokeStyle('#ffffff')
				this.ctx.strokeText("姓名", this.canvasWidth / 2, 554 * (this.canvasWidth / 750) - 140)
				this.ctx.restore()

// #endif
				var bottomImageHeight = 404 * (this.canvasWidth / 750)
				var bottomImageTop = this.canvasHeight - bottomImageHeight
				this.ctx.drawImage('../../static/bottom.png', 0, bottomImageTop, this.canvasWidth,
					bottomImageHeight)
				this.drawText(this.ctx, "内蒙古包头赛区", 42, "#ffffff", 53, bottomImageTop + 274, 400, true,
					'left', true)
				this.ctx.restore()
				this.drawText(this.ctx, "2020.04.05", 58, "#ffffff", 132, bottomImageTop + 346, 400, true,
					'left', true)
				this.ctx.restore()
				this.ctx.draw()
				setTimeout(() => {


					uni.canvasToTempFilePath({


						x: 0,
						y: 0,
						width: this.canvasWidth,
						height: this.canvasHeight,
						destWidth: this.canvasWidth * 2,
						destHeight: this.canvasHeight * 2,
						// quality: 0.5,
						canvasId: 'myCanvas',
						complete: () => {


							uni.hideLoading()
						},
						success: (res) => {


							this.imageSrc = res
								.tempFilePath
						}
					})
				}, 1200)
			})

		},